When you click on links to various merchants on this site and make a purchase, this can result in this site earning a commission. Affiliate programs and affiliations include, but are not limited to, the eBay Partner Network.
I thought I'd add my own DIY on this subject, as there has been some discussion on this point recently, and it seems that the way I did it was different than others. General overview - I remove the entire strut from the car and compress the spring on the workbench, not on the car (which is the whole point of McPherson struts).
Notable tools I used, ie. may be atypical from the usual sockets and wrenches (you'll obviously need those):
-32mm socket, at least 1/2" drive
-large breaker bar, preferably 3/4" drive
-3/4" torque wrench
-c-clamp / McPherson strut style spring compressor
-ball joint separator
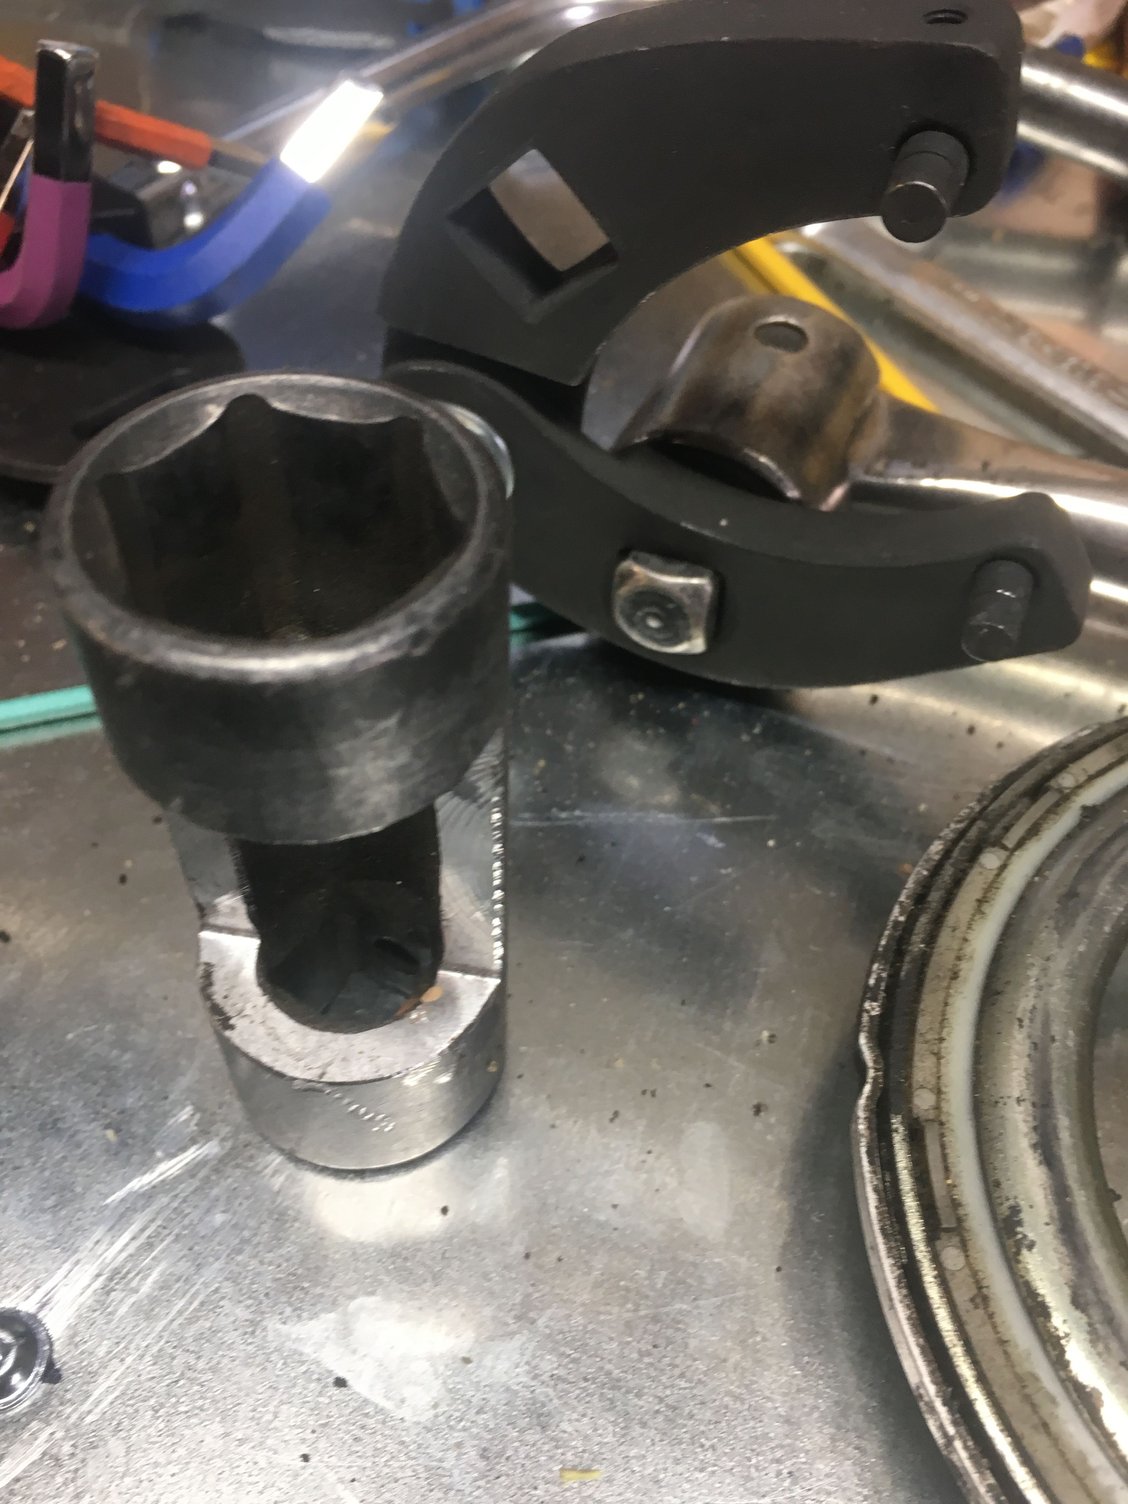
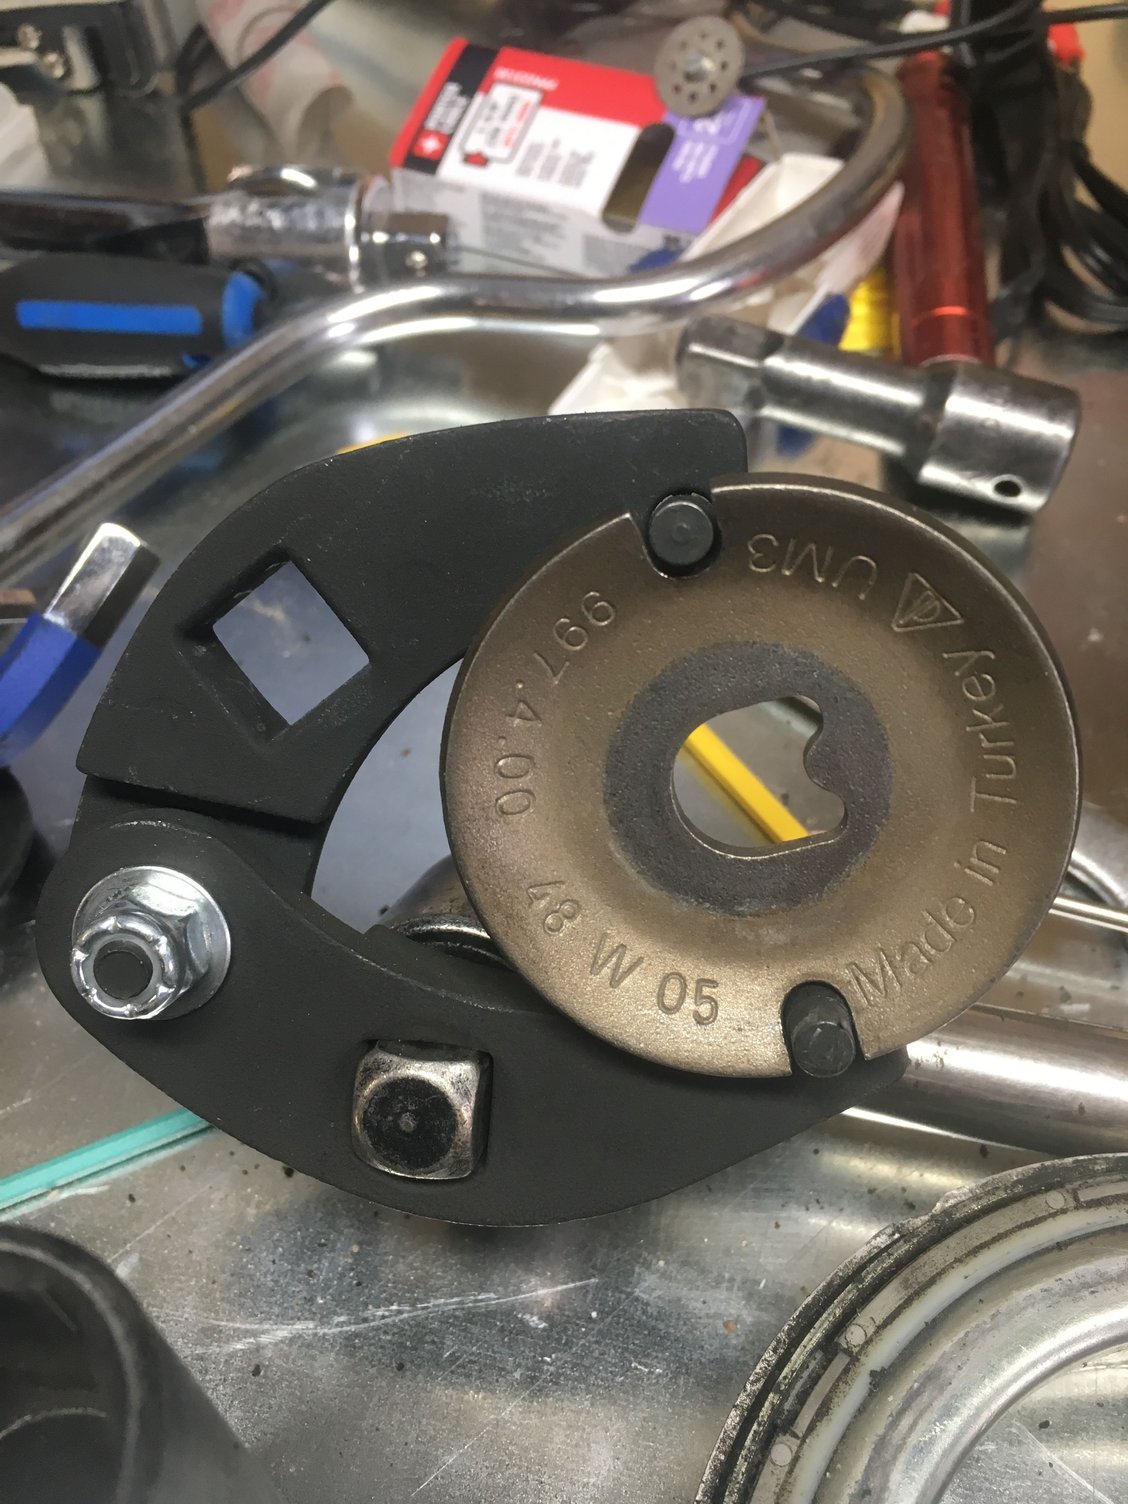
-gland nut wrench (found one on Amazon for about C$20, AMPRO T70566GL)
-cut down deep 21mm socket (for front strut top nut, to clear PASM wires; 19mm for rear)
The factory manual (of which I found a p1rate PDF somewhere online) only dealt with 2WD models, so when I first attacked the job the front was a surprise. The rear is actually quite a bit easier. I'm only dealing with the front here as at the moment I have the struts out to replace the top mounts and the bearings. As an aside, if anyone is going the springs only route, don't do as I do and just get the springs; get the top mounts and bearings at the same time, otherwise you may be doing the job twice like I am!
With the car on the ground, remove the centre caps and break the axle nuts free. The torque spec for these is over 300 ft lbs, hence the suggestion for a 3/4" breaker bar (and 3/4" torque wrench to get them back later). The longer the shaft on the breaker bar, the better, unless you're wearing the Iron Man suit or something.
Car should then be up on jack stands of course. Remove some of the plastic beauty panels under the frunk so that the top mount nuts and the PASM connectors are visible. I marked both sides of the connectors to ensure they go back the same way (they can be mixed up apparently). May also need to disengage some of the plastic clips that hold the PASM wires to the other stuff under the beauty panels. No photos of this, but it's quite obvious.
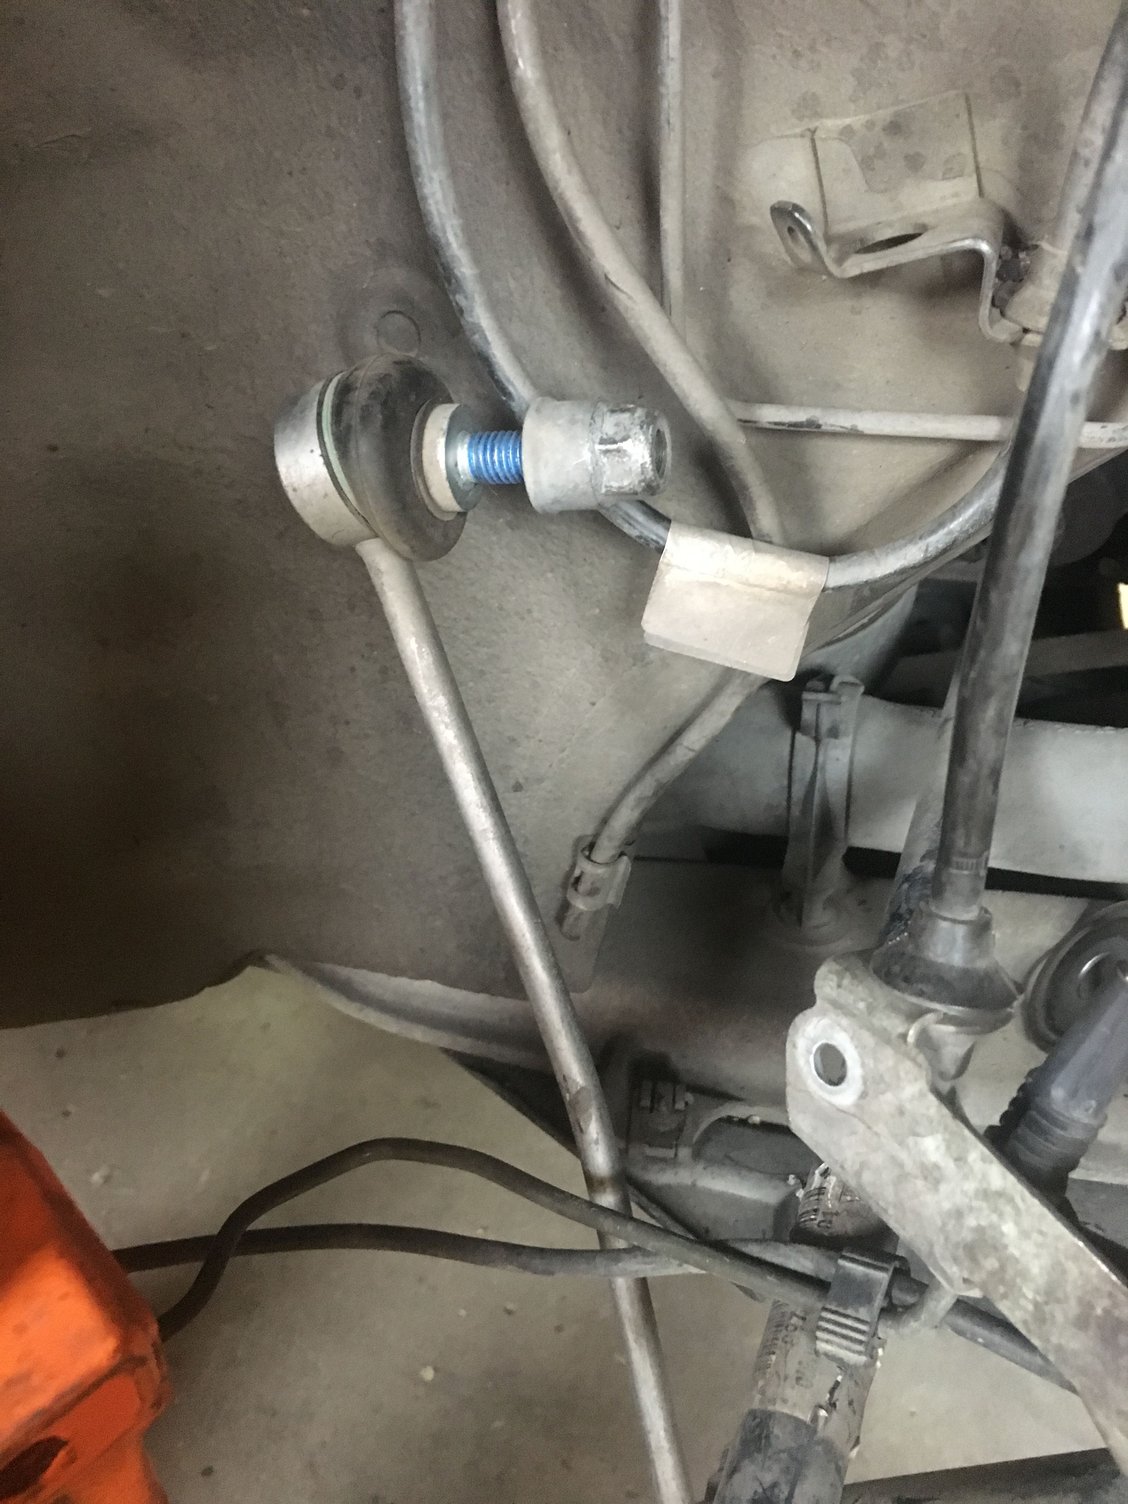
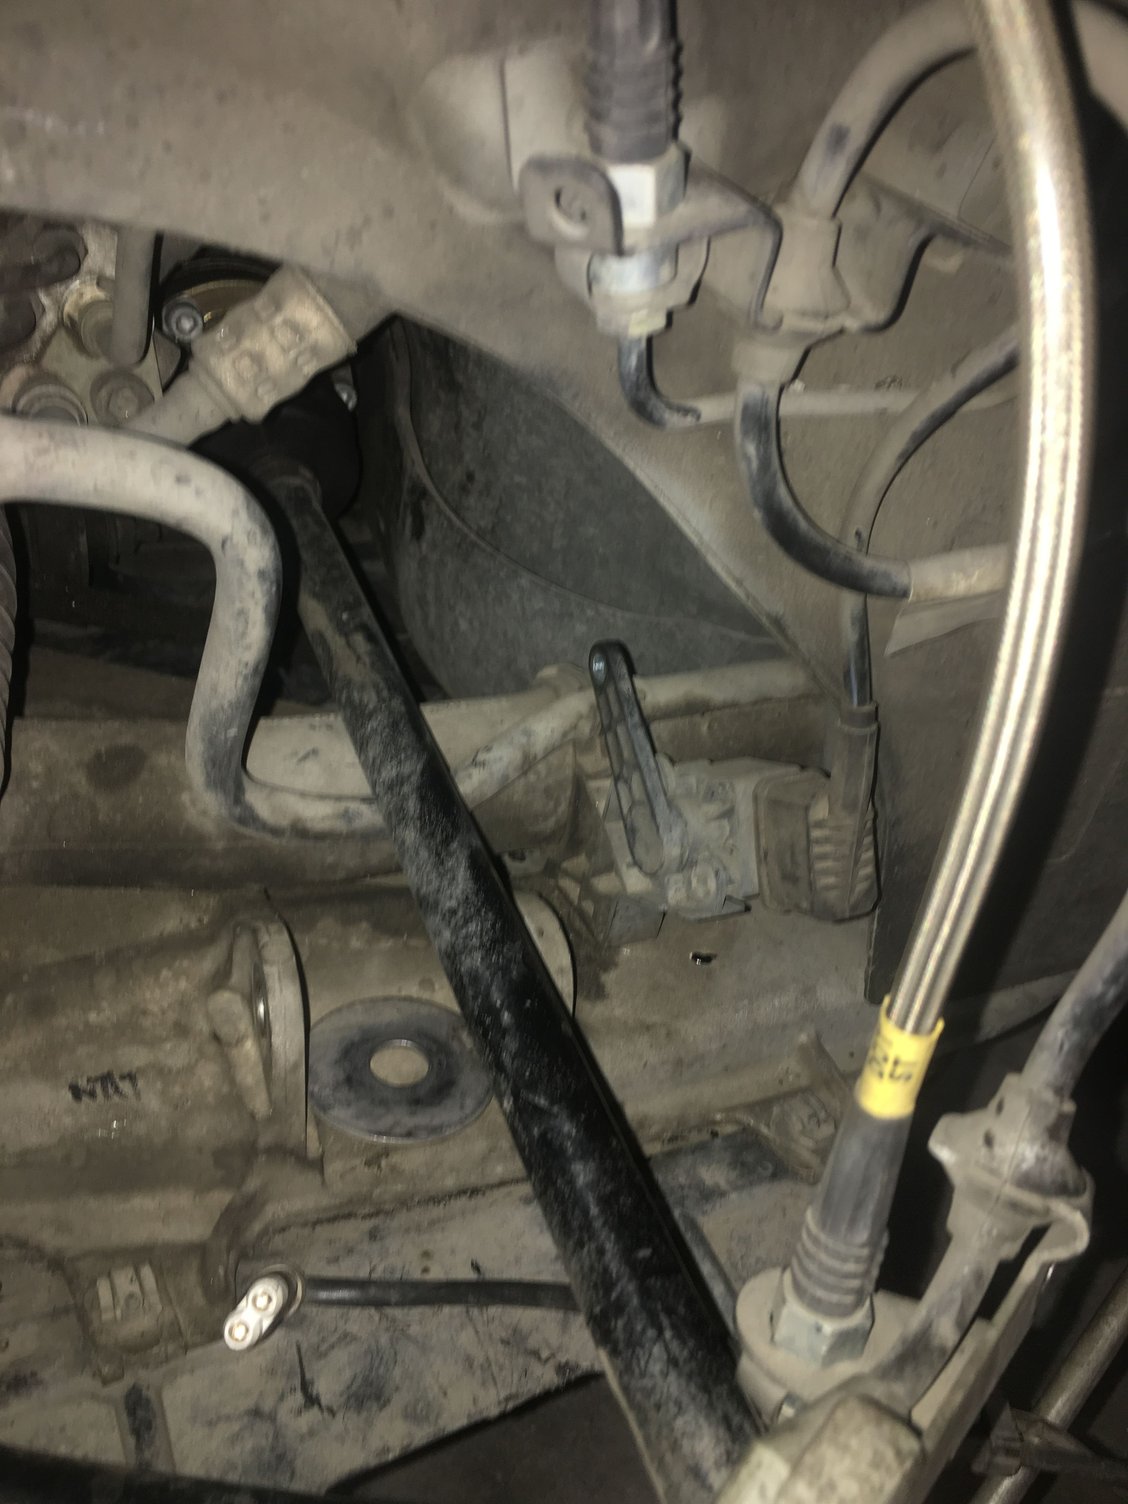
Disconnect the upper sway bar link from the hub/upright. Need to use a wrench combined with a T30 torx wrench too (pictured removed with nut back onto the link so I don't lose/mix it up).
Then disconnect the ABS wires from the connectors, you can't mix them up. Then remove the 10mm nut and socket holding the bracket (which holds the ABS wire and the actual brake lines) onto the hub/upright. Here's the bracket removed already:
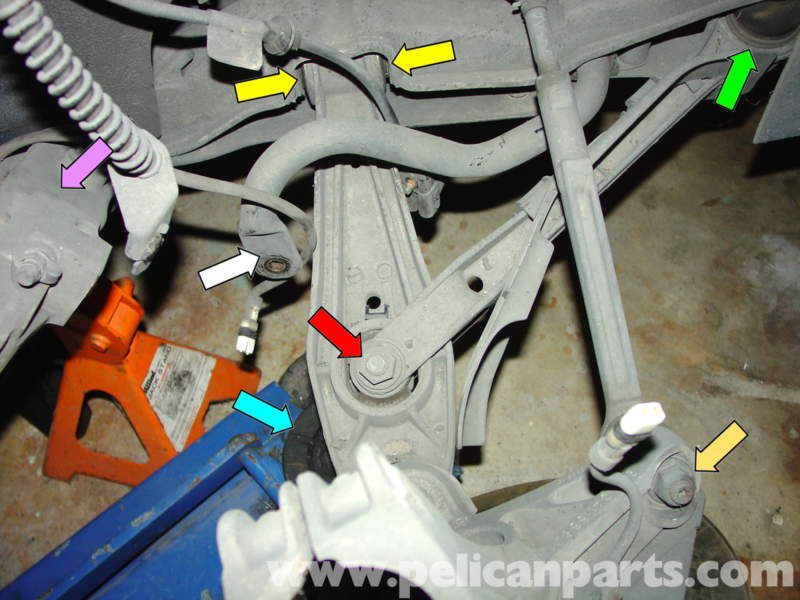
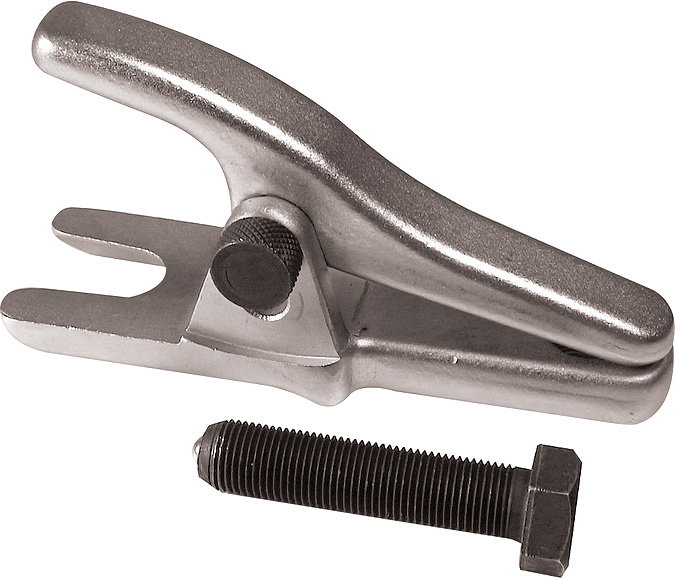
I still did it differently than the Pelican DIY. First I disconnected the tie rod end from the upright. Here you'll need the ball joint separator. It's the nut with the orangey coloured arrow at the right of the photo. Here's a picture of the type of ball joint separator tool I use. The 'pickle fork' type separators can damage the boots, so worthwhile to use this style of separator. I see the ECS Tuning's in house Schwaben brand has a version with extra large jaw opening, might have to pick one of those up for the other vehicles in the garage, but the Princess Auto 'normal' jaw opening version was just fine for the 997.
Then I removed the bolt holding the lower control arm to the control arm link (the skinnier arm that connects to the subframe nearer the front of the car). This is the fastener with the red arrow.
Then I removed the other nut and bolt holding the control arm to the subframe, yellow arrows in the Pelican photo.
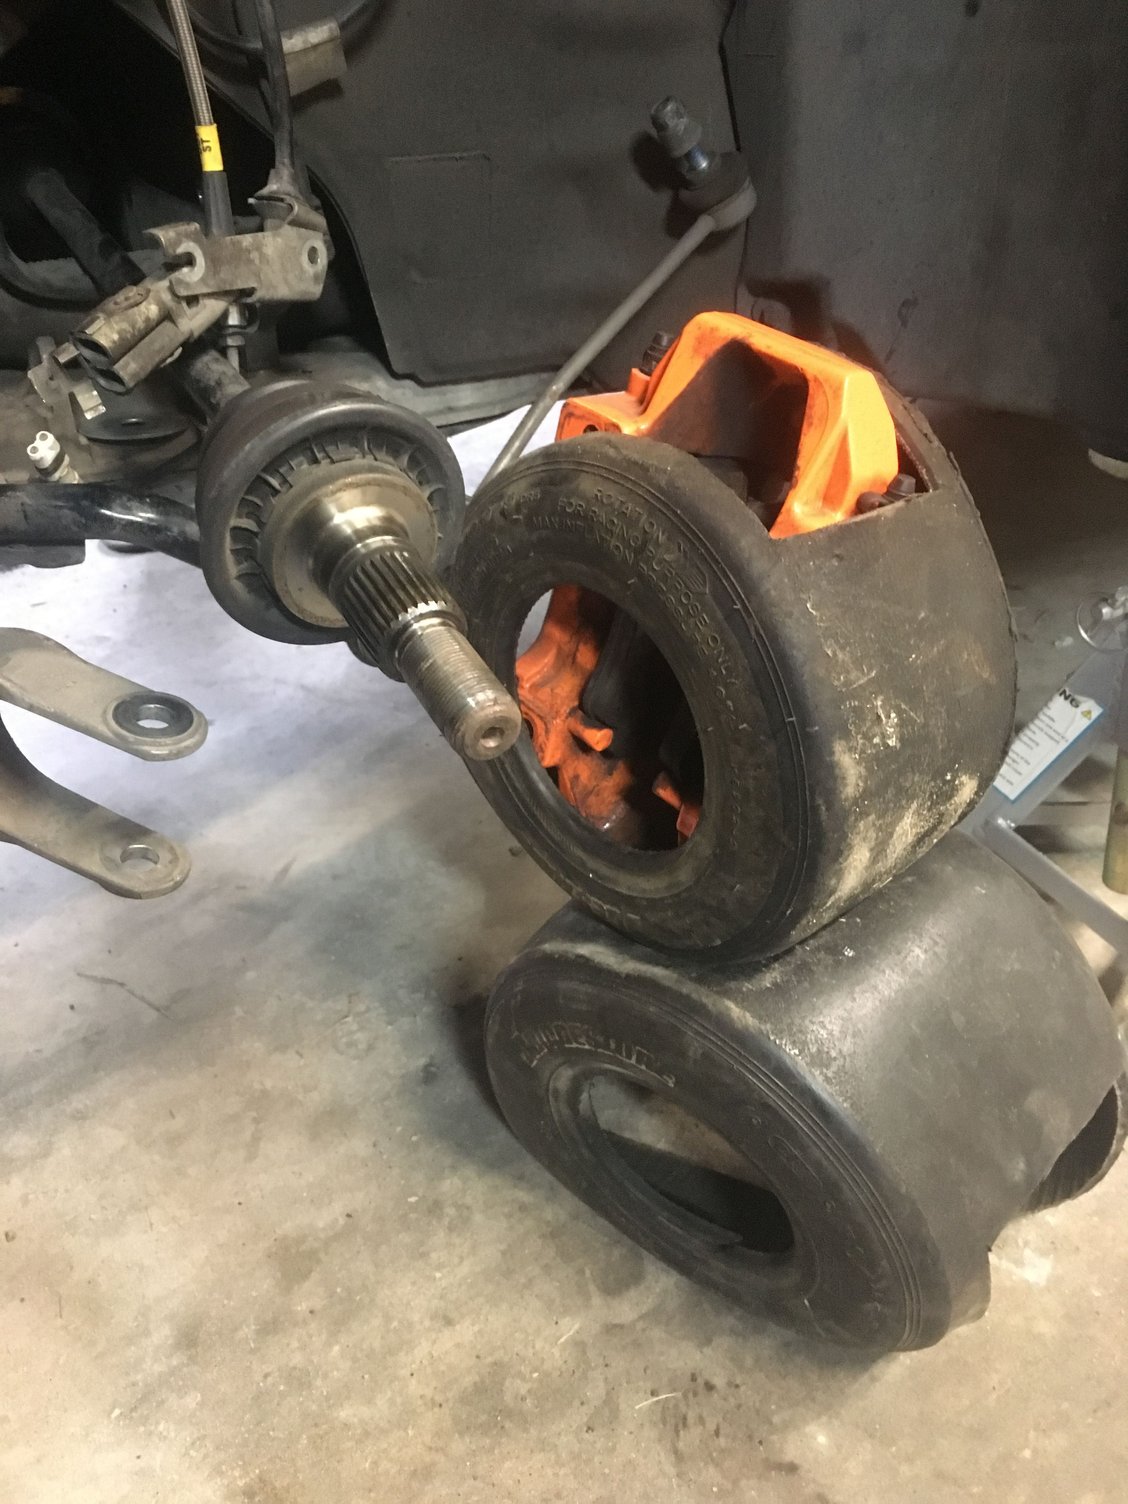
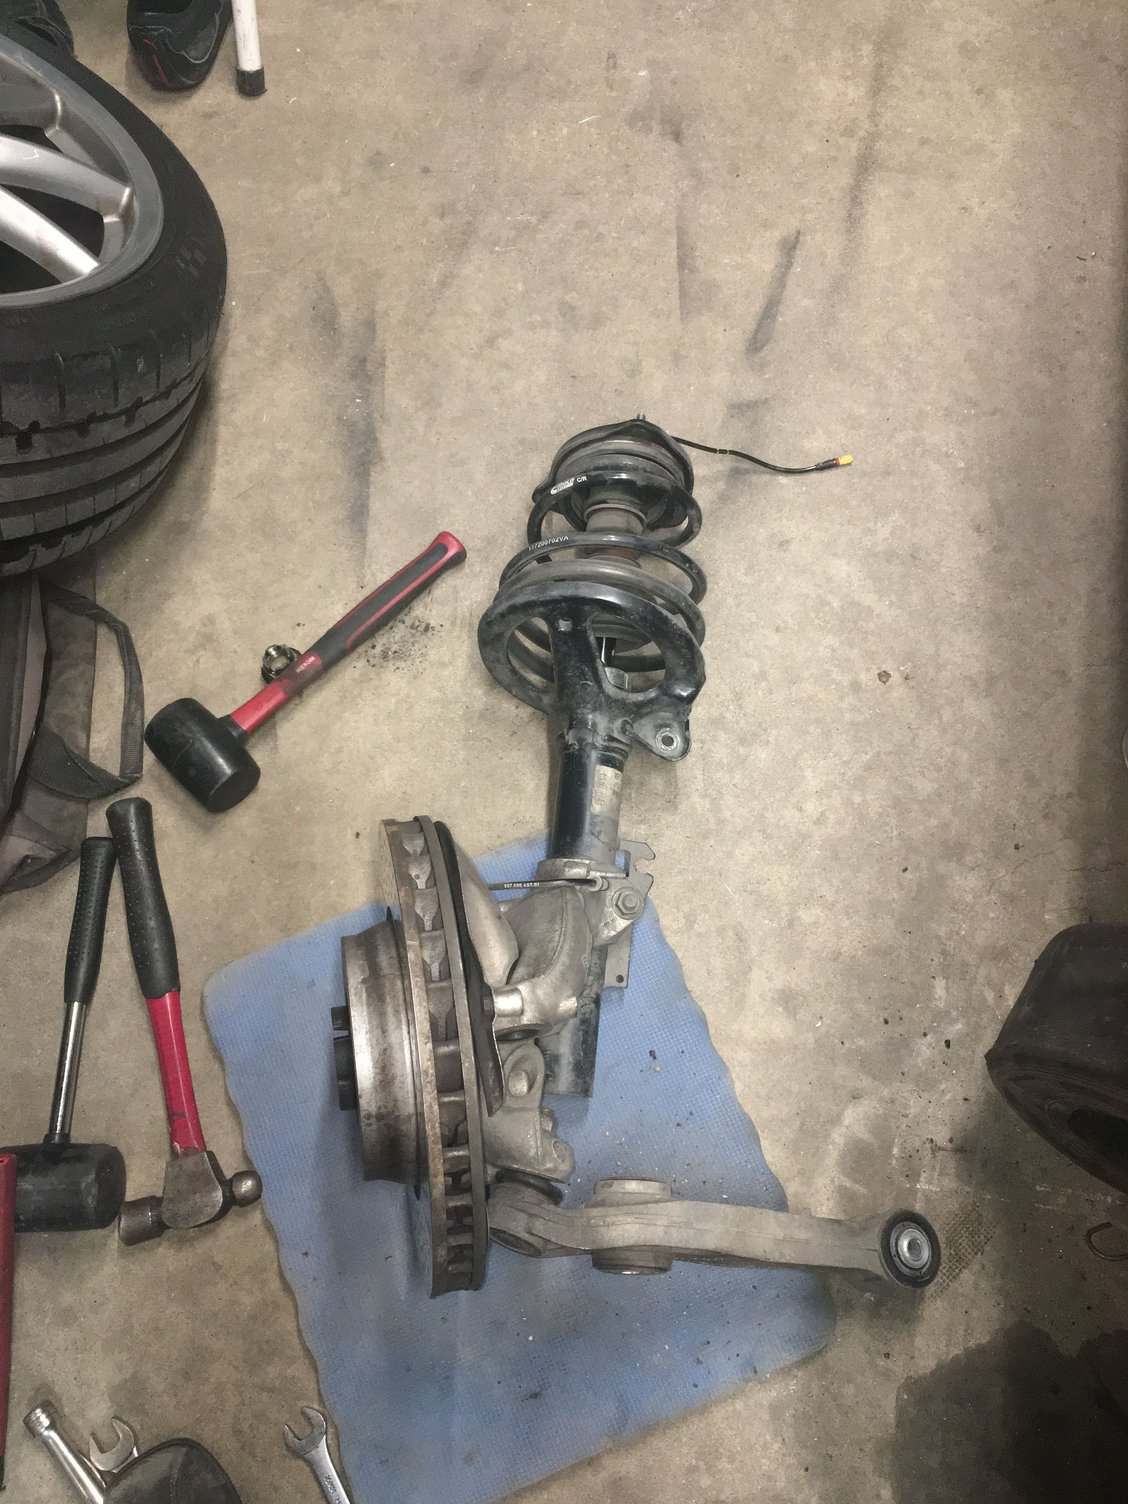
Then I removed the caliper from the upright, taking care not to bend the hard brake lines. I then rested the caliper on two old go-kart tires that I've had kicking around for like 20 years now (complete strut and upright removed from car already obviously):
I then used a small punch and hammer to disengage the front axle from the splines in the upright/wheel bearing.
At this point, you may as well remove the brake disc itself, unless the two screws are seized. I only realized I could have hefted a lot less weight afterwards, but I got a bit of a work out instead.
After all of that, the only fasteners holding the strut to the car are the three nuts at the top mount. To aid in alignment, I scribed marks around the top nuts so that I can put them back as close as possible as when removed. No photos, use something sharp. Anyway, it would be helpful to have someone else help at this point to take the strut out of the car, but I did this all on my own. Then it's just a matter of dropping the strut down, ensuring the axle clears everything, and it's out. The passenger side is a bit easier; on the driver side, the level sensor needs to be disengaged too, in the photo just to the right of the black axle:
Not including jacking up the car, I'm about 35-45 minutes in at this point, with the hardest part being breaking the axle nuts free. Thus I wonder why people are using the spring compressors on the car. Here's a photo of the strut/upright/brake disc assembly all removed as one.
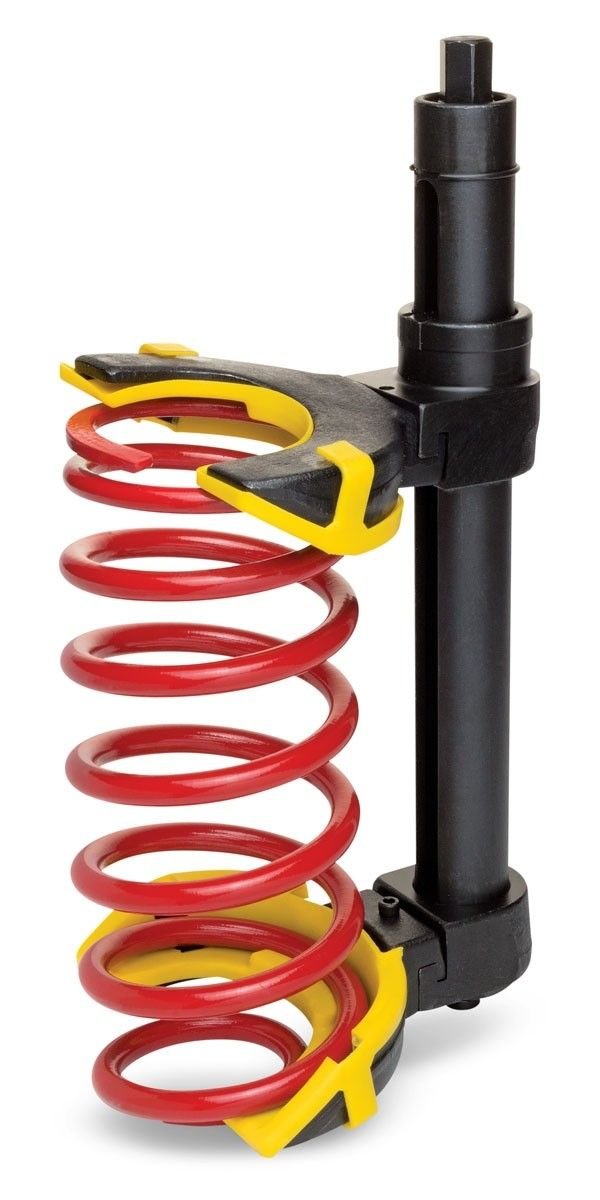
With the whole strut assembly on the bench, it's now possible to compress the spring. Here's the style of spring compressor that I have, and recommend. I managed to pick mine up used off a local kijiji seller years ago, and it's lovely, can be vice mounted if needed, and as safe as possible.
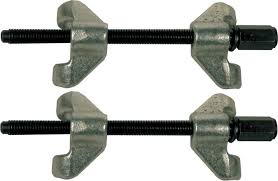
I suggest NOT using the cheap style spring compressors like these:
With the spring compressed, the strut top nut can be removed, then allowing complete disassembly of the entire strut. Here's where the gland nut wrench is used to keep the strut from rotating (note the key way on the dished washer), and the cut down socket to allow the PASM wire to clear. No pictures of the tools in action, but you should be able to get the idea.
And then that's it. The strut can be reassembled, and then everything reinstalled back onto the car after that. The major fasteners, ie. control arms and sway bar link (except for the axle nut of course) should all be torqued with some load on the suspension, I used the jack to lift up the strut. Once all back together, the car can be driven to the (pre-arranged) alignment appointment at the shop (because a $100k alignment hoist has got to be better than fishing line in my garage), and then back on the road again.
Glad you guys like the post. I saw other DIY threads mentioning compressing the spring whilst it was still on the car and thought that was nuts. The whole point of a McPherson strut is so that the whole assembly can come off the car in one piece easily. WRC teams can do complete suspension swap in probably five minutes or less, and that’s because they take the strut out. With the right tools you can get the whole strut off the car pretty easily, as I mentioned in the post, I think it took me 35-45 minutes per side to take the strut out, ready for disassembly on the workbench. No sense in using a spring compressor or standing on control arms with the strut in the car, that’s just dangerous.
Glad you guys like the post. I saw other DIY threads mentioning compressing the spring whilst it was still on the car and thought that was nuts. The whole point of a McPherson strut is so that the whole assembly can come off the car in one piece easily. WRC teams can do complete suspension swap in probably five minutes or less, and that�s because they take the strut out. With the right tools you can get the whole strut off the car pretty easily, as I mentioned in the post, I think it took me 35-45 minutes per side to take the strut out, ready for disassembly on the workbench. No sense in using a spring compressor or standing on control arms with the strut in the car, that�s just dangerous.
thanks for the writeup. I will be tackling this soon� most other videos don�t remove the axle nut, they just push the arm down To get the strut out. Is this an awd difference or preference
thanks for the writeup. I will be tackling this soon� most other videos don�t remove the axle nut, they just push the arm down To get the strut out. Is this an awd difference or preference
My cars an AWD and I got it out without removing the axle nut. I had even bought replacement nuts but then realized it wasn't needed once I got in there.
My cars an AWD and I got it out without removing the axle nut. I had even bought replacement nuts but then realized it wasn't needed once I got in there.
I�m planning on doing coilovers on my awd soon. Is it any different than the videos online where people are on working on RWD? Thx
I�m planning on doing coilovers on my awd soon. Is it any different than the videos online where people are on working on RWD? Thx
I have not watched the videos but followed Bruce in Philly's write-up when doing a spring change. The only real difference is in the geometry as the AWD offsets the struts to the side to avoid the axle. That and dealing with the axle itself (e.g. using caution around the boot) are the only things I can think of. IIRC I did have to loosen the lower control arm bolt to get it to move far enough down to get the strut out. Just remember not to retighten it until the spring is compressed again (car on the ground) or it will stress the bushing during movement.
I had my front end lifted the other day because I noticed my axle boot was leaking oil.
Anyway, I noticed the springs were loose and could be moved freely by hand. Is this normal on the 997.1? It�s not the case in the back. The drive seems normal enough.

 10-28-2018, 04:26 PM