When you click on links to various merchants on this site and make a purchase, this can result in this site earning a commission. Affiliate programs and affiliations include, but are not limited to, the eBay Partner Network.
Eagerly waiting for an update how does your setup work, which 275/35/18 in detail you run, which wheel offset/width and which camber etc?
I also remember you have the GT3 uprights, so wondering if they change the fitment at all.
And while you're at it, please share which 335 rear in detail works for track use for you? Your stiff spring rates may help with that. I had a problem with driver's side boost hose with big tires...or so I think...
Thanks again!
Hey Kai,
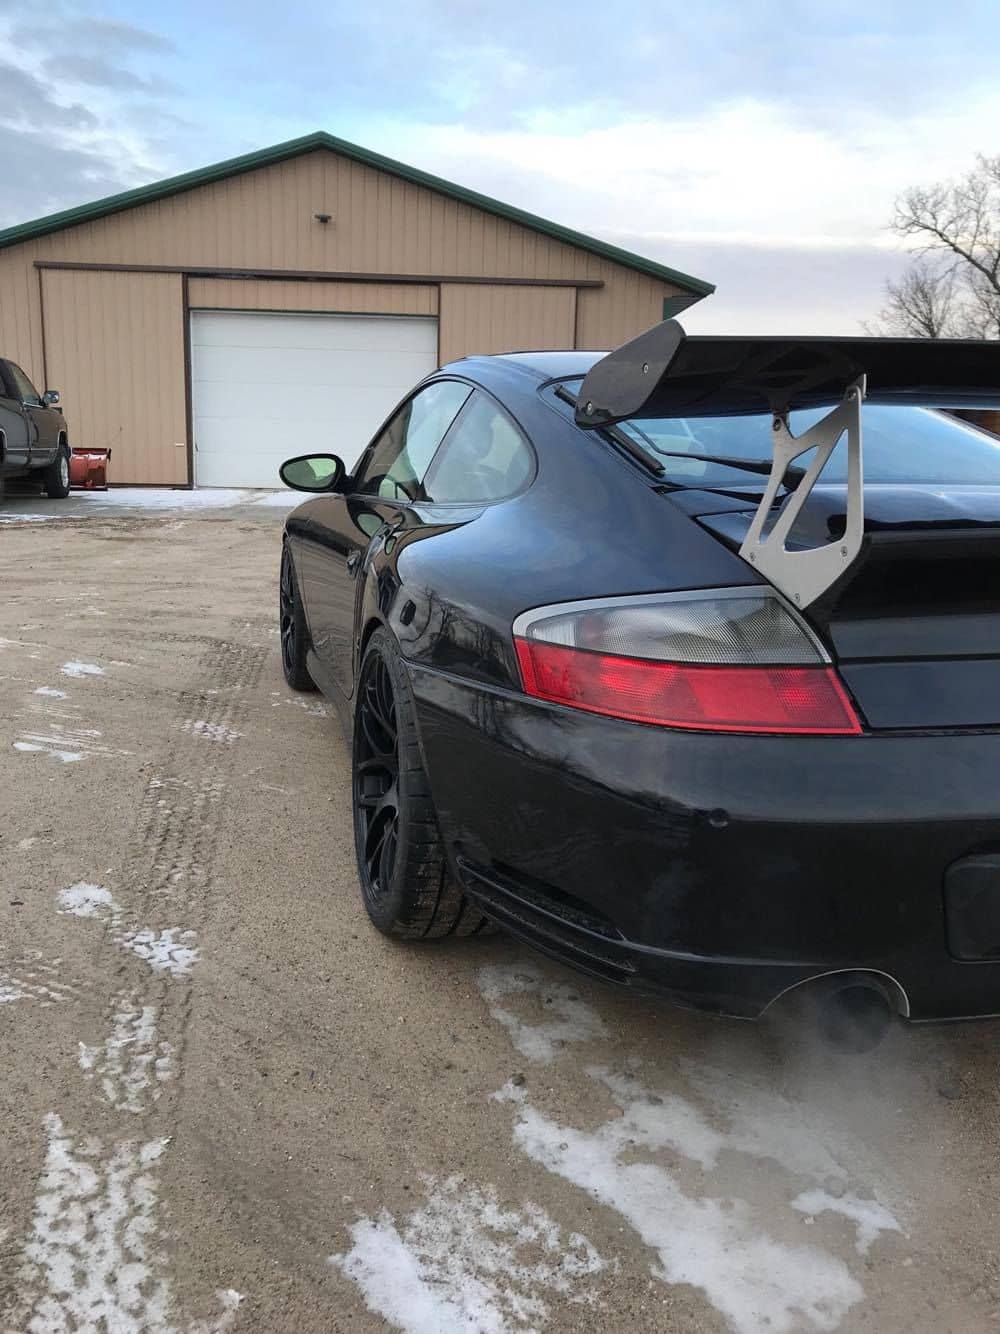
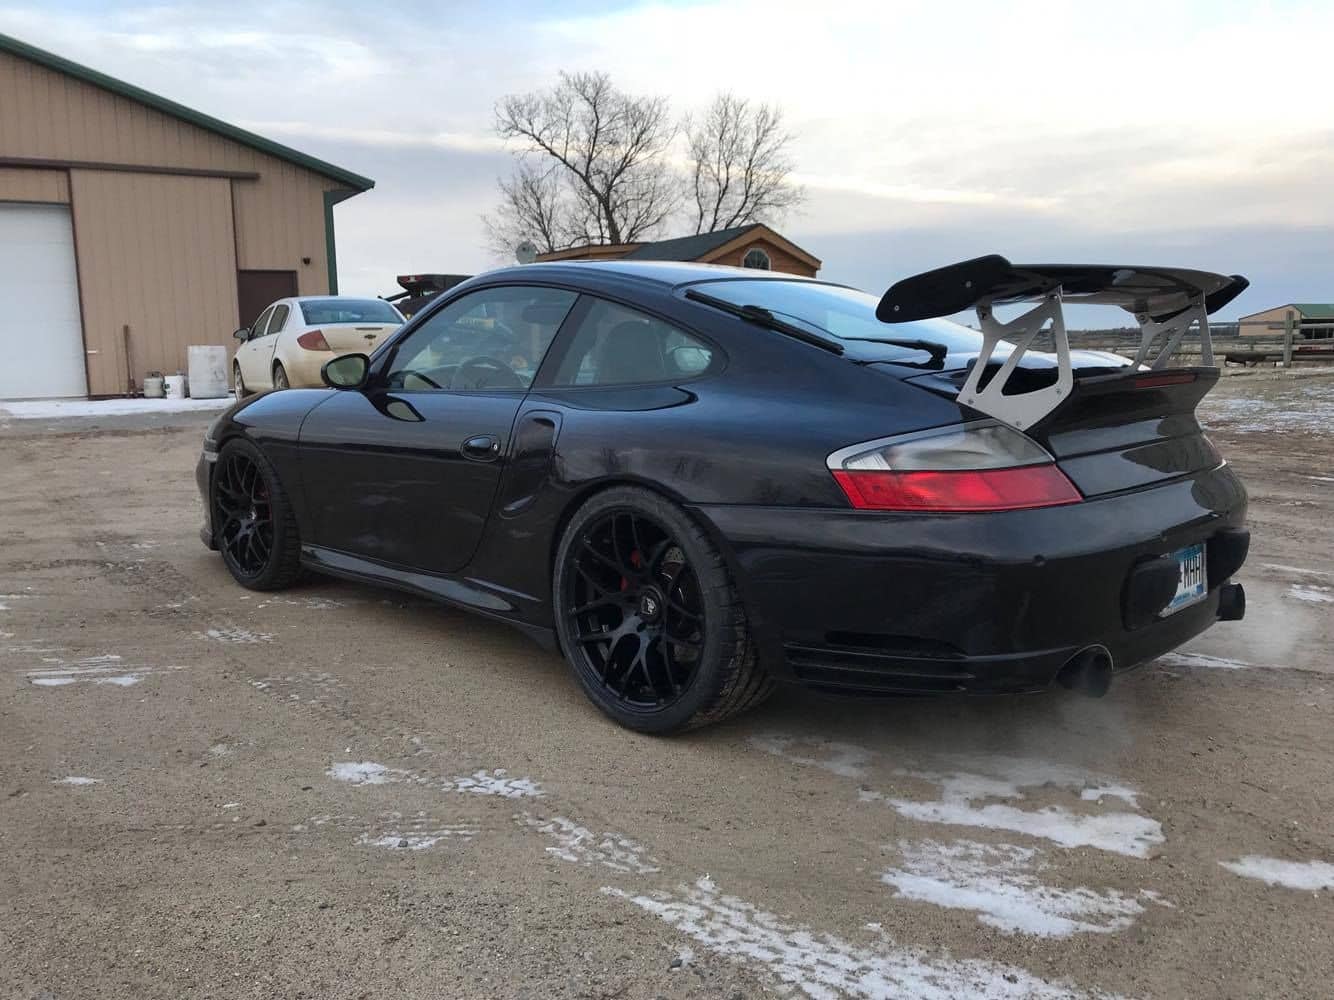
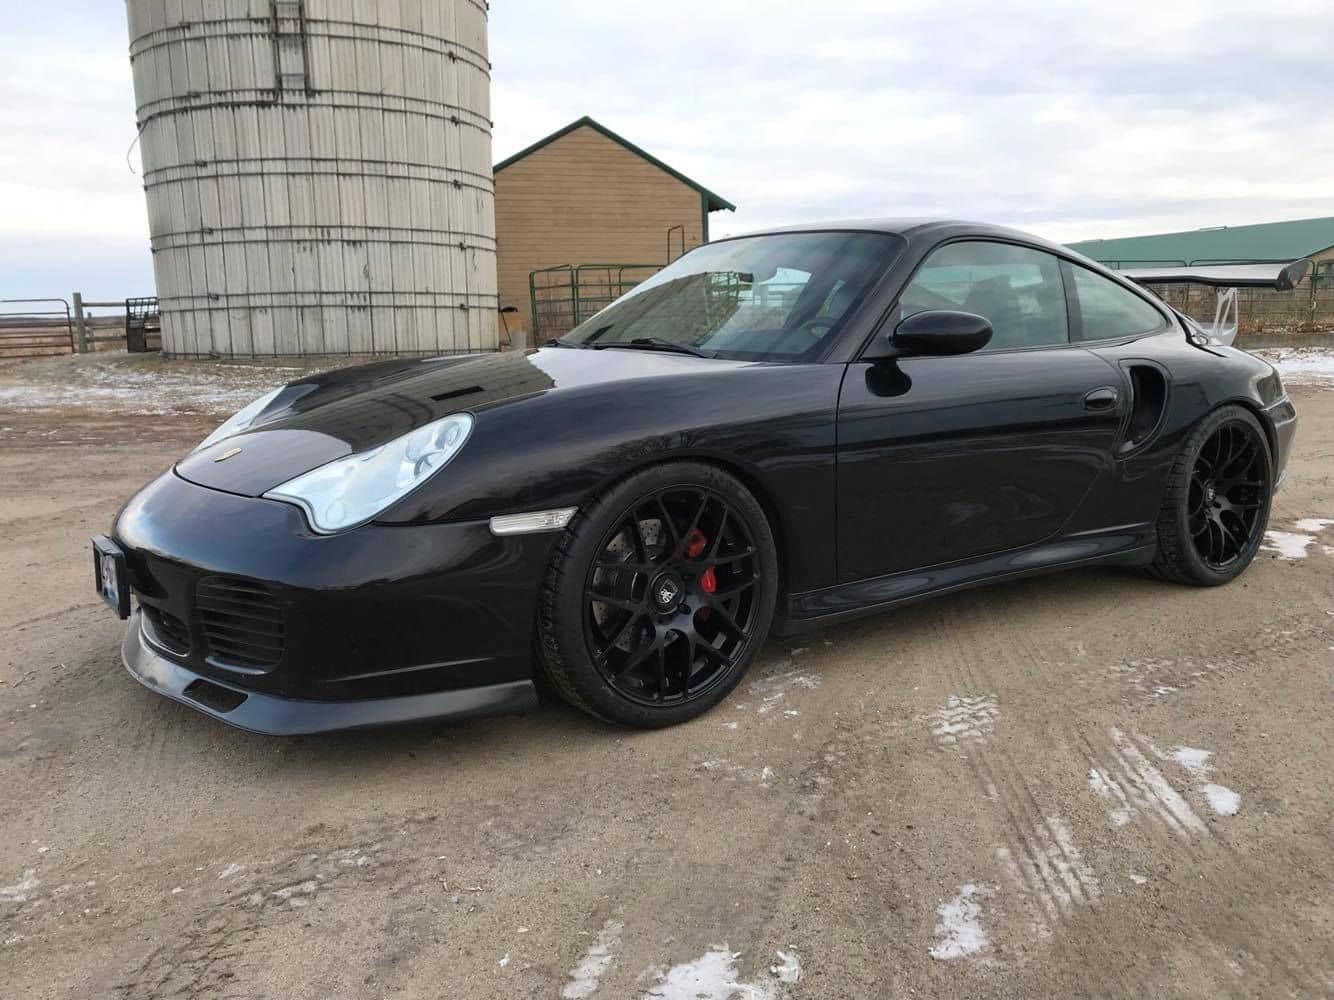
Sorry for the slow response. I've been at the shop wrenching on the car trying to get it into fighting shape after sitting all winter. I'll post up pics of the set up when I get it out of the shop. I've got many projects on the burner but the tire fitment of the 275/335s is finished and assured even at a very low ride height of 98/118 which is about 20mm lower than GT2 height. We are going to be using Nitto NT01 in a 275/35/18 and 335/30/18. Nitto just released the 335 and we have the first few sets in already. Luckily the 335 is a rather tall tire at 26.0" with plenty of sidewall which will make it a good performer. I would have preferred at 26.3" tall but 26.0 is close enough. Here is how they compare to the previous set up of 245/40/18 and 305/35/18. All listed measurements are actual side by side measurements, not listed measurements. Nitto, for example, lists the diameter of the 245 and 275 both at 25.5" when in reality the 275 is 4mm shorter. Measured tire width is overall width, not tread width.
As you can see the width difference is substantial, 3" of extra rubber in the front and 2.7" more in the rear. The rear 335s are very wide at 14" overall width but most importantly they have a load rating of 1874 lbs. which is very important for our cars. NT01s in 315/30/18 are only rated at 1653 in comparison. This is why I never cared for the performance of the short 315/30s as they just don't have the support of the taller tires.
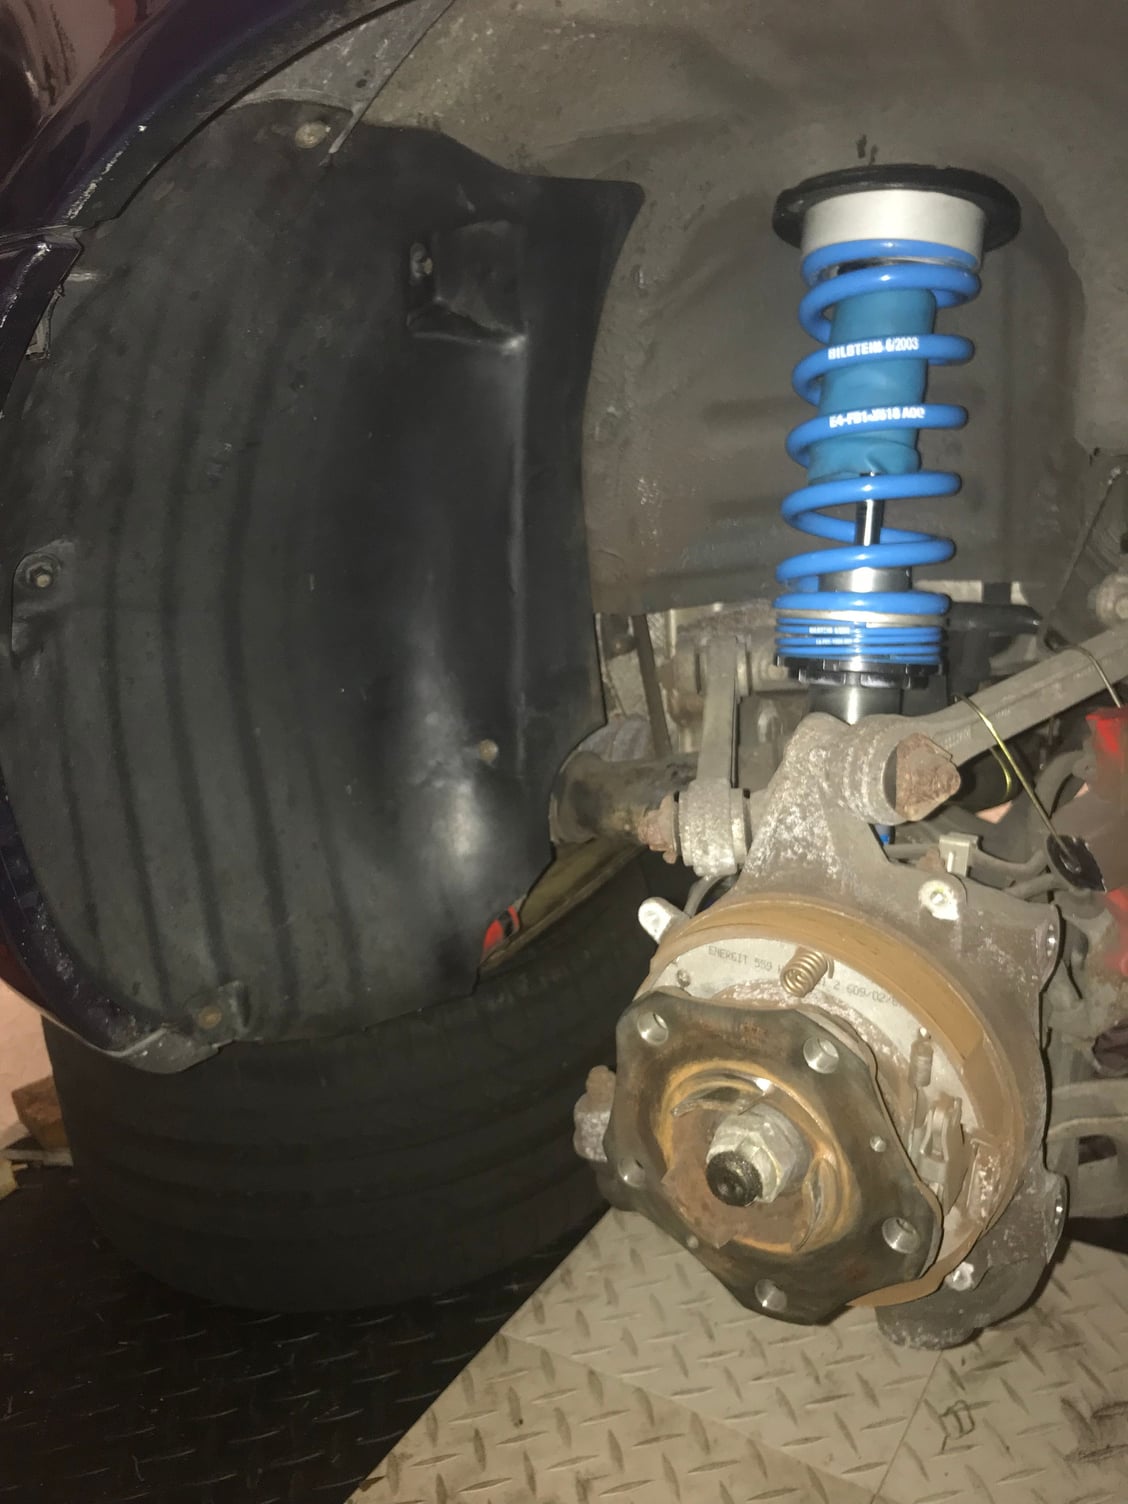
Minimum wheel width of 9.5/12.5 is mandatory with this set up. The tires are rated at 9/12 wheel but I would recommend a 9.5/12.5. We will most likely end up fitting 10/13. The 13 rear is easy but the 10 front may be tricky. The rear will require an offset of ET49-46, aggressive rolling of the fender lip, trimming of the metal on the fender lip near the fender/bumper junction and trimming of the plastic lip on the bumper. You can see that in the picture below (you can see the blue touch up paint used to treat the bare metal areas). Note how tightly the fender lip is rolled and the very aft inner fender lip edge is cut away. None of this work is visible from the outside but must be done to run a low ride height. You will also need GT2 fender liner brackets and heat and mold the liner to fit snug up against the intercooler boost hose. I did not have any clearance issues in that area and had maybe 1/4" of room between the tire and the wheel well liner by the boost hose. You will need solid TA bushing and mono ***** in the rear LCAs to prevent any movement of the wheel assembly under load. Adjustable solid TA bushing help as they allow you to move the wheel assembly slightly forward to give you a little more room in the rear. 13" rears are possible with carefull offset selection. Springs in excess of 1000 lbs are a must to run an aggressive ride height. -2.5� camber is that I'm basing this on.
Checking for wheel/tire clearance of your particular set up in the rear is very simple by the way. You just need to put the car up on 4 jacks, place a jack under the rear tire, disconnect the rear shock from the upright at the bottom, disconnect the sway bar drop link, and jack up the wheel/tire assembly into the wheel well. Look closely at your interference areas and make adjustments from there. I rubbed chalk on the tire edge to make any contact areas in the wheel well / fender lip area clearly visible.
In the front, you will need a wheel that is positioned as close to the inner coil over spring as possible. 2mm of room is all that is needed. This will minimize the radius of the arc the wheel makes as it turns. You will need a 2.25" spring and a 9.5" wheel with an offset of ET43-46. The exact offset depends on the wheel type, brake hat thickness, etc. You will need to rotate the upper mounts in order to push the top of the strut as deep into the wheel well as possible. Flipping JRZ upper mounts, for example, moves the strut in 14mm toward the center at the top. This effectively moves the top of the tire into the body my 12mm. Obviously you will need motorsport type monoball upper mounts that allow you to flip them to achieve an extra 2� of camber at the top. If using shocks with adjusters at the top, you will need to grind out the opening in the tub at the upper strut. About 5-10mm is sufficient. Sounds scary cutting into the body of the car but it's not a big deal, Cup cars have this done at the factory. A good carbide bit will grind into it like butter. Once this is done, you will need a front camber of about -3.3 to -3.5�. You will need to achieve this via shimming of the LCA. Motorsport or GT3 split LCAs will be needed along with solid adjustable TA bushings so you can fine tune the caster. Not many shims will be needed at you are already getting most of your camber at the tops. Once all this is done, you will have slight interference at full lock on the inside of the tire at the coolant pipe area, especially if you are running brake cooling air guides as on the Cup car of GT2. A simple fix for this is to install a steering angle limiter at the steering rack that prevents you from turning the wheel the last 1/4 turn near steering lock. In a nutshell, this is pretty much all that needs to be done to make this work. It may even be possible to run 10" fronts depending of final fitment.
Obviously, all of the above is predicated on running GT3/Cup uprights. I have no idea how the AWD uprights geometry would impact any of this unfortunately. Hope this helps Kai.
[url=https://flic.kr/p/FzqHSV]
Last edited by powdrhound; 03-22-2016 at 01:55 AM.
Hey John, looking forward to your impressions and new look with everything completed.
I'm struggling to find street tires for my OZ rim 8.5 & 12inch . Ideally with the AWD I need 245/40/18 & 315/30/18 unless there's any other combination that will work.
I got rid of the Nitto NT01 that were painfully noisy, I'm currently running PSS 225/40/18 & PS2's 295/30/18 on the OZ rim 8.5 & 12 , tires are a bit stretched but car seems to drive and handle pretty good.
I would get Michelin PS2 in a 245/40/18 and 315/30/18. Those are good tires and perfect for AWD at 25.7/25.5.
BF Goodridge also makes the G-Force Rival S in the same sizes but I don't know anything about those tires. The Michelins is what I would get.
I would get Michelin PS2 in a 245/40/18 and 315/30/18. Those are good tires and perfect for AWD at 25.7/25.5.
BF Goodridge also makes the G-Force Rival S in the same sizes but I don't know anything about those tires. The Michelins is what I would get.
PS2's are my 1st choice, I love Michelin's but I cant get that combination right now and there's no ETA.
Originally Posted by 993GT
Careful with the Rivals...look at the rear load rating
Ps2 or Pzero Rosso are nice on street
I've heard the early release Rivals were de-laminating, maybe due to the load rating. I was never a real big fan of Pzero Rosso but I've heard that they have improved.
P Zero Rosso are just as good as PS2, but they are a bit chunky compared to PS2. Ive had both of them on my M5 E60 and with spacers, the Rossos would rub, but the PS2's didn't. Something to keep in mind when choosing tires. 315 doesn't equal 315!
P Zero Rosso are just as good as PS2, but they are a bit chunky compared to PS2. Ive had both of them on my M5 E60 and with spacers, the Rossos would rub, but the PS2's didn't. Something to keep in mind when choosing tires. 315 doesn't equal 315!
Thanks for the heads up, l'll see if l can find PS2.
Bringing up an old thread for guys. Just did the mod on another customer car. Huge difference in space up front. Combine this with a fender roll and you can really make a 245 stick out and look nice, widen your track, and improve performance.
I just did this - what's the best way to compress the bubble? I think the only thing that I did with my heat gun was make it mad (and melt the top layer)
I did slot the frame(s) and cut the bracket - you can hardly tell
I just did this - what's the best way to compress the bubble? I think the only thing that I did with my heat gun was make it mad (and melt the top layer)
I did slot the frame(s) and cut the bracket - you can hardly tell
I use a heat gun and slowly heat up both the top and the bottom. And do a larger area than just the bubble. Then I have a 4x4 inch piece of metal i use. I use my welding bench table corner and put the liner on it, 4x4 piece of metal on center of the bubble. Then use a woodworking clamp ok hold it down flat. Pour a little cold water on it, let it sit for a few min and then good to go.
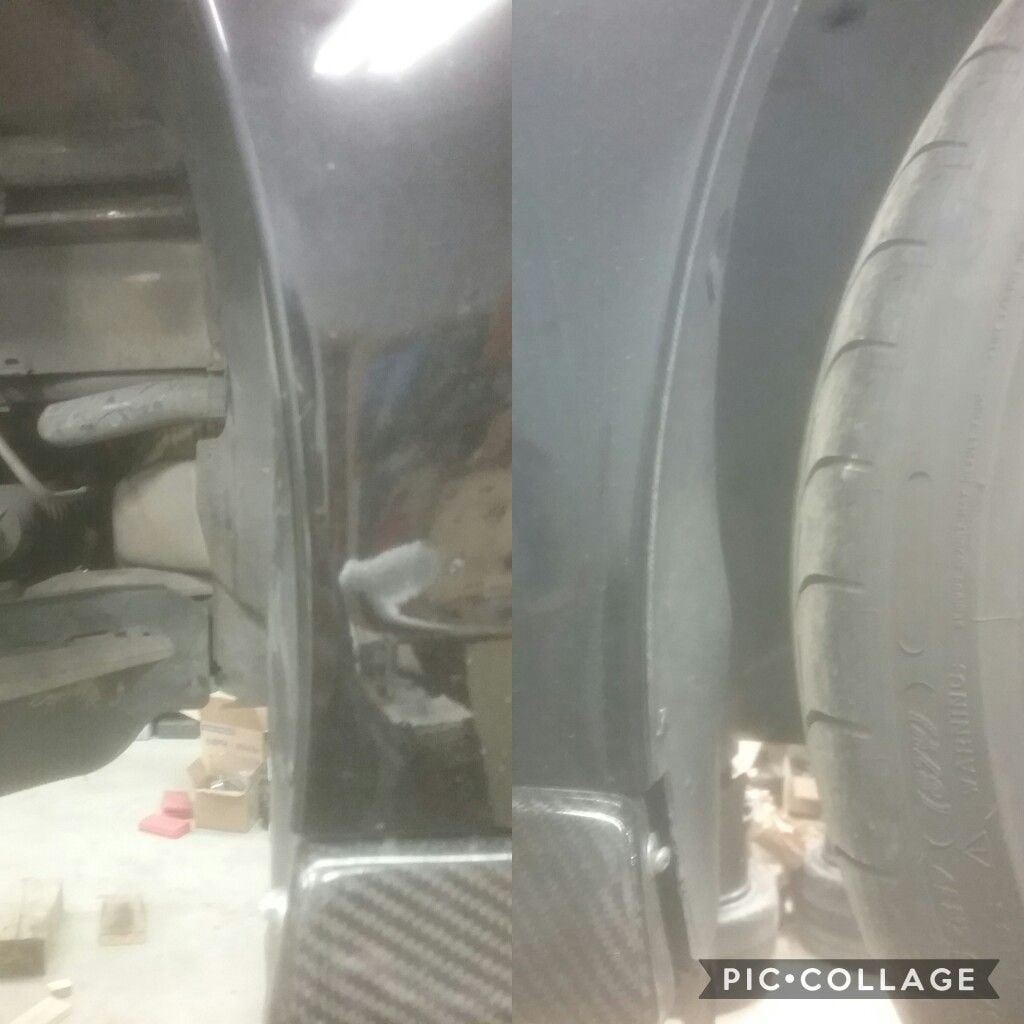
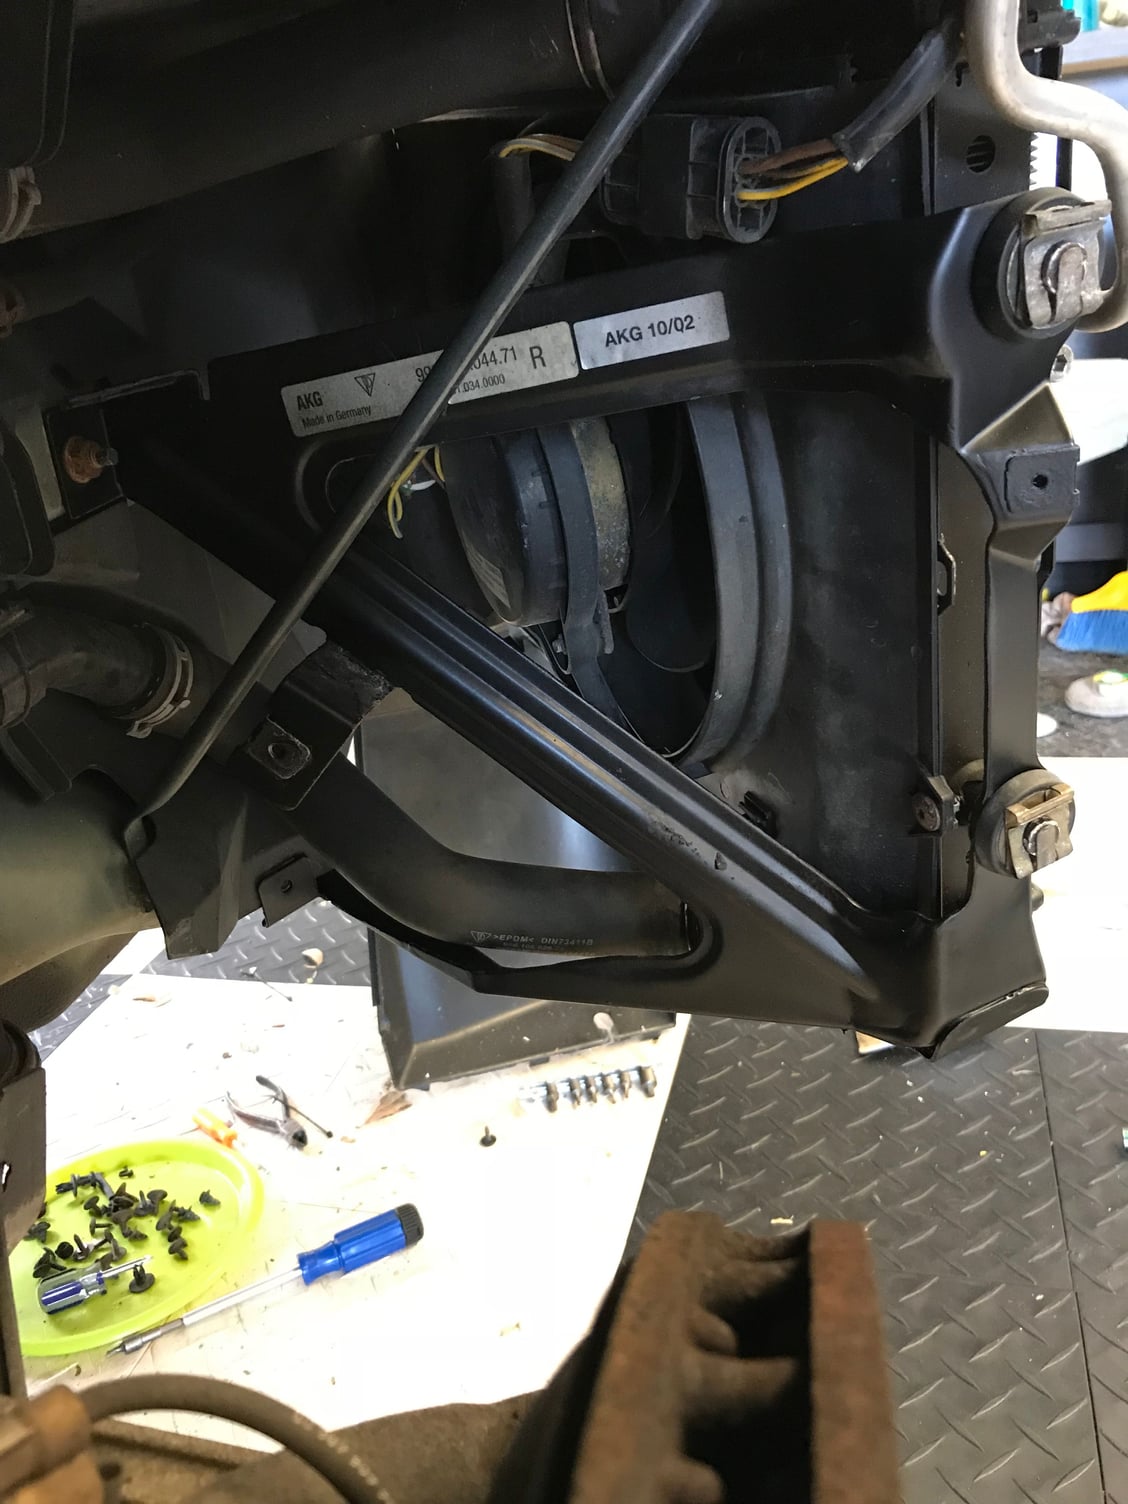
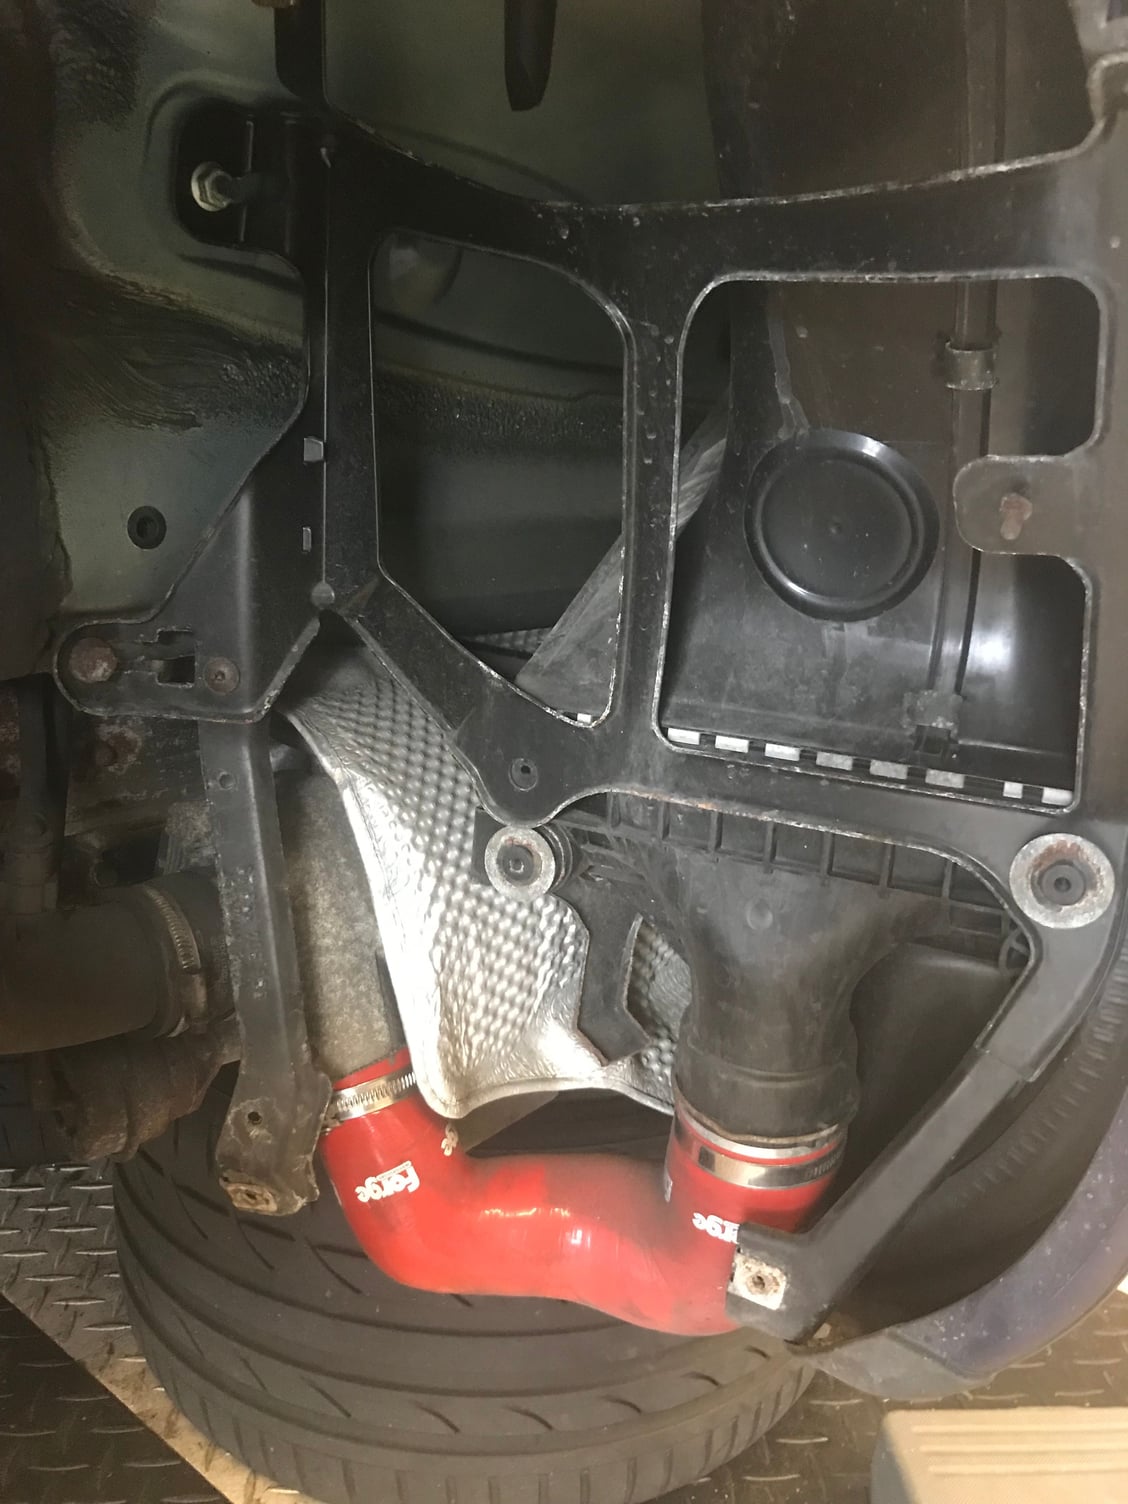
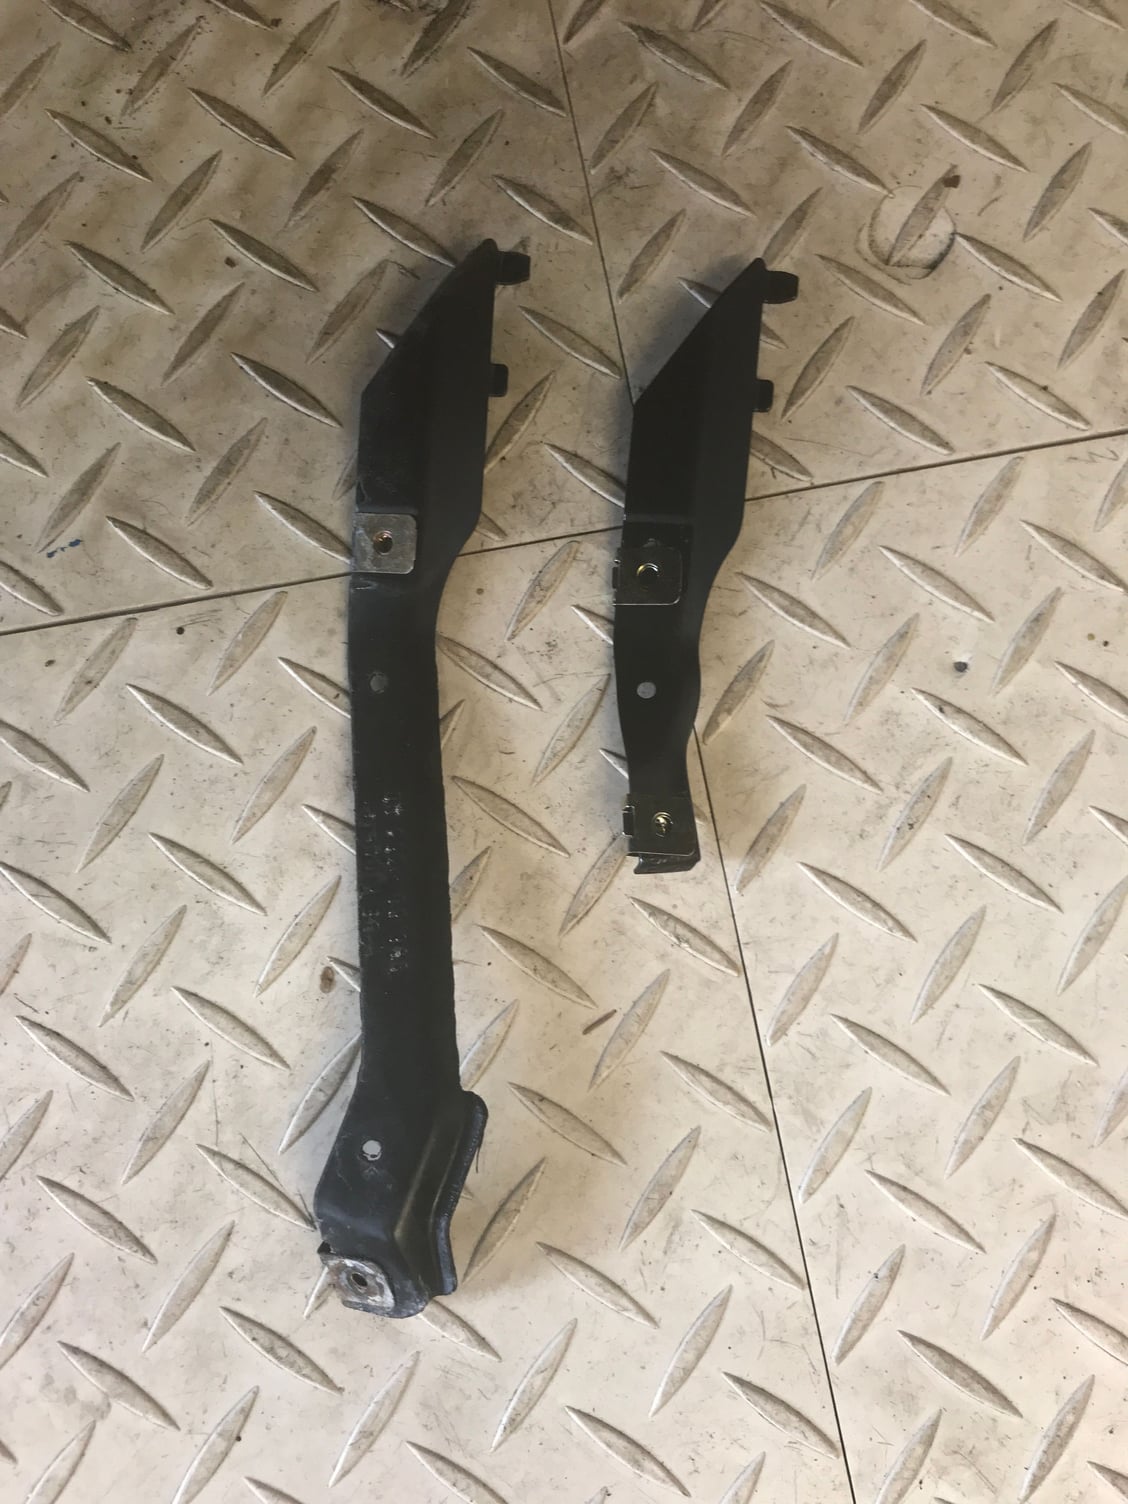
I took some pictures when I did the rear brackets with the GT2 versions - first picture is the stock brackets (rear)
This is what the two look like side by side - New GT2 version is shorter
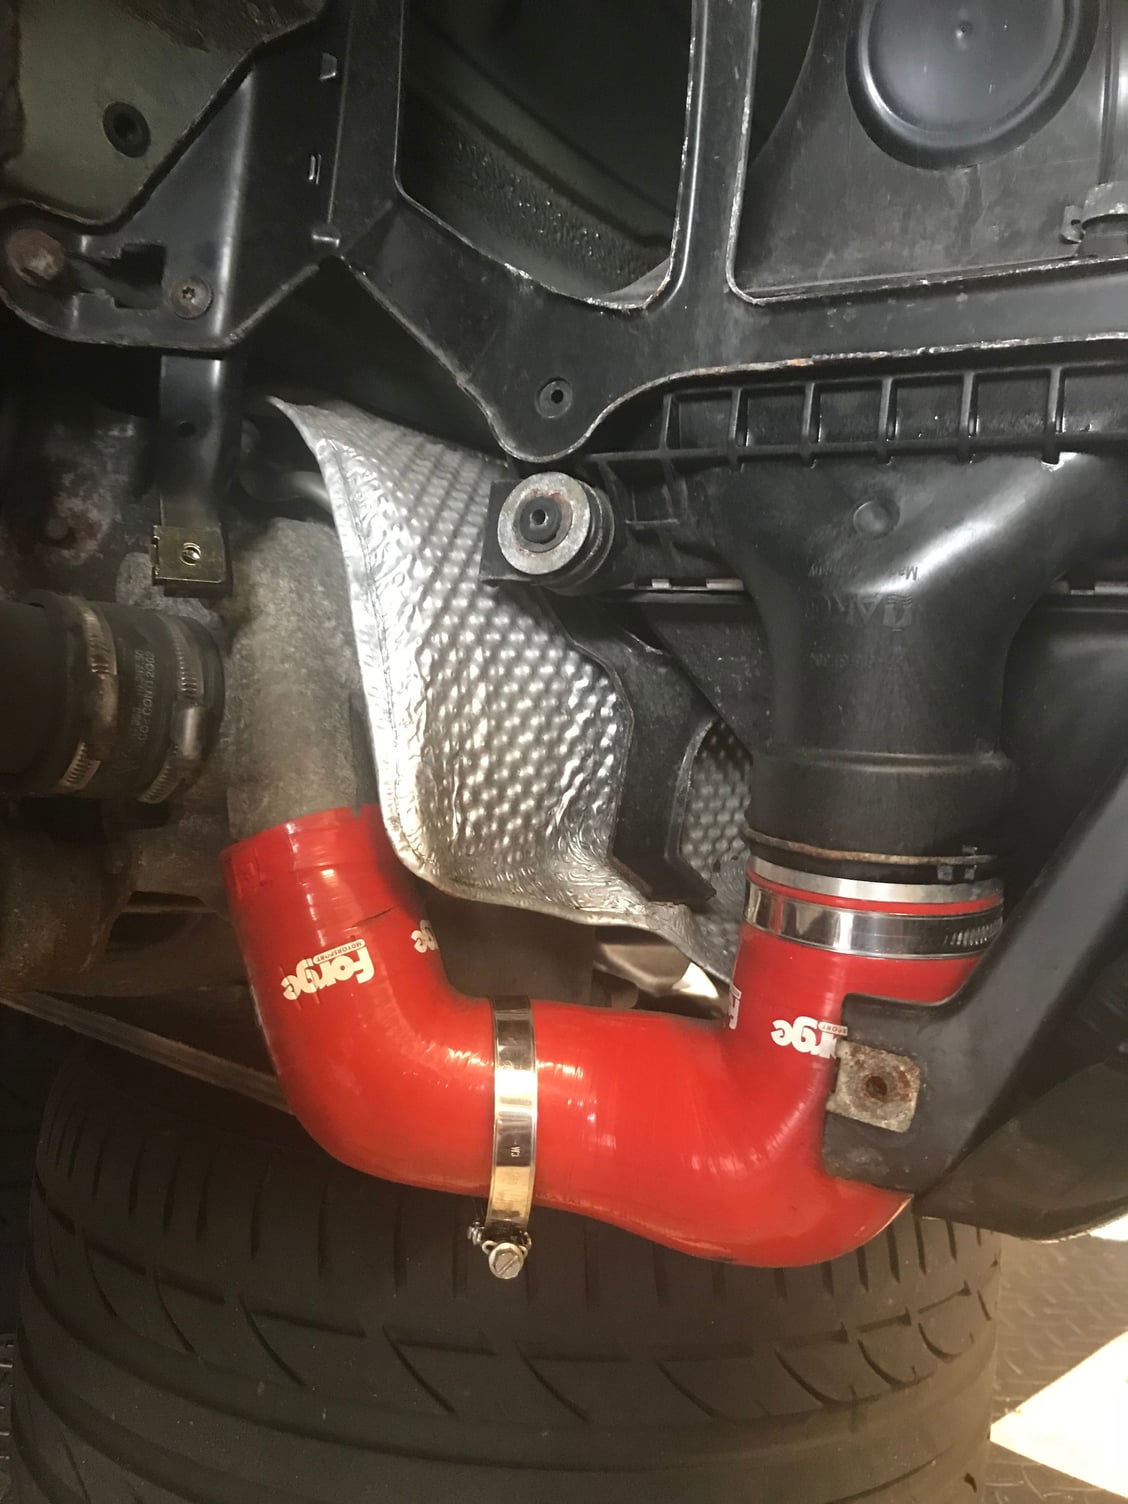
I also repositioned the hose clamp on the intercooler hose
And finished up - have to drill a new hole for the bracket - but basically that pulls the fender liner out of the way by about 3/4 an inch
You wouldn't happen to be able to point out where you did the slotting of the bracket would ya? I put on some larger wheels and im rubbing pretty hard so I think i need to do this mod but I don't wanna mess it up.
You wouldn't happen to be able to point out where you did the slotting of the bracket would ya? I put on some larger wheels and im rubbing pretty hard so I think i need to do this mod but I don't wanna mess it up.

 03-21-2016, 08:49 PM


") . Ideally with the AWD I need 245/40/18 & 315/30/18 unless there's any other combination that will work.
. Ideally with the AWD I need 245/40/18 & 315/30/18 unless there's any other combination that will work. I'm currently running PSS 225/40/18 & PS2's 295/30/18 on the OZ rim 8.5 & 12
  , tires are a bit stretched but car seems to drive and handle pretty good.