When you click on links to various merchants on this site and make a purchase, this can result in this site earning a commission. Affiliate programs and affiliations include, but are not limited to, the eBay Partner Network.
I wonder if there is a way to set up a really cool boot intro video or animation full of Porsche hype. I'm going to get one of these radios this summer when it might be nice to drink a beer and enjoy nice weather during the install.
More (same as stock Android under Advanced Networking)
Mobile Network
Hotspot & Tethering
Airplane Mode
VPN
DEVICE
- Display
Brightness Level ( brightness for day and night mode )
Wallpaper ( change wallpaper )
Auto Blackscreen ( black the screen after xx seconds/minutes )
Displayed NET Switch ( shows the connection speed in upper taskbar )
- Sound
Keypad Tone ( On/Off: emits tone when pressing a key )
LOUDNESS ( Not entirely clear, but most proabably the same Loudness setting as on a HiFi installation before DSP was introduced, or for units without DSP )
AMP ON/OFF ( switching amplifier mode ). Note: In case your unit has a cooling fan installed, the setting AMP ON/OFF is also there to switch the fan On or Off on older units (brand units: before approximately July 2022; for brandless units you never know)
Power Conditioning ( absolute output volume from 0 to 60, all other audio settings are relative; if you think your audio is already too loud at position 5 (or so), you can decrease the absolute volume output here which means that Volume 5 is now lower )
Subwoofer ( set subwoofer volumes )
Equalizer ( set sound frequencies with equalizer )
Speed Compensated Volume ( set sound volume depending on the actual speed )
( show / remove installed apps; same as stock Android )
- USB Video Output Setting
( Some resellers sell external USB-connected DVD-players. This settings allows you to correct over/under scanning )
- USB Device Start
( None / Carlink - application to start when USB device is connected )
GENERAL
Press any key to start ( When you long-press the "Off" button on the top-left button array of your unit, your screen will switch off (but your unit does not go into deep-sleep). When you set this setting to ON, your unit will switch on again when pressing any button of your unit)
Brake wire for video in motion (Strange Chinese translation: (Dis)Allow display of video during driving . It means when handbrake is not used.)
Auto-start Navigation ( auto start navigation > needs Navi app to be set accordingly )
OSD Time ( on / off in notification bar)
Mirror view on reverse image ( if backup reverse cam is installed, and the video is 180 degree turned, this will switch to normal mode )
Mute audio when reversing ( decrease sound level if in reverse gear, does not completely mute )
Sound reduction when reversing ( reduces the sound when car is in reverse gear (driving backwards). Only works when previous Setting switched to ON )
Backlight control ( switches the leds behind the (soft-)buttons On/Off : or by switching on/off headlights, or based on time )
Default volume switch ( When your unit starts, do you always want to have the same default volume to start with )
Default boot volume ( sound volume which is preset on boot process; only works if previous setting switched to ON )
GPS Mix ( ON = Will reduce/mute media/radio when "speaking" navigation instruction; OFF = media will not be reduced/muted when navigation app issues instruction ). Some other translations than English mention this as "audio mix between navigation and media". Note also that most modern navigation apps have a setting themselves to mute or even shortly pause the media player when issueing a navigation instruction.
Sound mixing scale ( Set volume of background audio when "navigation speaks" (for example: Volume currently 10 so navigation uses 10, background music uses volume set here ). Only works if "GPS mix" setting (one above) is set to ON.
Lantern settings ( set the colour palette for the hardware buttons LED )
Steering wheel setting ( Configure the steering wheel buttons; only for non-Canbus systems. Canbus systems are hard-coded )
Launcher App Setting (This configures which app is displayed in the PIP window of launchers that have this PIP-window)
Navi app ( app to start when NAVI Button is pressed AND to auto-start navigation ... see 3rd point ..
Map Data Copy ( Old setting for iGo to copy maps from internal memory to SD-card, so that it doesn't get deleted on a new firmware install )
FACTORY
(requires password/pincode 3368)
Touch check
Original Car Agreement ( These settings are mostly controlled by the CANbus. The number of options can vary per CANbus type and can also work or not work per CANbus type. The number of options will be very limited without a CANbus. )
External Temperature ( shows external temperature in notification bar when CANbus is present)
Automatic start and stop ( ?? )
Radar Display ON/OFF ( When car is put in reverse gear, it will show the reverse camera or an image with edges of your parking sensors (if you have them))
Reverse Parking Line ( In case of a reverse camera show the parking lines )
Static Track ( Shows static reverse parking lines in case you don't want or have the "curving" parking lines )
Reversing track reversal ( If your reverse camera's left/right postion is reversed )
Max Reversing Angle (Change how far the parking lines curve. This to adjust it correctly to your camer/car)
Door ON/OFF ( shows if a door is open )
Drivers Door position ( left / right drivers position )
Rear Door Exchange ( Similar to Drivers door position, but for back doors )
A/C Information ON/OFF ( Shows changes if you change AirConditioning temperature/ blower speed/ etcetera )
Car Audio Type ( AUX / IPOD-TV )
Reversal Previous And Next ( This reverses your CANbus steering wheel next/previous behavior (Spotyfy is known for this) )
Reversal Volume ( Reverses the Volume +/Volume - in case your CANbus steering wheel volume keys/arrows work the other way round )
Protocol Print ( When on, this displays the CANBUS messages overlayed on the screen )
Temperature unit switch ( Celsius/ Fahrenheit )
CAN box upgrade (updates software in CANbus decoder; Be careful: this can soft-brick your decoder)
Car Model ( define the canbox manufacturer, params )
Back MIC switch -> When set to "On" the internal microphone is switched on, but only new M6 pro hardware. When set to "Off" the internal microphone is switched off. Use this "Off" setting when you have an external microphone connected. Do not use both microphones at the same time as it will only give you worse microphone performance. If you have an old(er) firmware and not the new M6 pro, you need to use this trick as described by Vitaly (@gordgelin ).
Antenna normally on ( Some cars need constant 12V on the Antenna to get a good signal, especially when you have a fin antenna and connected via the CAN bus => Then set to On)
HD reversing video format (Try this in case you have an AHD camera on a non AHD unit, or the other way round).
Boot Screen logo
Set Screen
Touch Screen Calibration
Panel Key Learning
Front View
Cancel the reverse into the front view (If you have back and front camera, it will switch to front camera when "leaving" the reverse gear)
MCU Panel Key (Set buttons like Band/Radio, Phone, Music) on the side of the screen to On/Off.
Unknown sources ( allow apps to be installed from unknown sources )
Door lock interference
Reverse power supply: This supplies power to the after market front camera (if one present), so it's able to show the video feed longer than 1 sec. Not enabling this, cuts off the video feed from the front really quickly, after turning it on, coming from reverese and back camera feed.
Volume balance settings (Set volume output for the several audio output channels: media, radio, navigation, etcetera)
MCU upgrade (Only upgrade the MCU firmware; Be very carefull to ONLY use the firmware for your type of unit)
Backlight current adjustment (Set display brightness but be carefull. It can blacken your screen entirely. There is no safe low position. passwd: 5768)
Home Launcher Selection (Option to chose one of installed FTY launchers. passwd: 8086)
USB Error detection
USB protocol selection
A key to export ( exports Settings to /mnt/sdcard/SettingsConfig as json file, but how to import this )
Single 360
Activation
DVD Update
TV Type
Video Output Settings
OBD
Sleep mode Setting (Switch off head unit or switch to deep sleep, when ACC is turned off). Deep sleep will keep your car battery alive for ~30 days, but after ~3 days, your car will go into total shutdown anyway to be sure not to drain the car battery in case some badly behaving program keeps a wake-lock preventing your unit from going into deep sleep. This can happen on rooted units. On normal units the system can still kill such a program.
360 switch
Backup Test
Plug In Serial Device Setting
USER
Location (same as stock Android)
Security (same as stock Android)
Language And Input (same as stock Android)
Google Settings (same as stock Android)
Backup And Reset (same as stock Android)
Account (same as stock Android)
Delay Power Off When ACC Off (After ACC of the delay time to put unit in sleep or off: OFF / 3 sec / 10 sec / 3 min)
Application Setting ( which applications you want to auto-start when you start your car and unit )
What do you have it wired to? 996 doesn't have CAN over OBD2, that wasn't standardized until 2007. The OBD2 data is an older ISO standard. There is CAN that between the ECU and the Dash IIRC that you might be able to use.
I am troubleshooting an issue and scanned everything for errors. It seems the car can tell I pulled the radio, with CAN errors between the HVAC controller and the Gauges. This makes me think there should be wires for CAN to the original radio, but I don’t see them in any of the posted wiring diagrams.
Also the car wiring does not have an illumination wire on the harness, it seems it came through the CAN bus on the MOST cars (04 base Carrera with Bose).
Does anyone know where the radio got the CAN bus signals? (Used for radio readback in the tach display?)
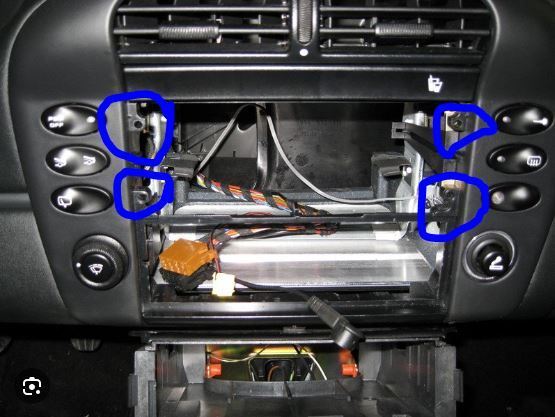
So my question may have gotten lost in the shuffle. How did you guys affix the radio so that it doesn't shift around?
I heard something about screwing it into the side but that would only make sense if you were able to get the OEM plastic box out or if you had a double DIN kit.
I tried to remove the plastic OEM frame but even after removing the 4 screws, it would not move (stock picture):
I am going to replace the lighter plug with a USB adapter and while I am in there, firm up the radio.
Tom,
I was wrong, you need to remove the vent assembly located above the frame before you can get the frame out……. Fought with it again today, failing to figure out the illumination line wiring….
So I went ahead and purchased this unit. The function and appearance of the unit itself are great. The instructions, adapters, and mounting options are lacking. Getting switched power from the phone plug that is accessed by pulling straight back on the front edge of the panel by your knee is key to making it work, which is not mentioned in said instructions, and at least for my car (2004 Turbo with nav - PCM 2.0 I guess?), the included fiber box didn't work except if I turned the unit on, completely unplugged the amp in the frunk, then plugged it back in... then it would work until I turned the head unit back off. Otherwise I only got sound for 15 seconds. I could unplug the fiber and plug it back in again to get sound for another 15 seconds, but that's not very useful. The blue "designed in Germany, manufactured in China" box from Amazon fixed this problem for me except that there is still no fader of course, but that appears to be true of every MOST box. I also find it odd that only one of the big plugs on the included harness is used, and only part of that. I still haven't figured out how to mount the unit properly - I don't see how adding spacers on either side will help, as it also flops outwards... I think I'll just screw it in, or I'll have to add a spacer to make the frame thicker in the direction towards the front of the car so that the clips actually hold the unit tight into the frame, and then ALSO add spacers left and right, and then the unit will fit right. Overall, honestly I'm not impressed. The unit itself is really geeky and fun though - the wireless Android Auto actually works more than half the time, which is better than I can say for most wireless Android Auto units, and the ability to install any old Android app is great - I fired up AndFTP and downloaded my music collection to the local unit - I got the 256/8GB one - and I'm listening to my whole mp3 collection directly from the unit, which is awesome, and something I've always wanted the ability to do. I give the installation experience 2/10 stars and the unit itself 9/10 stars - it does look right at home and correct for the car... if I could only figure out how to hold it in right
I do also want to say that Sadocom didn't appear to be aware of any of these installation or MOST box issues, which seemed odd, and was mostly unhelpful, though friendly and available on WhatsApp.
All in all, I think this is the best option, which is a bit sad, but I don't have any regrets. I would pass on the unit with the MOST box and just get the blue Amazon one though.
Take a look through my posts in this thread for mounting options ( I measured some matching color metal stock and wedged it and zero issues) . The mega thread in the 996 forum has all the wiring / repin / dimmer / power run details ( I suspect how you powered the most converter may have been your initial issue however glad you resolved it).
a few notes for you - my car is an 04 with bose / cd changer on frunk and had a pcm navigation unit with in dash prompts / turns etc
- update the android os as well as all packages on the stereo as I pull and apply these as soon as they come out. Last one fixed canbus issues partially and I get speed and some other car data in the unit now
- I mounted all antennae under the top of the dash right between the air vents and leather or whatever material you have for surround
- apple carplay and google connect near. Instantly. Better than in any of our modern / newer cars
- I moved my google voice to a sim card and run it on the head unit. Cheap and
- gps on these is excellent as you can feed off both the US and Russian satellites
- explore the settings in the danced unlocked menus
- my sound is excellent and I can fade f/r r/l etc without issue
ill tackle cameras next when I have the rear apart when I do my injectors and coolers upgrade later this year. I’ll post my experience once done.
I need help - I ordered this unit but I already have an aftermarket amplifier with RCA’s from the frunk to my head unit. It seems this system only has 1 left, 1 right, and 1 subwoofer connection. Is there another device I need to order?
Post some pics of what you are dealing with. If your car had the amp replaced with an aftermarket we will need to do a little digging to figure it out and see how they wired it. It could be as simple as plug right in. These units with the converters are for the MOST fiber based cars. They sell ones without it and that’s what you need. Let me know and I’ll help as best as possible. Thx - scrh1.
info or pics that would help :
the new radio and wiring harness it came with
existing aftermarket amp and the wiring. They may have cut a lot of wires or maybe not. You will need to look on the drink as well as once you remove the stereo we should see how speakers were handled.
I fitted mine a few weeks back and have poor radio reception. I thought it was because the antenna power was selected to switch off and then not powering the antenna amplifier. But it’s not that…
there were two antenna wires on the pcm2 and only one plugged into the new head unit. Why are there two and could I have plugged in the wrong one?
, pre Carplay ... Really want Carplay. I installed the last head unit, I'm still levaraging the stock BOSE amp and subwoofer, which I'm ok with sound wise. This is pre MOST, so is the install pretty straightfoward like the the last install? Looking for Carplay primarily.
Clicking on this link, https://a.aliexpress.com/_DdkJwUr, I see lot's of options, I would'nt bother with camera's for now, so probably just a mic and whatever else is needed for integration.
I have bought a passive LOC similar to what you have. Thanks.
Any tip on how to mount the front camera?
Where did you get the passive LOC?, I have a similar setup as you, also in SoCal. Thinking about doing this install, trying to figure out everything I need for the install. Already have double din radio installed. Much appreciated.
Where did you get the passive LOC?, I have a similar setup as you, also in SoCal. Thinking about doing this install, trying to figure out everything I need for the install. Already have double din radio installed. Much appreciated.
I did not use the passive LOC. If you’re local, you can look at my install and the wiring on my car. PM me.
My install was plug and play and surprised to say it all works. I used a splitter for the left, right, and subwoofer connections into my kenwood amp. Anyone have recommendations on EQ settings?
My install was plug and play and surprised to say it all works. I used a splitter for the left, right, and subwoofer connections into my kenwood amp. Anyone have recommendations on EQ settings?

 02-10-2024 | 05:57 AM