When you click on links to various merchants on this site and make a purchase, this can result in this site earning a commission. Affiliate programs and affiliations include, but are not limited to, the eBay Partner Network.
Built test rig to connect to INLET of turbos and began testing from below. Both turbo inlet plastic pipes needed to be removed and the rubber connectors. Test rig consists of 2" pipe by 2" length rubber plumbing connectors and pipe end plugs. You can also use a pipe cleanout adapter. I used one of each.
Test rig:
This pipe/connector on both sides needs to be removed and the test rigs connected to the turbos.
It didn't take but a minute to find the next leak.... Easy to guess, the infamous check valve #16, part number 996-110-135-70, Almost impossible to build any pressure in the test setup with this leak. It just dumps air from the hidden check valve into the turbo inlet piping on drivers side.
.Looks like I'm at a stop again until I get this part and install it... Hopefully a local dealer has one in stock. Considering how frequently they supposedly fail, you would think so, but I'm not holding my breath.
Any advice on how to replace this part?
I'm assuming:
Remove airbox.
Remove Y-pipe.
Remove throttle body (and plan on replacing throttle body O-ring while I'm in there).
Lower engine a bit on engine mounts.
Find the check valve buried somewhere above plenum on drivers side.
Try and remove old check valve without breaking plastic nipple off plenum.
Install the new check valve in the right direction
Put everything back together.
Can anyone who's done this verify?
Any additional tips for changing out this check valve?
Any readily available at auto parts store alternative if the check valve isn't in stock at the dealer?
Is the #16 check valve #1 or #2 in this diagram? Should I just replace both?
I might note that the car still ran pretty great with both a stock tune and a canned Cobb tune even with the bad valve... I'm guessing I was working the turbo harder then necessary though. No codes, good boost pressure on the gauge.
WOW! - All I can say is thank you for all the detail and pics here. I'm going to the "Depot" tomorrow to get some parts. Although the Torque Solution units sure do look pretty!
I was reading some other threads.... It implied what I have labeled as Valve 2 is actually part of the hard line that goes down to the turbo intake. Not separately replaceable, and supposedly doesn't fail frequently.
OK, had some more time to work on the car and write an update...
Of note is that my car ran GREAT before all of this testing, I just wanted to do a boost test since winter hit and the car is relatively new to me. I really didn't expect to find major boost leaks, but there were definitely some things that needed to be addressed!
#16 check valve was leaking badly. And it was definitely a bit of a bitch to get to!
Even after removing all the stuff in the way and lowering the engine on the the mounts, It's still a bit of a pig to get the check valve out! First you need to loosen and move the spring clamps. But of course they were rotated the wrong way... A combination of cable operated clamp pliers, regular spring clamp pliers, very long needle nose pliers, needle nose vise grips, paracord to loop and rotate the clamps, and a bunch of cursing and I was able to move the clamps, but the damn valve STILL wouldn't come loose. I'd heard about folks breaking the nipple off their stock plenum trying to remove it, so I didn't want to just overly honk on it. I ended up cutting through the hose...
Here are the parts I'll be replacing now that I'm in the 'put it all back together' phase...
Airbox connector hose: Small split on both ends, signs of cracking. P/N 996.110.621.70
#16 Check valve. Completely shot, free flow in both directions. P/N 996.110.135.70
Small hose between check valve and plenum. Cut apart for removal. 3/8" ID fuel hose. Plan on using screw-style hose clamps to make my life a bit easier if i ever have to do this job again!
Venturi Tube (aka 'sucking jet pump'). Internal check valves test o.k. on bench, but I saw bubbling from the end during pressure test. P/N 996.110.652.70
Small check valvesTests o.k, no signs of leak, preventative replacement. P/N 964.110.950.02
N75 Cycle valve. Tests o.k, no signs of leak, preventative replacement. P/N 996.605.155.00
F-Pipe. Looks ok, no signs of leak, preventative replacement with Forge silicon F pipe.
Diverter valves. Tests o.k., no signs of leak, preventative replacement with Bosch / Kayser 710N diverter valve..
Throttle body gasket Hard to test, easy to replace. P/N 996.110.318.02
In addition, testing all connector hoses, zip tying all connector ends. Several other boost threads mention the lines going to the fuel pressure regulator... I can't spot that with my current level of disassembly... What do I need to pull to get to the FPR?
The fuel pressure regulator is behind the secondary air pump. I believe I removed the mounting bolts from the pump and moved it out of the way a bit to access the regulator.
2.5", so you need a reducer to attach to the input side of the turbo. I am fabricating a set out of 50mm aluminum tubing that will fit on the output side of the turbo going to the intercooler hose. I don't see an issue testing from the input side of the turbo, as long as you keep the pressure under 15 psi, which is a little over 1 bar.
For connecting to the back of the turbo's, I can just use a home depot coupler and pipe plug... If I buy any pressure tester, i want to be able to connect to the turbo outlet tubing, 2" diameter plugs.
I was doing a bit more testing today as well as installing a few parts... It was planning on replacing both small check valves, They both tested fine with a simple suck and blow test from both sides, allowed air one direction but not the other, but when I put them on a pressure/vacuum tester, once was definitely leaking.
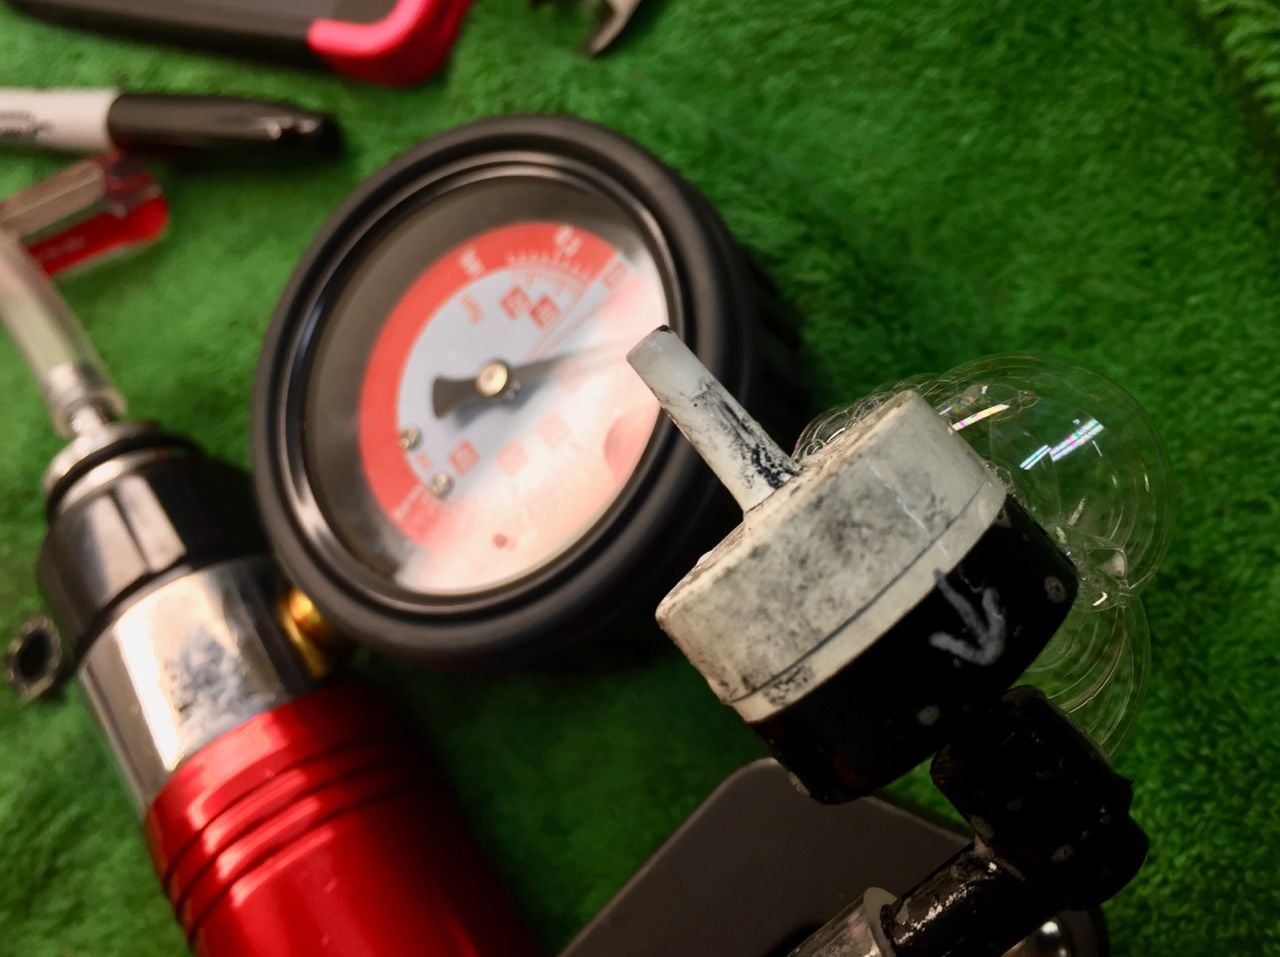
By the way this little pressure/vacuum tester I bought off Amazon is working out great for testing individual components, waste gates, diverter valves, etc...
The Mityvac pumps that do vacuum and pressure are almost double once you add the 'not included' adapters, and they get quite a few crappy reviews for not holding up... I figured I'd rather have a $37 tool that I might need to replace after a few years than a $65 version that doesn't hold up any better.
So I"m going down this same exact path. I'm fairly certain now that there are no fittings that are leaking air. My theory now is that it is a check valve. However I don't feel any air coming down to the driver's side turbo inlet piping. I've been searching, but haven't found anything yet. How do I drop the engine down a few inches?
 12-25-2017, 10:12 PM