When you click on links to various merchants on this site and make a purchase, this can result in this site earning a commission. Affiliate programs and affiliations include, but are not limited to, the eBay Partner Network.
Does the maintenance manual give limits/max clearance? I wouldn't want to make a call on something like this without measuring and comparing to the acceptable tolerance.
Good idea, but I could not find anything. I ended up taking them to Ted Robinson at German Precision in Santa Clara and it's definitely time for a rebuild. I got the same suggestion from Neil Harvey at Performance Dynamics who has been very helpful even though I'm not batting in his league of race-spec rebuild. That's been super nice of him.
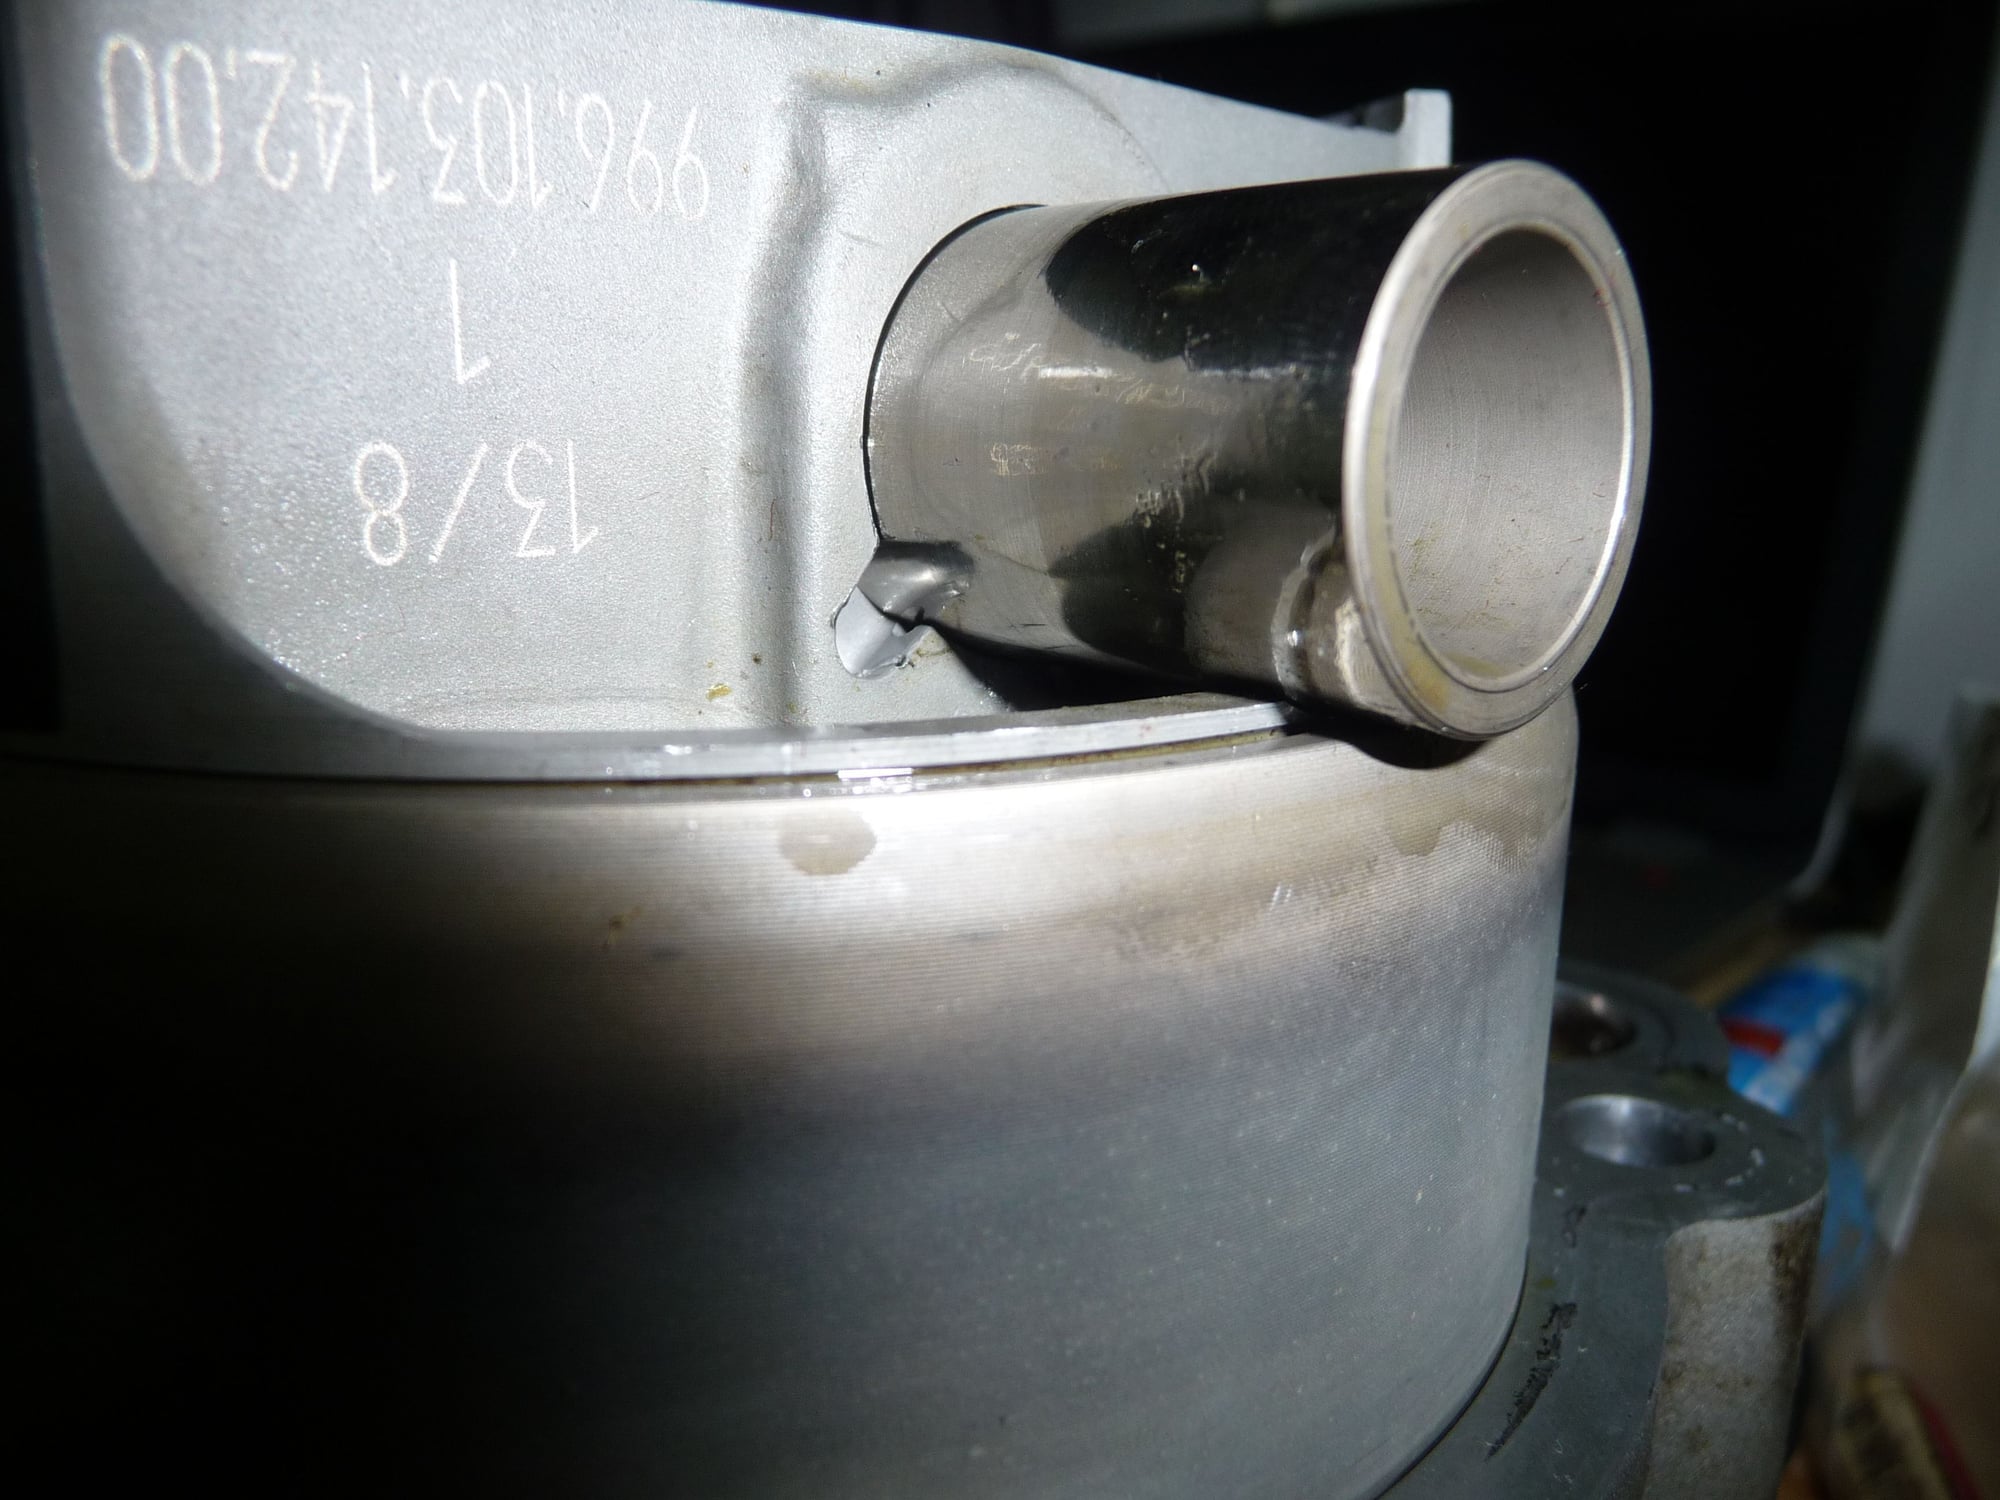
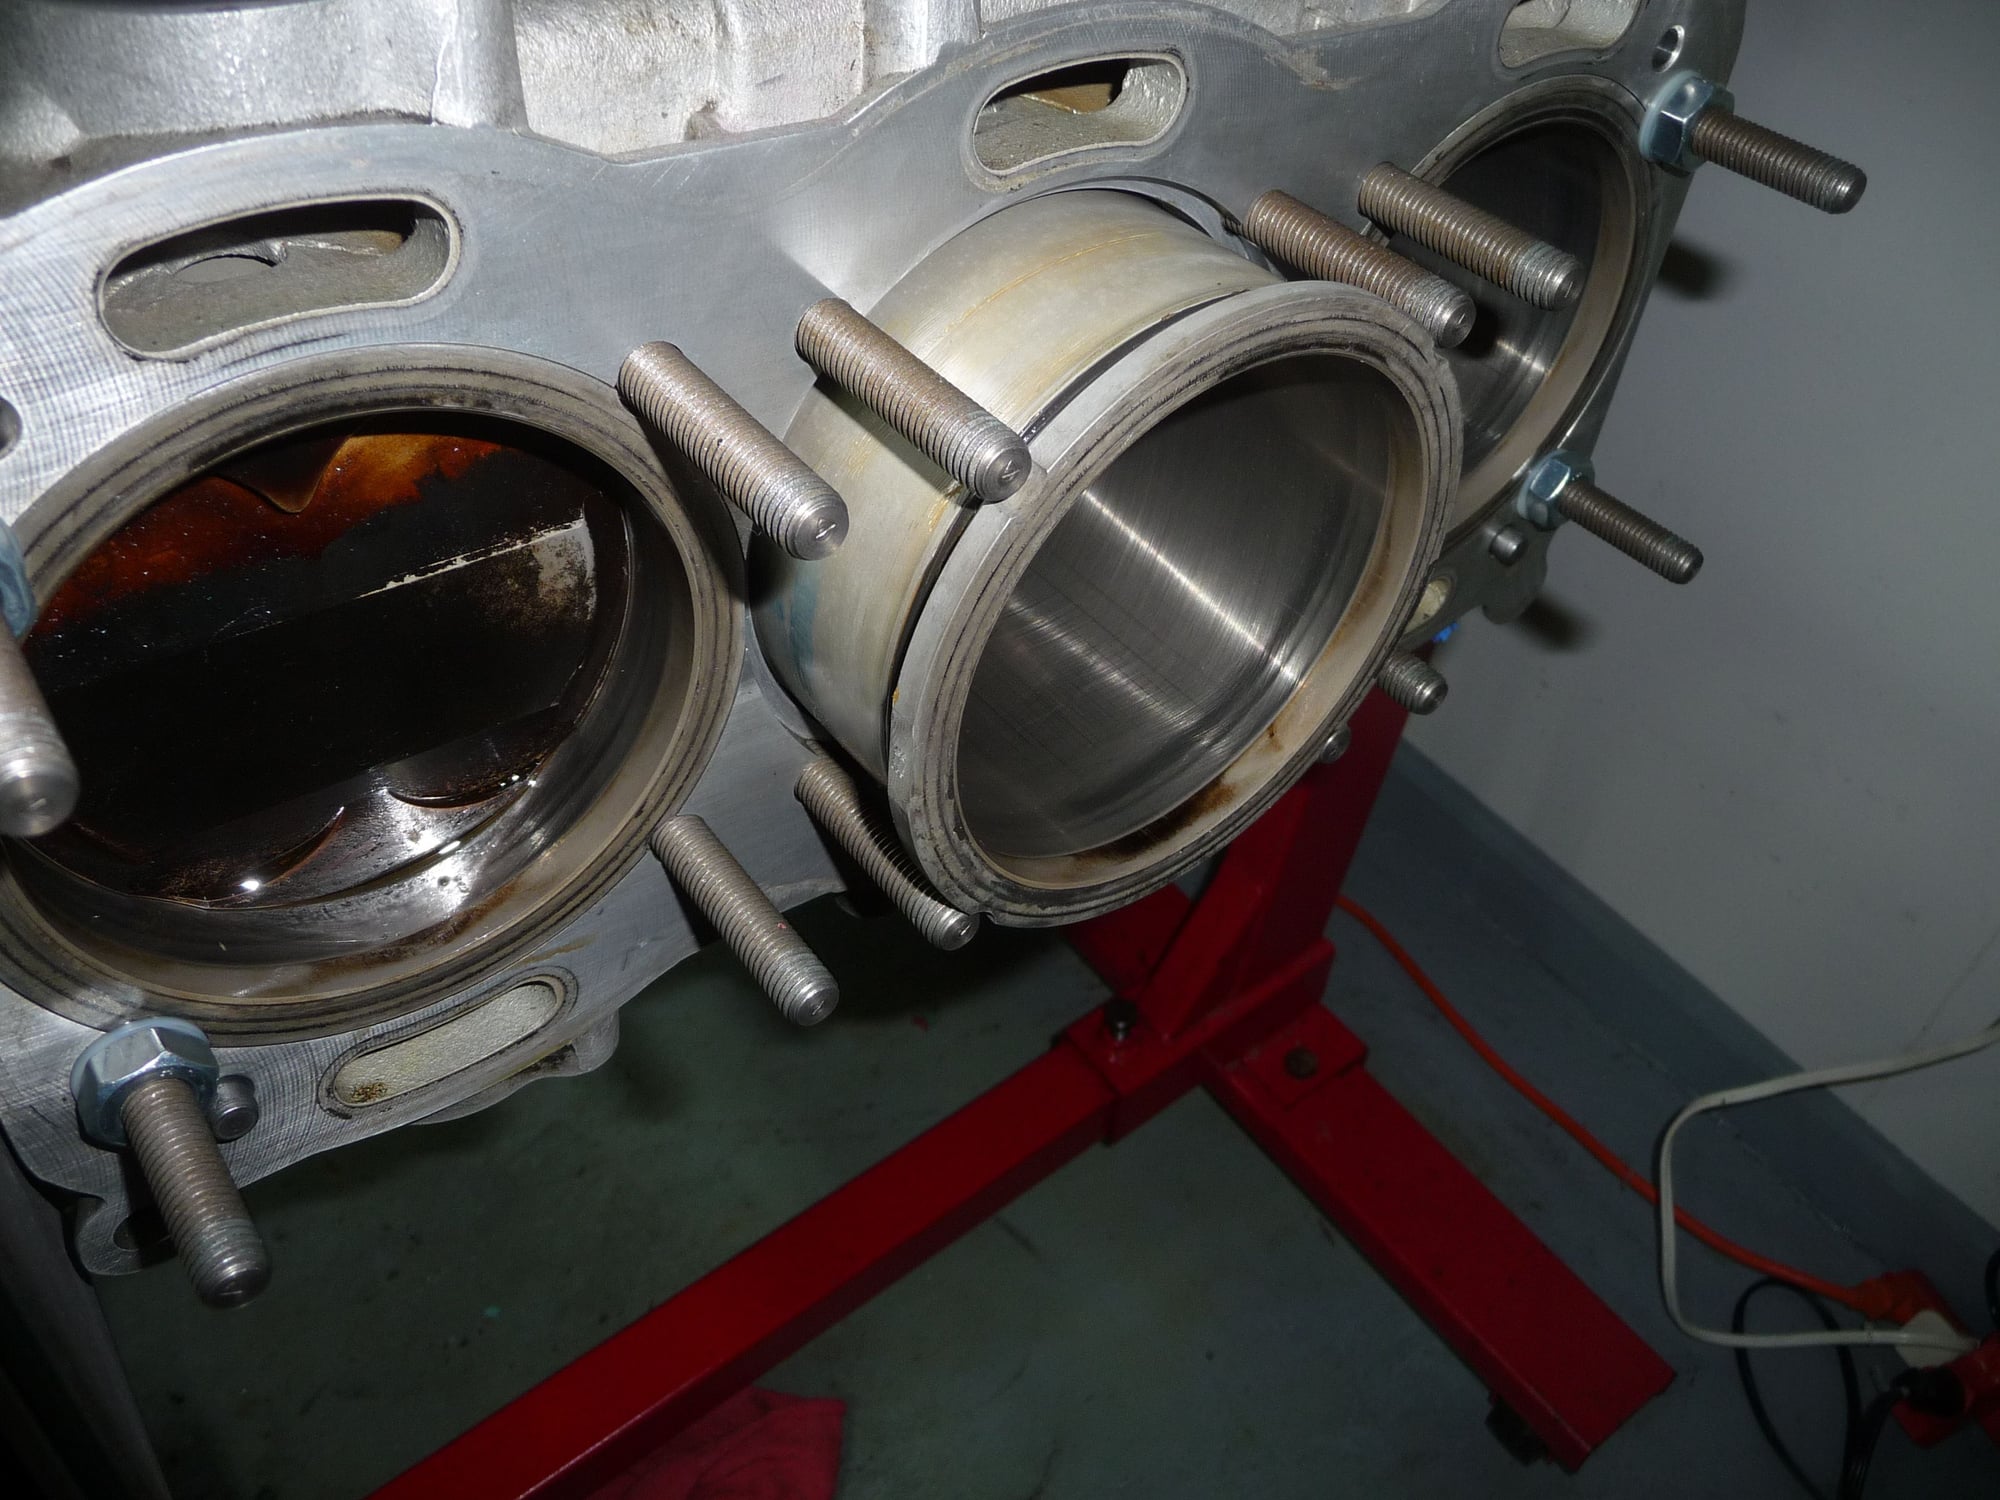
So I took the block down to this:
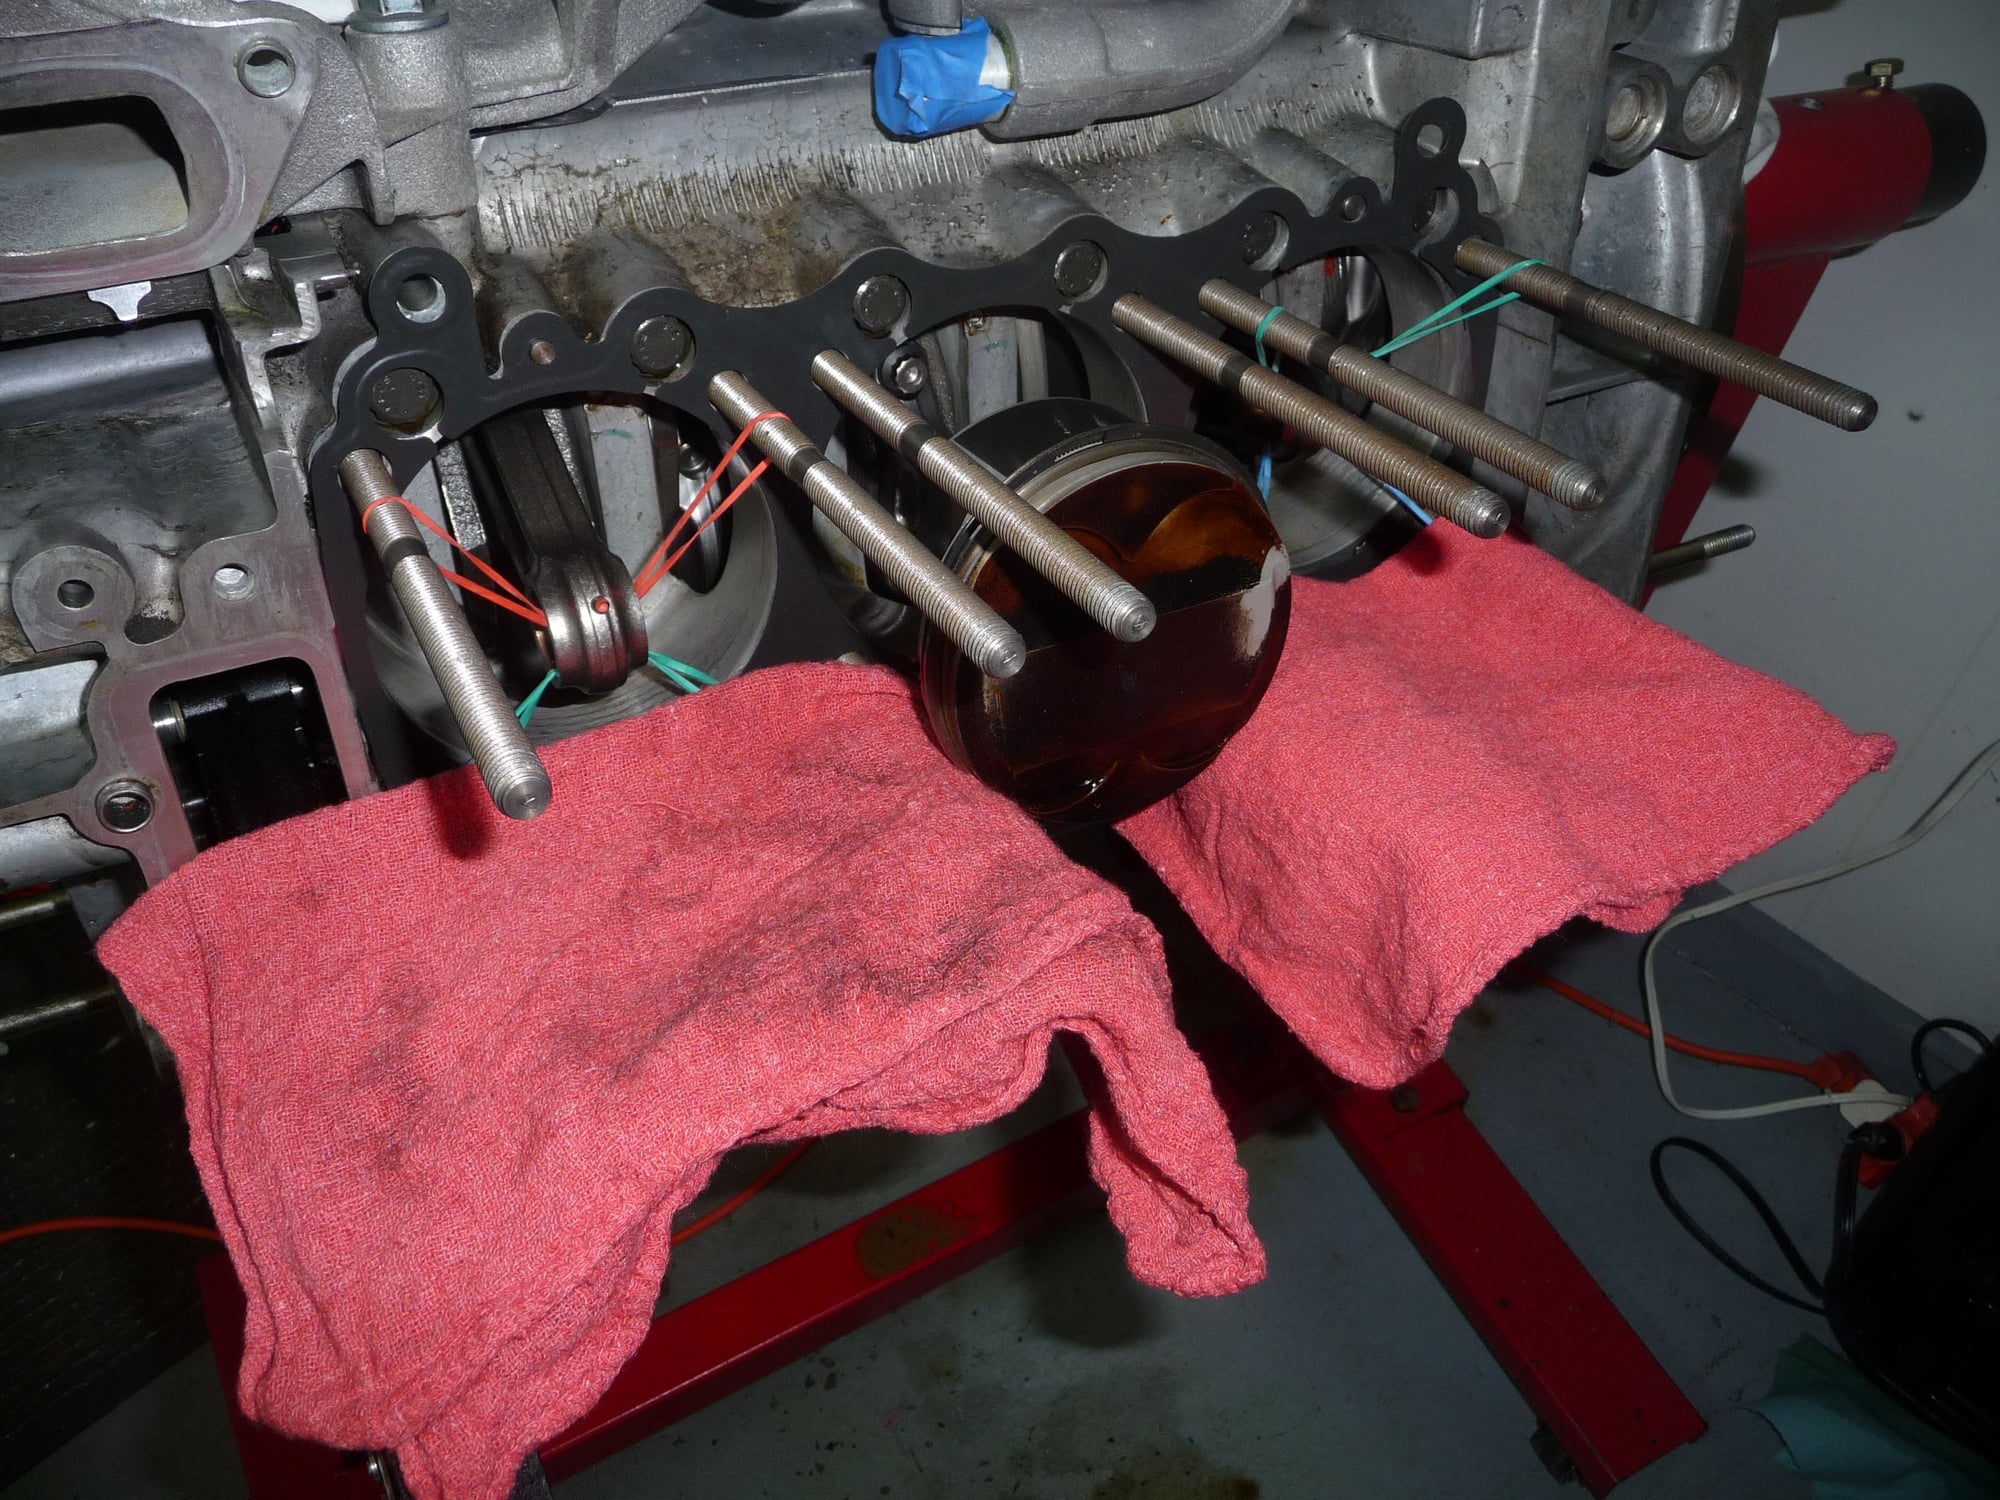
That's everything short of splitting the case. Per Neil's suggestion I also pulled the rods to look at the bearings. They definitely needed replacing:
As previously mentioned, I replaced these with the Porsche original bearings made by Glyco. Here's an old a new bearing:
You can see a triangle and a circle in these. That's actually a P for Porsche and G for Glyco. The Glyco-direct ones do not have the Porsche logo on them.
In order to pull the rods, I needed to remove the pistons which was pretty simple. I did loose one of the pesky wrist pin clips into the crankcase, but I heard it bounce around and was able to fish it out relatively easily. Replacing the pistons into the sleeves is pretty simple with a piston ring compressor. I used a generic one, aligned the three seal openings at 120 degrees from each other, pulled the compressor tight and placed it on the underside of the sleeves. Holding it down tightly and making sure that none of the rings can slip out between the compressor and sleeve, I gently tapped the piston with a rubber mallet. With the sleeves lined in some oil, they slide in quite easily. Here's are a couple of pics:
What I'm hung up on right now is the rod bolts. They're $55 from the dealer per bolt (!). It's part number 997 103 176 92, which superseded 997 103 176 91. Many parts systems will actually give you an incorrect part number of 997 103 115 01, which is the Carrera bolt. Thanks to Dan at SharkWerks for helping me confirm these part numbers.
The difference is that the GT3 bolt is an M10 x 47mm, whereas the Carrera is M10 x 55mm. ARP sells a kit for M10 x 45mm, which is what E36 & E46 engine runs. I'm therefore a little stuck. Options I'm exploring per various recommendations:
1) Run the old bolts
2) EBS sells a Wrightwood Racing bolt made by ARP for $38 apiece
3) Have a machine shop cut down 50mm bolts as long as I can ensure there's enough thread.
Not sure yet what to do and I have a few days to decide since my heads won't be back for a little bit.
Assume you have the GT3 PET? It's really clear on the part number. The Cup PET will list the motorsport parts.
Regarding valve guides I've heard that you replace them when you're in there. They wear rather quickly.
The bolt pic is super interesting. My bolts are actually the middle one that's the supposed Porsche Motorsports bolt. It's exactly that tapered shape. If the 997 rods are the same as my 996 rods (Pankl Titanium), then it sounds like using a 50mm bolt is no problem, which is what the other two seem to be. There's certainly no issue with the threads - they'll happily go 3mm further through the rod bottom. A call to BBI is on order...
Exhaust valve guides are being replaced for sure. Intake TBD and looks ok for now. Are you saying replace both while you're at it?
yeah I'm not an expert on this, I just enjoy watching Jared build these engines (they're my local shop and do quite a lot of rebuilds, big power builds, and massive turbo builds on the mezger engines for street and cup/race cars)...If you call BBI ask for Betim. I'm unsure if they sell these parts outside their own builds. Unsure on the valves. Sharkwerks had some commentary on this relative to their 3.9 builds.
In the 'this is likely to be a dumb question' category - with the con rod bearings looking worn, why would you not split the case and look at/freshen the mains?
In the 'this is likely to be a dumb question' category - with the con rod bearings looking worn, why would you not split the case and look at/freshen the mains?
Thanks
Ray
Not a dumb question at all. I've talked to a few very knowledgeable folks and this hasn't come up as something that is likely to be an issue. What's your take?
Thanks for all those part numbers... I've reached out Pankl to see if I can source the bolt from them.
There's also that Wrightwood Racing bolt made by ARP, but that turned into a dead end real quick. It's going to be Pankl-direct or the Porsche OEM part.
I guess I fall into the 'While I'm here camp' coupled with some goodly looking wear on the bearing might want me to just go for it... That said, this is a $$$lippery slope
WRT bolts - the cup car parts handle the RSR just fine, the TT parts are also quite good and will easily handle 700+hp - so maybe good-enough applies here...
Cup Car
P/N for Rod bolts (2005) 996.103.176.95 - Same for 997 Cup
P/N Bearing shell (2005) 996.103.121.94
Assembly Goop 999.917.726.00
RSR
Same as Cup Car
2007 RSR
P/N for rod bolts: 996.103.176.9B
Bearing shells are the same
Pet 7.3 P/N
Con Rod Bolt: 996.103.176.91 M96.76
996.103.176.93 M96.79
Bearing shell
996.103.121.81 M96.76
996.103.121.94 M96.79
HTH
Ray
Part 997.103.176.92 supersedes the 996.103.176.93 street bolts wherever I look. Some places still claim to sell the 996 bolt, but most point you to the 997 one and I'm not sure those selling it can actually source it. 997.103.176.92 seems to be the Porsche-recommended one to currently get for street applications.
Totally hear you on the $$$lippery slope. That's exactly my cause for concern and I'm already doing a bunch more stuff than anticipated like full head rebuilds and now another $500-600 just in bolts. TBD...
Yes, thanks for asking. I cleaned and installed a few of the top accessories that won't interfere with cylinder installs (oil cooler bracket, pulley bracket), but I did that mostly to stay productive while waiting and deciding on where/what parts to buy.
That's ending soon though. I'm getting my rebuilt heads back on Tuesday and should have the rod bolts this week as well. Then I've finally got everything to start putting the motor back together. Until I need to time the cams, I've got everything on hand.
I'll post some pics as I make progress on that stuff.
Ok, finally a big update. I got the heads back a few weeks ago, made a decision on the rod bolts and started putting things together again.
First off, rod bolts. OEM bolts are $1000+ for a set. They are a Pankl bolt, but Pankl can't sell it directly either (I tried) due to IP reasons. They are also strictly one-use. Instead, I sourced the Wrightwood Racing ones at ~$600 for the set and they are at least ok for two uses I'm told. It's a good product made by ARP, but unfortunately I had a rather lacking customer experience with Wrightwood. ECS tuning, who sold them to me, were great though.
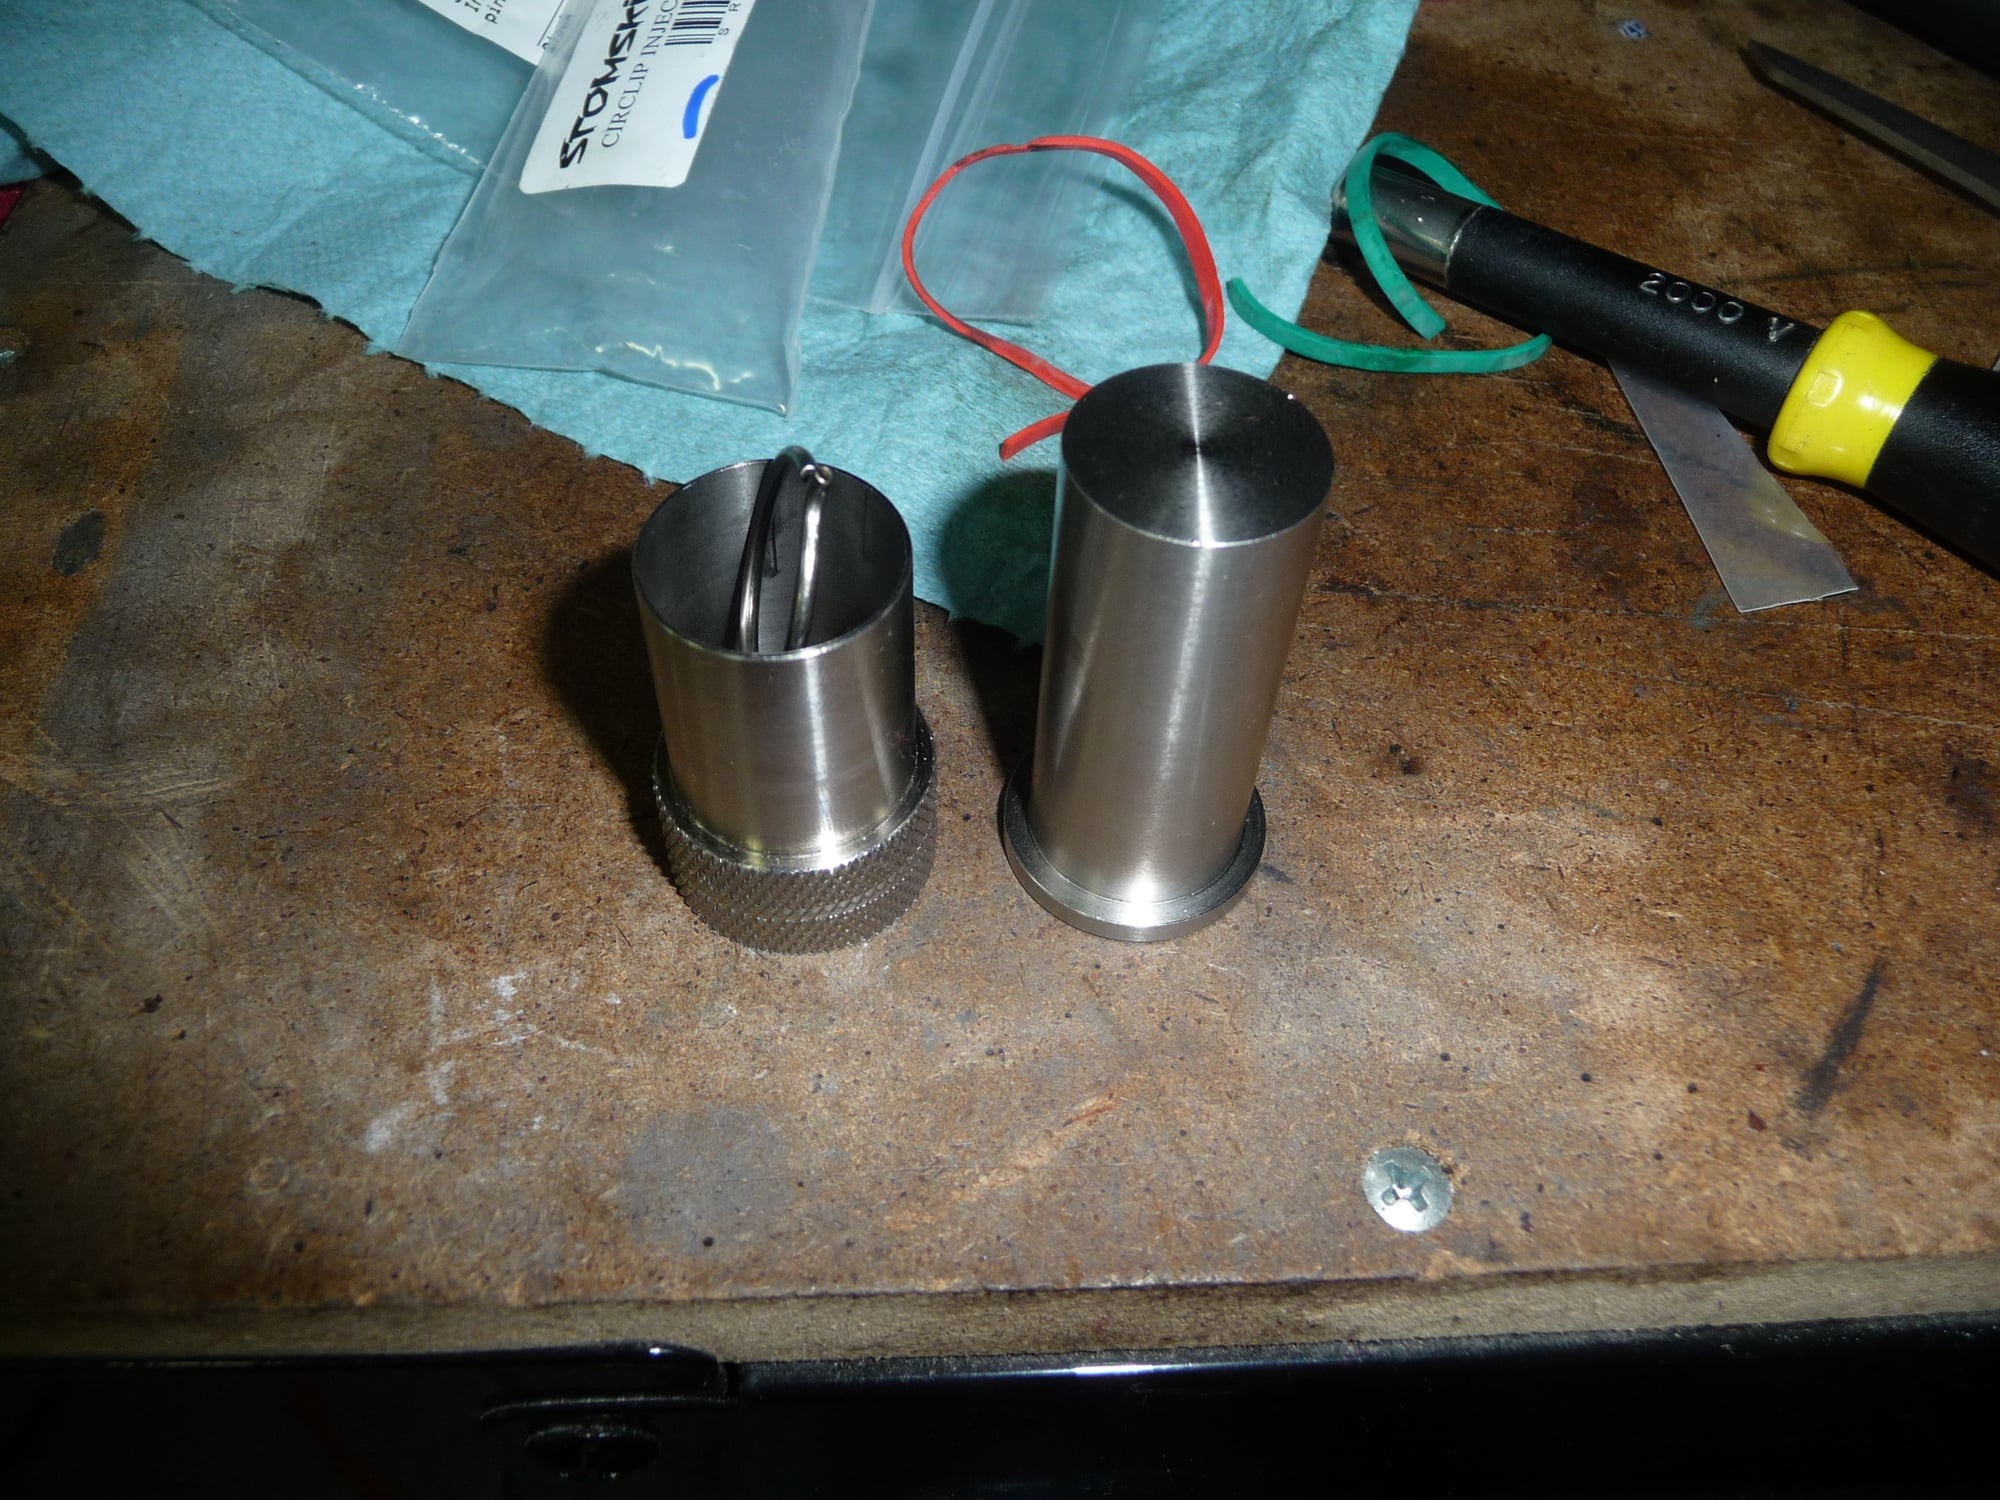
Install is a piece of cake. Apply supplied assembly lube and torque to 45 lbs. Here's a picture of the two - the black shorter one is the 47mm OEM one and the silver one is the longer 50mm ARP one:
(my workbench is much cleaner than the dog hairs in this picture imply )
I'm still confused as to why these bolts need to be this expensive. ARP has many bolts of similar quality available as sets in the $250 ballpark. Sales volume is the obvious reason, but still.
Next up was installing the pistons and sleeves. This is as tricky as documented! Here's the method I followed that avoided by the $700 Stomski tool to push the sleeves in:
1) Remove the middle cylinder sleeve (#2 or #5) from the jacket. I did this by putting some silicone spray where the rubber seals are, letting it rest and then gently using a mallet + wood to distribute even force across the bottom to slowly loosen the sleeve. The three o-rings need to be replace prior to re-install.
2) Using any piston ring compressor (I used a generic $10 one), install the two outer pistons on your bench. Use lots of oil. Once you have the pistons in, pull them out such that you don't pull any of the rings back out the sleeves, but that you can slide the wrist pin in and out like this:
You can leave one circlip in on each piston when you're remove the piston so that at this stage you only need to reinsert one circlip per piston.
3) Mount the middle piston on the rod. Notice the rubber bands to hold all the other rods in place. It's also good to put some padding on the crank case bolts so they don't mar the pistons or piston rings.
To mount the circlip, I considered many options including trying to put them in just with a notched screwdriver. In the end I decided to use the Stomski circlip install tool. It's essentially the same theory as the Porsche OEM tool, which I didn't even try to source. The 22mm Stomski tool is available from a few different places. Here's what it looks like with a circlip in it ready to install:
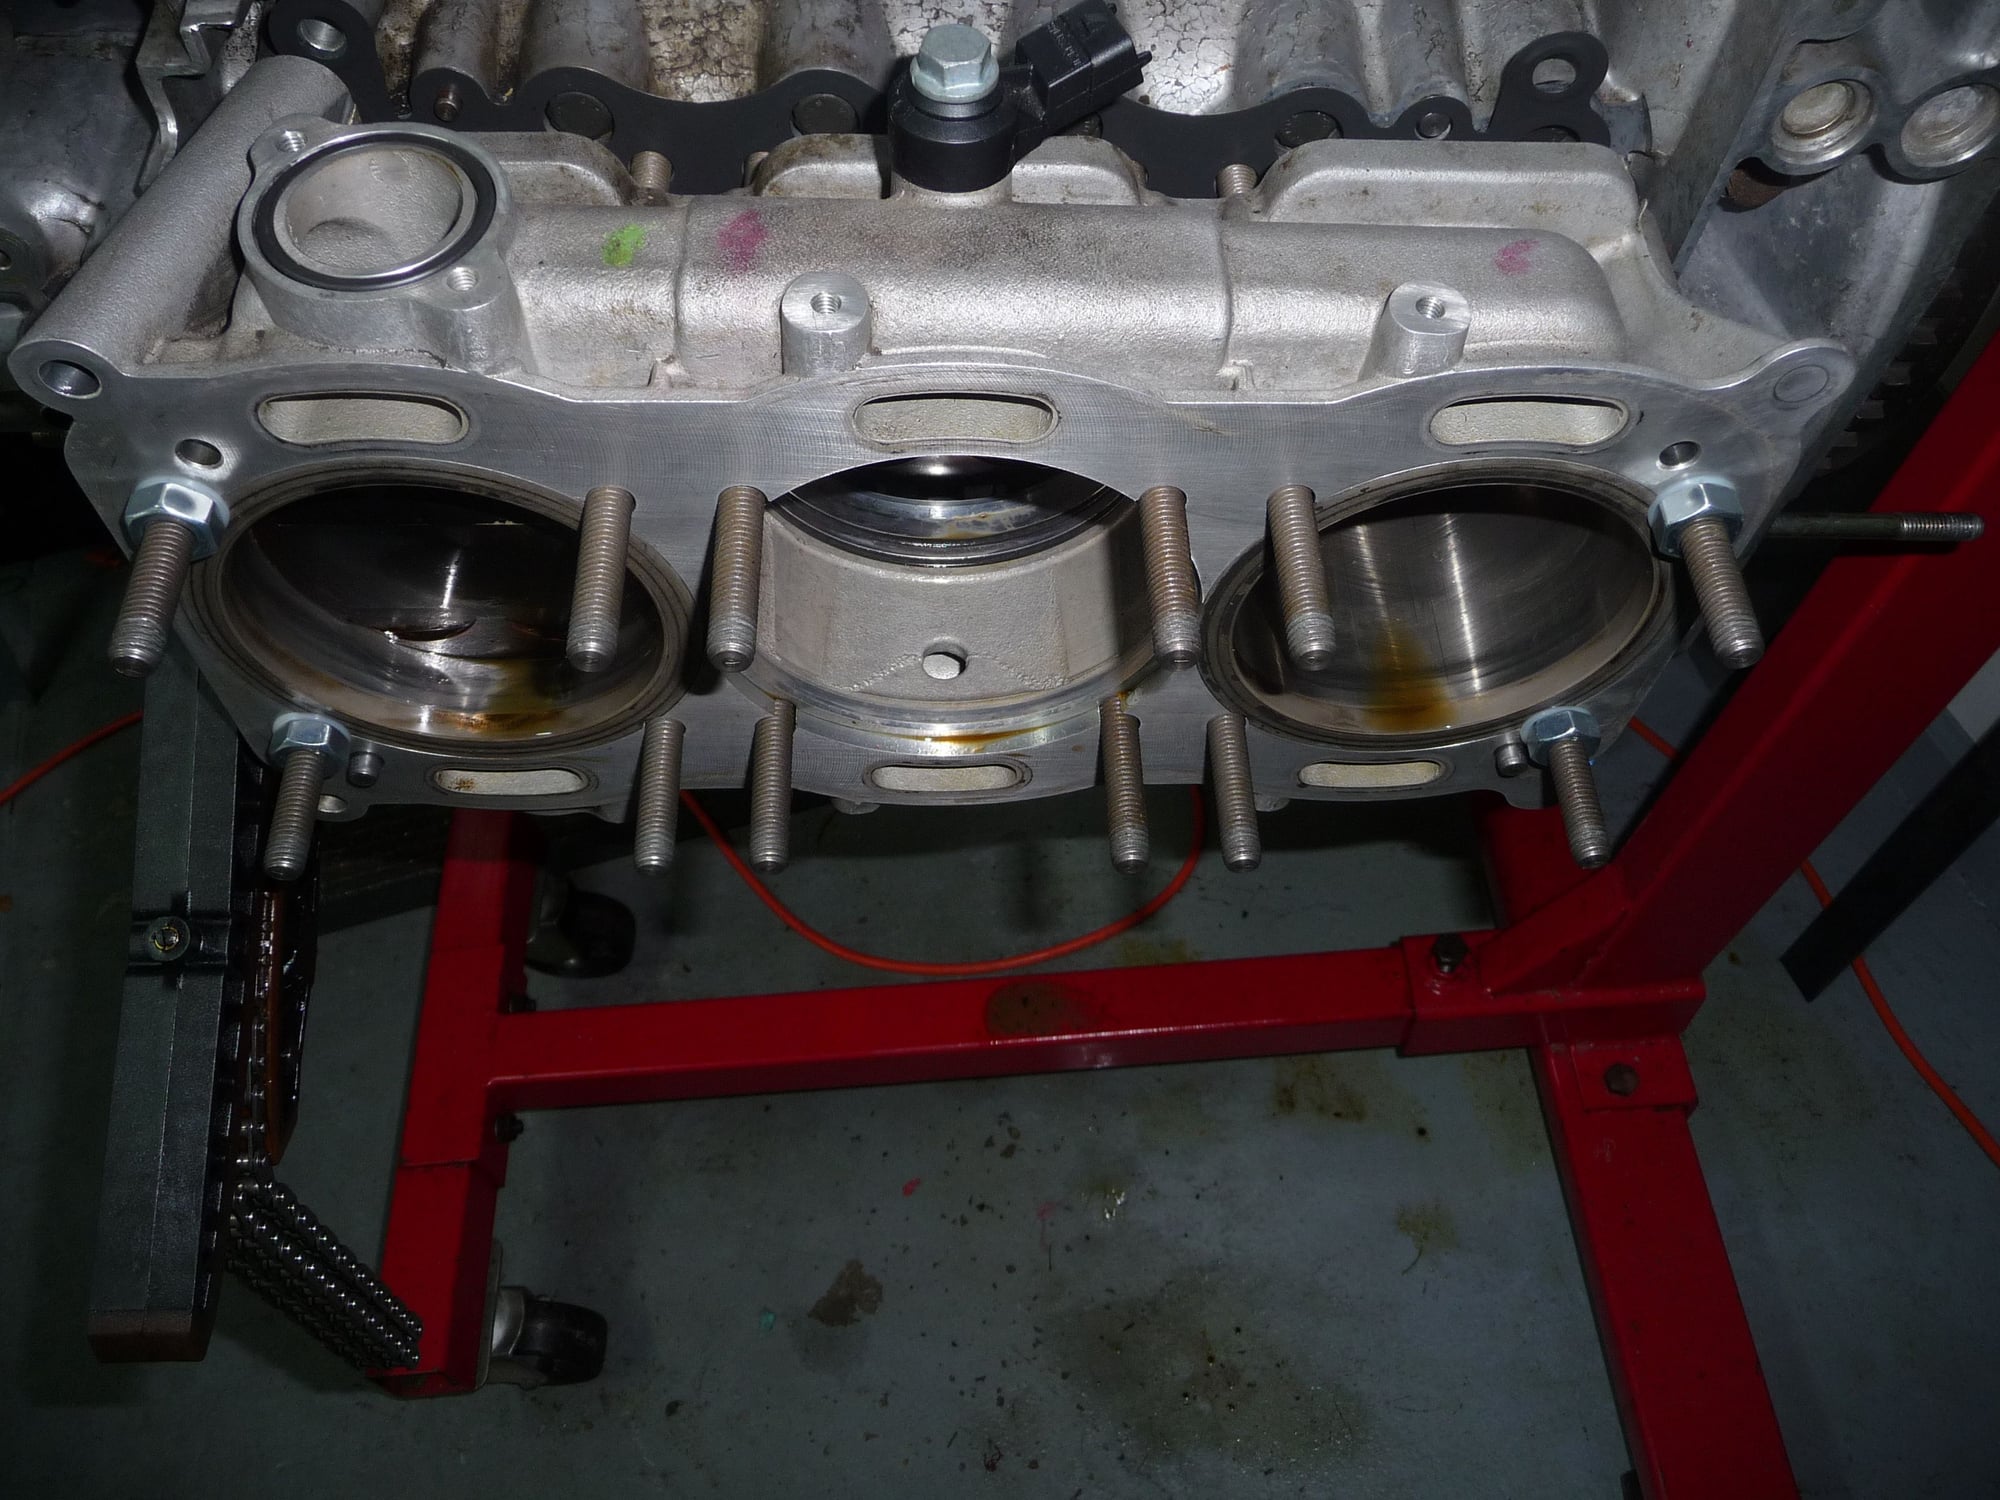
4) Put the new gasket on and slide the prepared jacket on. Turn the engine such that one of the outer cylinders is far out to give you room to work with. Slide wrist pin on and use circlip injector to install circlip.
5) Once you've done the first, turn the engine a little to get the piston a few mm further into the sleeve. Then, turn the engine in the other direction as you're pushing on the jacket to get the other outside rod to come out without pulling the piston out of the first one. Install wrist pin & circlip. You'll end up with this:
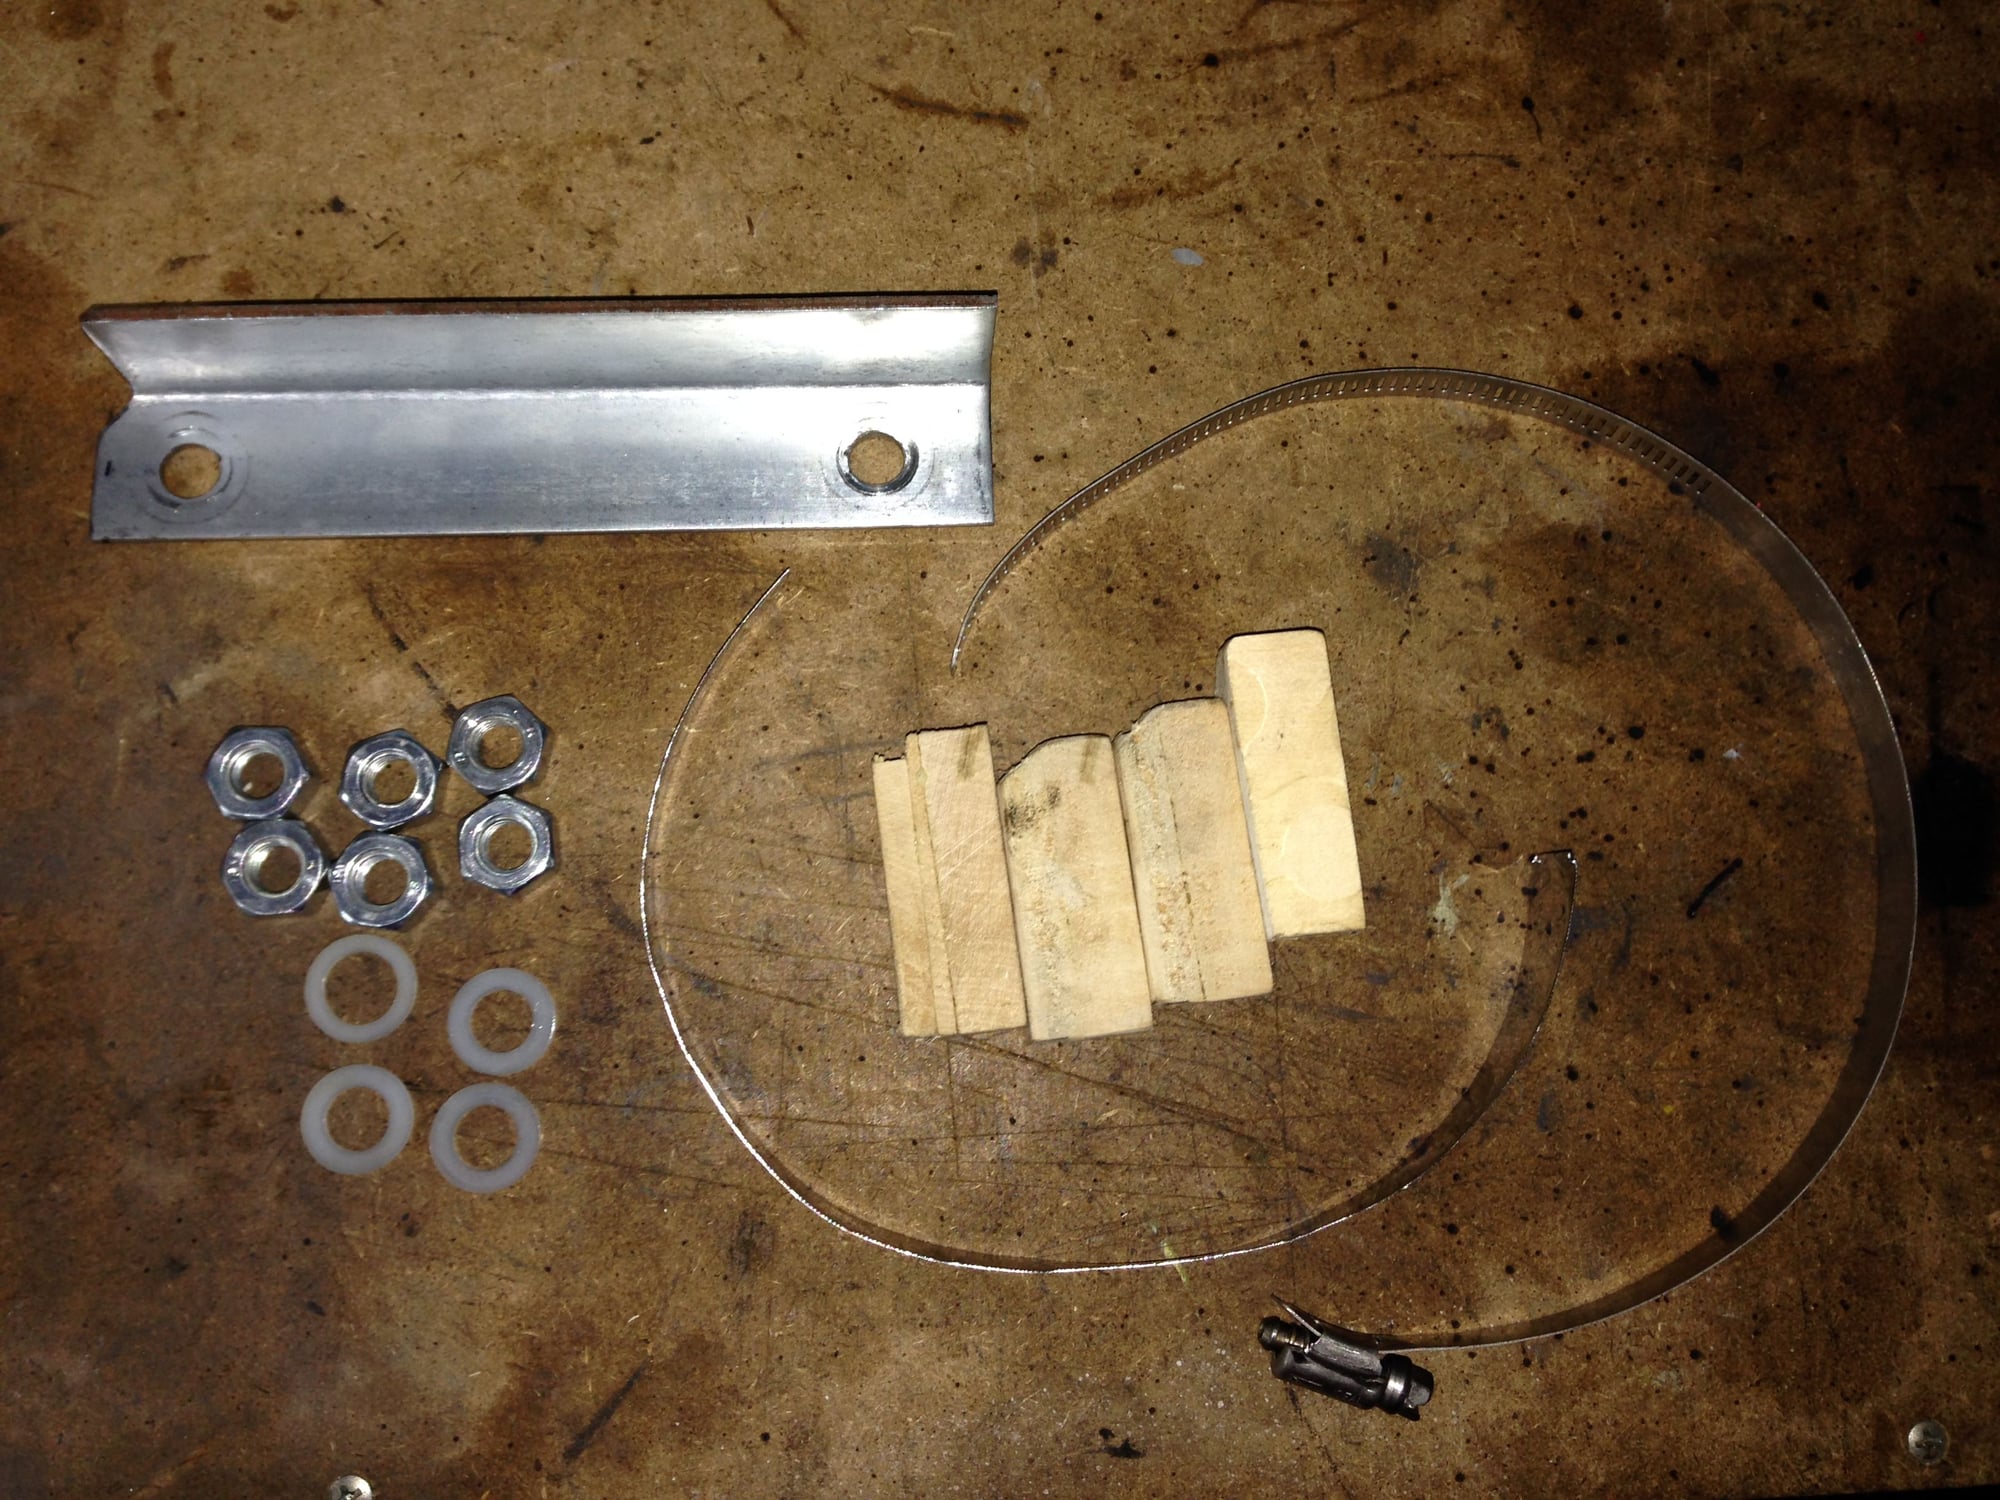
6) Make some tools. I'm using $15 of self-made stuff in lieu of a $700 tool. It's an awesome tool, but for someone who doesn't use it again, this method works too. Instead, here are my tools:
What you see is:
6x M10 nuts
4x nylon washers
1x 15 mm wide piece of flexible metal (I used stainless steel I had l lying around)
4x 22 mm wide basswood spacers
1x large hose clamp
1x very stiff brace for pressing pistons sleeves in
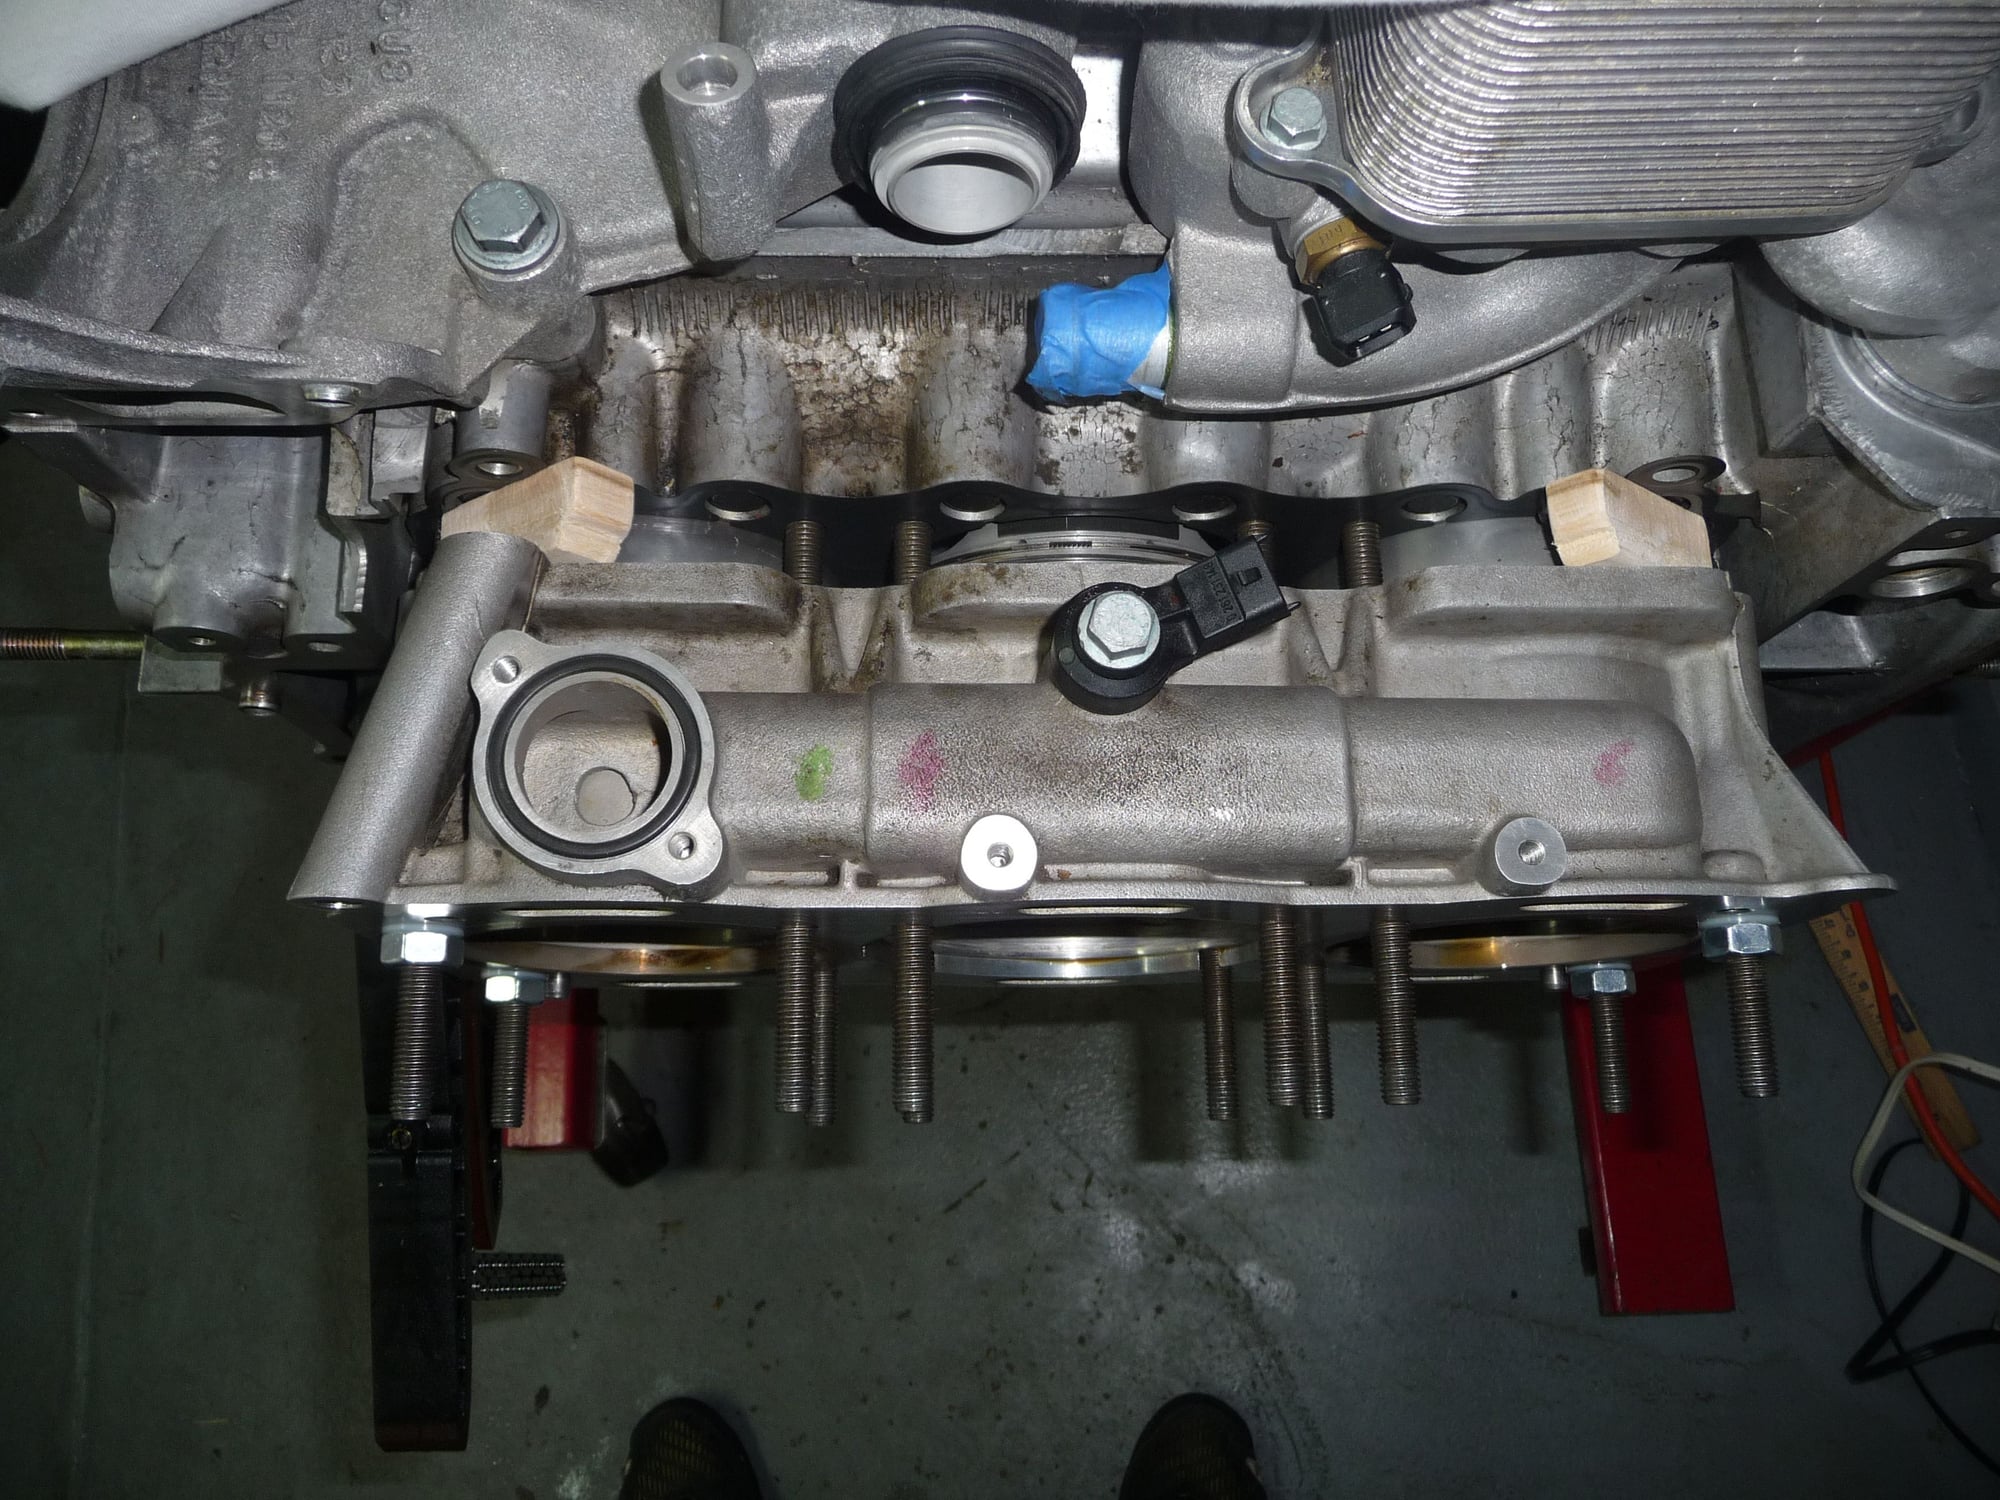
7) Using the washers and nuts, install the spacers like the picture below, thus leaving a 22 mm gap between the jacket and the block:
The reason for a 22 mm gap is that this gives you two important things. One, it allows you ample space to compress the piston rings on the middle piston and two, the outer sleeves are now far enough in the block to allow you to fully turn the engine without the piston rings pulling back out of the sleeve. This could obviously be very different from engine to engine even on GT3's or Turbo's, so measure it for yourself. I basically used a 1-2 mm margin of error at all times and came up with 22 mm being good a good compromise between space to work with and knowing that I won't pull a piston out of the sleeve.
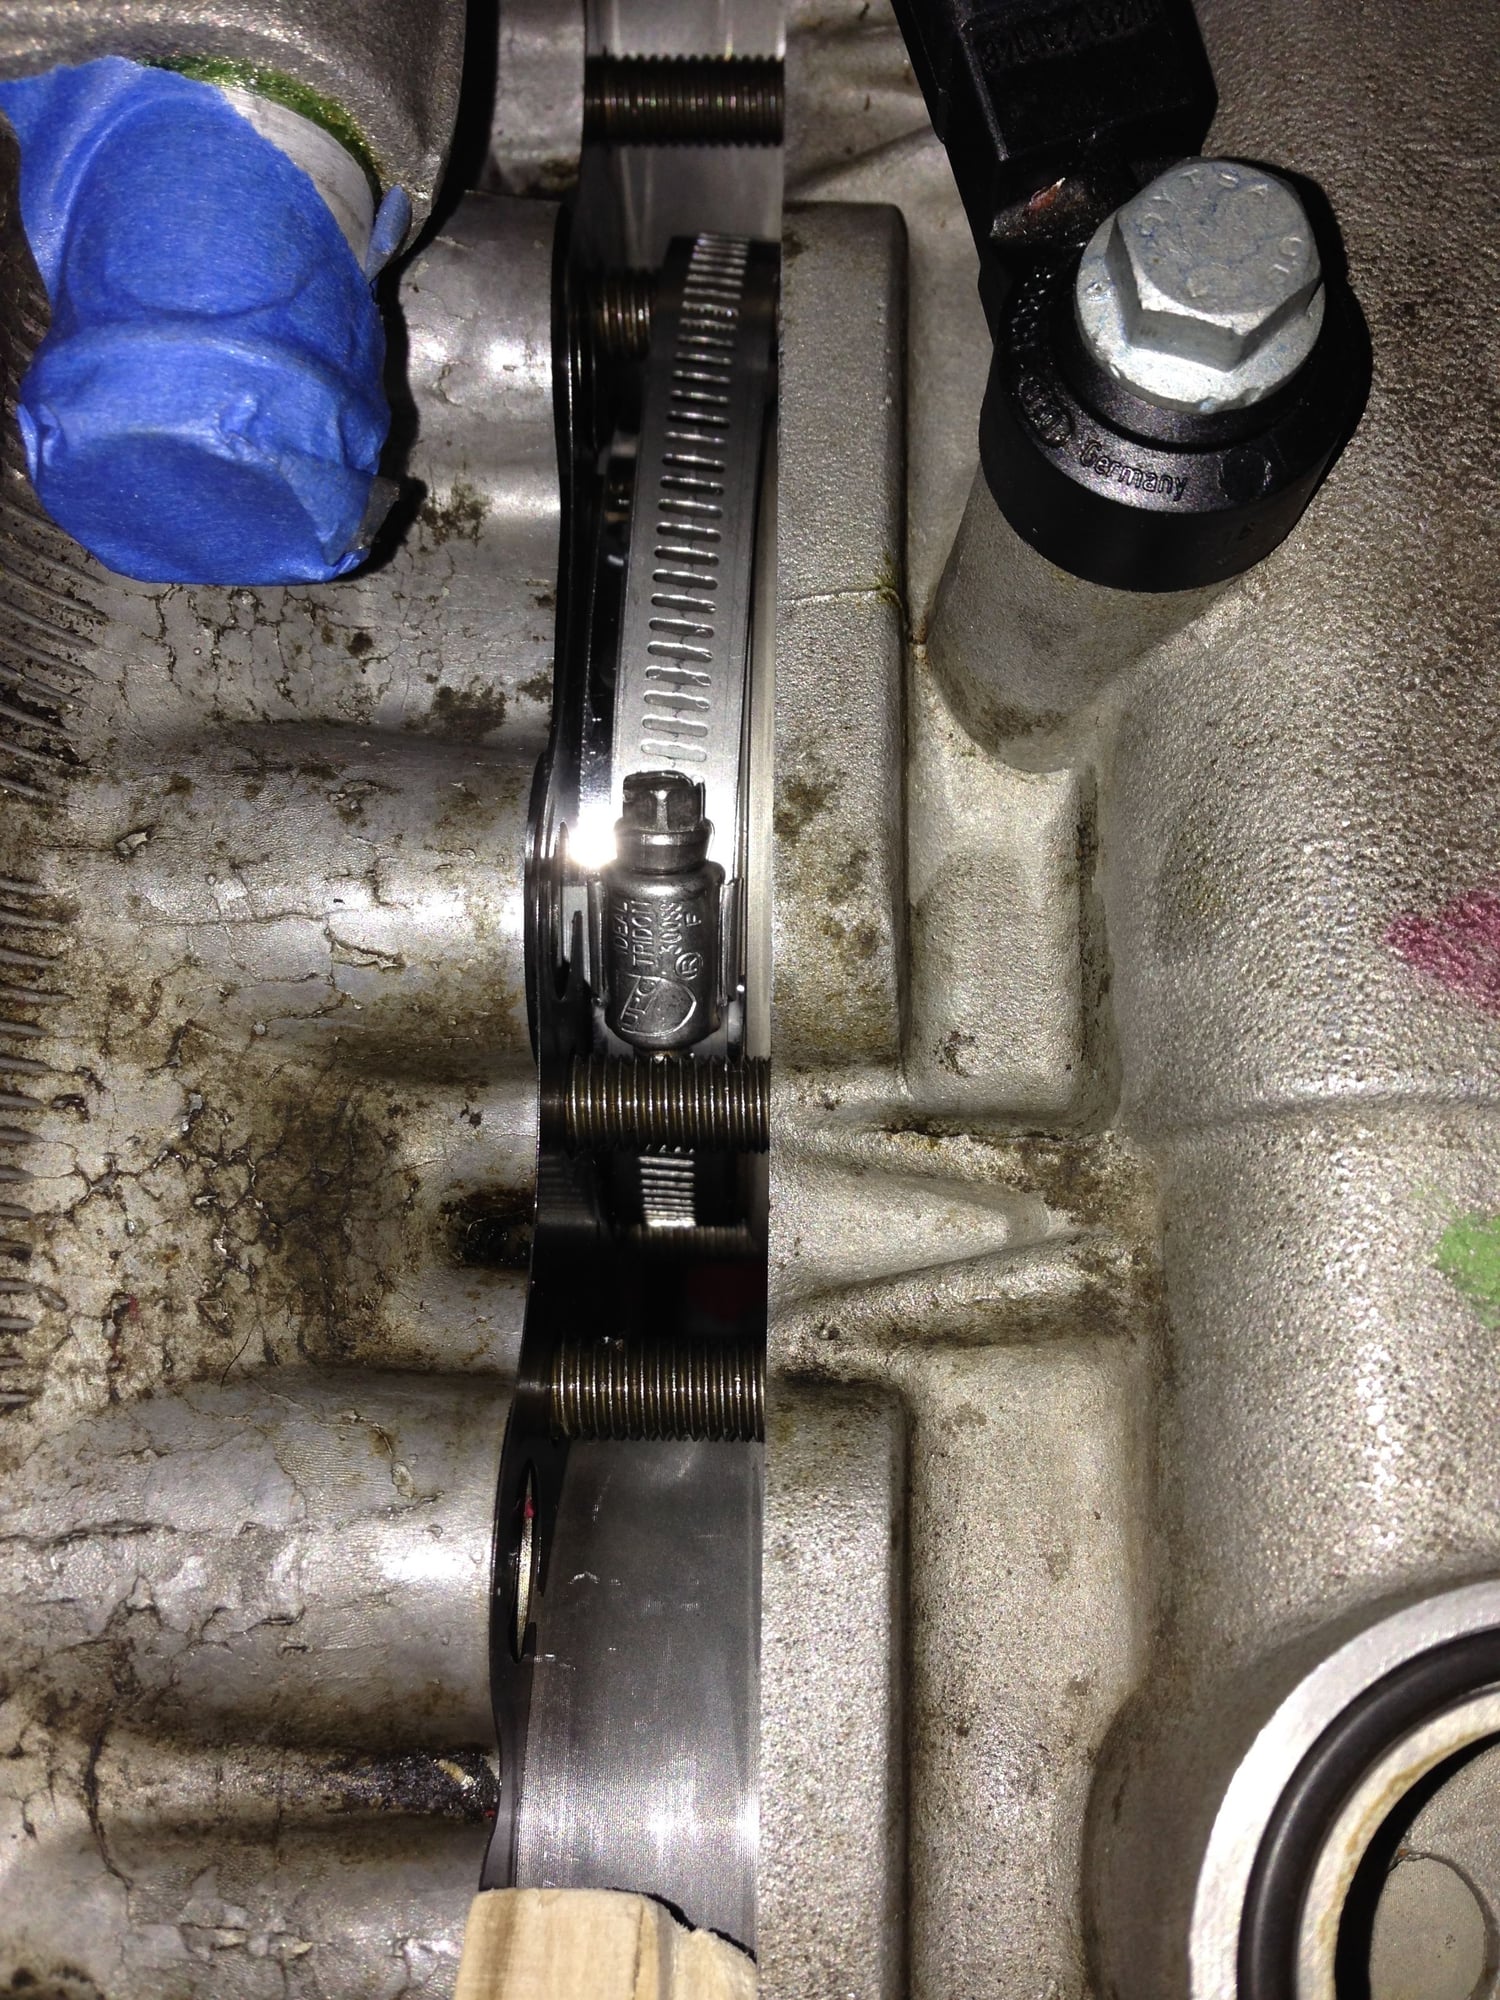
8) Using the 15 mm metal strip and the hose clamp, compress the rings. One trick on the strip I made is to very slightly put a small kink on it 3 times on the side where it hits the sleeve, like all piston ring compressors have. This prevents the metal strip from getting pushed into the sleeve potentially. You end up with this:
9) Replace the 3 seals for the sleeve and make sure the seals and jacket is lubricated properly. Slide the sleeve into the jacket, being careful to put the slightly beveled edges on the sides, not top or bottom (it's obvious).
10) Install the sleeve tool:
Notice the gasket leftovers on the sleeve here. It's easier to remove before you do this reinstall...
11) Once you start pushing the sleeve in, I was very careful with the speed and rate at which I turned the two nuts. I did less than 1/4 turn at a time to try to be as straight as possible.
This is kind of the crucial phase here, where you carefully need to guide this piston into the sleeve. My hose clamp was about 14 mm wide, so I had 4 mm of room on either side of it. It's hard to explain without seeing it, but the bore of the block and jacket allow you to move the metal strip that's holding the rings down into them. So that means you can get the piston 4 mm into the block or jacket.
That's really helpful because as you install, it's easiest to have a bit of a back and forth of pushing the sleeve onto the piston and then letting the piston (by turning the engine) push the jacket back out a little. Be very very very careful to never ever let any gap occur between the sleeve and ring compressor though. You cannot let the rings put out ever or you'll likely damage them.
12) Once the piston rings are fully in the sleeve, remove the metal strip and hose clamp. Then fully screw in the sleeve, again being careful to put equal force both sides. With proper lube, this actually goes on really easily.
From there, the install of the heads is a piece of cake. This was definitely the hardest step of all so far.
Pretty sure those rod bolts are torque to stretch - ARP gives torque values, but suggest that as a last resort...
Keep the info / pictures coming. When done - could you please share the part numbers...
Ray
Interesting. I was just told 45 ft-lbs and that's it. How do you mean "last resort"?
Part number on the bolt is... I don't know. I just asked for the Wrightwood Racing GT3 rod bolts and whoever I called in the Porsche world knew what I was talking about.
 10-15-2014, 01:42 AM


 )
)