When you click on links to various merchants on this site and make a purchase, this can result in this site earning a commission. Affiliate programs and affiliations include, but are not limited to, the eBay Partner Network.
My Eureka moment with water drains in our 996 cabs
For 2 months now I have been breaking out in cold sweats about rain here in S. Florida. Why? Because no matter how much I search I could not understand where the rear drains where on my 1999 C2 cab., and how to clear them. Every time I parked it and went into a store or something I panicked that a down pour would flood my electrics or insulation.
So let me share my discovery:
First it should be clear how to find the drain outlets in the rear wheel wells. It is well documented in threads. Briefly. Remove tire, remove front well shroud by removing the three plastic screw thingys. And there is your outlet. If your lucky the thin rubber shield will still be there. Pull it off and clear any dirt or debris. Easy part.
Now, where is the drain "hole" inlet. I say hole because I will now correct that. It is not a hole. repeat, Not a Hole. This is where I believe most of the confusion is.
So where is it, let's call it an inlet. Open your top all the way. Then begin to close it and stop it when the clam shell is open and stop it there. You will now be able to see down into where all the top mechanisms are. About 10 inches from where the glass of the rear window would be if it were open down in the now exposed area is nothing that resembles a hole or rubber grommet or anything close to what looks like something purposed for water to drain down into. You will see however, some black molded plastic, again, that looks nothing like a drain opening. Only what I would call crevices. Believe it or not one is the inlet. They may all be inlets that flow together. But trust me that is where the water flows into.
What I did was take a funnel and insert the nozzle down into them and pour a tiny bit of water. Sure enough the water poured out the wheel well outlet. EUREKA. So there you are. I then poured loads of hot water to flush anything out. Again guys, not a hole. And what is the inlet, is nothing that common sense would lead you to think it was.
If anyone is still confused I would be glad to take pictures and describe it further.
What's even more puzzling, is I have seen where people say to remove the rear speaker and you will see the drains. Well, I did this and nothing even close to what resembles any drains are seen. Except!! There is a corrugated black plastic hose that comes out from what would seem to be the wheel well area. Problem is, at least on mine, it comes out but just stops and the end is just flopping around and not connected to anything. At first I thought, Oh boy, this must connect up to the area where the actual drain inlet is. I thought maybe it had disconnected or broken and fallen down. But after looking at it, it is impossible for it to go up anywhere. I was tempted to shoot water down it, but thought better thinking it might be a factory electrical tube for wiring, so I didn't. I could also take a few photos of this "tube to nowhere" tomorrow and maybe someone knows what it is or what it's for. I believe it has nothing to do with drainage. Some said there is a dip pan or collection area. I saw nothing of the sort. In fact, there is too much wiring in that area, that I can't imagine Porsche putting drainage devices in that area.
As far as the front drains, I have located the holes by the battery. As far as I know these are the only drains up there. If I'm wrong please educate me.
At this point I'm calling my car sorted as far as the drains go. Now just need to check them yearly.
Removing the rear speaker will reveal a "pan" of sorts. It's more of a plastic chute on top of the rear wheel well housing. This is where the water is directed from the clamshell "crevice" drains, and down into the the drain exit at the lower part of the wheel well.
Try this: Open the clamshell partway. Remove a rear speaker and sit in the back seat with a flashlight. Have a friend use a funnel to pour a bit of water into the clamshell drain crevices. Watch where the water flows inside the speaker hole. Better yet, take a video and post it here!
O...mg... I think I've now seen/heard it all Did you run around whooping and hollering when you figured out what your "special purpose" was for too ? Wow...
Hey! Leave Him alone! Did you know he is in the phone book too!!
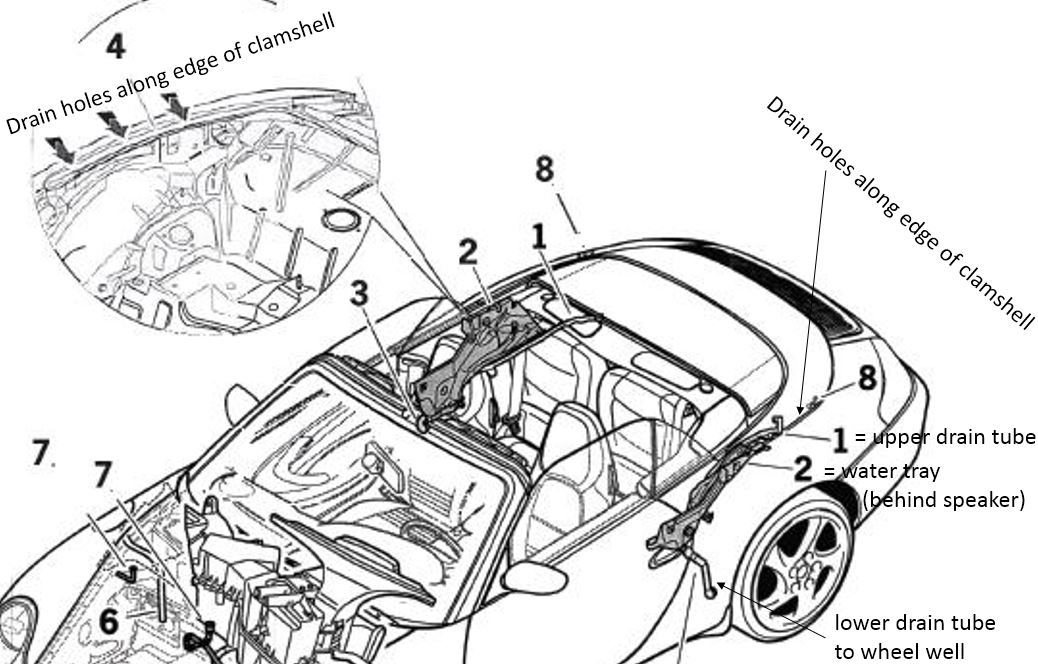
A. Rain water enters the "groove" around the edge of the clamshell lid.
B. It flows into drain holes or "slots" at the front edges of the grooves
C. An upper drain tube (1) collects the water and dumps it into a plastic water collection tray (2) on each side, located behind the speakers. This is an open tray with a channel to direct the water down to the lower tube. It's like a water slide. (Note: This is a bizarre design.)
D. The water collection tray has a hole at the bottom. The lower tube (3) connects here and directs the water to the wheel well, and onto the ground.
(Note that if the lower tube clogs, water would back up into the water collection tray, and then overflow behind the interior rear passenger panel, and onto the rear floor.)
This system can clog at any point. When cleaning, I recommend blowing out both the upper and lower tube with compressed air or vacuum, which requires removing the rear wheel well liner, as well as the interior rear speaker.
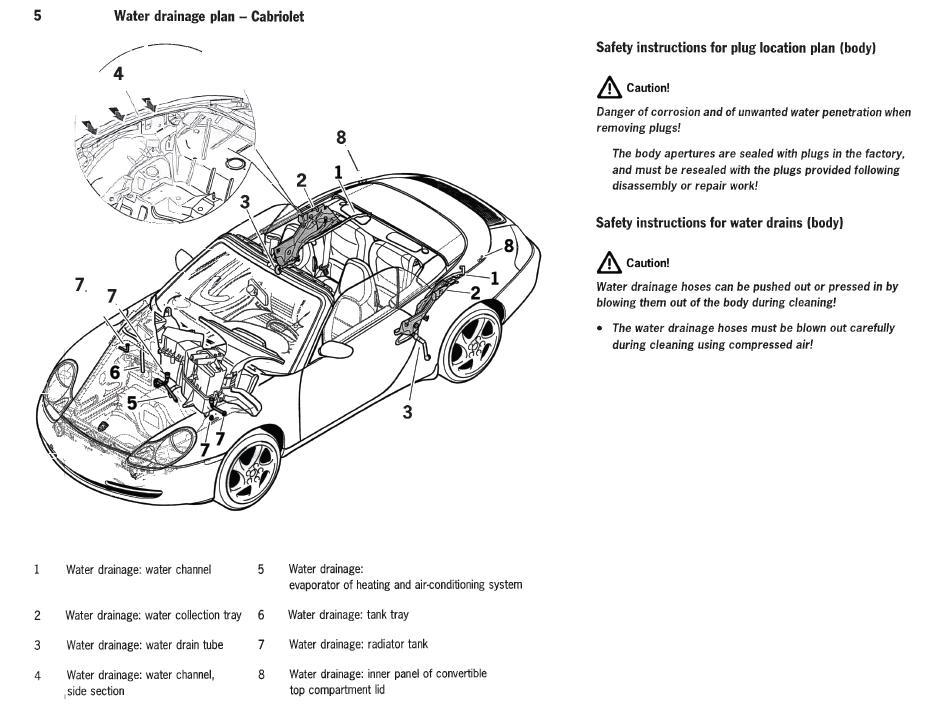
HERE are the locations of the four drain holes in the frunk.
There is a Porsche TSB regarding these, You definitely want to execute the TSB or risk flooding the interior cabin and destroying your electronics under the seats - ask me how I know.
In the photo marked A & B you are looking at the top that was put all the way down then raised so the clam shell is the only thing up. Make sure you stop it in the position where the 2 large retractable wings on either side are still in the vertical position, otherwise your view will be blocked somewhat. The photo is looking down where the canvas top would meet the quarter panel just behind where the rear window meets.
The arrow marker A is the actual channel where the water flows into as in drains off the canvas top. Again it is not a round hole, but slot a slot or channel. If you shine a flashlight down you will see what appears to be like a water slide where the water goes down into the drain pan. I will point out the drain pan in the next photo marked C & D. Ignore arrow B for the time being.
The photo marked C & D is the rear side speaker removed. D is pointing to the drain pan which has a hole in the bottom which drain out the outlet in the rear wheel well. This hole in the bottom of the pan you want to make sure is clear of any debris. Also check the waterfall from arrow A and make sure nothing is obstructing it and clear of surface dirt or debris.
Now...arrow B is pointing to the long rectangular openings that are actually cut in the metal of the quarter panel. There are 3 of them, the one you see, and 2 others as you follow the panel towards the rear of the car. These are simply additional drain slots that do not drain into the drain slots that allow water to go down the waterfall into the drain pan. They simply allow water to drain directly into the wheel well randomly, no tubes or waterfall channels attached. You will want these to be clear of debris. Most of the water from rain will be collected by the A arrow channel since it collects the rain that cascades down the canvas top. The B arrow slots simple catch whatever little direct rain collects in the outer quarter panel groove.
Arrow D points to a tube that attaches to a nipple on the inside of the quarter panel and emptying in to the collection pan. Arrow D shows the tube properly seated in the clip which holds it so it flows into the same collection pan that collects the water from the top channel inlet down the waterfall. Make sure it is clipped into the clip. Arrow C shows the tube which has slipped out of the clip and not directing it into the collection pan. This is not good since water will now come out of it and go places you don't want it to.
I do not know where the inlet is for the tube, but it is clearly part of the drainage system since it clips into the collection pan. I am going to replace these corrugated plastic tubes with rubber tubes so they won't break. As you can see the tube is barely long enough to fit into the clip. This is because it has broken off and become shorter than it should be. When I do this I am going to do a smoke test on it with a cigarette using a elongated rubber hose to see where the inlet is for this drain tube. Smoke should cone out where the inlet is.
This is the basic design of the rear drains.
It goes without saying to do both sides.
Hope this is clear. Once you get the top positioned correctly with the retracting wing out of the way, it is quite self explanatory.
Here is a better photo using a flash of the speaker removed showing the tube D, collection pan E and an addition arrow F indicating the waterfall (water flows in direction of arrow) channel from the top (arrow A in the other photo) inlet slot.
The drain hole leading to the wheel well outlet is right about where the clip is on the bottom of the collection pan. That is the hole that needs to be cleared and is the culprit for water the entering cabin. If it's blocked and the pan over flows it goes right down to the interior carpeting. This hole was block on both sides of my car with rubber chunks and grime. Expensive water damage waiting to happen.
Oooo a little sensitive are we Naven? More pictures please? I still haven't quite gotten it...Oh and btw, I'm pretty sure this stuff is covered in your owners manual

 02-02-2016, 03:15 AM


")
