When you click on links to various merchants on this site and make a purchase, this can result in this site earning a commission. Affiliate programs and affiliations include, but are not limited to, the eBay Partner Network.
So as promised long ago I would post a DIY thread about this option
OBJECTIVE: install facelift cupholders to a 1998 Carrera
TIME REQUIRED: 1-2 hours in a peaceful no-rush pace.
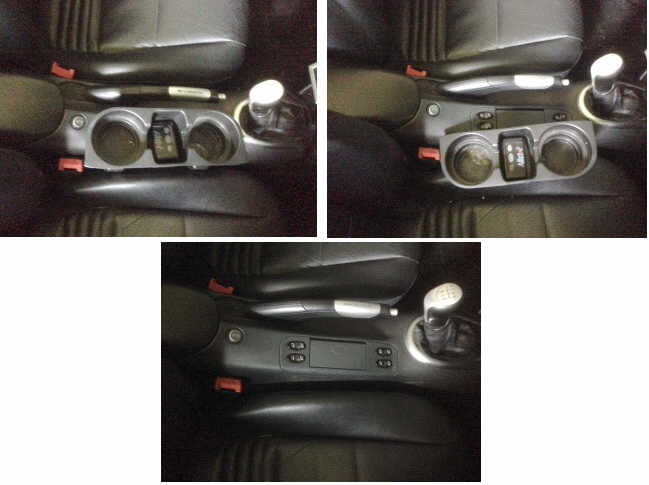
PARTS NEEDED: first of all, it is not enough with only the vents and the cupholders themselves, of course a handy man can customize the old trim panel but I assume it is not worth spending time so you NEED all 4 bits in the picture
TOOLS REQUIRED
* T20 torx head screWdriver
* Flathead screwdriver
* Soft glove or piece of cloth
* Saw/grinder
* Small pliers
I assume that the process described can be applied to any 996 and presumably Boxter as well, I know there is the option of audi/vw style oem cupholders for MK1 996, but I hate the look of those and in my case I would have to lose the oem Satnav (which is more or less useless today but I do like the look of it)
so lets begin:
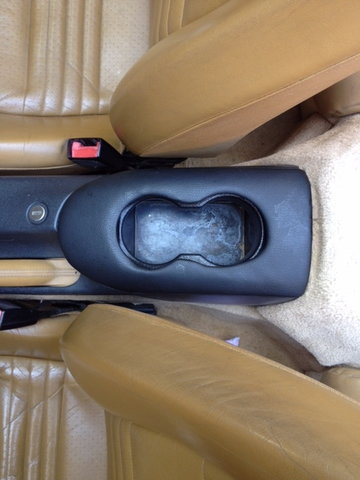
the ''before" picture
step one using a flathead screwdriver pry of the trim surrounding radio/satnav (no tricks comes easily off)
[imghttp://content31-foto.inbox.lv/albums/r/riddler777/DIY-stuff/DSC05796.sized.jpg?1428158961[/img]
same on the other side
trim removed
next: you need to disconect switches, use the same flathead screwdriver, the connectors sit rather tightly, so be gentle
after the connectors are disconnected and trims removed this is what you should see
the radio frame attaches to the dash with 4 torx screws
you need to undo those, this is where the torx T20 screwdriver comes in handy
TIP just before removing the radio/satnav put the glove on the gear selector/shifter, it is necessary for protecting the shifter against scratching, as the underside of the radio/satnav has sharp edges and is relatively heavy, and will sit on the lever while you are disconnecting the wires
IMPORTANT NOTE find your radio security code if you have it, once the radio/satnav is removed it will request it when you put it later back in.
the radio comes out with a little force pull it slowly towards you, no tricks behind this, but it can be seated rather tightly
disconnect the connectors. radio connectors sit very strongly in place.
the radio removed with frame
remove the radio satnav from the surrounding frame: press the fixing points on both sides of the radio
once that is done, you have to remove the metal frame, that will have to be refitted to the "new" frame
it comes of very simply, just pry off the small metal strips and it slides out
frame removed
install the frame in the new plastic frame, this is a bit tricky, since the opening on the new one is a bit wider some 8-10mm so you have to be a bit more creative with those metal strips and the small pliers
next - slide the frame over the radio unit
make sure it seats correctly and the spring fixings click into place
now it should look like this
install the cupholders by simply sliding them into the frame
make sure that also seats in correctly and the springs click in place
next step before installation is to remove the metal frame that is seated in/behind the dash
it is seated with 2 t20 torx screws
you won't need this anymore
next step is where the saw/grinder comes into action
notice that the vent on the right is longer, the heater in prefacelift cars has the vent channel of different shape in comparison to the facelift heater, so as this is buried deep inside the dash and is rather hard to access, I trimmed the new vents according to the shape of the old ones
wont show how mine were trimmed since that end is invisible anyway
TIP in order to avoid any rattles and sqeaks, I suggest to put a self attaching wool or dense cloth pads in the rails of the air vents as they install rather freely
last step remove the switches your car had originally and install those in the new trim and install the new trim in place, that simply pushes in place until it clicks
begining to think that if someone has a dead PCM1 screen from a car with these cupholders I could purchase that, just for the front cover and buttons, not that this one bothers me but since the buttons are bit worn and to replace those I would have to disassemle the PCM anyway
I respect it but your beverage will be up high for all (the law) to see. Could be a little fragile with that plastic hanging and extended. I've posted this before and it works great. A hole saw, the insert from Pelican and some professional upholstery and you're done. Glued it in with a little silicon sealer so it will come off easy if you want to clean the insert. Only criticism on the forum is the compromised place to rest your elbow but mine rests on the front lip so not a factor.
You solution has a much better finish when closed but I have been very happy with my console solution.
Nice write up! It doesn't help me one bit as I could care less about the cup holder. I thought you deserved the props for doing such a good and thorough job though!!!
Great write up and photos. I went the easy way out. $7 for the holder which slips into the seat space and can be reversed or removed in a second.
And before I get comments on how it looks, I don't give a **** what yawl think.
I am not really particular on how it looks. It serves the purpose. Hell I even have small leather boxing gloves hanging from my rear view mirror and a Garmin GPS velcro'd to the dash. How the car drives are more important to me and 'doodlebug' drives like a goodun.
Cup holders and glove boxes are overrated on a proper sports car. Auto manufacturers are caving in more and more into "Consumer" demands and not necessarily "Enthusiasts" imo. (ex. lane departure warning(check over your shoulders the old fashion way dumbass), backup sensors(try turning your neck), TPMS(get out and do it the manual way), big **** side mirrors(don't drive if you're that blind), etc.
Consumers are dictating how automobiles should be instead of the other way around which is sad. [Rant off]
I respect your rant but consumers drive the market. Even though enthusiasts make up a fraction of the market, and given we are influencers, I think I speak for 99% of this forum that wants glove boxers and cup holders. For those who I don't speak for I would encourage you to start a "how to delete a cupholder" thread.
I respect your rant but consumers drive the market. Even though enthusiasts make up a fraction of the market
I agree with your first part and definitely think consumers should drive the market when it comes to appliance cars. However my thinking isn't the same when it comes to niche/specialty/certain performance cars. I can understand that some manufacturers have to stay consistent if they have a broad portfolio of cars to retain the same customer base though.
 04-04-2015, 12:28 PM


 using a flathead screwdriver pry of the trim surrounding radio/satnav (no tricks comes easily off)