
Lower Control Arm DIY
 05-24-2016, 03:48 PM
#16
Captain Obvious
Super User
Super User
Those joints are not protect from the environment and will wear out a lot faster than regular ball joints. That's the main reason they are only recommended for track use.
 05-24-2016, 05:07 PM
#17
Not true, you can either get weather-sealed/'booted', which are about equally as protected as a typical balljoint...yes you can get 'open' style joints and they would be a poor choice for poor weather/dirty-road street cars
05-24-2016, 05:43 PM
#18
Captain Obvious
Super User
Super User
I have to apologize, I had a picture of a heim joint in my had and kept thinking the monoball is the same. I was wrong.
05-24-2016, 06:05 PM
#19
No worries at all 
Even the heim's (such as toe-links or dogbones for those wondering) you can get with boots, although I'm sure they still won't last as long as factory stock...but it's worth it!
Even the heim's (such as toe-links or dogbones for those wondering) you can get with boots, although I'm sure they still won't last as long as factory stock...but it's worth it!
07-14-2016, 12:20 PM
#21
Race Car
Is there a good way to separate the LCA from the carrier without damaging the ball joint boot?
07-14-2016, 01:20 PM
#22

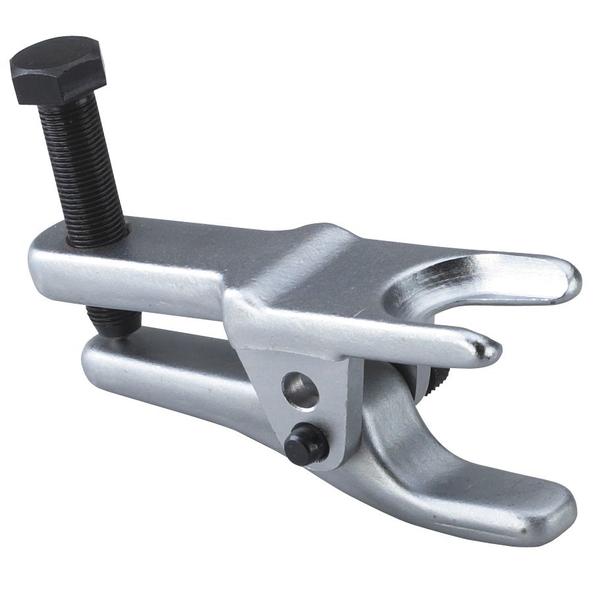
You can buy these at many tool places like HF and such. Make sure you get the billet version as the cast version is weak and will break on you.
07-14-2016, 01:27 PM
#23
Race Car
Awesome. Thanks Alpine!
07-14-2016, 01:42 PM
#24
Drifting
My tool is a small sledge hammer, the ball joint stud is just slight taper fit, I loosen the nut by 1/4", and give the casting the threaded stud fit into a couple of smart, but not abusive whacks, the taper fit will pop loose, I've used this trick over several different cars, as well as my own 996 just over a month ago, works like a charm.
07-14-2016, 01:49 PM
#25
My tool is a small sledge hammer, the ball joint stud is just slight taper fit, I loosen the nut by 1/4", and give the casting the threaded stud fit into a couple of smart, but not abusive whacks, the taper fit will pop loose, I've used this trick over several different cars, as well as my own 996 just over a month ago, works like a charm.
08-07-2016, 12:29 AM
#26
Just a tip, I bought this tool and I loosen the control arm ball joint nut and bring it to the top of the ball joint so it is flush. Then I use this tool sort of upside down. The single arm is on the nut/bolt and NOT on the underside of the control arm. Few little cranks with a socket wrench and it pops out REALLY easy. It is basically pushing the bolt down. I tried it the other way (single arm under neath and using the tool as sort of a pry bar.... didn't work.). If you already knew this, then it is a new one for me.
08-07-2016, 12:54 AM
#27
Drifting
The U-shape portion should fit around the LCA bushing and over the casting the tapered LCA bushing body fits into, the U-shape end and the single arm ends squeeze together when the threaded stud of the tool turns to pop loose the tapered LCA bushing.
08-07-2016, 10:01 AM
#28
Yes, this is what I meant.
Tip #2=> The bolt by the chassis can slide all the way out and then down. There is a hidden hole there to get the bolt fully out. To replace the bolt just do the reverse. You cannot angle it in.
Tip#3=> I know this is against all of "mechanic" best practice, but I didn't buy a 21mm or the 18mm. I just held the nuts in place with an adjustable wrench and my socket wrench on the bolt side. I just carefully adjusted the adjustable wrench tight enough against the nut. You don't need it to break the bolts loose, just need it to keep the nut from spinning once you break it loose. Note: Everything is back on the car, just hand tight, if I cannot get sufficient torque with the adjustable, I will buy the correct tools.
08-07-2016, 11:02 AM
#29
Rennlist Member
"Tip#3=> I know this is against all of "mechanic" best practice, but I didn't buy a 21mm or the 18mm. I just held the nuts in place with an adjustable wrench and my socket wrench on the bolt side. I just carefully adjusted the adjustable wrench tight enough against the nut. You don't need it to break the bolts loose, just need it to keep the nut from spinning once you break it loose. Note: Everything is back on the car, just hand tight, if I cannot get sufficient torque with the adjustable, I will buy the correct tools."
Hey, if it works/enables you to complete the job without damaging anything (including yourself) it is "the correct tool". This being said, I'm not sure I understand "sufficient torque"... AFAIK the suspension components should all be torqued to "specific" #'s... as opposed to "sufficient" #'s...
Hey, if it works/enables you to complete the job without damaging anything (including yourself) it is "the correct tool". This being said, I'm not sure I understand "sufficient torque"... AFAIK the suspension components should all be torqued to "specific" #'s... as opposed to "sufficient" #'s...
08-07-2016, 01:02 PM
#30
Rennlist Member
