
Brake Caliper leak, damaged bleeder threads
 07-04-2023, 12:42 AM
#1
My car: 2004 C4S 6MT
So my left rear bleeder valve (inside) has leaked in the past after I got the car. I had tightened it down a little, and that had seemed to help, but this weekend (when going in to replace the brake lines), I realized that the bleeder was still leaking, but probably only when at full pressure while braking.
So, took the caliper completely off, then removed the bleeder valves. (I have brand-new valves that I was going to put on.) However, the threads for the inside bleeder valve are completely trashed!!! I have a thread-chaser (not a tap), but there are no good threads to even get it started. There may be good threads deeper in, but I can't get anything started without chewing them up worse.
So, do I now have to buy a new caliper? Given that it's a hydraulic seal, this isn't an area where thread repair will work. Is there another solution that I'm missing?
My car: 2004 C4S 6MT, so I think the part number is 996-352-425 (Left Rear caliper)
Will this part number (for C4S and Turbo) always be red? I don't have to worry about that, right?
I've found one new for about $700, or used and questionable looking for $390. Does this sound about right? Any good deals anyone knows about?
Thanks!
EDIT: corrected that it's the Left Rear, not the right rear
Last edited by jdbornem; 07-04-2023 at 12:47 AM. Reason: I'm apparently still learning left from right :)

The following users liked this post:
996-CAB (07-04-2023)
07-04-2023, 01:32 AM
#3
I suppose it can't hurt to try. Thanks!
07-04-2023, 10:40 AM
#5
07-04-2023, 10:45 AM
#6
Nordschleife Master
Remember its not the treads on a bleader screw that make the seal its the interfereance fit of the tapper at the bottom the screw to the caliper. Just be carefull to not go too deep making the repair
07-04-2023, 11:31 AM
#7
Burning Brakes
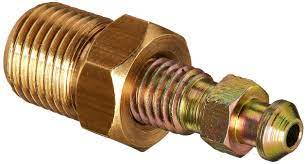
What it looks like installed

Last edited by hbdunn; 07-04-2023 at 11:40 AM.
The following users liked this post:
damage98MO (08-18-2024)
Trending Topics
07-04-2023, 12:16 PM
#8
Race Car
Almost time for some new rotors there good buddy.
07-04-2023, 01:05 PM
#9
Nordschleife Master
Ah, didnt look at the link. Looks like simple repair with the correct tools.
08-17-2024, 01:21 AM
#10

Hi, the kit from Autozone that you used contained 2 sets of seat & bleeder screw of different sizes. Did you use the larger set ? If so, what size drill and tap did you use for that seat/scree combo ? I am facing the same repair right now on 2002 996 Targa so any details you have would be great... thanks
08-17-2024, 03:01 AM
#11
Hi, the kit from Autozone that you used contained 2 sets of seat & bleeder screw of different sizes. Did you use the larger set ? If so, what size drill and tap did you use for that seat/scree combo ? I am facing the same repair right now on 2002 996 Targa so any details you have would be great... thanks
So a 7/16 drill and a 1/4 NPT tap.
I did have one issue that I only drilled down about 1/2 and inch or so, you don't want to damage the bottom of the hole, which is the sealing surface. Then, the 1/4 tap is also tapered, and starts out fairly narrow. So initially it only cut very shallow threads before i bottomed out in the hole. So I then had to cut the tap shorter (using my Dremel), in order to use a wider part of the tap, so it would actually cut full threads. It was kind of a mess. But, eventually, I got good threads, and the Dorman kit linked here worked. No leaks yet in over a year.
08-17-2024, 11:42 PM
#12
Burning Brakes
It looks like I bought this:
https://www.amazon.com/gp/product/B01MDV3A30
So a 7/16 drill and a 1/4 NPT tap.
I did have one issue that I only drilled down about 1/2 and inch or so, you don't want to damage the bottom of the hole, which is the sealing surface. Then, the 1/4 tap is also tapered, and starts out fairly narrow. So initially it only cut very shallow threads before i bottomed out in the hole. So I then had to cut the tap shorter (using my Dremel), in order to use a wider part of the tap, so it would actually cut full threads. It was kind of a mess. But, eventually, I got good threads, and the Dorman kit linked here worked. No leaks yet in over a year.
Yes that�s the tap and drill bit for the large one.
With bleeding brakes after every track event I�ve opened and closed it maybe 30 times with no leaks.
Last edited by hbdunn; 08-17-2024 at 11:45 PM.
The following users liked this post:
damage98MO (08-18-2024)
08-17-2024, 11:49 PM
#13
did u drill with the caliper attached, or did you remove the caliper to drill ?
08-18-2024, 09:34 AM
#15
Nordschleife Master
For the tap they make different styles. Most taps that u see r "starting" taps but for tapping into a closed hole u want to look for an "end" tap. Having both taps will make the job easier.
The following 2 users liked this post by De Jeeper:
damage98MO (08-18-2024),
wdb (08-18-2024)