When you click on links to various merchants on this site and make a purchase, this can result in this site earning a commission. Affiliate programs and affiliations include, but are not limited to, the eBay Partner Network.
Last weekend I jumped in and replaced the spark plugs, coils and spark plug tubes on my two month old (to me) 996. My model is a 1999 C2 coupe with 37K miles. While it’s really low miles for its age, the spark plugs most likely have never been done and it’s 21 years old. So I decided to replace the coils and tubes while I’m in there. This is only the second or third thing I’ve done to my 996 that required any serious wrench turning. While this job isn’t difficult tech-wise, the plugs aren’t easy to get to so I wanted to be well prepared.
I am NOT a mechanic and the is my first time doing this job so I’m detailing every step, even the ones that should be obvious to seasoned weekend wrench turners. There is a lot of good information here on Rennlist, Renntech, Youtube, etc but I still had questions. What is a tube and why do you need it? Do I need to do anything to accommodate the larger new style coils? Do need a 3” extension, a 4” extension, 6” extension or all of the above? Also, I notice that people with a lot of experience tend to leave out details that are obvious to them but not to someone doing it for the first time.
This DIY covers this job without removing the mufflers. Unlike older DIYs, it has information on using the newer 997 style coil. Doing this DIY helped me prepare for the job and hopefully it will help others consolidate all the information I had to find from different sources.
1. Chock both front wheels.
2. Break the lugs loose on the rear wheels
3. Jack up the rear of the car & put jack stands under the rear jack points
4. Remove the rear wheels (optional: put them under the car for added safety)
5. Remove the left heat shield (2 bolts. 10 mm wrench)
6. Disconnect the wire from the left front coil (push down on the top of the rubber boot - click)
7. Remove the coil (2 bolts 5 mm hex)
8. Remove the spark plug (spark plug socket, extension)
9. Install new spark plug. No need to gap the plug (21 ft-lb)
10. If you’re replacing the tube remove it (needle nose or 1” expandable marine plug)
11. Lube tube gaskets & install new tube (by hand)
12. Install old/new coil, listen for click on plug (5/16”, 8 mm, T40 or “E-torx” E8? for 997 type. 7.5 ft-lb)
13. Re-connect electrical lead to coil. Listen for click
14. Optional - Start engine & check for smooth running & CEL
15. Repeat steps 6-15 for remaining two cylinders on the left. They are more difficult to access. Leave the center coil out to make it easier to get to the rear coil
16. Re-install left heat shield (7.5 ft-lb)
17. Repeat steps 5-17 for the right side
========== Basic stuff - Skip this if you already know what plugs, coils & tubes are ==========
Why do I want to do this?
Porsche recommends changing the plugs every 30K miles on the 1999-2001 models and 60K for 2002+. Pelican Parts recommends every 10K miles but they’re trying to sell you stuff. For those of you that know even less about cars than I do, the spark plugs create a spark (duh) inside the cylinder that ignites the fuel/air mixture. The metal electrodes on the end of the plug that do this wear down and cause less of a spark than there should be, causing your engine to run rough or lose horsepower. In many older cars, you needed to manually set the gap of the electrode for your car. This is not necessary for the type of plug the 996 uses.
Spark plugs need to be the right type for the car. Use the search function to find the right one for the 996 or go to your favorite auto parts store. If you buy spark plugs from your Porsche dealer, you’re probably not reading this. Plugs are cheap ($6-$24 each) so get a good brand (Bosch, Beru, NGK…)
What about this “coil” thing?
The coil controls the electricity going to the plug. Many older or less expensive cars have a wire going to each plug from a central ignition system. The 996 does away with this and puts a coil on each plug for better performance and to remove the weak link that is the spark plug wire.
But the coils can crack, causing them to stop working or underperform. If you’re getting misfire codes or rough running, coils are a major suspect. Since coils run $45 each and need to be removed anyway, it might make sense to replace the ones that are cracked or even all of them.
What the hell is a spark plug tube anyway?
OK, don’t make the mistake I made at first. The long rubber thing at the end of the coil is NOT the spark plug tube! The spark plug tube is a plastic tube with a rubber O-ring on each end that seals off the spark plug area from the rest of the cam assembly & all the oil that goes with it. If the tube or O-ring gets old and brittle, oil can start leaking into the area where the plug goes. If you have oil on the outside of the plug, you need to replace the tube or the gaskets.
In the 996, the spark plug goes straight through the top of the cylinder for better combustion. To do this, it needs to travel through the camshaft (valve) cover with all its oil flying around in there. If they built the tube into the cover, you’d have to remove the entire cover to replace any of the three O-rings that would still be needed. So, they used this easily replaceable plastic tube & O-ring assembly. On later models, the tube is metal. Make sure you get the O-rings when you buy the tube. It is possible to buy the tube without the O-rings and vice-versa.
No, you don’t need to replace every coil if you don’t want to. You don’t need to replace every tube or even think about the tube if you don’t want to. However, if your car is pushing 20, it would be a good idea to just replace them all and get it over with while you’re in there. You don’t want to do this again in a year. And again again in another year.
========== End of basic stuff ==========
Parts Needed:
(6) Bosch FGR-6-KQE spark plug or equivalent. Make sure they have a "6" separately stamped on them & not a "5" See post #17 below (thank you @islaTurbine )
(6) Spark plug tubes w/ 2 O-rings (make sure you get the O-rings with them)
(6) Beru 997 style ignition coil (997-602-107-91-M14) or equivalent
Optional parts to move the heat shield away from the larger coils (I got these at my local Lowes):
(4) M6-1.00 x 35 mm bolts
(4) 1/4” x 3/8” x 3/4” spacers
Most people recommend using the newer 997 style coils as they are apparently more robust. Make sure you get the bolts with them. The old coils have shorter bolts because the part of the coil they go through is thinner than the rest of the coil. The 997 style coil has a slightly different design here. The part I bought from Pelican came with the bolts. However, the heads are an E-torx (E8?). A 5/16 or 8 mm socket works fine though.
Tools/Supplies Needed:
Wheel chocks
Lug wrench(es) to remove wheel lugs & locking lugs
Jack (if you own your own lift, you’re probably not reading this)
Two jack stands
10 mm socket/wrench - Heat shield
5 mm hex angled wrench or stubby socket - Old 996 style coils
8 mm or 5/16 socket or E8 if you have one - New 997 style coils
Spark plug socket (get one with a U-joint)
Socket wrench (one that can pivot may help in the tight spaces)
3”-6” extension (depends on if you’re using a U-joint extension)
Torque wrench (7-22 ft-lb, may not fit everywhere, use it where you can)
1” expandable marine drain plug to remove tubes (
) <===== NOTE- I did NOT like this one!
Clean oil for O-rings
May also help:
Multiple 3” extensions to get the socket into the tight space
Duct tape to keep the spark plug socket from coming off the extension (not a joke)
U-joint for socket wrench
Head lamp (everywhere you look, there’s light)
Gloves (If you’re a sissy non-mechanic like me. I got rid of the gloves when I got to the rear plug)
Tunes
Beer (or chardonnay if your other car is a Range Rover)
Small hands (if you have access to a 9 year old girl, make her do this)
About removing the mufflers
If you read posts about this subject in Rennlist, half the people will say you’ll save your sanity by removing the mufflers. The other half will say you don’t need to remove them and if you do, you’ll likely need to buy new hardware as the bolts, etc. can be rusty. The general consensus is that removing the mufflers takes around 20-30 minutes but may save you more than that. This one is a judgement call. I would say if you have large hands and/or limited tools, removing them might be the better choice. And if you have large hands, why do you need to be driving a Porsche anyway? I mean seriously? Since I’m going to be saving $$ by working on this car, I decided to buy a decent socket wrench with a swivel head and some other tools that are good for tight spaces. I did it without removing the mufflers. I also have small hands, hence the Porsche.
To be honest, I was not able to remove the tubes on the rear cylinders with the marine plug I used and with the space (and motivation) I had. With a better tool or with the mufflers off, I might have been able to.
========== Expanded Instructions ==========
Steps 1 - 4 - Jack up the rear of the car & remove the rear wheels
There are lots of instructions online for the best way to jack up the car and put it on jack stands. Try these:
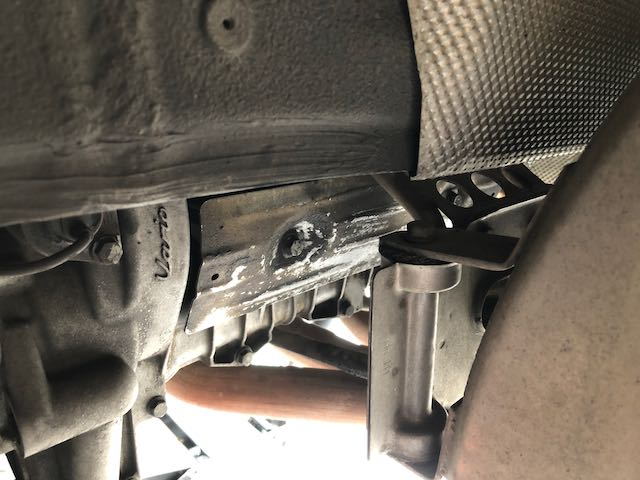
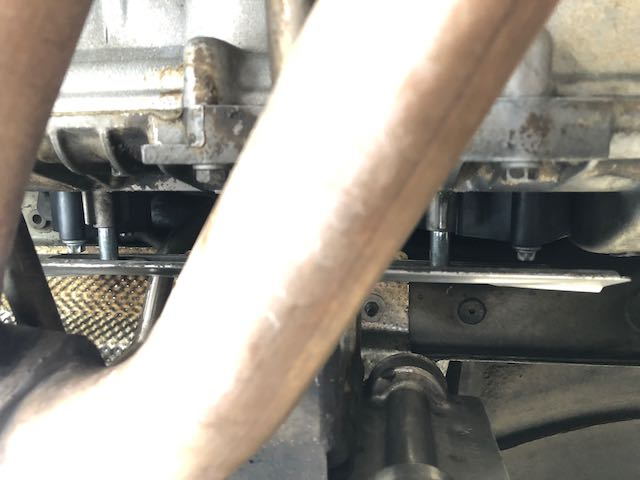
The heat shield is a piece of aluminum bolted to the cam covers where the plugs & coils are. Why do the left first? The left side is slightly easier than the right. So you might want to start with the easier ones and work your way up to the hard ones. Of course, feel free to start with the right side if that’s what you want to do. Remove the two 10 mm bolts on the front and rear end of the heat shield and remove it. You should now see the coils for the left bank of cylinders. Note how the head shield is installed. There is a “wing” that points towards the engine. On the Porsche diagram, this is on the rear. See pictures below for the before & after of the heat shield removal.
Left (dirty) heat shield viewed from the front. Note the two 10 mm bolts
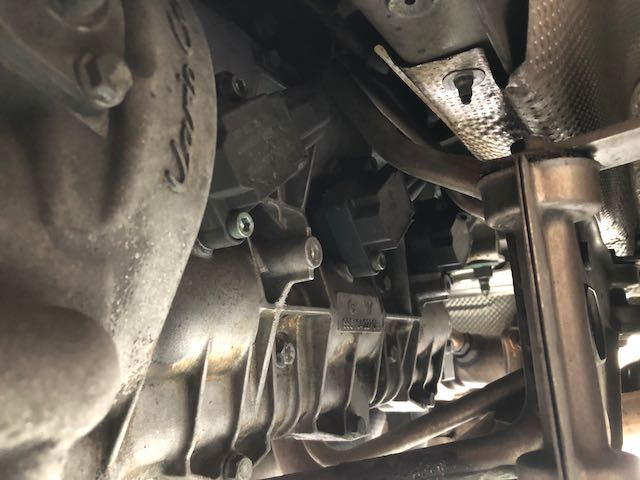
View of the 3 left coils from the front after removing the heat shield
Step 6 - Disconnect the wire to the coil for cylinder 3 (left front)
FYI, here is how the cylinders are numbered:
FRONT
3 6
2 5
1 4
REAR
Cylinder 3 is the easiest so start with that. At least you’ll sort of know what you’re doing when you get to the ones that you can’t see. First, remove the electrical connector to the coil. It’s easier to get leverage on it without the coil flopping around so do this first. There is a plastic piece under the rubber boot that you push down on. This forces the fastening clip upward. Push down on it and then slide the connector off. If you’re having trouble with it, the rubber boot should slide off by itself. That may give you a better chance of releasing the connector.
Step 7 - Remove the coil
You’ll need a 5 mm hex to remove the two bolts assuming they are the original 996 style coils. A small ratchet wrench is fastest but a normal 90 degree hex wrench will work too. Once the bolts are off, pull the coil off the spark plug. It might be a good idea to twist it left & right first to break loose any rubber that might have stuck to the plug. The bottom part of the rubber plug connector is pretty flexible so you should be able to move the coil where you need to in order to get it out.
The front cylinders are easy. The middle ones were slightly harder. The rear cylinders were tough. I finally had to remove the middle coil again to get my arm through and reach the rear coil from the front with one hand while bringing the other hand through the rear to steady the wrench. My small ratchet didn’t work well on this one. I ended up using a simple 5 mm angled hex wrench for the rear coil. tl;dr - REMOVE THE REAR COIL/PLUG BEFORE YOU REINSTALL THE CENTER ONE!
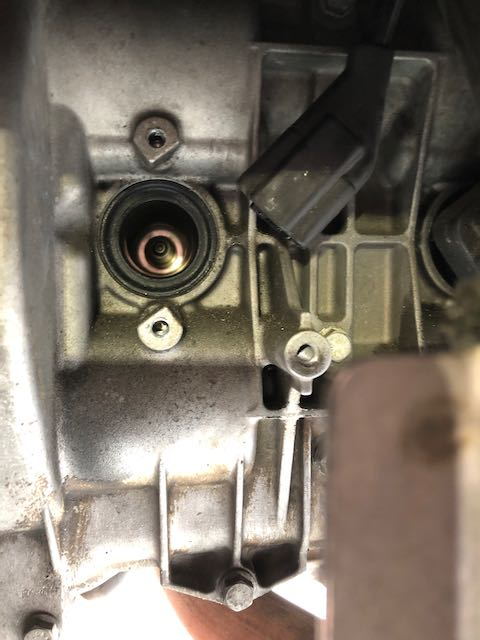
Inspect the coil. Look for cracks on the plastic housing. If you’re only replacing the bad coils you’ll obviously want to replace the cracked ones and the ones from any cylinders that are throwing misfire codes. Also look for oil on the rubber spark plug connector. If there’s oil there, that means the spark plug tube is cracked or one of the O-rings on the tube is bad. You’ll want to replace the tube or at least the O-rings. See picture below of the spark plug hole with the tube still in it.
Spark plug port with tube (black ring inside) and plug still in it
Step 8 - Remove the spark plug
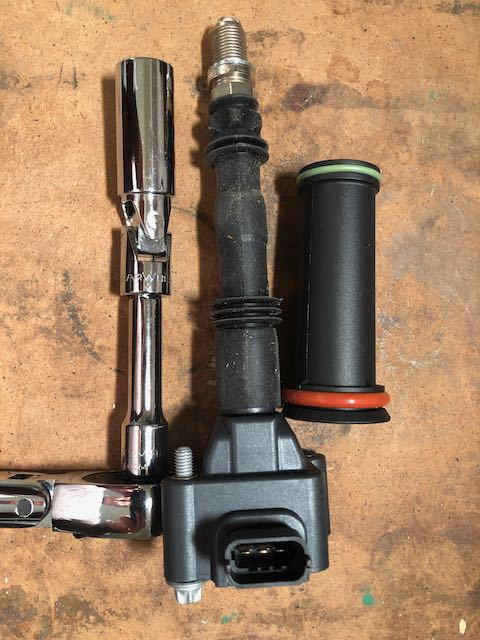
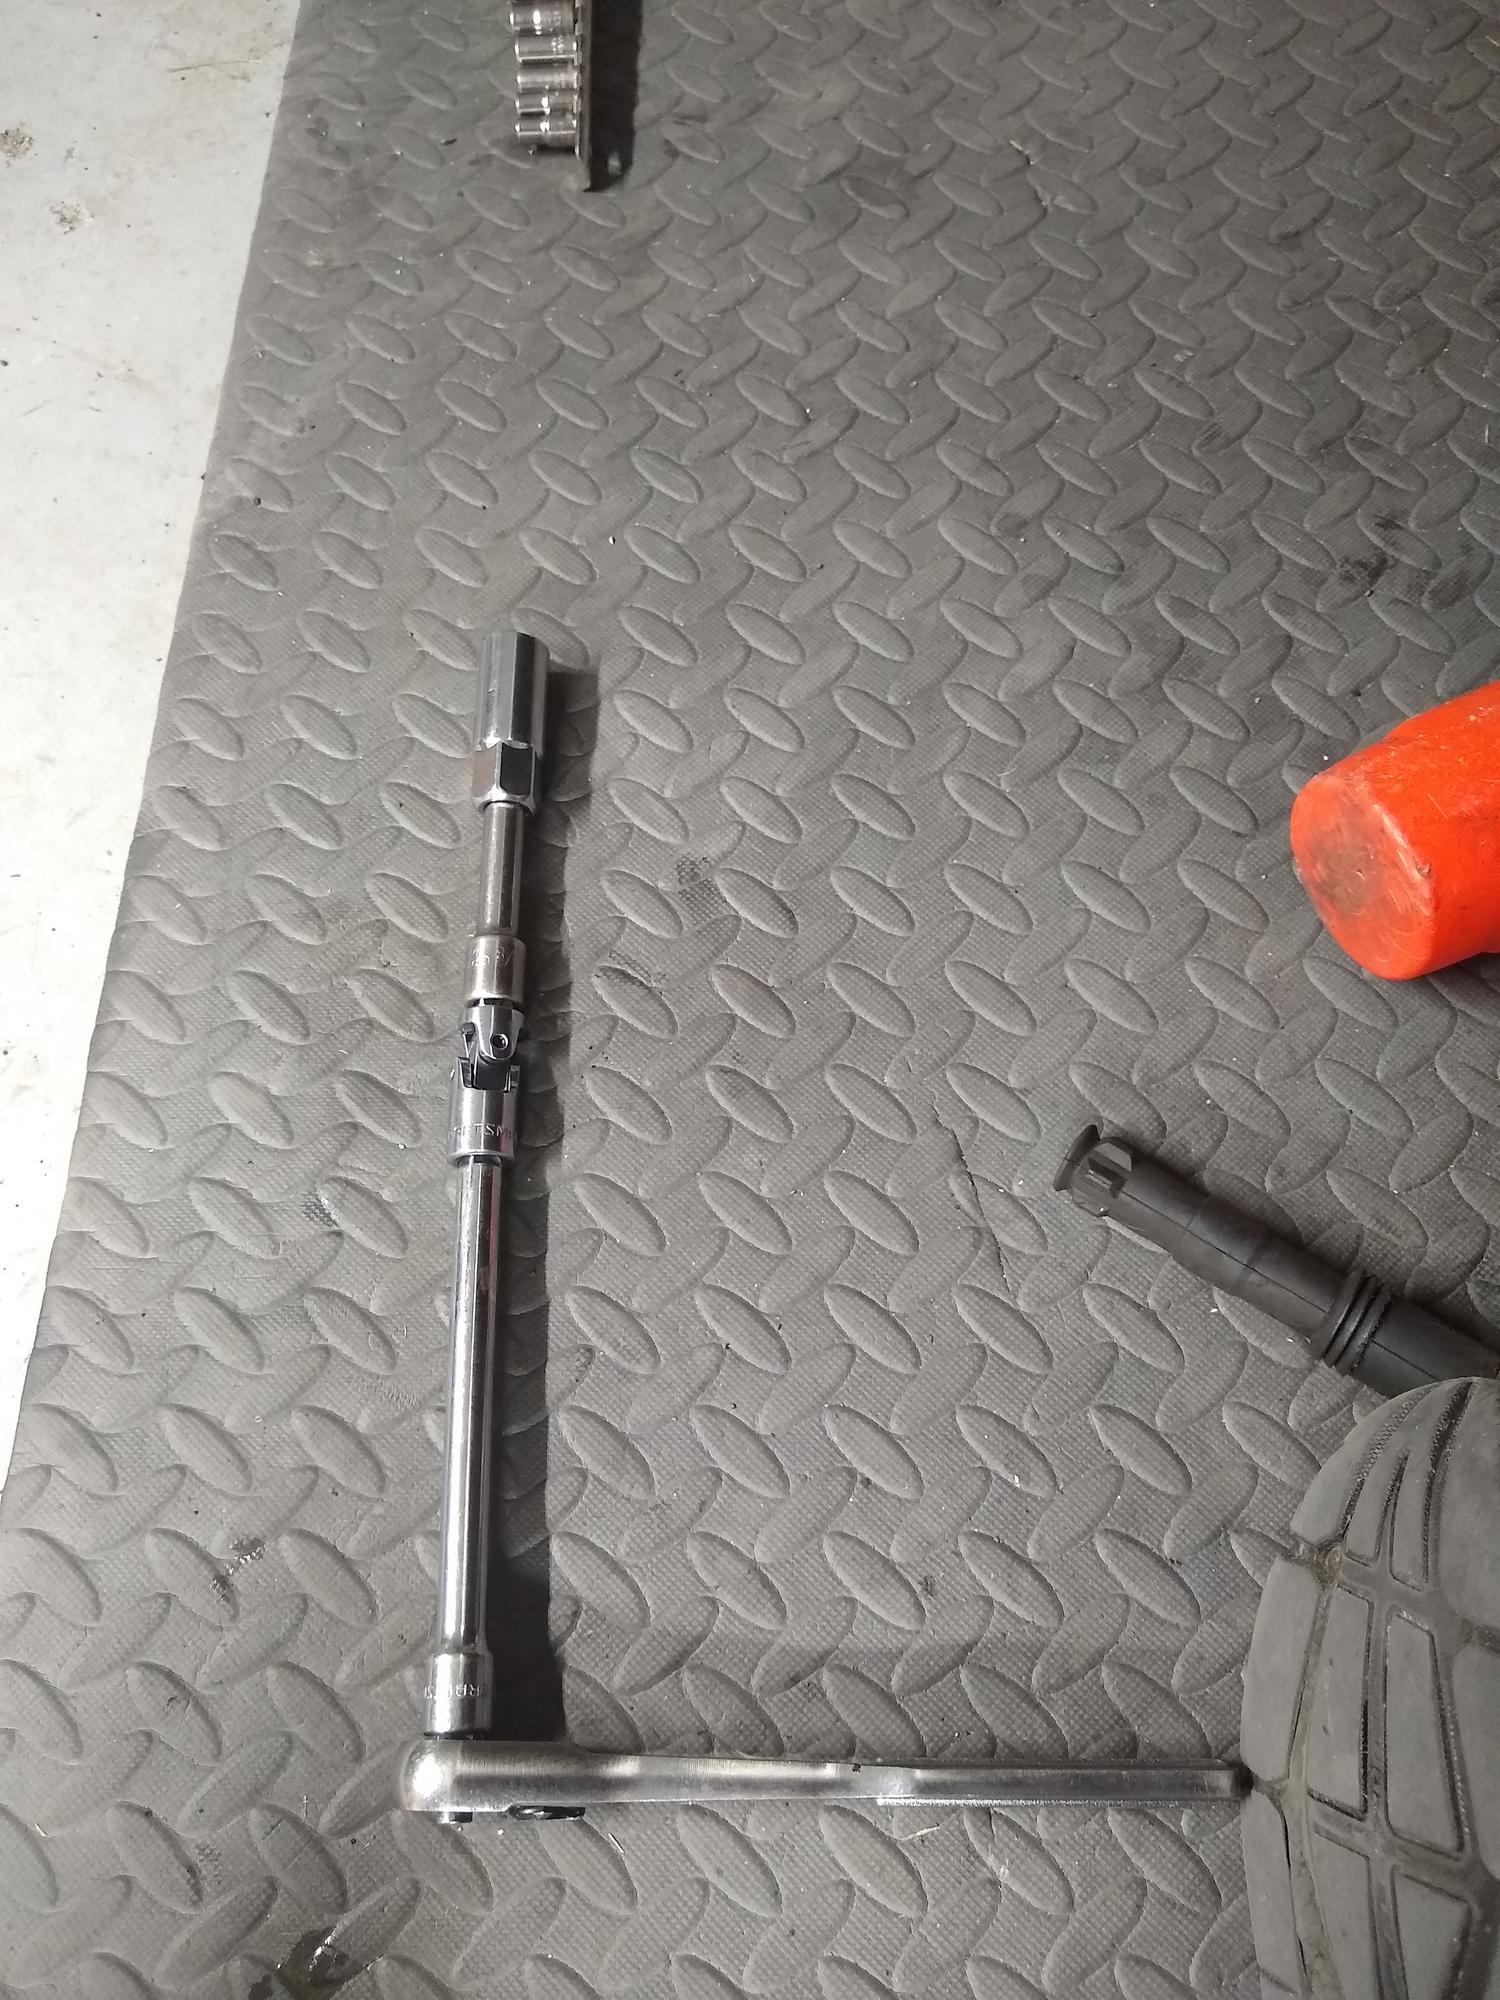
What kind of extension to use will depend on what kind of socket you have. A 3” extension with a standard spark plug socket will be too short. If you bought a spark plug socket with a U-joint on it (a good idea), a 3” extension will be long enough. I have heard people have good luck with using two 3” extensions to get the right length. Some people have reported having problems with the extensions coming off and recommend duct taping them together. Below is a picture of a 997 style coil with the plug attached & a tube next to a U-joint type spark plug socket & 3” extension. This worked perfectly for me for all 6 cylinders.
Length comparison of 3" extension & U-joint spark plug socket compared to the coil & where it should contact the plug
I had no problem with my 3” extension (and small hands) and the socket with the U-joint. Just buy one of these on Amazon and save yourself some trouble. It makes it easy to get the socket in without disconnecting and reconnecting extensions and it’s just long enough to work. For me, removing and reinstalling the plugs was the easiest part. Once it gets broken loose and you get a few turns on it, it will probably be faster to use your fingers to get it out the rest of the way.
Inspect the electrode for excess wear, carbon or oil (especially oil). The condition of the spark plug is a good window into the health of the engine. It might even be a good idea to take a picture of each plug with the cylinder number for future reference or proof of a good running engine if you plan on selling soon. I don’t have the chops to tell you how to analyze spark plug wear. Google it.
Step 9 - Install the new spark plug
The rubber end of the coil can be pretty tight. I put some dielectric grease on the porcelain part of the plug & pushed it in and out of the coil to lubricate both & make sure it slides all the way on to the contact point. Dielectric grease is non-conducting so it won’t transmit electricity where it shouldn’t. Don’t use the wrench at first. Start the plug install with only the socket and extension and use your fingers. This way you can tell if you’re cross threading the plug or not. Stripping the threads on a Porsche (or even a Kia) cylinder is an expensive mistake.
If you have a torque wrench and it will fit, torque the plug to 21 ft-lb. Some plugs have instructions on the box for how much to tighten to get the desired torque. Mine didn’t. Lucky me. 3/4 of a turn past where the washer hits is a good guide.
You do not need to gap the plug. Per Porsche, do not use anti-seize or lubricate the threads.
Step 10 - Remove the spark plug tube
The tube separates the spark plug & coil assembly from all the oil flying around inside the cam cover. The tube may be old and brittle so be careful. If it shatters and you end up with plastic pieces inside of your cam assembly, it will make for a very bad day.
If you bought a 1” expandable marine plug and have a new tube handy, use the new tube to pre-expand the plug to what you think will work to get the tube out. Make sure there’s no oil on the part of the tube that the plug is going to touch. Lubrication isn’t what you need right now. Push the plug in as far as you can and see if you can take the tube out. If not, keep expanding and trying.
If you don’t have a plug, I saw that sliding a non-beveled screw into the tube & catching the bottom of the tube with the head will work. The tube is a little less than 4” long so the screw will probably have to be at least 4 1/2” to get a decent finger hold on it. Otherwise, I’m sure Porsche has a $600 tool for this somewhere.
This is the part I had the most trouble with and took the most time. My tubes were in there TIGHT! And to add insult to injury, all my tubes were leak free and looked perfect. In some cases, the marine plug alone wasn’t enough to get the tube out. It took me a long time re-trying and experimenting with different things. Someone wrote that they wrapped sandpaper around the plug (thank you whoever you are!). That worked for me in some cases but I usually had to swab some glue on the inside of the tube to help the process along. The plug I used also took a lot of turning force to tighten which made it even harder. Maybe if I had bought a better plug, it would have worked. I did not have the room or the patience to get this done on the two rear cylinders.
If I had to do it again, I might buy a 6” flathead screw driver & bend the head 90�, then use that to hook on to the back side of the tube and get it loose. Another brilliant idea I had a few days later was to wrap a longer and wider strip of sandpaper around the rubber plug a few times. This should make the plug thicker so you don’t have to twist the handle as much. The extra width of the sandpaper should allow you to get the paper part inside the hole first with a tighter starting fit and not have it bunch up on you.
Step 11 - Lube & install new tube
Lubricate both O-rings on the tube. Clean motor oil works just fine. Push the new tube into the hole. If the tube won’t go in, flip it over and stop drinking. The top of the tube should be flush with the cam cover. In most cases I was able to get it in using both thumbs & quite a bit of force. In one or two instances I carefully pushed with a socket extension.
Steps 12 - 13 - Install/re-connect the coil
Assuming you’re installing a new, 997 type coil, you will most likely need a different wrench than the one you used to remove the old one. The Beru model I bought comes with E-torx bolts. I was never able to confirm the actual size. If you have a set of E-torx sockets, great. Otherwise an 8 mm or 5/16” socket/wrench will work fine. The official torque spec is 7.5 ft-lb. Remember the housing is plastic so don’t over tighten.
You most likely won’t hear that satisfying “click” when you slide the coil onto the plug. If you put some dielectric grease on the porcelain part of the plug it should slide on and make contact just fine. Once it’s on, tighten the bolts. If you’re really pressed for space, you can remove the rubber boot from the top part of the coil and slide it on separately (well at least on the Beru brand). I did not have to do this on any of mine even with the muffler installed & did not have a problem with the electrical contacts making contact.
NOTE: I read a report that the heat shield can rub on one of the bolts on cylinder #4 (right rear). He used a bolt with a thinner head.
Once the coil is on, re-connect the electrical lead. If you don’t, you’ll have a 5 cylinder Porsche.
Step 14 - Start the engine & test
After each plug, it would be a good idea to start the engine and make sure everything is connected. Otherwise you won’t know which cylinder is the one you goofed up. Since I did the middle & rear cylinders together, I did this after cylinders 3, 1/2, 4, 5/6. Make sure no-one is under the car, put it in neutral and start the engine. Make sure it sounds normal and there is no check engine light. Run it for as little time as possible. The exhaust headers heat up quick.
The front cylinders are the easiest. The middles are a little harder and the rears are, umm, challenging. Winter’s coming.
Again, if you’re leaving your mufflers on, do yourself a favor and do not put the middle coil back on until you’re done with the rear. On the left side (1999 C2) I was able to lay underneath when working on the coils, bring my right hand through the front to manipulate the wrench & left hand through the back to steady the wrench. When working on the coils, a socket was too long and had to use manual tools. A right angle 5 mm hex wrench to get the old one off & 5/16” closed end to get the new one on. On the right rear, I wasn’t able to get my rear side hand in there to do much but barely tickle the wrench.
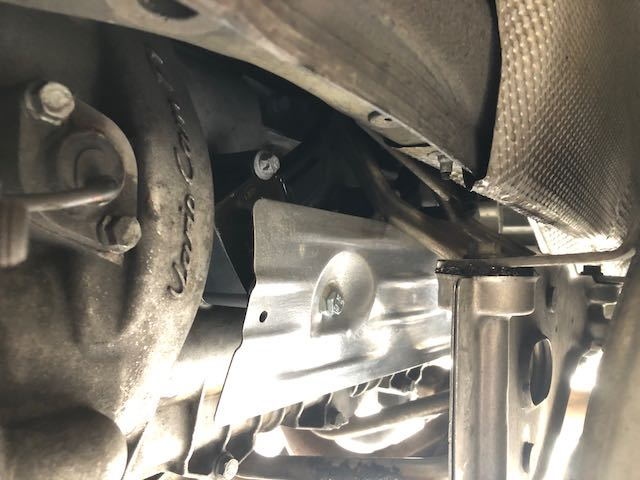
The rear spark plug wasn’t that bad. The tube was another story. I gave one half hearted attempt on the left side to remove the tube and gave up. After none of my other tubes looking bad & no oil on the plug, I didn’t even try on the right rear. If you need to remove the rear tubes, seriously consider removing the mufflers or have a better tube removal system than I did. Also keep in mind the headers block you from below so you will still have those to deal with. There is a bracket attached to the muffler that blocks you from the side. I assume that comes off with the muffler but I’m not sure.
Step 16 - Re-install the heat shield
Due to the newer style coils you will at least need to use longer bolts. User wyovino told me to use the old coil bolts which worked great! However, I noticed the heat shield was touching the coils and that bothered me. So the next day I took them off, went to Lowes (large hardware store) and they helped me find some M6-1.00 x 35 mm bolts and 1/4” x 3/8” x 3/4” spacers (picture below).
Bolts & spacers to make more room for the 997 style coils
It was more challenging to get the heat shields back on without having the spacers fall out on you. I used both aluminum foil and dielectric grease between the bolt and spacer to keep the spacer from falling. I also cleaned up the heat shields. Below is a picture of the left heat shield with the spacers, taken from underneath. The front is on your right.
Longer bolts & spacers installed behind the heat shield viewed from underneath
And below is a picture of the finished job with a clean heat shield. After a long, hot shower, I’m ready to drive!
Clean heat shield. Job done!
I’m sore…
Last edited by ssherman68; 12-28-2021 at 03:34 PM.
If you find any inaccuracies, let me know and I can edit the original post. Please provide a reason for the correction. Don't just say "do xyz instead".
Good write up. I did this recently while swapping mufflers and it was still a pan in the butt.
Did you do the tubes as well? Those are what gave me the most problems. Since you were swapping mufflers I guess you took the bumper off too? The headers and the bracket inside of the mufflers were what was really in the way. I knew the headers would stay on even if I took the mufflers off and I wasn't sure if those brackets came off with the mufflers.
Originally Posted by wyovino
I don't know how (or why) you could do this without removing the mufflers, but good job.
I decided that since you're often working in small spaces on this car I would buy some tools that would work well in small spaces. This was kind of a test of that. If I had to do it again, if I were replacing the rear tubes I would take out the mufflers. Now that I know what to use and how to get to the various parts, If I were just changing coils and plugs, it would be faster to leave the mufflers on. Getting the tubes out was the hardest. Getting the coils off the rear was difficult until I took the other coil off and used a manual right angle hex wrench (that I just randomly already had LOL). I couldn't get the rear tubes out with the mufflers on. To be honest, I didn't try that hard. Getting the right heat shield back on with that spacer was a PITA as well. I finally figured out it was hitting something and wouldn't completely line up with the hole. I had to flip it 180�.
There is still the exhaust mount that is attached to the body when you remove the muffler but you can get extensions through it. Even then one of them is still a pain. I think it made the back much easier.
Thanks to the OP for this thread. I tackled this job today and there were a lot of tips here that saved me some time.
I did a few things different that might help others that have this project on their list that I'll post here or in another thread when I have the energy but right now I need a martini and a Jacuzzi.
Glad it helped! The coils and plugs aren't bad. The tubes were what took all my time. Hopefully you found a better way to take those out! I'm tackling the water pump, thermostat & coolant flush in a few weeks (and an oil change).
Great write up! Thanks for the details! I�ll be saving this post for future use. I have a new to me 996 as of three weeks ago. I�m sure this service is coming soon to a garage near me.
BTW - I have large hands (always have to buy XL gloves) and size 13 feet. And I *LOVE* my new 996!
Fantastic write up, very well done. Using this I just got the job done. I would like to share a bit of my experience for future readers of this thread:
I dropped mufflers because I'm going aftermarket anyway. If *feels* like it adds a lot more space, but not having done without removing mufflers, I can't compare. That being said, using the long bolt from the muffler mount, I was able to fashion a spark plug tube puller using nuts from the exhaust mounts and a fender washer I had laying on the work bench. Worked like a charm.
These are all the extensions I used. I didn't use all of these all of the time, but selected the best combination of these for the spark plug I was working on at any given moment.
I did use all of them once, to access one of the annoying spark plugs. #4 I believe. You'll see I was able to get it almost straight on through the bracket, but not quite. The U-joint extension gave me *just* enough flex I could get to it very easily.
Happy wrenching everyone, and thank you OP. Super helpful, made my life very easy.
I tackled this job yesterday. I tubes came out quite easy, however I could not get the new ones in! They were the same parts as well, 'German' brand, however the end of the new tubes seem around 1mm larger and would not push in and seat. Not sure if I need to warm them slightly (garage was super cold).
I tackled this job yesterday. I tubes came out quite easy, however I could not get the new ones in! They were the same parts as well, 'German' brand, however the end of the new tubes seem around 1mm larger and would not push in and seat. Not sure if I need to warm them slightly (garage was super cold).
Mine were stiff to push in, but didn't require any heating. I used a 25mm socket on the lip of the new tube and pressed on the socket. The socket was easier to push on because I could get my palm on it instead of trying to use my thumbs right against the valve cover.
Mine were stiff to push in, but didn't require any heating. I used a 25mm socket on the lip of the new tube and pressed on the socket. The socket was easier to push on because I could get my palm on it instead of trying to use my thumbs right against the valve cover.
 05-16-2020, 08:11 PM