When you click on links to various merchants on this site and make a purchase, this can result in this site earning a commission. Affiliate programs and affiliations include, but are not limited to, the eBay Partner Network.
My turn indicator stalk just fell to the dreaded 996 faulty stalk issue - the right turn won't hold. I read the posts I could find - most discussing how to replace it - one or two stated it wasn't possible to repair. I don't handle bad news well. Can someone please dispute those posts? The Youtube videos show the steps to removing and replacing the unit, but it's a $450 part, new, or take a chance on a used one, still at least $100. WHY can't I repair it? It looks like there are a handful of rivets holding the metal box together - I can drill those out.. then surely it's just some damn piece of plastic that I can super-glue back together, right? Has anyone tried that? I do NOT want to spend $400 on this part right now, or anytime this decade.
It is not repairable. I have taken it apart and looked. A tab has broken on the stalk inside the box. And because It is an oily plastic, and under stress, you can't glue it. Sorry ...
Could you 3d print a new plastic piece in less than 4 hours? If you had a 3d printer, and could replicated the part in less than 4 hours, considering $100 per hour, you could come out ahead.....
My turn indicator stalk just fell to the dreaded 996 faulty stalk issue - the right turn won't hold. I read the posts I could find - most discussing how to replace it - one or two stated it wasn't possible to repair. I don't handle bad news well. Can someone please dispute those posts? The Youtube videos show the steps to removing and replacing the unit, but it's a $450 part, new, or take a chance on a used one, still at least $100. WHY can't I repair it? It looks like there are a handful of rivets holding the metal box together - I can drill those out.. then surely it's just some damn piece of plastic that I can super-glue back together, right? Has anyone tried that? I do NOT want to spend $400 on this part right now, or anytime this decade.
I have what i believe to be a working used one sitting in the garage. I bought it and removed the computer stalk to install in my car. Don't know what they are going for used, but shipping and a few $'s would cover it.
Could you 3d print a new plastic piece in less than 4 hours? If you had a 3d printer, and could replicated the part in less than 4 hours, considering $100 per hour, you could come out ahead.....
I have an an Ultimaker 3+ and Solidworks professional licence... anyone have a dead indicator stalk they want to donate to the cause?
Hi -- you might ask Rolex11 -- I was going to buy his but drove too hard a bargain, so he still has it. His is a three - lever type, but he said - and I've read others say it too - that you can just take the extra stalk off your faulty unit and add it to the type he has. I haven't taken my wheel apart yet so I don't know exactly how this works, but supposedly it's not a big challenge. Rolex11 was very nice and would probably take less than the $120+ minimum prices you usually see.
Left turn signal not holding in position, ordered stalk assembly and 4 end pieces. Stalk assembly came with left 2 end pieces installed, so I didn't need to order these.
Disconnected battery and used T30 to remove airbag. Bolts were tight and some cars use T27 on one or both, try T30 first and if doesn't fit then go to T27, don't do it the other way or could strip.
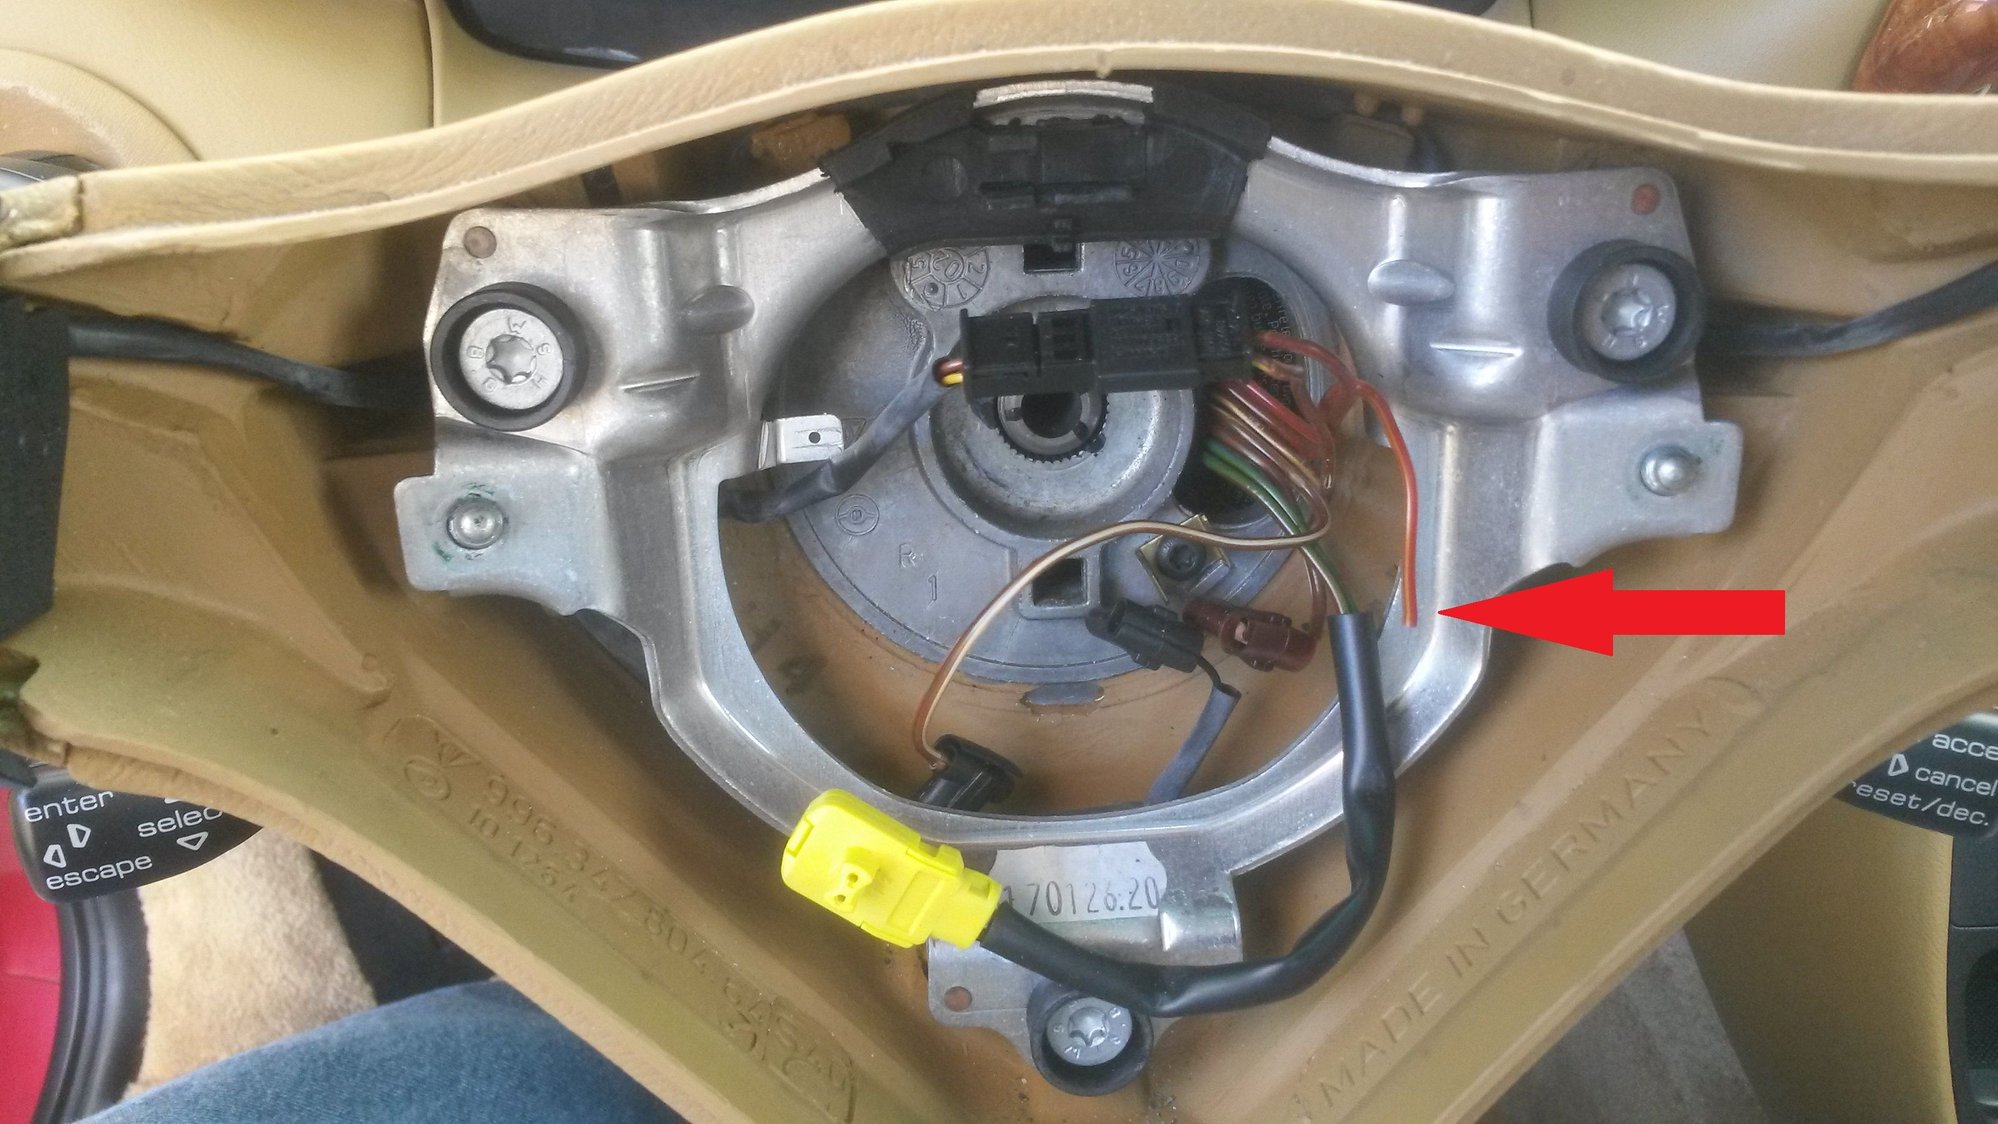
Found this unterminated wire floating around, all electrical functions were working correctly so covered and secured with tape during reassembly.
I tried a few ways of marking position of steering wheel. Best way I found was almost remove wheel, then with permanent marker draw a line across wheel and shaft, that showed how to exactly fit back together.
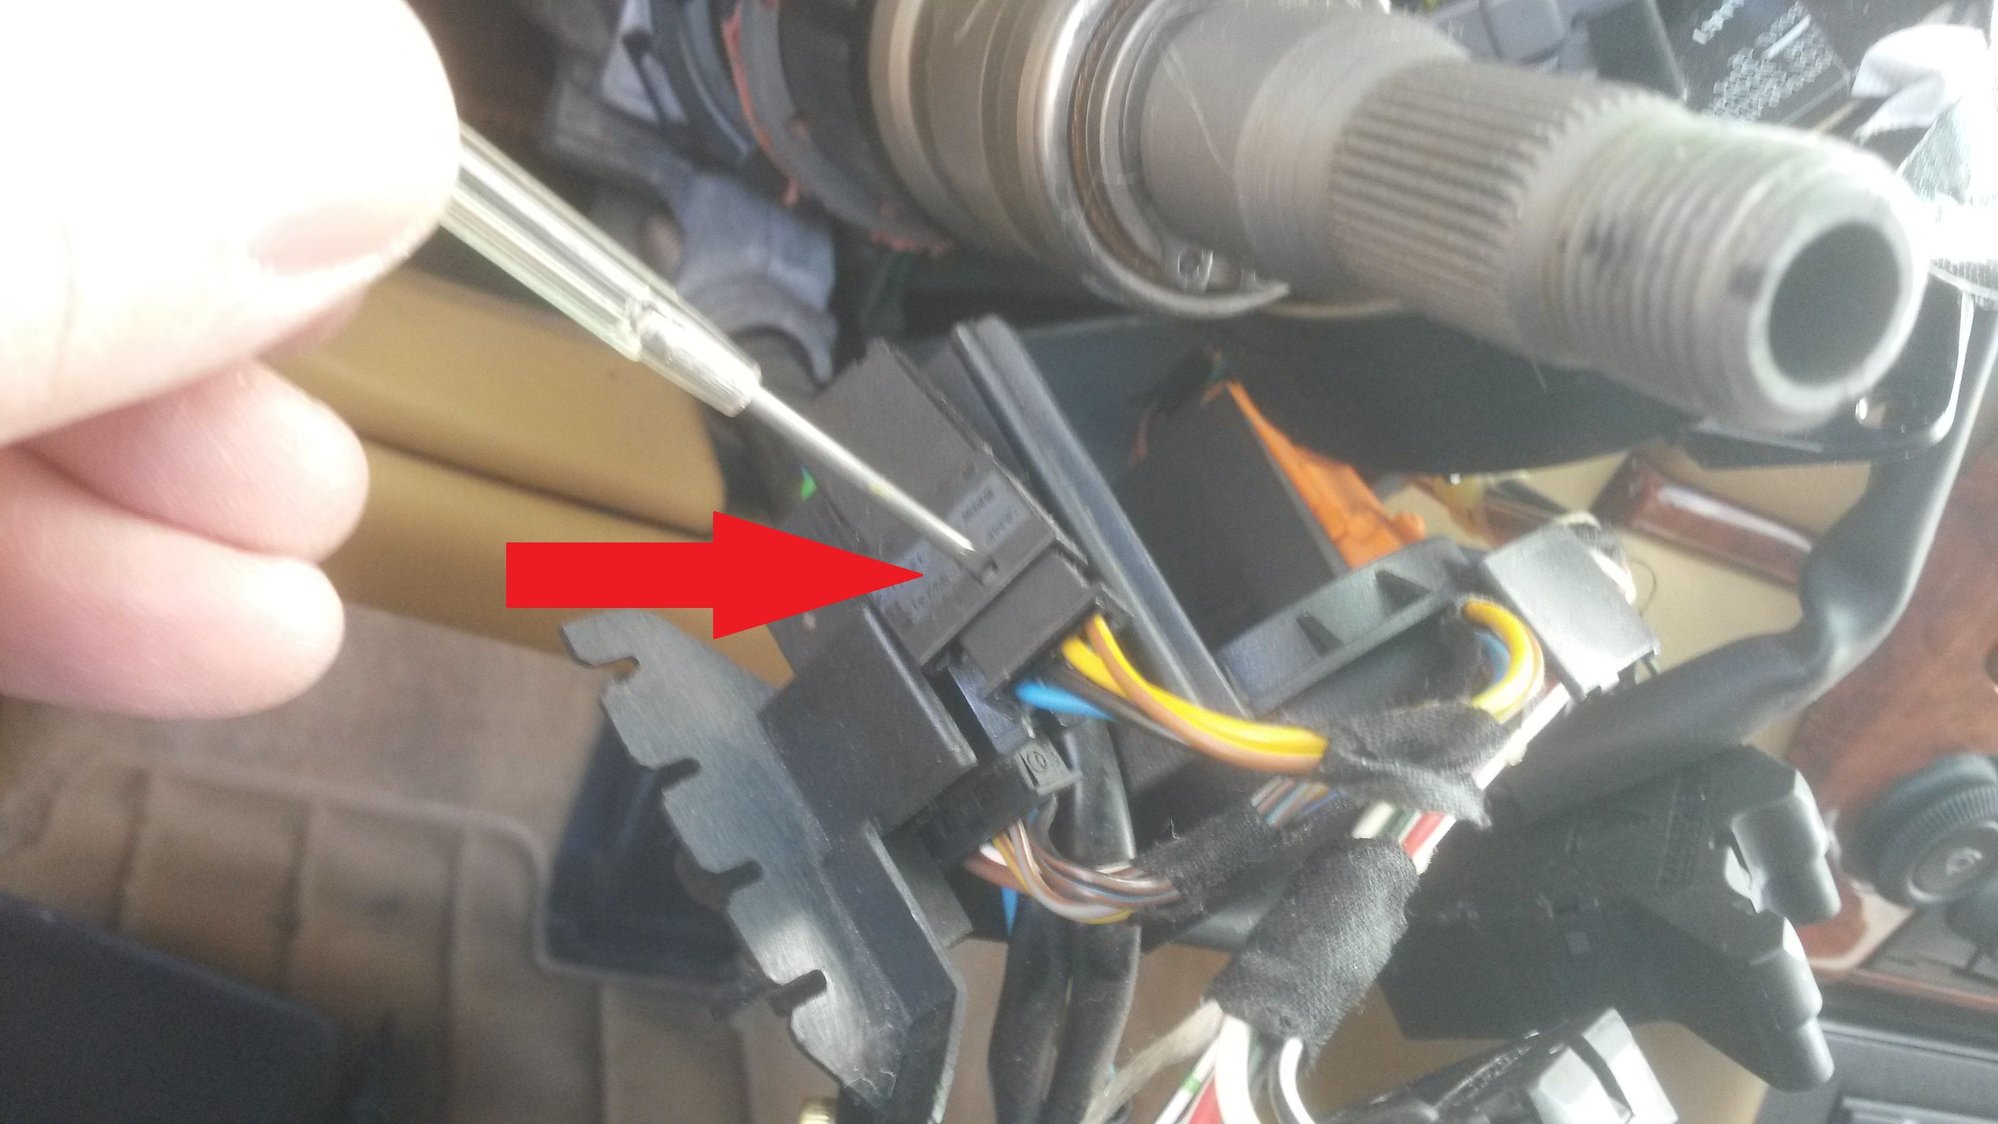
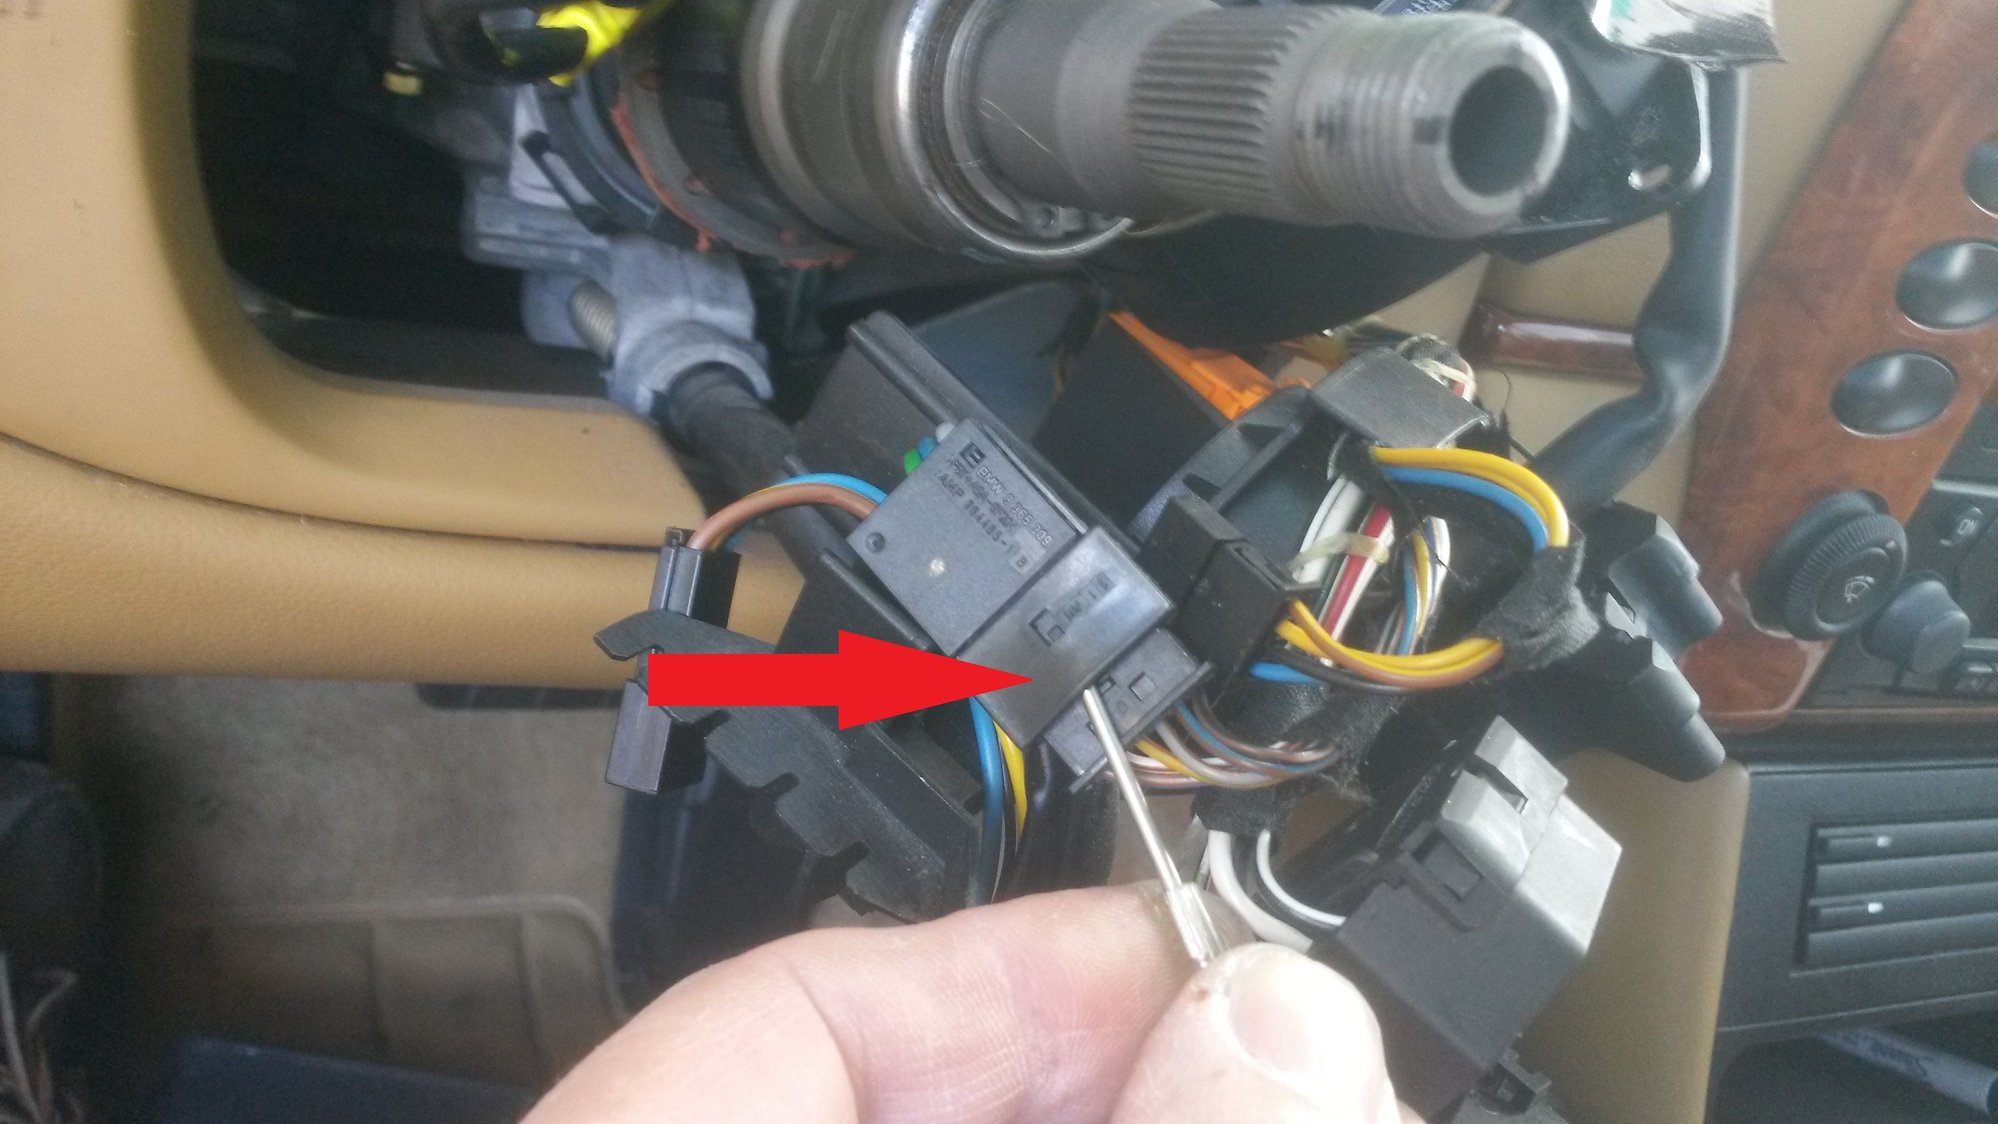
In 2 Porsche service manuals, Bentley book, Wayne's 101 project book, and Youtube videos, I didn't see info to separate these connectors. Arrow shows raised solid tab that holds together, when properly released there will be no mark on tab or mating connector.
The only way I could see to release connectors was to pry up here, which left small marks so probably is not correct way, but it works.
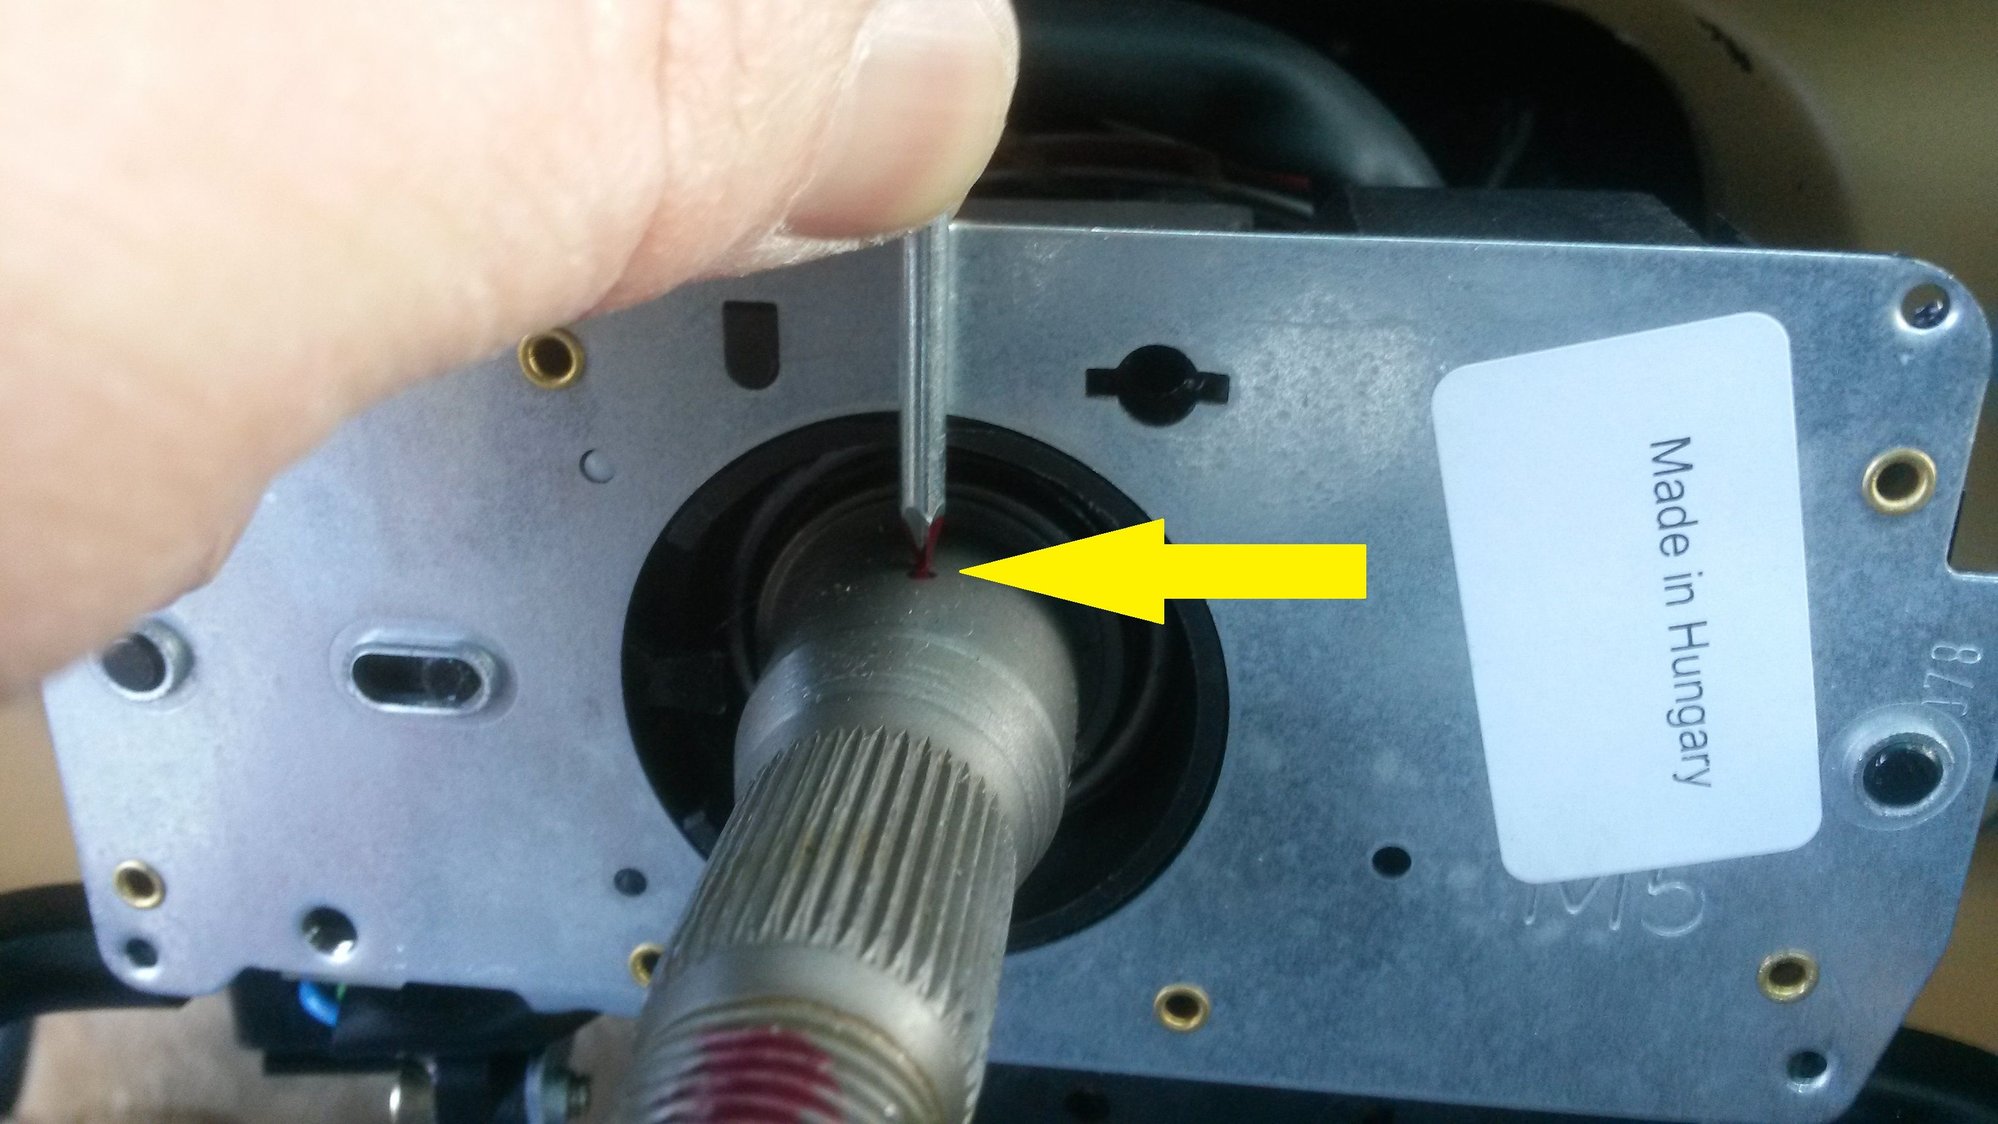
Reference materials said mark position of switch assembly, and I did not see a description of how to do so. So I got a nail and lined up with face of assembly with paint on tip, and touched shaft leaving a small dot of paint. Upon reassembly pushed stalk back until nail tip directly over paint dot. Perfect.
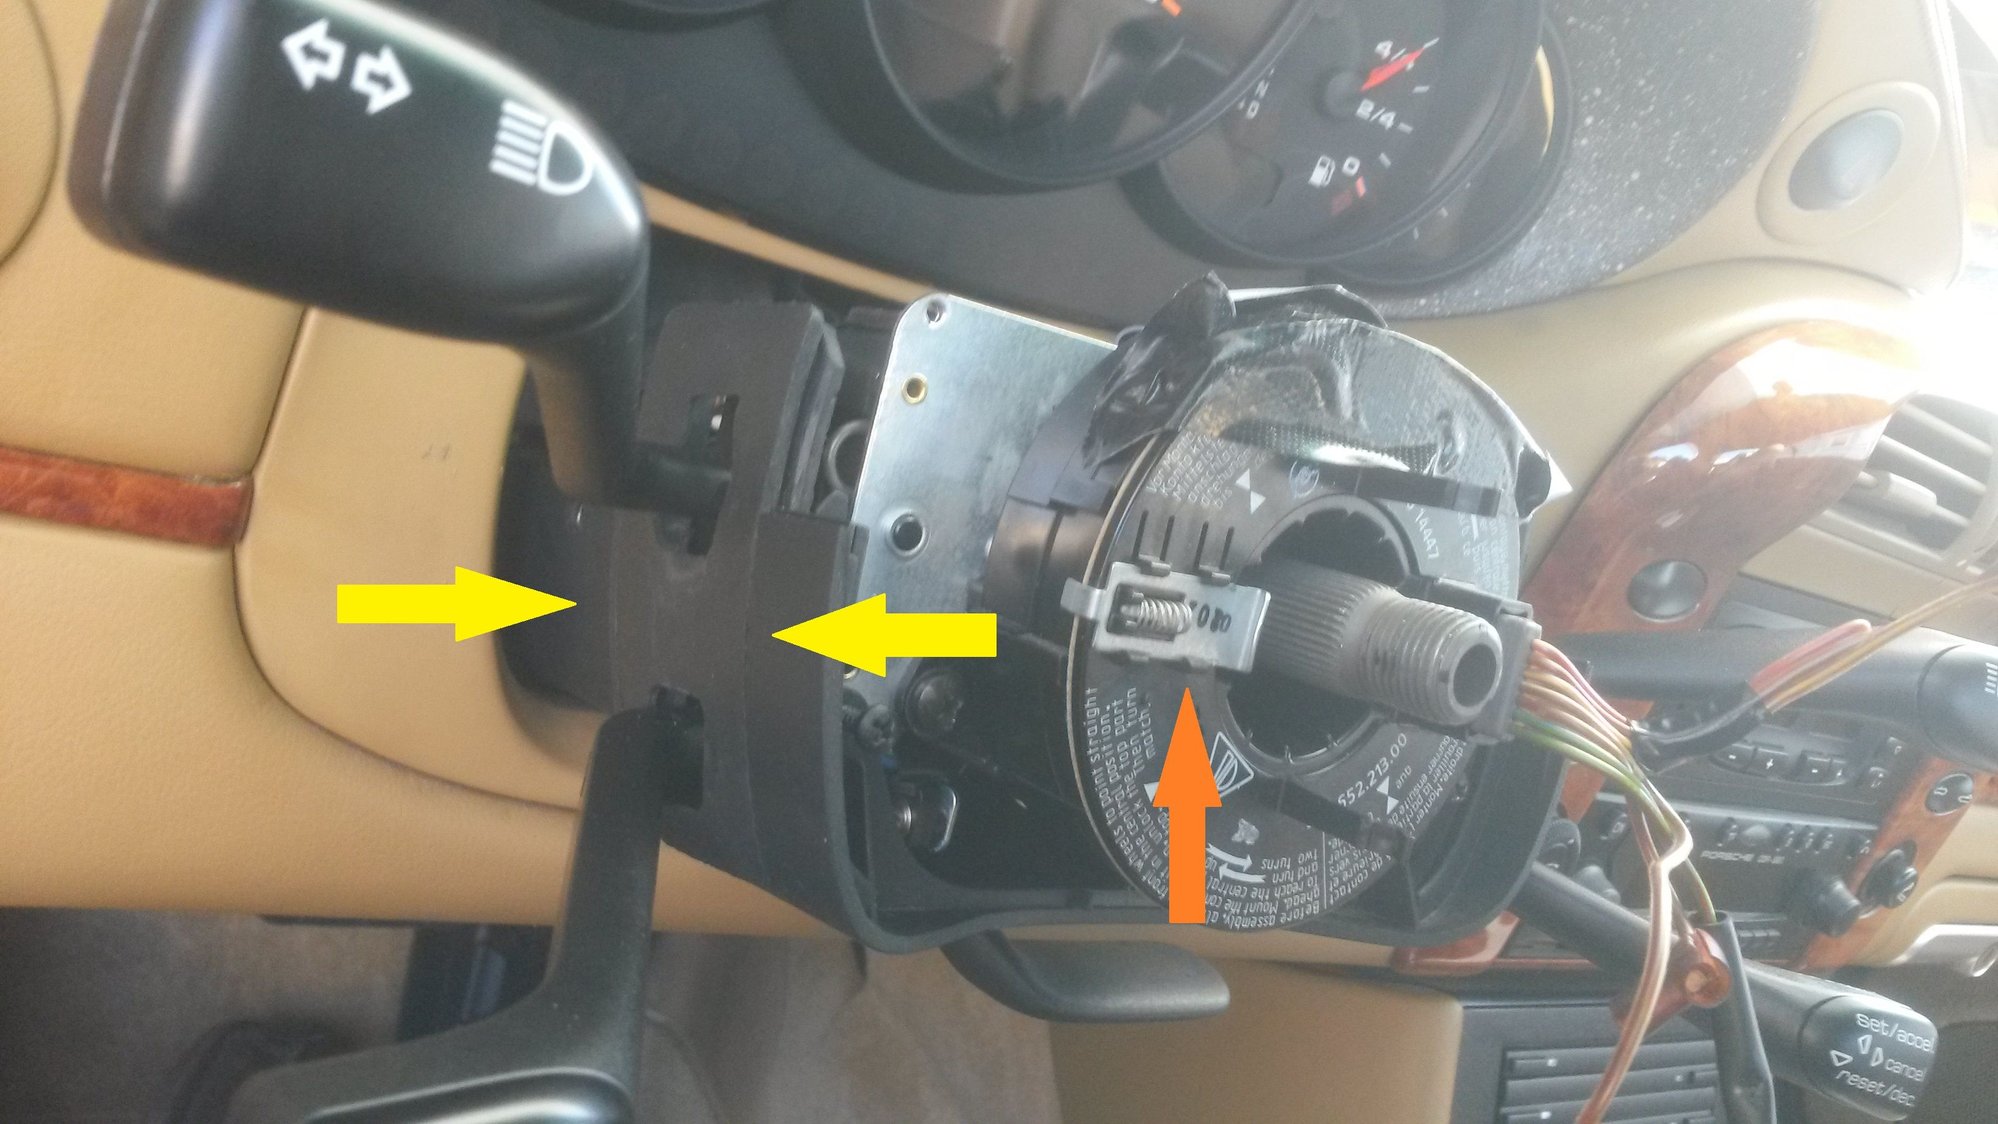
Yellow arrows show side shields correctly installed, surface smooth all the way across.
Orange arrow shows locking mechanism on clock spring, rear of steering wheel has small ramp that moves this over as wheel installed. On this one the front lid stayed loose and had to be held in place with a piece of tape, don't know if that is normal or if something wrong with clock spring assembly.
Torqued wheel and airbag fasteners and blue loctite airbag bolts, reconnected battery, reset accelerator pedal, windows, clock, and put code in radio. Drove vehicle and all functions on 4 stalks work, and horn works. Looks like 100% successful project, just wish could repair stalk assembly if breaks again.
At exactly 3 years it broke again, this time won't hold for right turns. Ordered 3-stalk version (4th stalk directly swaps from old assembly) pn 996 6132 1711 so saved money, and from FCP Euro so lifetime warranty.
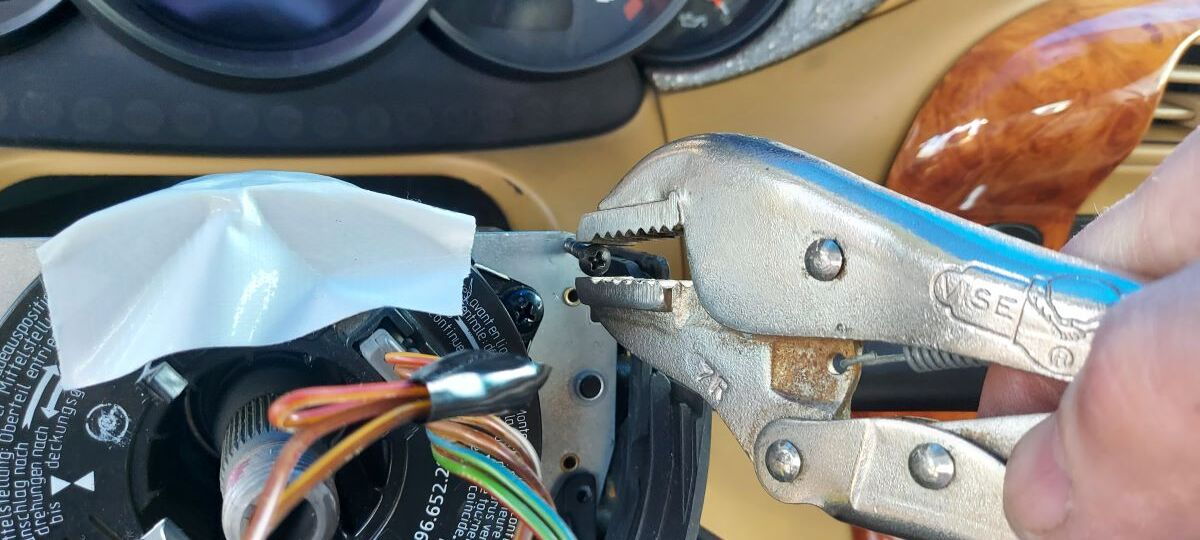
The 4 corner holes weren't threaded, don't remember that the first replacement. Screwdriver wouldn't turn them to create threads so carefully used vise grips.
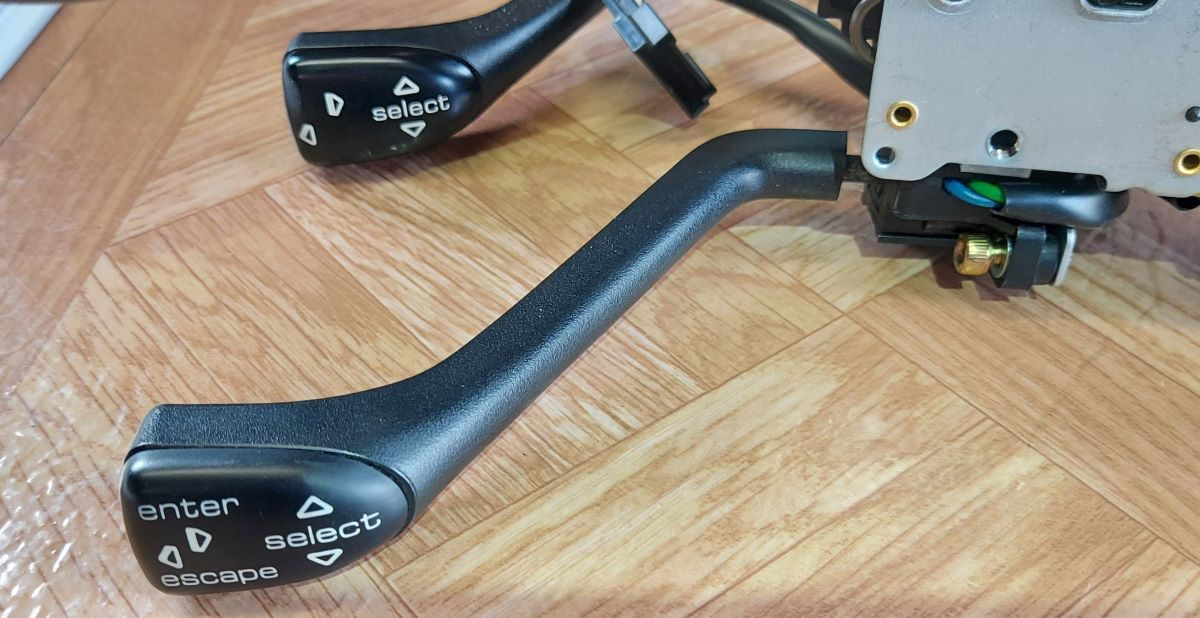
The 4th stalk now has a different cap, early version is close, current one in the back.
My turn indicator stalk just fell to the dreaded 996 faulty stalk issue - the right turn won't hold. I read the posts I could find - most discussing how to replace it - one or two stated it wasn't possible to repair. I don't handle bad news well. Can someone please dispute those posts? The Youtube videos show the steps to removing and replacing the unit, but it's a $450 part, new, or take a chance on a used one, still at least $100. WHY can't I repair it? It looks like there are a handful of rivets holding the metal box together - I can drill those out.. then surely it's just some damn piece of plastic that I can super-glue back together, right? Has anyone tried that? I do NOT want to spend $400 on this part right now, or anytime this decade.
I did repair mine but it's tricky. I riveted the plastic pieces back into position using a piece of .015 fiberglass as a bridge. Now the high beam switch has failed and I have to take it apart AGAIN!

 03-22-2019 | 08:51 PM