
Oh No!! .... Not another 993 Speedster Project - Pure Sex Edition

 05-21-2014, 04:55 PM
#92
Addict
Lifetime Rennlist
Member
Lifetime Rennlist
Member
Re: your text messages...
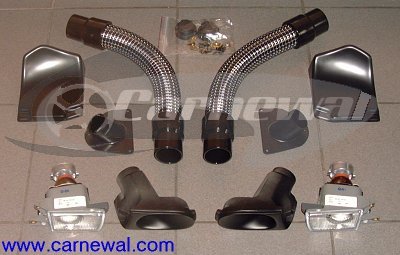
"Turbo 'S' Air Scoops"
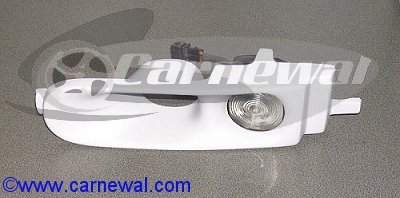
"Turbo 'S' Air Scoops with LED's"
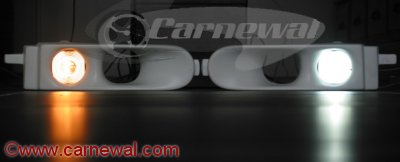
Type911.co.uk's "993 Brake Cooling Ducts with Lights"


"Turbo 'S' Air Scoops"
"Turbo 'S' Air Scoops with LED's"
Type911.co.uk's "993 Brake Cooling Ducts with Lights"
05-21-2014, 05:16 PM
#93
Addict
Lifetime Rennlist
Member
Lifetime Rennlist
Member
Re: TechArt, hope you have better luck than this:
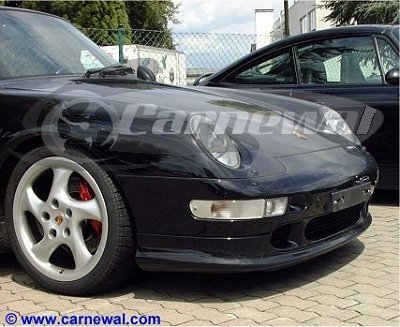
I installed a set of Techart ducts/lights and it to was a PITA that required some cutting of the backside of the bumper and some creative shaving of the parts to get it even close to lining up. Very disappointing for such expensive parts. Plus the brake duct only blows air into the wheel wel...useless.
I installed a set of Techart ducts/lights and it to was a PITA that required some cutting of the backside of the bumper and some creative shaving of the parts to get it even close to lining up. Very disappointing for such expensive parts. Plus the brake duct only blows air into the wheel wel...useless.
05-21-2014, 09:46 PM
#94
Rennlist Member
Thread Starter

Thanks for all your help.... but i ordered a new set of "Turbo S" brake ducts to trade with someone that has a used set of Techart Brake ducts. I am familiar with how to install these so i am not too worried.
Thanks Again!
Ben
Thanks Again!
Ben
Last edited by TwinTurbo959; 05-22-2014 at 01:43 AM.

 05-23-2014, 09:21 AM
#97
Rennlist Member
Thread Starter
Test fitting the rear clamshell and adjustment before final install.... i can't even imagine how many times this was done.

Note: 964 clamshell, you can tell by the supporting frame/hinge:

The guys at LA Dismantlers (Daniel et.al.) worked into the morning to get ahead on the install...
Now to get the springs on, and the wheels spaced properly....
-Ben
Note: 964 clamshell, you can tell by the supporting frame/hinge:
The guys at LA Dismantlers (Daniel et.al.) worked into the morning to get ahead on the install...
Now to get the springs on, and the wheels spaced properly....
-Ben
05-23-2014, 10:25 AM
#99
Drifting
05-23-2014, 10:55 AM
#100
Rennlist Member
Thread Starter
05-23-2014, 11:52 AM
#101
Agent Orange
Rennlist Member
Rennlist Member
I'd also replace the stone guards on the rear fenders. FDM sells their pre-cut sets for a very reasonable price.
05-23-2014, 11:55 AM
#102
Seared
Rennlist Member
Rennlist Member
05-23-2014, 08:56 PM
#104
Rennlist Member
Thread Starter

Yes, thank you for noticing.... it is off by a shade or two.... without hesitation, it is being repainted. These guys are doing a lot in very little time. I know they stand behind everything, and want the car to be 100% (or as close to it as possible).... i'm also getting the feeling that they want to keep it
 ...but that's not going to happen..... also, the stone guards are on order
 more pics coming soon....
-Ben
Last edited by TwinTurbo959; 05-23-2014 at 09:22 PM. Reason: added picture
05-23-2014, 09:08 PM
#105
Rennlist Member
Thread Starter
So... this is where we are at with the seats....
Logo:

Upper Portion:

Back with heated seat element:

Lower part with heated seat element:

Note the pattern of the heating element in the white material, this part can be cut to fit and it will not break continuity to the rest of the part. That is what is so special about this product... normally it is one "wire" that zig-zags through the material, and if it breaks at one point it stops working completely.
Leather is OEM Porsche Black, and White leather.
more to come soon....
-Ben
Logo:
Upper Portion:
Back with heated seat element:
Lower part with heated seat element:
Note the pattern of the heating element in the white material, this part can be cut to fit and it will not break continuity to the rest of the part. That is what is so special about this product... normally it is one "wire" that zig-zags through the material, and if it breaks at one point it stops working completely.
Leather is OEM Porsche Black, and White leather.
more to come soon....
-Ben