

Sub Frame Mounts
 01-05-2016, 10:20 PM
#31
Rennlist Member
Join Date: Nov 2010
Location: Central California
Posts: 3,484
Likes: 0
Received 14 Likes
on
13 Posts
Yes, you can easily do it on properly installed/quality jack stands. You will need a proper vocabulary, patience, air chisel, and the usual tools. Just start the lip in the recessed area of the subframe. Work side to side, and it'll get easier. The hardest part was making enough room to pry old bushes out, since my suspension was intact. Do the bottom halves first, so then you can hit the tops from inside. Don't chew up the subframe! Good luck.
 01-06-2016, 05:51 PM
#32
Rennlist Member

Join Date: Nov 2012
Location: PA
Posts: 282
Likes: 0
Received 0 Likes
on
0 Posts
Yes, you can easily do it on properly installed/quality jack stands. You will need a proper vocabulary, patience, air chisel, and the usual tools. Just start the lip in the recessed area of the subframe. Work side to side, and it'll get easier. The hardest part was making enough room to pry old bushes out, since my suspension was intact. Do the bottom halves first, so then you can hit the tops from inside. Don't chew up the subframe! Good luck.
01-06-2016, 06:57 PM
#33
Rennlist Member
Just did these last week. My car was on jack stands. One thing to note is that the whole sub-frame has to be lowered an inch or so to get the top bushings out and then back in. If you don't have an air chisel, which I didn't, you need to be creative and figure out other ways to push these out  . I used a smaller hand held cold chisel to start and remove the rear bottoms. they are the easiest and you shouldn't have any problems with them.
The front bottom bushings have room for a 2 jaw gear puller to fit in and press them out.
As far as the top bushings, I dropped the sub-frame down about an inch, put a round aluminum slug with a hole in the center up under the bushing and tightened the bolt to press them out.
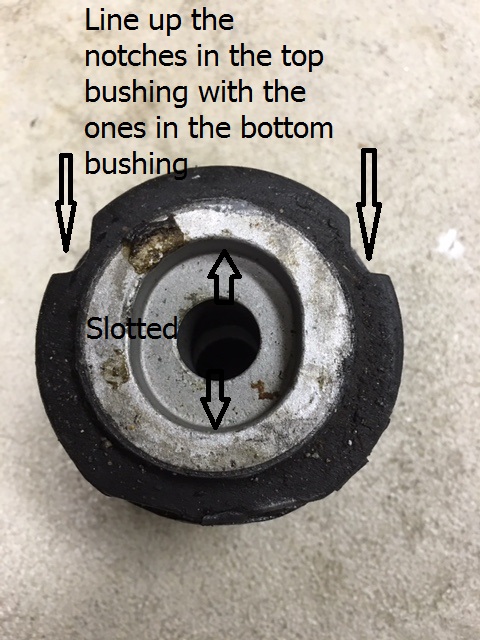
All of the bushings have elongated holes in them that need to be lined up between the top and bottom when installing them. Take notes when you pull the old ones out so that you line the new ones up the same as the old ones. Good luck
Old bushing
Here are some of the tools I used.
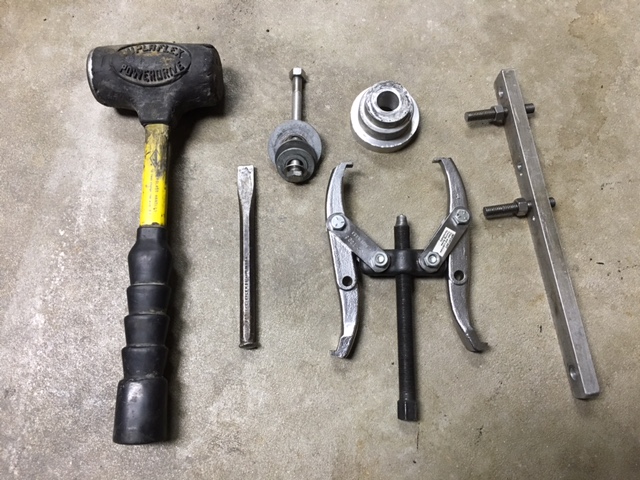
. I used a smaller hand held cold chisel to start and remove the rear bottoms. they are the easiest and you shouldn't have any problems with them. The front bottom bushings have room for a 2 jaw gear puller to fit in and press them out.
As far as the top bushings, I dropped the sub-frame down about an inch, put a round aluminum slug with a hole in the center up under the bushing and tightened the bolt to press them out.
All of the bushings have elongated holes in them that need to be lined up between the top and bottom when installing them. Take notes when you pull the old ones out so that you line the new ones up the same as the old ones. Good luck
Old bushing
Here are some of the tools I used.
Last edited by Bradford; 01-06-2016 at 07:47 PM.
01-07-2016, 02:06 PM
#34
Rennlist Member
Join Date: Nov 2012
Location: PA
Posts: 282
Likes: 0
Received 0 Likes
on
0 Posts
Just did these last week. My car was on jack stands. One thing to note is that the whole sub-frame has to be lowered an inch or so to get the top bushings out and then back in. If you don't have an air chisel, which I didn't, you need to be creative and figure out other ways to push these out . I used a smaller hand held cold chisel to start and remove the rear bottoms. they are the easiest and you shouldn't have any problems with them.
The front bottom bushings have room for a 2 jaw gear puller to fit in and press them out.
As far as the top bushings, I dropped the sub-frame down about an inch, put a round aluminum slug with a hole in the center up under the bushing and tightened the bolt to press them out.
All of the bushings have elongated holes in them that need to be lined up between the top and bottom when installing them. Take notes when you pull the old ones out so that you line the new ones up the same as the old ones. Good luck
Old bushing

Here are some of the tools I used.

. I used a smaller hand held cold chisel to start and remove the rear bottoms. they are the easiest and you shouldn't have any problems with them. The front bottom bushings have room for a 2 jaw gear puller to fit in and press them out.
As far as the top bushings, I dropped the sub-frame down about an inch, put a round aluminum slug with a hole in the center up under the bushing and tightened the bolt to press them out.
All of the bushings have elongated holes in them that need to be lined up between the top and bottom when installing them. Take notes when you pull the old ones out so that you line the new ones up the same as the old ones. Good luck
Old bushing
Here are some of the tools I used.
Thank you for the help! I just received the rennline bushing kit. I hope the install goes smoothly with minimal use of curse words.
Justin
11-09-2017, 12:47 PM
#35
cheers
11-09-2017, 04:05 PM
#36
Rennlist Member
The inch dimensions were for the CAD drawings.
The spherical self aligning washers were picked from this list in stainless steel
http://workholdingcomponents.mortonm...igning-washers
I hope this helps.


 11-10-2017, 03:26 PM
#38
Wow, what a coincidence, thanks for posting! Great idea with the spherical washers. I will try to redraw your sketch next week and post it here.