
Engine Drop Time Lapse


 01-07-2012, 09:19 PM
#62
Burning Brakes

Just need to throw the clutch vent stuff on and she's all ready to pop back in. I've been taking the time lapse stills, just been too busy to mess with making the videos now that I'm back to the grind and I think there's a microbrew somewhere calling my name.
Will I get it running this weekend? I want to say I sure as hell better, but we'll see, eh..
Been following your posts with humor and awe. You may not be 20 any more......but, you're not 50 either. Great job staying "after it".
I have one suggestion for consideration. I can not determine "why" Porsche decided to vent the clutch cavity to the engine air filter; but, my guess is that this was in response to US EPA laws......wanting to prevent clutch debris from entering the atmosphere. If you stop to think about it, the last thing in the world you would like to get into your engine is the abrasive dust that comes off your clutch. And, when you look at the elaborate piping and hose system that the Germans came up with, you just have to ask: "why"?
So, I would consider removing all the clap trap intended to vent the clutch to the air box and plug off the port from the bell housing. My understanding is that Porsche discontinued this design for the 996. Think about it.
Just my unaudited two cents.
01-08-2012, 01:48 PM
#63
Pro
Thread Starter
Join Date: Oct 2010
Location: Seattle, WA
Posts: 626
Likes: 0
Received 0 Likes
on
0 Posts
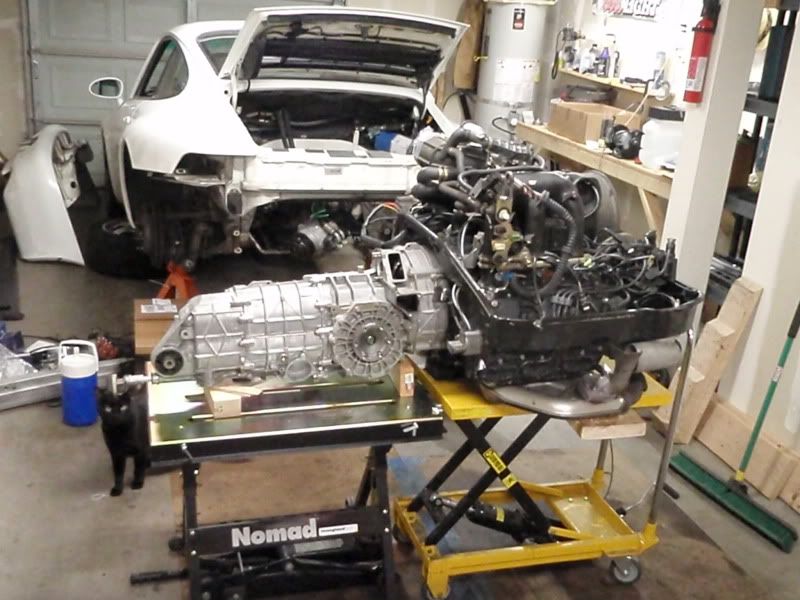
As previously mentioned, I was starting to get a little burnt out so the days were getting shorter. I decided to just merge several days of work together in to one long video. I am currently at just under 70 hours in to this, going by the number of stills I have captured. Subtracting the amount of time spent looking for what I had just set down, I am confident the figure would be about half of that.

So this video covers me from the point of drilling out the broken bolts to having everything ready to reinstall. Has been relatively smooth sailing since the broken bolt hump had been gotten over, then it was just a manner of remembering how it all went back together. I definitely have to give credit to Chris's German Auto for saving my butt after finding one of the intake sub-stacks cracked, Chris having one on hand saved a lot of waiting! The bolt had wound up seizing in the metal insert, and when I was breaking the bolt, the insert spun in the plastic and put a big crack in it. After this though, I finally started to pick up momentum again!
Thursday and Friday I skipped out of work early and routed the wires and wiring harness, dropped the intake back on, reinstalled the tins, cleaned up the heat exchangers, installed the clutch and finally got the transmission back on.
Yesterday was finishing up the odds and ends before everything goes back in. Installed the slave cylinder and hose, put the clutch vent back in (it has an open air box lid of some sort, I don't think it's doing a whole lot of ventilating anymore..I use paper filters so I am not super worried about getting a lot of clutch dust down the intake), and topped it off with a gallon of Redline 75-90. It took exactly the gallon to fill it, I guess I drained it pretty well.
The engine insulation pad was sagging but not in too bad of condition...but I decided it needed to come out. Both removing the pad itself and then cleaning up the adhesive fall in to the, "Not Terribly Fun" category, but it really made a dramatic difference in how the compartment looks...with a white car, it is a lot brighter and more open feeling..which of course highlighted that the bay was kind of dirty, so I gave it a quick once over as well.
I then dropped the engine to the ground, checked for clearance and..I think there might be a light at the end of the tunnel! I'm not ruling out another freight train, but I am feeling pretty good at this point.
Bonus points to anyone can spot what was giving me trouble getting the transmission to go on that last inch. It was a real mystery, hahaha..
01-08-2012, 02:00 PM
#64
Seared
Rennlist Member
Rennlist Member
Travis,
Excellent work - I look forward to dropping mine one day.
It would probably take me months to accomplish what you've done here...
Andreas
Excellent work - I look forward to dropping mine one day.
It would probably take me months to accomplish what you've done here...
Andreas
01-08-2012, 02:04 PM
#65
Rennlist Member
BTW, how did the ignition wire harness go together? Did you assemble them on the fly or did you use the dimensions on the schematics?
01-09-2012, 01:05 AM
#67
Pro
Thread Starter
Join Date: Oct 2010
Location: Seattle, WA
Posts: 626
Likes: 0
Received 0 Likes
on
0 Posts
Nope, not the pilot bearing....
Anyway it's back in place and I've got all the vitals hooked up, or I think I do at least. I went to fire it up, took a lot of cranking and then it sputtered...crank, sputter, crank, sputter. It wouldn't run/idle with the starter off, giving throttle input didn't affect it at all. The battery started dying so I hooked it up to the rental, and replaced the DME relay while I let it charge a bit. I can smell gas, so I don't think it's fuel..must be spark? I double-triple checked the plug wires after installing them, and checked resistance after assembling them. Plugs, caps and rotors are new. Hall sensor clearance was at .80mm, I didn't check the clearance on the old DMF.
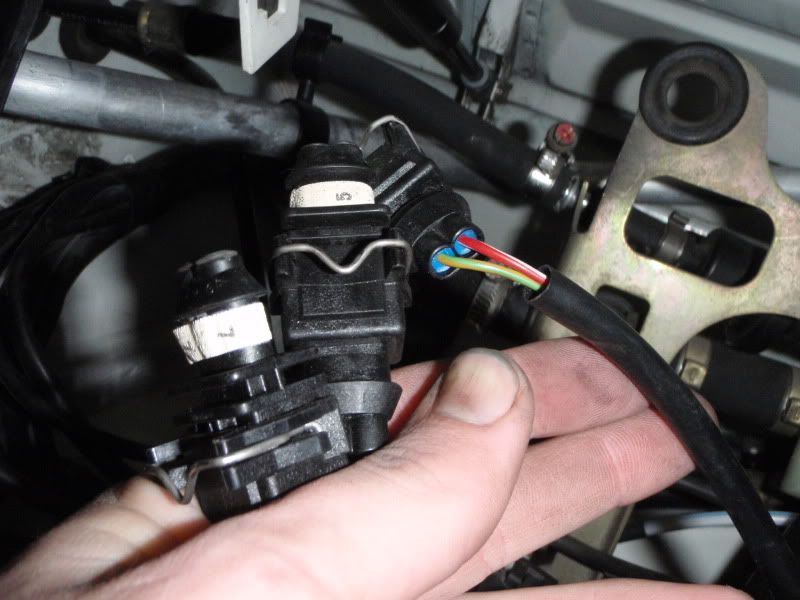
Only thing off the top of my head is that it might be something to do with the plug on the right, which I neglected to label somehow, and I can't find a home for it. And..what are the two to the left? They have some sort of rubber plugs or something on them, I'm guessing they're not used? Only other thing I could possibly think of would be the cylinder head temp sensor, the 993 handbook said this would not allow the car to start cold..and since I had a local member offer me his earlier and I declined, this probably moves it pretty high on the possibilities list..
Anyway it's back in place and I've got all the vitals hooked up, or I think I do at least. I went to fire it up, took a lot of cranking and then it sputtered...crank, sputter, crank, sputter. It wouldn't run/idle with the starter off, giving throttle input didn't affect it at all. The battery started dying so I hooked it up to the rental, and replaced the DME relay while I let it charge a bit. I can smell gas, so I don't think it's fuel..must be spark? I double-triple checked the plug wires after installing them, and checked resistance after assembling them. Plugs, caps and rotors are new. Hall sensor clearance was at .80mm, I didn't check the clearance on the old DMF.
Only thing off the top of my head is that it might be something to do with the plug on the right, which I neglected to label somehow, and I can't find a home for it. And..what are the two to the left? They have some sort of rubber plugs or something on them, I'm guessing they're not used? Only other thing I could possibly think of would be the cylinder head temp sensor, the 993 handbook said this would not allow the car to start cold..and since I had a local member offer me his earlier and I declined, this probably moves it pretty high on the possibilities list..
Last edited by TravisB; 01-09-2012 at 01:41 AM.
01-09-2012, 01:33 AM
#68
Advanced
Join Date: Nov 2010
Location: Orange County, CA
Posts: 53
Likes: 0
Received 0 Likes
on
0 Posts
From my thread on "'95 plug wire change surprise", Geolab's response:
>#3. In the 2nd picture there are two plugs that are not plugged in anywhere. These are directly under the heater blower. Does anyone know what these are for?
These two plugs serve two vacuum solenoids on the later Varioram intake versions of 993's. The same engine electric harness was used for all US and ROW engine versions. For your engine version, these plugs were left astray in the engine, and there are other plugs left alone on middle top of engine as well.
01-09-2012, 01:46 AM
#69
Pro
Thread Starter
Join Date: Oct 2010
Location: Seattle, WA
Posts: 626
Likes: 0
Received 0 Likes
on
0 Posts
Thanks alenz...so we've got two down, one more to go!
Well I am giving up for the night and I'm off to bed. I expect you guys to have this mystery solved for me by morning.
Well I am giving up for the night and I'm off to bed. I expect you guys to have this mystery solved for me by morning.
01-09-2012, 10:19 AM
#70
Rennlist Member
Travis, looking at my countless pics of my upper-engine disassembly, I think that plug with the YE/GN and RE/WH wire goes into the black casing that you can see through that bracket at the upper right. There is a hose going to each side of it and on top of what looks like a valve, a connection for that plug.
01-09-2012, 10:44 AM
#71
Pro
Thread Starter
Join Date: Oct 2010
Location: Seattle, WA
Posts: 626
Likes: 0
Received 0 Likes
on
0 Posts
OK, I will re-check that area...what's puzzling is how clean it is, almost like it was covered or something. I've been trying to find wiring diagrams to try and figure it out by the colors of the wire but haven't found anything yet..
Nope, not the throwout bearing..
Harnesses went together pretty well. I did the exact opposite if what I was supposed to and just disassembled everything at once, so it was all by the instructions...had to tweak a couple spots by a few-four mm's but they fit pretty well all in all.
I will say marking the label with the position as well as the length would make things easier..not a big deal really but since you're already making labels, it would be a time saver that doesn't add any cost or effort. One thing I did that helped smooth the process along was marking the place for the looms with small zip ties..trying to hold them together to snap the halves together while using a ruler was a pain, and the zip tie gives a solid "stop" to rest against compared to, say, masking tape.
All in all I am very glad I elected to do this, the savings basically paid for one week of my rental car. Thanks for putting these together!!
01-09-2012, 03:05 PM
#73
Drifting
Travis,
+993 for the inventive sharing of your engine drop!
As for your meticulous cleaning of the tranny...sigh...you people....as if it wasn't already sure that my **** retentive nature would require similar, now I HAVE to do this.
Congrats on a job well done!!! (I'll assume the last plug issue will be quickly resolved and this premature statement won't result in a jinx on the project!)
+993 for the inventive sharing of your engine drop!
As for your meticulous cleaning of the tranny...sigh...you people....as if it wasn't already sure that my **** retentive nature would require similar, now I HAVE to do this.
Congrats on a job well done!!! (I'll assume the last plug issue will be quickly resolved and this premature statement won't result in a jinx on the project!
)
01-09-2012, 03:20 PM
#74
Pro
Thread Starter
Join Date: Oct 2010
Location: Seattle, WA
Posts: 626
Likes: 0
Received 0 Likes
on
0 Posts
OK...well, Alex was right about that particular plug. So now everything is hooked up..well, I don't have the heater blower stuff in; I assume this wouldn't cause it to not start though right?
I'm going to start diving in to the timing I guess..
I'm going to start diving in to the timing I guess..
01-09-2012, 04:00 PM
#75
Pro
Looking at your time lapse again in slow mo where you inserted the distributor shaft, I think you missed it by 1 tooth.
This might be the cause of the engine not starting.
Just a guess and I hope you don't get my humor wrong.
Good luck finding the problem. If it's not the shaft it might be the plug cables.
Ed
This might be the cause of the engine not starting.
Just a guess and I hope you don't get my humor wrong.
Good luck finding the problem. If it's not the shaft it might be the plug cables.
Ed