
Engine Drop Time Lapse
 12-30-2011, 05:15 AM
#46
Pro
Thread Starter
Join Date: Oct 2010
Location: Seattle, WA
Posts: 626
Likes: 0
Received 0 Likes
on
0 Posts
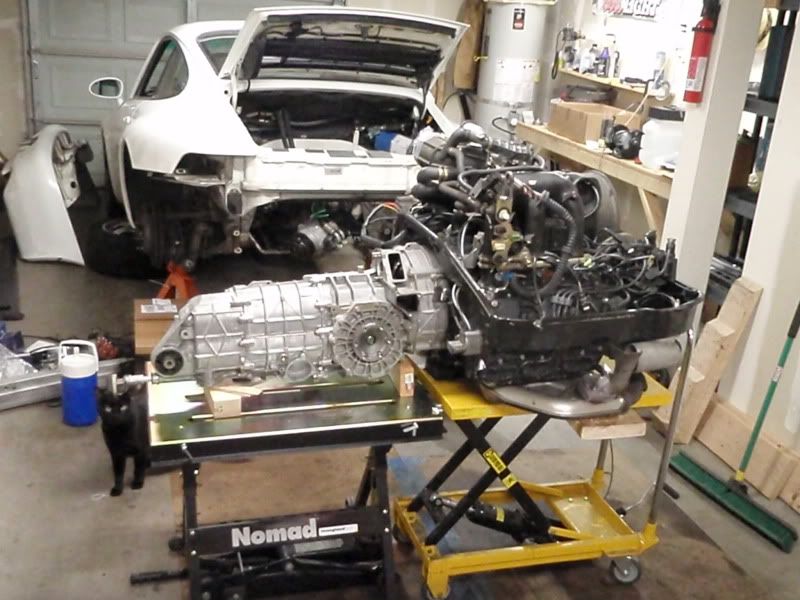
Day 6: Spend some, save some..also questioning if I'm going to get this wrapped up by the 3rd.
First thing, I went in to get the injectors from the rebuilders. That was a spendy trip, for what I wonder might be a relatively easy task with a special tool or two. Although I think I am mostly bitter about the fact that they only look cleaner..the flow numbers were exactly the same before and after. An operator error with the camera missed the first couple hours of the day, but up until now I was working on the stuck bolts. I worked on the shroud first, grinding the bolt flat on the top and getting the center drilled out. The extractor's corners crumbled somewhat after my second attempt, I think I got lucky there! But they didn't work. But then I remembered I had a HeliCoil kit somewhere, left over from when I found a couple cross threaded bolts in my former motorcycle's frame. And they weren't particularly big...I get lucky again, I just happen to have the right size kit. That thing cost something like $70, glad I can put it to use again!
First one goes smooth as butter...the second one, the tip of the pilot bit breaks. Well, that's a bummer. I was still able to drill deep enough to get almost a full coil in, I may just have to use a shorter bolt in that spot. I grab some lunch, remember to turn the camera on and you get to watch the drill bit walk on me working on the A/C compressor bracket. I think I didn't quite get the top of the bolt flat, or maybe I didn't get the center punch quite large enough.
Moving on to the intake, I grab the intake stack to work on making the drill jig out of it. The broken bolt is stuck in the plastic piece's insert...and the plastic piece is cracked from the insert spinning when I was trying to break it loose. Crap! After swearing profusely I start calling all the shops around here trying to find someone that's got one laying around, eventually extending my search to Pelican and FDM. Tomorrow morning I am supposed to check back with a local shop to see if they've got one laying around, otherwise I'm going to have to wait until Saturday or Monday/Tuesday. Monday is my last day of vacation; theoretically I could have everything else ready to go and with a reallllly long and productive day maybe get it all back together.
So after that, I decide to back off that area of the project and work on some simpler projects. Plugs, valve cover gaskets, RMS, and got the chain covers ready to go, just need to go get some Loctite 574(?) and button it back up. I also checked out the lifters, thankfully they were all fine..I figured I'd wind up replacing the 6 exhaust lifters at least. So my financial hit from the injectors is more than neutralized now I suppose!
 12-30-2011, 11:13 AM
#47
Nordschleife Master
Still sounds like your beating the odds here, Travis. I mean, only three seized bolts and one cracked part? A good day in the garage in my book... and the lifter money goes back in the kitty .. (sorry Charlie ;-)
12-30-2011, 12:19 PM
#48
Addict
Rennlist Member
Rennlist Member
Join Date: Jul 2003
Location: Agoura Hills (Los Angeles) California
Posts: 5,181
Received 357 Likes
on
211 Posts
What a great posting. Thanks for doing it. For most of us, changing the oil is a challenge and we feel good about ourselves when we complete it with only minor spells. This is over the top. Good luck and keep 'em coming.
12-30-2011, 01:40 PM
#49
Addict
Lifetime Rennlist
Member
Lifetime Rennlist
Member
Good work so far!!
Why do you need Loctite 574? Certainly not for any of the valve covers or chain covers. Lubricate the rubber gaskets with products like Loctite 111 or the equivalent, and use 7ft-lbs. Note that you will need a smaller torque wrench to hit this small torque value, or you can use the finger-o-matic method, which means the bolts will be just-tight. :-)
(you have full access to the covers, but if the engine is in the car, it's often impossible to get a torque wrench in).
Cheers,
Mike
12-30-2011, 02:10 PM
#50
Rennlist Member
Snap-On TMAMXS5E, 1/4" drive stubby 5 mm hex...
 12-30-2011, 02:40 PM
#51
Pro
Thread Starter
Join Date: Oct 2010
Location: Seattle, WA
Posts: 626
Likes: 0
Received 0 Likes
on
0 Posts
Because that's what is recommended on your DIY page! :-p Is 111 better than 574? I was just getting ready to run out to the parts store right now..
Edit: just saw the 111 is a Dow Corning number according to your post in another thread..and also that it just needs to be lubed. Motor oil, now that I am practically swimming in!
Porsche recommends using Loctite 574 on the gaskets before they are tightened.
Last edited by TravisB; 12-30-2011 at 03:04 PM.
12-30-2011, 11:59 PM
#52
Addict
Lifetime Rennlist
Member
Lifetime Rennlist
Member
Because that's what is recommended on your DIY page! :-p Is 111 better than 574? I was just getting ready to run out to the parts store right now..
Edit: just saw the 111 is a Dow Corning number according to your post in another thread..and also that it just needs to be lubed. Motor oil, now that I am practically swimming in!
Edit: just saw the 111 is a Dow Corning number according to your post in another thread..and also that it just needs to be lubed. Motor oil, now that I am practically swimming in!
The 574 is for sealing the case halves and the cam towers - not rubber gaskets.
There are other recommended coatings for the rubber gaskets, but this is the stuff I use. I remember a thread where Darin states another coating, but I do not seem to have it bookmarked...
Cheers
Mike

 01-03-2012, 07:54 PM
#54
Pro
Thread Starter
Join Date: Oct 2010
Location: Seattle, WA
Posts: 626
Likes: 0
Received 0 Likes
on
0 Posts
Haha, sorry to leave you guys hanging. Nothing new to report really, I was starting to get burnt out a little and then some personal drama on new years completely sucked the life out of me so I'm taking a few days off as a breather I guess. Might get back on it tomorrow, but I said that yesterday..
 01-03-2012, 09:59 PM
#56
Pro
Thread Starter
Join Date: Oct 2010
Location: Seattle, WA
Posts: 626
Likes: 0
Received 0 Likes
on
0 Posts
01-04-2012, 01:40 AM
#57
Drifting
All things in moderation. Sounds like you've taken the breather you need. I've found myself on many late nights screwing more up than I'm fixing. It's amazing how much better things go when you've stepped back from it for a short while. Great post though, enjoyed following it and Charlie. Kind of like "Where's Waldo". 
01-04-2012, 12:06 PM
#58
Nordschleife Master
 I hate 'personal drama' .. it just sucks and I think we should eliminate it from the universe for the common good.
  01-07-2012, 12:24 AM
#59
Pro
Thread Starter
Join Date: Oct 2010
Location: Seattle, WA
Posts: 626
Likes: 0
Received 0 Likes
on
0 Posts

Just need to throw the clutch vent stuff on and she's all ready to pop back in. I've been taking the time lapse stills, just been too busy to mess with making the videos now that I'm back to the grind and I think there's a microbrew somewhere calling my name.
Will I get it running this weekend? I want to say I sure as hell better, but we'll see, eh..
Last edited by TravisB; 01-07-2012 at 01:32 PM.