


3rd Brake Light -> LEDs

Super Moderator
Needs More Cowbell
Lifetime Rennlist
Member
Needs More Cowbell
Lifetime Rennlist
Member

Joined: Mar 2002
Posts: 29,323
Likes: 17
FWIW, this was a similar kit once available for 968's
http://www.968engineering.com/chmslconversion.html
http://www.968engineering.com/chmslconversion.html
Burning Brakes
Joined: Sep 2005
Posts: 774
Likes: 6
From: Sunny Miami
uhmmmm ....i like this DIY ... love the led looking ...
i think i can get 12V leds ... One of my business are semiconductors ..
we sell over 10 million led pcs a year ...
With 12V leds, you dont need resistors, and you can connect them parallel to the 12VDC without aditional mess ...
should be extremelly easy to do with 12V leds...
If there is enough people interested i could factory order them ...
But let me check if they can supply to me .
I think my factory/vendor has, as we currently sell a 12V red led , with intermitent capability. (Not suitable for this DIY of course)
let me ask and check out also the brightness.
can not be xtremelly bright , as this would be an issue more than an advantage.
will keep you posted ...
eloy
Seared
Rennlist Member
Rennlist Member
Joined: Jul 2005
Posts: 16,885
Likes: 490
From: Ellicott City, MD
Advanced
Joined: Mar 2002
Posts: 60
Likes: 0
From: Sammamish, WA
i wonder if we can just replace them with these...
http://www.allelectronics.com/make-a...T1-3/4-/1.html
http://www.allelectronics.com/make-a...T1-3/4-/1.html
Pro

Joined: Aug 2006
Posts: 548
Likes: 0
From: Schaumburg, IL.
Those should be drop in replacements for the lamps. Because led's are diodes you just need to assure the correct polarization of each one. No damage to anything if wrong the diodes with incorrect polarization just won't light up. I'd like to see how bright those are. I'd be interested. I might prefer 12V white high intensity LED's as the white hi's are very bright and the lens assembly is already red.
These might be brighter
http://www.allelectronics.com/make-a...T1-3/4-/1.html
But yes... I've had my light bar apart and put in new bulbs... they are just about the same size as 5mm LED's I wouldn't go any bigger than 5mm LED's. if they are 12V it would be a direct drop in replace for the bulbs. For $11 + shipping it sounds like a nice mod.
Nick
Advanced
Joined: Mar 2002
Posts: 60
Likes: 0
From: Sammamish, WA
that'll be the only thing i am concerned with. From the spec, i am not sure how much head room there are for these. I would like to see LEDs working upto 15V without dying.
But, it won't be too bad, if i only have to add one or 2 diode (not LED, about 0.6V drop per diode, i think) to reduce voltage.
But, it won't be too bad, if i only have to add one or 2 diode (not LED, about 0.6V drop per diode, i think) to reduce voltage.
Pro
Joined: Aug 2006
Posts: 548
Likes: 0
From: Schaumburg, IL.
I just looked at the tech sheet for the LED's it would be close. 13.6V would be ~25ma forward current with the absolute max spec being @ 30ma. it is a little close for comfort. They would run on the high side of the design specs and may shorten their life some. A single diode drop of ~.7 v would help some or a resistor or even a single small 12V (TO-92 package) regulator if you could stuff it into the lightbar would work, but all would require a mod to the PCB or wiring.
EDIT: Well scratch the TO-92 12V regulator idea. a regulator that small only could run 100ma ~4 LED's nowhere near the 24 needed. Still looking at options...
Nick
EDIT: Well scratch the TO-92 12V regulator idea. a regulator that small only could run 100ma ~4 LED's nowhere near the 24 needed. Still looking at options...
Nick
Rennlist Stories
The Best Porsche Posts for Porsche Enthusiasts

Porsche Reveals Coupe Variant of the Electric Cayenne With a Fresh Look
Verdad Gallardo
10 Porsche Colors That Have More Personality Than Most People
Verdad Gallardo
Guntherwerks' Final Speedster Creation Is the Ultimate Porsche Restomod
Verdad Gallardo
10 Reasons I Hate Going to the Porsche Dealership (& the 1 Reason I Stay)
Joe Kucinski
Porsche Shakes Up The N�rburgring Lap Record Table Once Again
Verdad Gallardo
6 Ways the Porsche 911 GT3 S/C Redefines Performance
Joe Kucinski
10 Wildest Homologation Specials Porsche Ever Sold
Verdad Gallardo
Super Rare RUF BTR III Comes Out of Hibernation, Looking For a New Home
Verdad Gallardo
10 Porsche Opinions That Can Start a Fight
Joe KucinskiInstructor
Joined: Feb 2005
Posts: 105
Likes: 8
I'm working on an LED mod at the moment - if it works I will reveal all. If it doesn't I'm out �36.
BTW, LEDs must be superbright, and red (not white) - something to do with wavelength, spectrums and colours and the difference between the spectral output of incandescent bulbs compared to LEDs.
BTW, LEDs must be superbright, and red (not white) - something to do with wavelength, spectrums and colours and the difference between the spectral output of incandescent bulbs compared to LEDs.
Pro
Joined: Aug 2006
Posts: 548
Likes: 0
From: Schaumburg, IL.
I'm working on an LED mod at the moment - if it works I will reveal all. If it doesn't I'm out �36.
BTW, LEDs must be superbright, and red (not white) - something to do with wavelength, spectrums and colours and the difference between the spectral output of incandescent bulbs compared to LEDs.
BTW, LEDs must be superbright, and red (not white) - something to do with wavelength, spectrums and colours and the difference between the spectral output of incandescent bulbs compared to LEDs.
Nick
Instructor
Joined: May 2007
Posts: 180
Likes: 1
From: Atlanta
I'm all over this. My 3B light is out, and the local dealer said the rear window has to be replaced to fix it (?! $1300...?).
I haven't devoted the time to exploring the pcar fix yet - I'd rather have LED's anyway.
Waiting for a resolution...")
I haven't devoted the time to exploring the pcar fix yet - I'd rather have LED's anyway.
Waiting for a resolution...
Instructor
Joined: Feb 2005
Posts: 105
Likes: 8
Well, 'tis done. Not exactly plug and play but close enough. Extremely happy with results - I didn't do a side by side with originals but I would definitely say they are brighter. Certainly illuminate faster.
I used these - http://www.xenons.biz/products/ledwe...-dash-led.html They are red superbright 10K mcd 12v wedge types (with integral current limiting resistor and additional diode) and need to be 'adjusted' a little to replace the originals.
I'm not skilled at posting pictures and procedures but I took a few along the way. The whole job took me less than an hour.
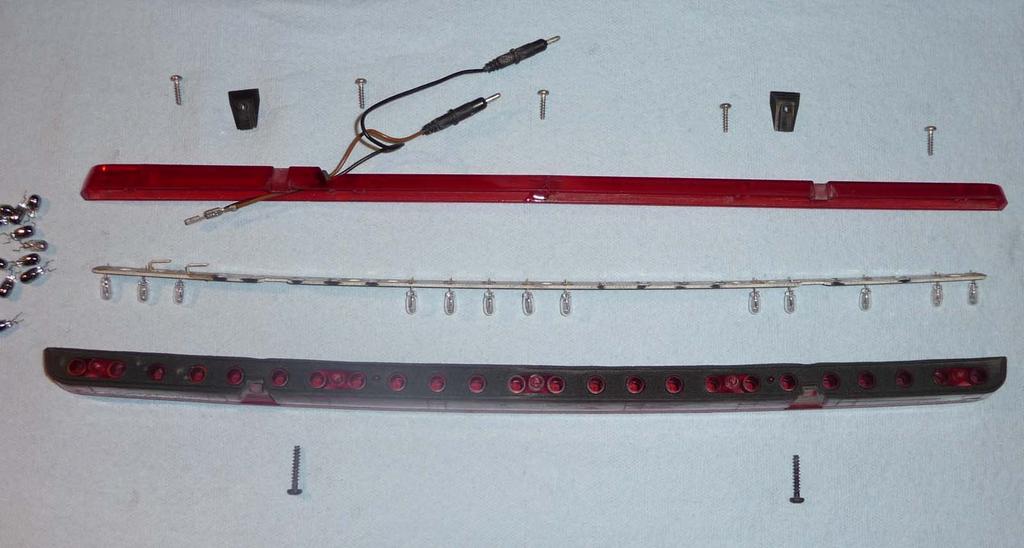
Pop off the light cover, undo the 2 securing nuts, unplug connectors, move to bench. 2 screws looses the light assembly from the back plate, another 5 screws gets you to the bulb holding pcb. Gently ease the pcb (and bulbs) away from the front lens -
led01.jpg
LED used -
led02.jpg
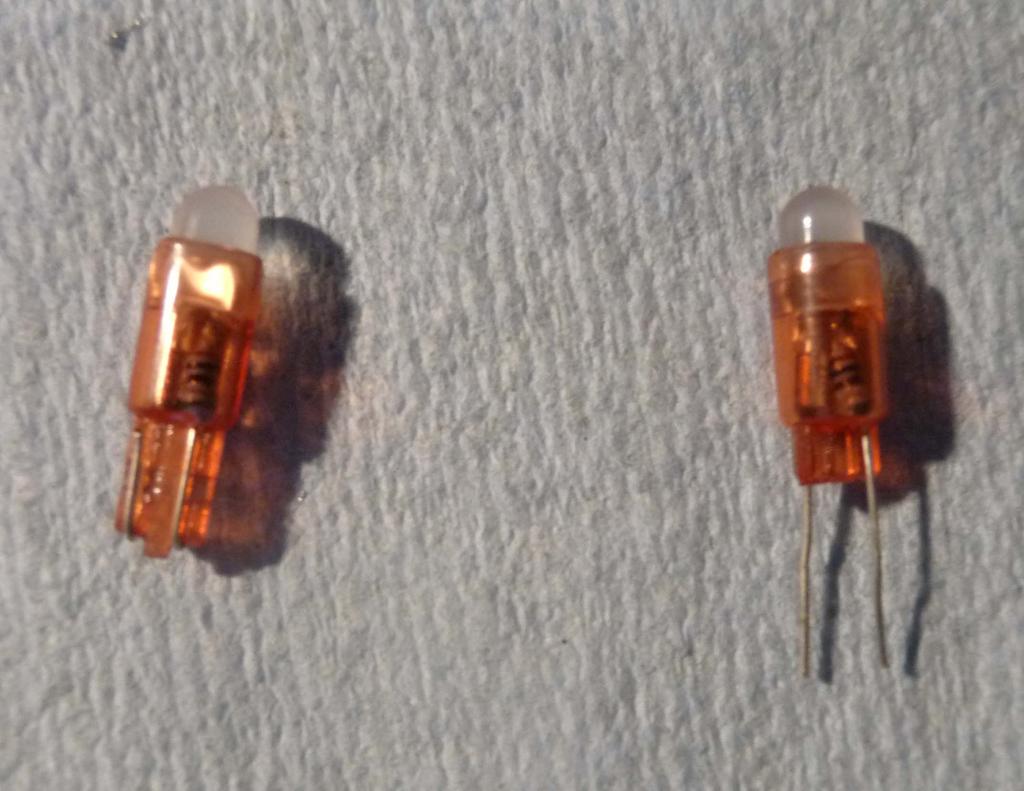
Adjustment required. Gently unfold the wire 'legs' and use some small end cutters to nip off about half of the plastic wedge base. Much easier than it sounds. This is to set the LED height roughly the same as the original bulb height.
led03.jpg
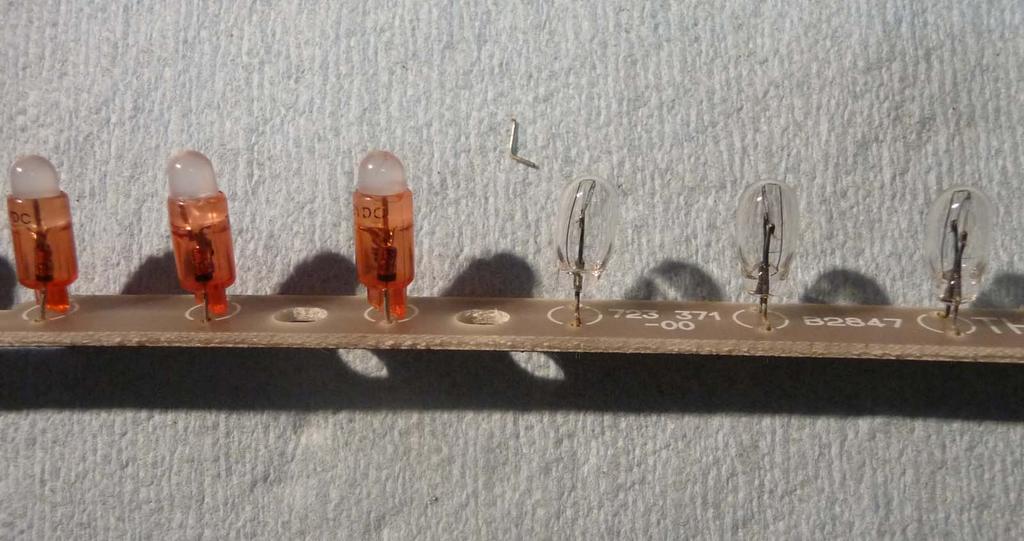
Desolder original bulbs and replace with the modified LEDs. IMPORTANT - ensure that each new LED is orientated the same way along the board (ie - all 'resistor' legs of the LEDs in the same track). It doesn't really matter which track at this stage as the power connectors can be connected to suit. For information - the positive connection (brown) will feed the pcb track side where the resistor side of the LEDs are soldered. Picture of LED and original.
led04.jpg
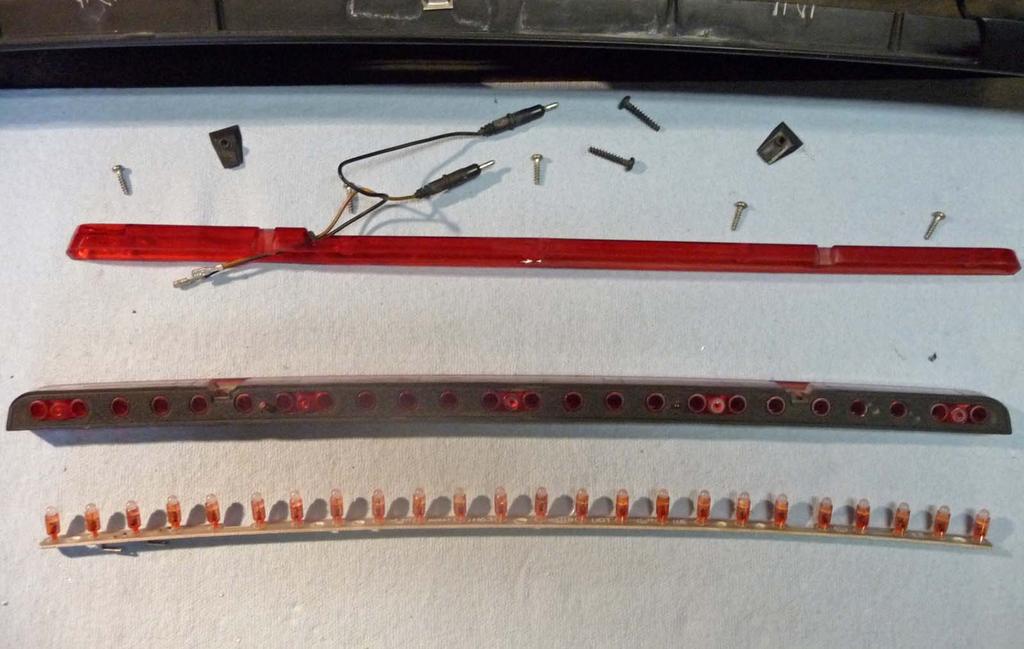
Ready to reassemble.
led06.jpg
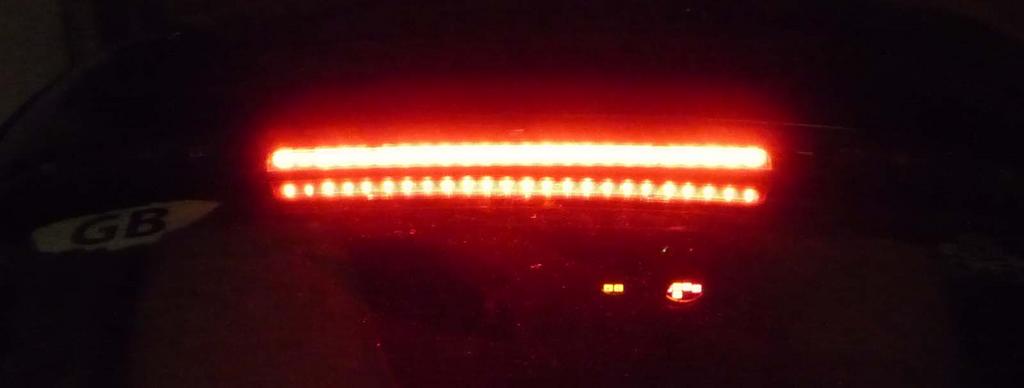
Back on the car (cover not fitted - away for paint).
led07.jpg
led08.jpg
I chose this way to achieve LED lighting because I couldn't get enthusiastic about cutting tracks, calculating series resistances, adding wires and resistors. These little babies are automotive-designed and have it all built in. Very quick and easy modification. Total cost was actually �34 shipped for 30 LEDs (so I've got 6 spares into the bargain). Just replacing the 11 dead bulbs (that initiated this quest) with Porsche originals may have cost the same but I think this solution is ideal.
Trev
I used these - http://www.xenons.biz/products/ledwe...-dash-led.html They are red superbright 10K mcd 12v wedge types (with integral current limiting resistor and additional diode) and need to be 'adjusted' a little to replace the originals.
I'm not skilled at posting pictures and procedures but I took a few along the way. The whole job took me less than an hour.
Pop off the light cover, undo the 2 securing nuts, unplug connectors, move to bench. 2 screws looses the light assembly from the back plate, another 5 screws gets you to the bulb holding pcb. Gently ease the pcb (and bulbs) away from the front lens -
led01.jpg
LED used -
led02.jpg
Adjustment required. Gently unfold the wire 'legs' and use some small end cutters to nip off about half of the plastic wedge base. Much easier than it sounds. This is to set the LED height roughly the same as the original bulb height.
led03.jpg
Desolder original bulbs and replace with the modified LEDs. IMPORTANT - ensure that each new LED is orientated the same way along the board (ie - all 'resistor' legs of the LEDs in the same track). It doesn't really matter which track at this stage as the power connectors can be connected to suit. For information - the positive connection (brown) will feed the pcb track side where the resistor side of the LEDs are soldered. Picture of LED and original.
led04.jpg
Ready to reassemble.
led06.jpg
Back on the car (cover not fitted - away for paint).
led07.jpg
led08.jpg
I chose this way to achieve LED lighting because I couldn't get enthusiastic about cutting tracks, calculating series resistances, adding wires and resistors. These little babies are automotive-designed and have it all built in. Very quick and easy modification. Total cost was actually �34 shipped for 30 LEDs (so I've got 6 spares into the bargain). Just replacing the 11 dead bulbs (that initiated this quest) with Porsche originals may have cost the same but I think this solution is ideal.
Trev