

Tool Storage MOD. (Pics !!!)
 07-02-2008, 05:39 PM
#1
Track Day
Thread Starter
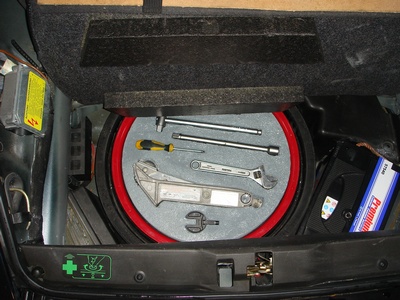
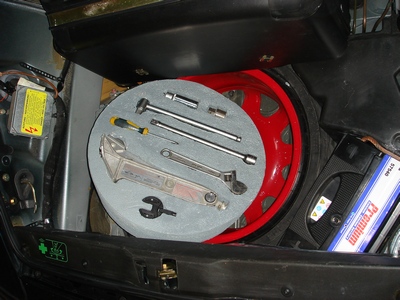
This is my first mod.........although I'm more than happy with my car there was always a small detail that kept on bothering me, I think that just maybe Porsche didnt really give to much attention on the storage of our tools, so I came up with this solution.
It was VERY easy to make by using a foam block, I sculpted it to fit into my spear tire, then I chose the tools I wanted I continued by outlining every tool and carving out the excess foam, after I brushed it by applying some grey colored oil-based paint.
Anyway It's almost midnight now as I live in Greece (time difference) so I better get going, Tommorow I'll do the whole DIY write up!!
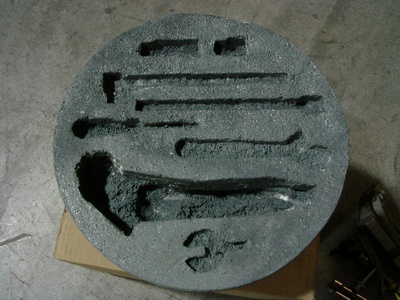
 07-02-2008, 06:47 PM
#2
Rennlist Member
Lol, that's awesome! My only comment is that you should throw out that jack...those things are scary. I used to carry around a little cheap jack from a Saturn (got off ebay) until I gave up and got AAA.
p.s. what's that black tool?
p.s. what's that black tool?
Trending Topics
 Multi layers might be cool too.
07-03-2008, 04:16 PM
Multi layers might be cool too.
07-03-2008, 04:16 PM
#11
Track Day
Thread Starter
Ok, well first of all........the specific foam block is used generally for home insulation, so it can be found in stores that supply home building materials, such as bricks, cement, roof tiles, wood etc. or if you guys know someone thats a Contractor or in the construction business, just ask them I'm sure they will provide you easy a foam block!!
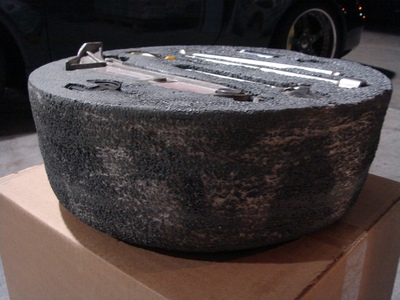
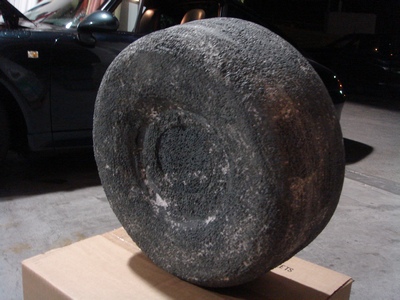
Anyway I started off by using a foam block with measurements roughly 45cm (17.7") x 45cm (17.7"). But if you can find a block that it's measurements are just over the spear rim diameter it's even better, cause it will save you time from cutting and scraping.
On the foam block thus using a pen I drawed out the inner rim diameter and dept also, at this stage I used a hand saw to cut at the excess foam, just don't over do it because at the end we want it to have a nice snug fit (lose is no good) remember we will be scraping off the rest.
After the cutting I'm now left with a very rigid and rough foam block, so now starts the formation. I must admit that forming was not as easy as I thought, I tried a million different tools till I finally found the right tool for the job.............and it was a brush with steel bristols (the one's that are used for cleaning BBQ'S, scraping paint off rails etc etc.) I effortlessly sculptured the foam to the desired measurements of the spear rim. Note: Start from underneath the block to get the curves of the bottom of the rim first, then gradually work your way upwards scraping off foam in a radius motion, this way step by step you will see your foam block start to fit in. Make sure to stop once n' a while to test for fitting.
After all the scraping is all done and you have a nice snug fit, grab the tools of your desire and place them on top, put them how ever you like best...............Grab a pen again and outline on the foam all the tools that you have placed on top, soon as you have done this remove the tools, now get a razor knife and cut out all the outlining of the tools and also dig out to the depth of your liking. Note: Do not cut out exactly on the outline, remember that we want the tools to have a tight fit, I think that there is nothing more annoying then tools rattling about everywere!! After this is done, test the tools to see that they fit nice n' tight, remove the tools again and now prepare for painting.
The color plays no role just choose the color you like the most. Very Important: Do not what so ever use spray paint or any high chemical manufactured paints it will just melt away your foam block and all your hours of cutting and scraping will be tosed down the drain............just use oil-based paints even water-based will do just fine. Give it a good thick layer of paint all over and let it set over night, and the next morning there you have it your own Tool Storage waiting to be put in place.
There is no need to rush this DIY, take your time, enjoy it.............it's VERY easy and at the end the results are great!! It took me no more than rougly 2,5 hours to finish!!
I hope this DIY write up is as detailed as possible, if you guys have any comments or questions I'll be more then happy to help out.
07-03-2008, 04:42 PM
#12
Track Day
Thread Starter
TheOtherEric: I agree the jack truly is scary, Ive used it twice and it just make my hair stand up, not good at all.
Brucec59: The air compressor can be fitted under the foam block with eaze, I'll be doing that tommorow.
Amfab: Gee, I forgot about my Spare DME......I should enough space to put it in.
Smiles: ......... the word "Καλοψημένη" is absolutely correct, it just isn't proper for this type of statement, for example it can be said as " I would like my steak Καλοψημένη". The right way to say it would be " Μπραβο, Ωραια δουλεια". But I do admire your effort though, hey I can sence some Greek spirit
Brucec59: The air compressor can be fitted under the foam block with eaze, I'll be doing that tommorow.
Amfab: Gee, I forgot about my Spare DME......I should enough space to put it in.
Smiles:
......... the word "Καλοψημένη" is absolutely correct, it just isn't proper for this type of statement, for example it can be said as " I would like my steak Καλοψημένη". The right way to say it would be " Μπραβο, Ωραια δουλεια". But I do admire your effort though, hey I can sence some Greek spirit
 07-03-2008, 11:13 PM
#15
Smiles: ......... the word "Καλοψημένη" is absolutely correct, it just isn't proper for this type of statement, for example it can be said as " I would like my steak Καλοψημένη". The right way to say it would be " Μπραβο, Ωραια δουλεια". But I do admire your effort though, hey I can sence some Greek spirit
......... the word "Καλοψημένη" is absolutely correct, it just isn't proper for this type of statement, for example it can be said as " I would like my steak Καλοψημένη". The right way to say it would be " Μπραβο, Ωραια δουλεια". But I do admire your effort though, hey I can sence some Greek spirit "Μπραβο!"
(I'm Italian, and so I understand "Bravo." I married a Greek woman, and am now orthodox, so we like saying "Χριστός ἀνέστη!")
Again, very nice, and Bravo.
Last edited by Smiles; 07-03-2008 at 11:18 PM. Reason: It's all Greek to me