964 / 993 Control Arm Bushings

 02-03-2008, 07:21 PM
#112
Rennlist Member
Join Date: Nov 2005
Location: Montreal, Canada
Posts: 3,854
Likes: 0
Received 0 Likes
on
0 Posts
Thanks Chris, I got mine friday and how nice to include a little jar of lube and not just a sample like I've seen before in my prothane kits.
Thanks again, install will follow in a couple of weeks.
Thanks again, install will follow in a couple of weeks.
02-07-2008, 12:40 AM
#113
So if I dont feel a wobble when I break, do I need these nice looking bushings?
How long do the origonal bushings usually last?
since I am doing suspension soon, can I schedule this at the same time?
How long do the origonal bushings usually last?
since I am doing suspension soon, can I schedule this at the same time?
02-07-2008, 12:55 AM
#114
Guru
Lifetime Rennlist
Member
Rennlist Small
Business Sponsor
Lifetime Rennlist
Member
Rennlist Small
Business Sponsor
Thread Starter
The lowest mileage car I did bushings on was a 29k 993 -- they were cracked and the car had the random steering wheel shake but was pretty good on the brakes.
Best is to pry between the arm and its mount looking for such cracking. Without prying, most bushings look completely normal.
In the end, I cannot really say how long the factory bushings last. If your bushings are indeed used-up, replacing them at suspension replacement time might be the smartest choice.
02-07-2008, 04:43 PM
#115
Burning Brakes
 02-15-2008, 09:34 AM
#116
Three Wheelin'
Saw something familiar looking at Paragon Products this morning...Good stuff, Chris!
http://www.paragon-products.com/prod...-cabushkit.htm
http://www.paragon-products.com/prod...-cabushkit.htm
02-25-2008, 11:14 PM
#117
Seared
Rennlist Member
Rennlist Member
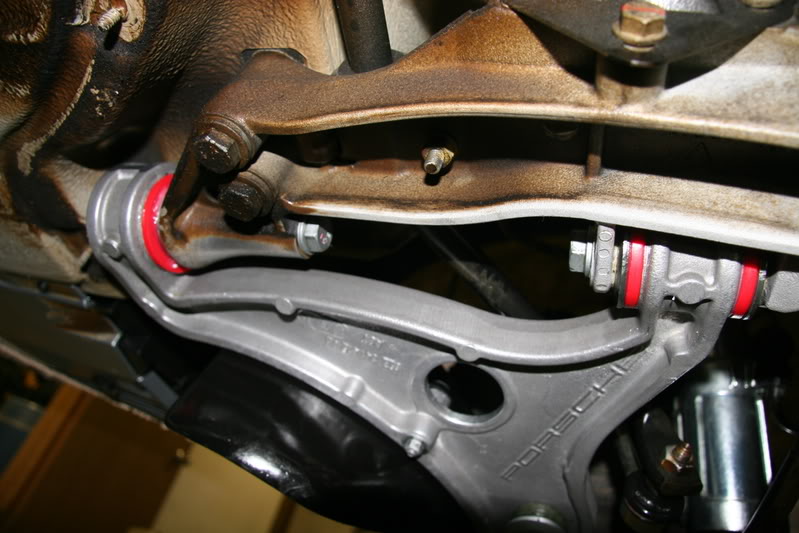
I just wanted to express my satisfaction regarding Walrod's Finest Bushing Kit. I received my set a few weeks ago, and finally made the time to install the parts today. While I have not driven the car yet, I can say that the fit & finish was perfect and everything went together exactly as described. In true form, I spent extra time cleaning the arms and polishing the bores (pictures to follow). A few hints:
- Lacquer thinner is THE solution for cosmoline, bar none. I previously slaved for hours using WD40, only to find that thinner will dissolve this nasty stuff in seconds flat (thanks for the hint, Neil). Naturally, I would not recommend using it on painted parts - only aluminum castings. Since my car takes regular baths in 303 Protectant, the newly-cleaned arms received a dousing for good measure.
- When using a hacksaw to cut a groove in the large bushing shell, be extremely careful not to overdo it. In my haste to forge ahead, I did make a few 'marks' in the bushing bores, but nothing that convinced me to replace the arms
- Once the inner sleeves have been removed from the rubber bushings, let them sit in a bath of lacquer thinner for an hour or two. Doing so will allow the rubber remnants to literally fall free of the sleeves.
- The hub-end of the a-arm does not need to be attached first during re-assembly. Locate the front sleeve in the suspension carrier and then rotate the arm around to snug the rear into the carrier ears. I found that it helped to compress the rear bushings with a small c-clamp while shoving it home. Insert the bolts and then guide the stud into the ball joint hole - you should be able to snick it together at this point.
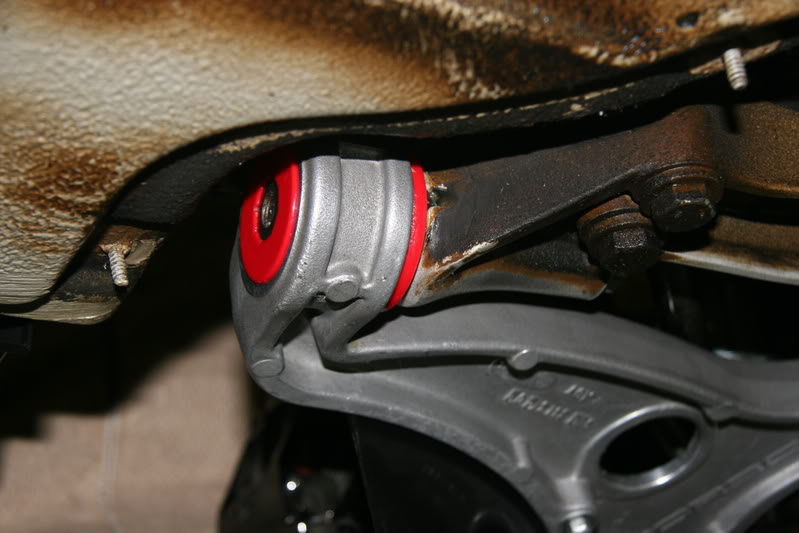
- Make sure the forward steel bushing is correctly clocked once the arm is back in position. Since the steel sleeves are now free to rotate, the forward one can move while manhandling the a-arm. The casting nub should fit into the relief - verify with a light from below.
- Chris supplies an adequate amount of grease - I found that I used every bit of it during assembly. Naturally, you'll have squeeze-out when pressing the bushings into position.
All in all, not a difficult job. Just make sure to accurately mark the castor eccentric in relation to the ball joint attachment (I used a pin punch) before undoing the nuts. Removing the inner sleeves is very easy after a few minutes with a torch, but getting the old bushing sleeves removed from the bores without scaring the aluminum proved all but impossible. I took my time smoothing these ‘marks’ by using various grades of emery cloth, Scotchbrite pads, and fine steel wool.
This is a great product at a very fair price - thanks Chris!
Andreas
- Lacquer thinner is THE solution for cosmoline, bar none. I previously slaved for hours using WD40, only to find that thinner will dissolve this nasty stuff in seconds flat (thanks for the hint, Neil). Naturally, I would not recommend using it on painted parts - only aluminum castings. Since my car takes regular baths in 303 Protectant, the newly-cleaned arms received a dousing for good measure.
- When using a hacksaw to cut a groove in the large bushing shell, be extremely careful not to overdo it. In my haste to forge ahead, I did make a few 'marks' in the bushing bores, but nothing that convinced me to replace the arms
- Once the inner sleeves have been removed from the rubber bushings, let them sit in a bath of lacquer thinner for an hour or two. Doing so will allow the rubber remnants to literally fall free of the sleeves.
- The hub-end of the a-arm does not need to be attached first during re-assembly. Locate the front sleeve in the suspension carrier and then rotate the arm around to snug the rear into the carrier ears. I found that it helped to compress the rear bushings with a small c-clamp while shoving it home. Insert the bolts and then guide the stud into the ball joint hole - you should be able to snick it together at this point.
- Make sure the forward steel bushing is correctly clocked once the arm is back in position. Since the steel sleeves are now free to rotate, the forward one can move while manhandling the a-arm. The casting nub should fit into the relief - verify with a light from below.
- Chris supplies an adequate amount of grease - I found that I used every bit of it during assembly. Naturally, you'll have squeeze-out when pressing the bushings into position.
All in all, not a difficult job. Just make sure to accurately mark the castor eccentric in relation to the ball joint attachment (I used a pin punch) before undoing the nuts. Removing the inner sleeves is very easy after a few minutes with a torch, but getting the old bushing sleeves removed from the bores without scaring the aluminum proved all but impossible. I took my time smoothing these ‘marks’ by using various grades of emery cloth, Scotchbrite pads, and fine steel wool.
This is a great product at a very fair price - thanks Chris!
Andreas
 02-27-2008, 08:45 PM
#119
Pro
OOOOOOHHHHHHHH AAAAAAAAHHHHHHH. I took mine down to a machine shop to get the bushings out. I figured it would be the best money I ever spent. They got them out with an air hammer. Gouged the crap out of the races. Great work for a place called "Precision Automotive"! Chris Walrod to the rescue! I should have replacement arms Friday. Thanks again Chris, you really came through for me.
03-03-2008, 11:54 AM
#120
Race Car
In need of some advice. I started the disassembly yesterday. The front center bush came out relatively easily, and so did the rubber and sleve.
The rears however have not. Following the same procedure, heated, twisted with chanel locks. The outer ring (that i grab with the centerlocks) spins freely but the bush in the rubber is staying put.
Am i doing something wrong? is there an additional step i am missing?
Any help is appreciated.
Regards