
Suspension DIY for Dummies ADDENDUM
 04-27-2007, 05:28 PM
#1
Pro
Thread Starter
Suspension DIY for Dummies ADDENDUM
Ok, so just completed this little project.
Like everyone else, I would like to thank Jeff (InTheAir) for taking the time to put together that great DIY w/ pics! I would also like to thank Tony (TRINITONY) and Garth (Garth S) for being RL junkies and being on-line when I needed some help!
After spending WAY more time on this DIY than one would reasonably need, I felt an Addendum to Jeff�s instructions was needed for those of us who don�t wrench regularly.
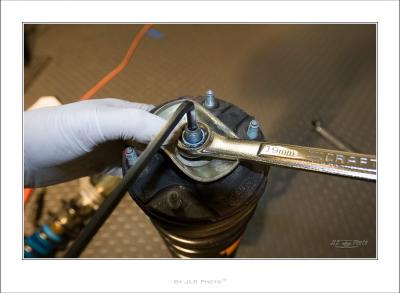
1. Tools - If you THINK your tool kit has all the right socket and wrench sizes just because have previously purchased a nice socket, allen and/or wrench set � GO CHECK! Many sets do not include ALL the sizes. Particularly, 16mm socket, 19mm socket, 21mm socket, 22mm socket AND a 7mm Allen.
2. Impact Gun - If you have a compressor but not an Impact Gun, go get an Impact Gun! I was unable to remove the 21mm nut for the front shock assemble using the spark plug socket and 7mm Allen or even a vise grip on the shock shaft. I had to take the assemblies to a local shop that used��. Yes, an Impact Gun. There is really little chance of doing damage here since you will not be reusing the shock or the nut. I bought and used the Impact Gun on the rear shock assemble with the 18mm nut. I did this with the shock assemble off. Worked like a charm!
3. Eccentric Bolts � These are a MAJOR PIA if you only have your car up on jack stands and not up high on a lift! If doing this on jack stands, get a long breaker bar. Then buy a 1� round steel pipe about 3� long. Use the breaker bar with the pipe over it for more leverage on the passenger side eccentric bolt. This technique will not work on the driver side since there is not enough clearance under the car. For the driver side, I positioned the 19mm wrench on the bolt so that the wrench pointed towards the ground. I then sat parallel to the axels with my legs under the car, gripped the brake rotor for stability and leverage, then proceeded to kick the $#!@ out of the 19mm wrench with bottom of my foot. Once loose, of course I was not lucky enough to have a car where the bolt would clear the heat exchanger even by rotating the bolt and wiggling it. Instead of �modifying� the heat exchanges with a hammer, I went the rout of loosening the motor mounts and placing a floor jack on the heat exchanger close to the eccentric bolt. This worked well.
4. Containment nuts � These are the two nuts in a bracket that hold the lower front shocks to the wheel assembly.

If you experience any hesitation on the bolt while removing it, put an 18mm wrench on the back of the containment nut. For some reason mine came almost all the way off and then became VERY difficult to remove any further. I switched to a breaker bar and the result was the thin metal bracket next to the bolt snapped. I ended up having to dremel the bracket in half and then cut through the bolt to remove it. These are only about $20, but most dealers do not have them in stock = about a 4-5 day delay in completion.
5. Read and follow ALL of Jeff�s instructions! Specifically about the 13mm shock tower nuts � �(F35.) Tighten each of the four (4) 13mm nuts at the top of the shock tower to a torque setting of 18-24 ft/lbs using the 13mm socket, 3/8� extension, and 3/8� torque wrench.
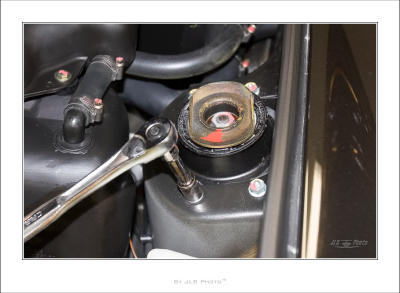
TIP: The proper Porsche spec for the torque of these four (4) 13mm nuts is 24 ft/lbs. However, there have been cases of the stud shearing off under 24 ft/lbs, possibly due to metal fatigue. If this happens, you will need to replace the entire spring perch. (Ask me how I know.) �
When installing the new shocks in either the front or rear, I would suggest NOT torquing to 24 ft/lbs!!! These bolts on the spring perch must take a lot of stress and weaken over time. 24 ft/lbs can easily shear these things off resulting in several days delay waiting on new ones and run about $140 each and most dealers do not have them in stock = 4-5 delay in completion. � I should have paid more attention to this - ask me how I know!
6. If you experience any long delays in completing this little DIY, disconnect the battery. If you think you have closed your bonnet enough for the light to go off, you may have not. This could result in a dead battery that needs to be charged overnight after you have finally finished and want to go for a test drive! � Ask me how I know.
7. Shoes - Wear comfortable shoes because you will walk at least 3 miles cumulative around your car looking for tools throughout this process.
8. Epson Salt � Buy a big bag to pour into a hot bath when you�re done. You will probably be pretty sore.
 04-29-2007, 01:58 PM
#2
Rennlist Member
Jeff,
Thanks for the addendum...I've had the parts on hand for a month but haven't been able to isolate enough time to get atarted. It may happen next weekend so I'll clip your info to the back of Jeff's (In the Air) DIy explanation. I'm NOT looking forward to this little project.
TMc
Thanks for the addendum...I've had the parts on hand for a month but haven't been able to isolate enough time to get atarted. It may happen next weekend so I'll clip your info to the back of Jeff's (In the Air) DIy explanation. I'm NOT looking forward to this little project.
TMc
04-29-2007, 06:01 PM
#4
Pro
Thread Starter
This may or not be helpful for anyone else.
I actually meant to write it up in more of a tongue in cheek style.
Jeff's write up is SPOT ON. This addendum reflects more of my stupidity than anything else!
I also had meant to add that most of the problems I encountered were the fault of my good friend and assistant - Mr. Murphy!
I actually meant to write it up in more of a tongue in cheek style.
Jeff's write up is SPOT ON. This addendum reflects more of my stupidity than anything else!
I also had meant to add that most of the problems I encountered were the fault of my good friend and assistant - Mr. Murphy!
04-30-2007, 11:01 PM
#6
Addict
Rennlist Member
Rennlist Member
Join Date: Jun 2001
Location: Lat: 47 Deg 26.848N Lon: 122 Deg 21.341W Seattle
Posts: 2,021
Likes: 0
Received 0 Likes
on
0 Posts
One can push the latch closed on the "bonnet" to turn off the light. It is the same thing you do if you have a power cable running to the battery tender in the winter.
Cheers!
Cheers!