


Strut brace search complete
Instructor

Joined: Feb 2005
Posts: 105
Likes: 8
I've got an 'Ambler' one. Yes, took a bit of 'personalising' but really looks the part (imo the only brace that really looks right) and does the job - mightily impressive. Tightened up the steering and stopped the windscreen from creaking - bargain. One of my better purchases (even though the original fit wasn't perfect).
Trev
Trev
Three Wheelin'
Joined: Aug 2006
Posts: 1,438
Likes: 0
From: Bremerton, WA
So, how does one aquire one of those from 'Ambler'? I don't mind a little 'work' to get it installed if it really works well (and the price is reasonable considering work required).
Inquiring minds and all that BS.
Inquiring minds and all that BS.
Thread Starter
Seared
Rennlist Member
Rennlist Member
Joined: Jul 2005
Posts: 16,887
Likes: 494
From: Ellicott City, MD
Foto,
Ambler, PA is the home of Fabspeed. Fabspeed sells a replica of the simple GT2 bar. According to some, the holes were not correctly spaced, so Fabspeed had two of the holes 'ovaled' to allow the bar to fit properly. There are terms for stuff like this.
Andreas
Ambler, PA is the home of Fabspeed. Fabspeed sells a replica of the simple GT2 bar. According to some, the holes were not correctly spaced, so Fabspeed had two of the holes 'ovaled' to allow the bar to fit properly. There are terms for stuff like this.
Andreas
Three Wheelin'
Joined: Aug 2006
Posts: 1,438
Likes: 0
From: Bremerton, WA

Thread Starter
Seared
Rennlist Member
Rennlist Member
Joined: Jul 2005
Posts: 16,887
Likes: 494
From: Ellicott City, MD
At the end of the day, all strut braces will do the same thing - prevent the shock towers from spreading while under cornering loads. It's been discussed before - a strong cable affixed between the towers would accomplish the same goal.
What have thee under the stainless cover?
Andreas

Racer
Joined: Aug 2007
Posts: 466
Likes: 3
While the 'look' of the original RUF brace is nice, I was more interested in the super-stout design. Rock solid with no pivot points. The Rennline brace looks well made, but still allows for flex from the Heim joints.
What have thee under the stainless cover?
Burning Brakes

Joined: Sep 2006
Posts: 1,096
Likes: 11
From: WetCoast, Canad�
Foto,
Yes, I removed the offending studs. I attempted to tap these out initially, but found that using the proper-sized (#2) bolt remover worked perfectly. The remover grabbed the threads with enough tenacity to allow the bolt to spin free of the small splines. Then it was a matter of just tapping the studs out.
Yes, I removed the offending studs. I attempted to tap these out initially, but found that using the proper-sized (#2) bolt remover worked perfectly. The remover grabbed the threads with enough tenacity to allow the bolt to spin free of the small splines. Then it was a matter of just tapping the studs out.
Did you use this type of bolt remover on the top side?

Thanks in advance.
Rennlist Stories
The Best Porsche Posts for Porsche Enthusiasts

9 Vehicles Porsche Helped Engineer that Aren't Porsches
Verdad Gallardo
9 Features and Characteristics That Only Porsche People Understand
Verdad Gallardo
I've Written 500 Rennlist Articles: Here's How Porsche Has Changed Along the Way
Joe Kucinski
10 Most Unnecessary Porsches Ever Built (And Why We Love Them)
Verdad Gallardo
Porsche 911 GT3 S/C vs 718 Spyder RS: 10 Categories, One Winner
Joe Kucinski
This Builder Is Turning Heads With Its Slantnose 911 Creation
Verdad Gallardo
Porsche 911 GT3 Artisan Edition Pays Homage to Japanese Culture
Verdad Gallardo
Porsche Reveals Coupe Variant of the Electric Cayenne With a Fresh Look
Verdad Gallardo
10 Porsche Colors That Have More Personality Than Most People
Verdad Gallardo
Rennlist Member

Joined: Jan 2004
Posts: 10,521
Likes: 170
From: NE Florida
Just this w/e I was replacing the dist caps for the 30k service on my car, one of the philips screws on the dist. cap would not break free no matter what I used on it. I used the second smallest of the set of these removers and it worked like a charm. Great tool to have in the chest.
Rennlist Member
Joined: Oct 2006
Posts: 8,356
Likes: 1,203
From: Vista CA
it looks like they are now selling a design that utilizes the stock studs?
http://www.perfectpowerinc.com/sales.html
Craig

http://www.perfectpowerinc.com/sales.html
Craig

Drifting
Joined: Jul 2001
Posts: 2,298
Likes: 78
From: St. Louis
I have the RUF brace from my 964. I contacted somebody about purchasing a set of monoball strut mounts and they told me htat they could put longer studs in for me. But now I can't remember who it was. Anyway, I went to the link listed and it looks like they just drilled the mounts a little deeper. I am going to have to look at my bar to see if there is enough metal in there to allow that. Just wish I was as handy as some of you out there.

Rennlist Member
Joined: Sep 2003
Posts: 574
Likes: 20
From: Austin, TX
Hi all --
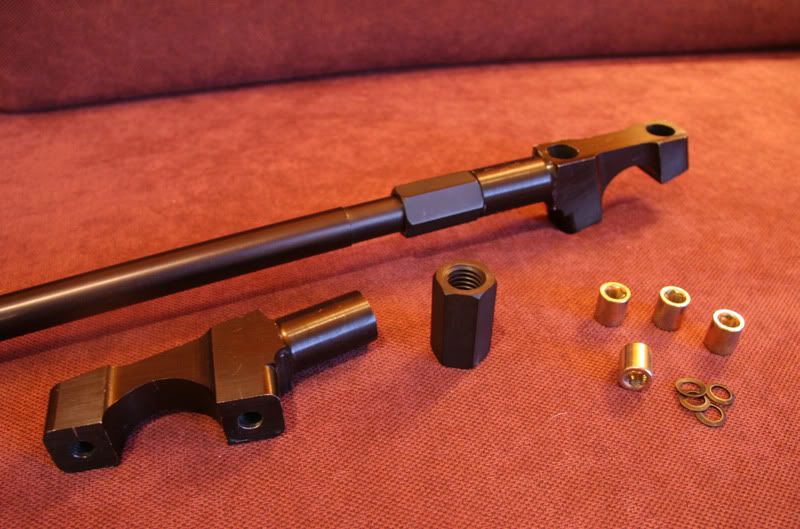
I finally got around to unpacking my Perfect Power strut brace and I have to second (third, fourth) what everyone else has said about this being an absolutely beautiful and stoutly made piece. The anodizing and machining are first rate!
I realized in mid-install that I have no idea how to install this thing and mine didn't come with instructions.
Three questions, really:
(1) What's the proper torque setting for the nuts that screw down the brace?
(2) Once it's screwed down, how should you go about adjusting the tension on the brace? Or should you be doing this during the test fitting?
(3) (and the stupidest question) -- washer goes underneath the hex nut, inside the barrel of the strut brace?
See, I told ya I didn't have the first clue in installing this thing. ;-)
Rennlist Member
Joined: Sep 2003
Posts: 574
Likes: 20
From: Austin, TX
Doh, I'm going to answer my own first question, at least. :-)
From another thread:
"Robin sun's P-Car Site lists the Strut tower bolts (13mm) torque at 33Nm or 24.3 ft lb. "
With the warnings from other RL'ers to:
"And be sure not to overtighten them. Many past posts of those studs being fragile and end up breaking if given too much force."
and
"As Kelly said, the studs are easily snapped so be very cautious & use a proper range torque wrench. Many here use 18-20 ft lb (there's at least 1 post of a snapped stud at 18 ft lb). I carefully torqued mine to 24 ft lb in 3 stages."
and
"What Dan said. I stayed shy of 20 ft-lb due to the horror stories and also because they weren't on very tight when I started."

Three questions, really:
(1) What's the proper torque setting for the nuts that screw down the brace?
(2) Once it's screwed down, how should you go about adjusting the tension on the brace? Or should you be doing this during the test fitting?
(3) (and the stupidest question) -- washer goes underneath the hex nut, inside the barrel of the strut brace?
See, I told ya I didn't have the first clue in installing this thing. ;-)
"Robin sun's P-Car Site lists the Strut tower bolts (13mm) torque at 33Nm or 24.3 ft lb. "
With the warnings from other RL'ers to:
"And be sure not to overtighten them. Many past posts of those studs being fragile and end up breaking if given too much force."
and
"As Kelly said, the studs are easily snapped so be very cautious & use a proper range torque wrench. Many here use 18-20 ft lb (there's at least 1 post of a snapped stud at 18 ft lb). I carefully torqued mine to 24 ft lb in 3 stages."
and
"What Dan said. I stayed shy of 20 ft-lb due to the horror stories and also because they weren't on very tight when I started."
Three Wheelin'
Joined: Oct 2006
Posts: 1,433
Likes: 5
From: On the Faultline
(2) There was some disagreement about this on another thread recently but IIRC the final verdict tended toward expand the bar until it's snug then tighten it down.
(3) Yes. Brace over stud, then washer, then hex nut.
(3) Yes. Brace over stud, then washer, then hex nut.