
Suspension,,,To DIY or not DIY,,,
 02-18-2006, 09:13 AM
#76
Former Vendor
Join Date: May 2002
Location: Tampa
Posts: 6,849
Likes: 0
Received 0 Likes
on
0 Posts
Joe - You will find a u-shaped spring clip that hold the brake line in place on that bracket. Use a large screw driver at the top. Wedge it in between the brake fitting and the U-clip. Then turn the screwdriver sideways.
 02-18-2006, 11:01 AM
#77
Addict
Rennlist Member
Rennlist Member
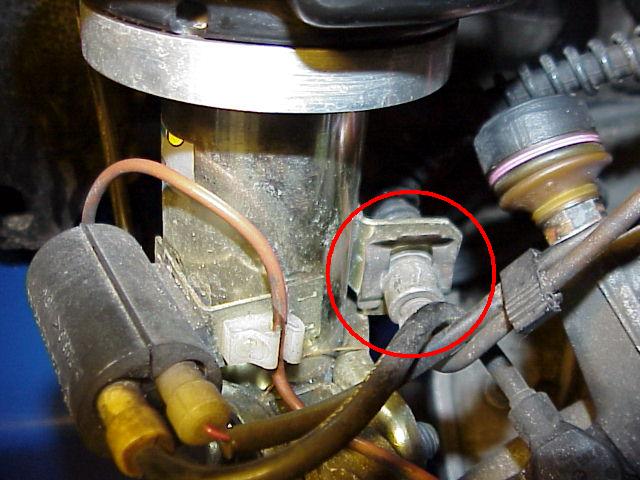
Joe, Before I handed out any more mis-information  , I pulled the front wheel to illustrate Bob's instruction.
The first picture shows the Bistein strut installed with the brakeline held inplace with a clip.
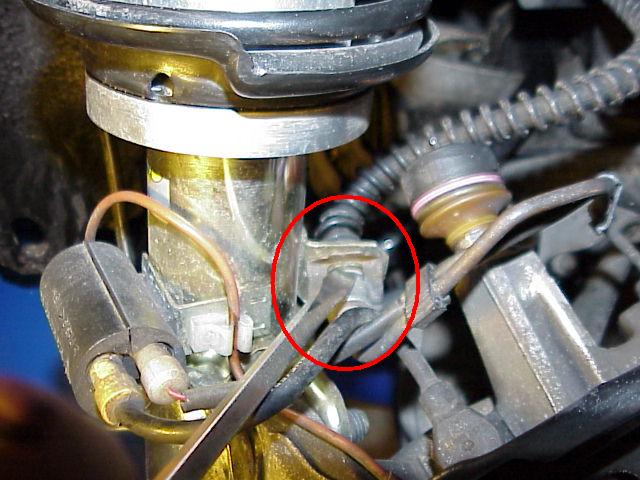
In the second, I held a screwdriver against the clip. I am preparing to pry it out.
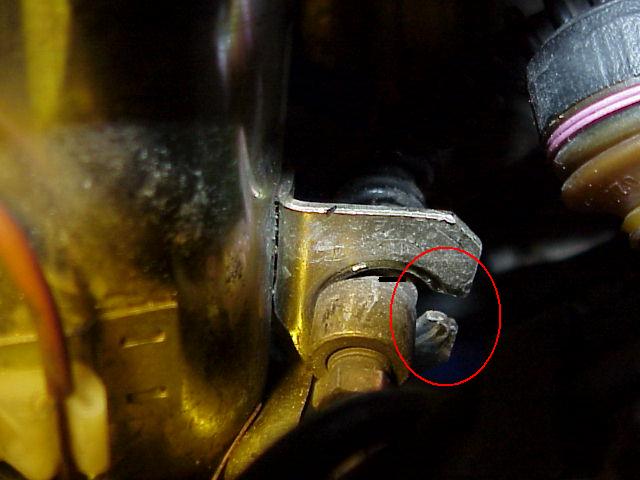
The last shows the cut you need to make. You make this cut on the old strut to free the brake line and on the new strut to accept the breakline. (The brakeline to the caliper is hard tubing so I use the term "free" loosely.)
I reviewed my notes this morning and Bob is correct that you do not have to remove the caliper to replace the strut but I did. Made it easier for me working with postioning the solid brakeline but it takes more time.
, I pulled the front wheel to illustrate Bob's instruction.The first picture shows the Bistein strut installed with the brakeline held inplace with a clip.
In the second, I held a screwdriver against the clip. I am preparing to pry it out.
The last shows the cut you need to make. You make this cut on the old strut to free the brake line and on the new strut to accept the breakline. (The brakeline to the caliper is hard tubing so I use the term "free" loosely.)
I reviewed my notes this morning and Bob is correct that you do not have to remove the caliper to replace the strut but I did. Made it easier for me working with postioning the solid brakeline but it takes more time.
02-18-2006, 12:53 PM
#79
Addict
Rennlist Member
Rennlist Member
Bob, These are the struts and suspension I bought from you a couple years ago during your Xmas Special. Could not be happier and I got a great deal. This must be my favorite mod.
 02-20-2006, 06:46 PM
#81
Addict
Rennlist Member
Rennlist Member
Under the heading of learning from someone's mistakes, remember to lubricate the sway arm bushings during assemble. I just finished removing all four bushings and lubricating them. Hopefully the annoying suspension squeak is gone!!
02-23-2006, 04:07 PM
#86
Rennlist Member
thanks Dave for the photos and the explanation...very helpful. Just curious thought...if the orginal (and the new strut) has an enclosed brake line bracket, why would the designers install a U-clip as well? Certainly helps make this mod easier to do.
Also, your good third photo clearly shows the cut you need to make to the bracket, but the opening doesn't look wide enough for the line to clear? Maybe its just the angle of the photo, but the cut should be, what, 1/4 wide?
Also, your good third photo clearly shows the cut you need to make to the bracket, but the opening doesn't look wide enough for the line to clear? Maybe its just the angle of the photo, but the cut should be, what, 1/4 wide?
 02-23-2006, 08:16 PM
#88
Burning Brakes
**UPDATE**
My car is in a thousand pieces, my old shocks/springs are out and my new shocks are at home waiting for me!!! I can't wait to spend Friday putting her back together!!!
My car is in a thousand pieces, my old shocks/springs are out and my new shocks are at home waiting for me!!! I can't wait to spend Friday putting her back together!!!

