

Changed my broken rear spoiler wall tonight.
 01-10-2006, 09:49 PM
#16
I received my replacement spoiler wall from Pelican Parts today - pleasantly surprised that it arrived a day after I ordered it! It goes on this weekend (sans decal, less is more for me).
Scott
Scott
 01-11-2006, 12:01 AM
#17
Seared
Rennlist Member
Rennlist Member
I replaced mine a few weeks back. I took my time and finished it within 20 minutes or so. By looking at the replacement part, you'll quickly glean how the wall reattaches. I used a small amount of silicone on the lower rubber thingy in order to ease the channel of the new wall on properly. Ditto at the top, a bit of silicone to allow the top part to snap in place easier.
Once you've either undone the top portion of the old wall, or simply cut the thing in half, figure out from which side you wish to remove and install the part. You'll want to properly protect the paint of the decklid - I used a bunch of blue painter's tape to give the old and new walls something to slide on.
Andreas
05-03-2006, 01:58 PM
#18
Rennlist Member
Here's another bump for this great thread. I just realized my spoiler wall was split in half as well. Will need to get this done.
I doubt it, but is there a noticable difference before and after the wall is replaced?
I doubt it, but is there a noticable difference before and after the wall is replaced?
05-03-2006, 08:55 PM
#19
Yes! The nasty flapping sound your broken spoiler wall makes as it beats on your paintwork is completely eliminated. (Wish I'd seen this thread months ago. I did it the p-car way and it was a PITA--took me an hour and a half.)
Last edited by Jack of Hearts; 05-03-2006 at 08:56 PM. Reason: sp
05-03-2006, 11:26 PM
#21
Yes the P-car DIY is way too much work. Mine is also split. I took it out intending to replace it but had to put it back for a while (clutch took precidence). It was an easy job. By the way what is this so called Spoiler Wall Decal???
05-03-2006, 11:39 PM
#22
Instructor
Join Date: Oct 2003
Location: Herber City, Utah
Posts: 200
Likes: 0
Received 0 Likes
on
0 Posts
Thanks for the bump! Mine is split as well and I planned to follow the p-car DIY...so glad this thread came back around, I missed it earlier. I've had the part for a few months, just didn't have the time to take everything apart, this sounds much faster.
05-04-2006, 12:49 AM
#24
Nordschleife Master

Originally Posted by Porscheologist
Yes the P-car DIY is way too much work. Mine is also split. I took it out intending to replace it but had to put it back for a while (clutch took precidence). It was an easy job. By the way what is this so called Spoiler Wall Decal???

Scott
 05-04-2006, 02:08 AM
#25
Addict
Rennlist Member
Rennlist Member
Actually, the p-car instructions have been updated to reflect more or less the same method discussed in this thread (but it's at the very bottom after the detailed description of the "remove the spoiler" method). Did mine 2 weeks ago this way also- definitely the way to go. I have no idea why you'd need to remove the grille to do this job. Great tip Fo3!
05-04-2006, 10:15 AM
#27

Originally Posted by Arrwin
Here's another bump for this great thread. I just realized my spoiler wall was split in half as well. Will need to get this done.
I doubt it, but is there a noticable difference before and after the wall is replaced?
I doubt it, but is there a noticable difference before and after the wall is replaced?
05-04-2006, 10:34 AM
#28
Rennlist Member
Originally Posted by tom97c4s
I have my replacement wall sitting in my garage for over 1 year, I think its about time to do the install this spring. Arrwin why don't you get yours and we can make this a warm up for the oil change in the fall
Sounds good to me. I will order mine soon.
05-26-2006, 12:06 AM
#29
I'm so proud of myself - I did my first DIY tonight! This forum really encouraged me to do it. Yeah, replacing the rear spoiler wall is not exactly opening up the cylinders or something, but I haven't done any repairs to a car of mine/ours since the early '90s...just washes, waxes, air filters, etc. This is sort of a milestone... 
It was pretty easy. The links and pics on this thread were very helpful. The hardest part was removing the allen screws while being careful not to scratch the paint, but was successful in that. Here's a look at the result (albeit with dusky lighting).
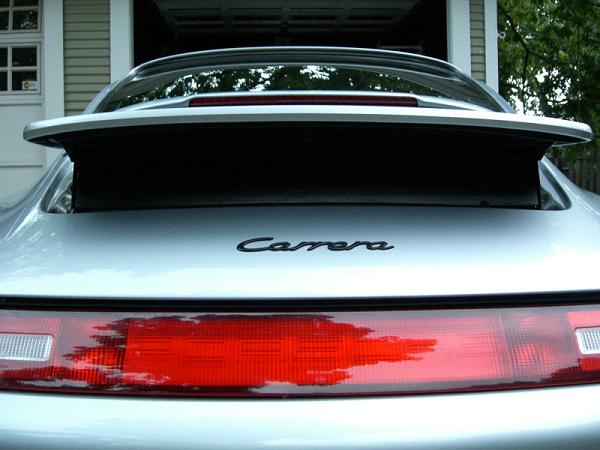
It was pretty easy. The links and pics on this thread were very helpful. The hardest part was removing the allen screws while being careful not to scratch the paint, but was successful in that.
Here's a look at the result (albeit with dusky lighting).