When you click on links to various merchants on this site and make a purchase, this can result in this site earning a commission. Affiliate programs and affiliations include, but are not limited to, the eBay Partner Network.
There's a lot of anecdotes on the right way to install a windshield on a 993. Having lived with both correctly and incorrectly installed windshield and how bad the squeaky windshield problem can be I have a lot of opinions. My experience with current glass installation options mirrors what I read online - the few shops that really knew how to do it right are disappearing, most glass shops will only do it the "standard" way which for the 993 guarantees incorrect installation . I'm hoping this thread can be a collaboration of forum members with experience to recreate the "right way" to install a windshield.
A key part of the installation process is the use of the templates to set the glass in the adhesive bead at the correct depth. These templates today (3/24), are MSRP $470 for effectively 52 sq-in of cardboard. I see this as a great barrier to their use.
I'll link to some of the threads I read later but here are the key stages as I see it, each one has nuances and details that must be understood:
- removal of old windshield
- inspection and repair of surrounding metal
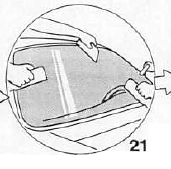
- installation of the new windshield
Forums are poor databases so apologies to future readers, yes, you're gonna have to read the whole thread.
So in that spirit, lets kick off with the one thing the forum has been asking for since 2010: the 3D file of the templates. A huge shout out to my compadre Jonathon Simmons of LPR AX fame for many hours of CAD work to perfect these files.
There are 3 files, top, bottom and side. You need 2 side parts as indicated in the pictograph from the FSM:
I started with a tracing of the factory templates made by our own famous MikeCap, making a photocopy of the tracing to hand cut layers of cardboard to build up the thickness, which also averages fabrication errors. Each card laminate was sanded to best match the original tracing. I then checked the templates on my known good windshield (outside seals removed of course) and confirmed they matched. These laminates were then scanned by my good autocross buddy Jonathon to produce the 3D files. I had a set printed and after confirming <1mm error to the original tracings, I sent them back to Mike to compare with the factory originals. I'm sure Mike will reply to this thread with his experiences but his comment to me was they were "dead on"
I'll add photos of this process later if there's interest.
There is so much more I have to document here so for now this is a work in progress.

 03-06-2024, 03:45 AM