When you click on links to various merchants on this site and make a purchase, this can result in this site earning a commission. Affiliate programs and affiliations include, but are not limited to, the eBay Partner Network.
Distributor Removal "tools" / ideas - Paging Andreas and others....
Ok, so dropped the engine two years ago and the one thing I didnt do but should have was sent the distributor off to Steve to rebuild prophylacticly. So, decided that is my project for this winter. Anyways, everything is disconnected or out except for the distributor. I can jiggle it a little, but its not popping out. I have searched a ton and heard suggestions that included lady foot crow bars, ropes, removing alternator fan to get more leverage...etc etc. Admittedly, I only pried on it for a few minutes today before needing to get ready to leave town. Based on Steve's advice and what I have read, it doesnt appear I should have to remove anything else to get it out. I found a thread where Andreas references a tool he cobbled together that worked, but the pictures on the thread are not working for me. Im traveling the next 3 days, so figured I would use this time to brainstorm and get suggestions...then hopefully get back to town and get the damn thing out. Any suggestions of pictures of tools used that got it out are welcome! TIA
I used a slide hammer I made along with stainless steel cable that I wrapped around the body of the dual distributor. I also encased the cable in vinyl tubing to prevent cosmetic damage. Do a search on my UN and you should find it. The sliding mass on my slide hammer has some weight to it.
Whoever rebuilds your dual distributor, make sure they at least install all three of the non-standard 7201 bearings in it and of course the Continental branded belt. Ask for the old bearings and the boxes they came in back.
These dual distributors are over 20 years old. I've rebuilt my share of these and there is only one way to do it right...a full rebuild and not just a belt.
Thanks. Sounds like a slide hammer with a homemade cradle or something under it is the way to go.
I plan on sending to Steve at RSS for rebuild as I would rather have someone who has done these before tackle. I trust Steve will use all the right stuff and will confirm so thx for sharing that info!
Kent,
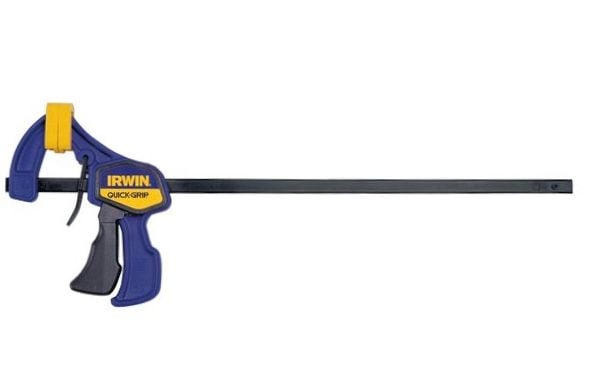
You are correct - I used a typical Irwin ‘Quick Grip’ woodworking clamp (around 2’ long), punched the split pin out, and removed the clamping head. Then I found a suitable weight that would easily slide on the shaft, placed a nut & bolt through the split pin hole, and used the contraption as a slide hammer. I chose this clamp because of the plastic foot. Worked as intended.
Kent,
You are correct - I used a typical Irwin ‘Quick Grip’ woodworking clamp (around 2’ long), punched the split pin out, and removed the clamping head. Then I found a suitable weight that would easily slide on the shaft, placed a nut & bolt through the split pin hole, and used the contraption as a slide hammer. I chose this clamp because of the plastic foot. Worked as intended.
Andreas
Thank you! That should be enough to help me out together something that will work.
Here is the process as I did it:
"Removing and shipping your distributor off for servicing yourself is a surprisingly easy thing to do. To make room to remove the Distributor detached the center coil distributor wire only on each distributor cap and tie the caps with the plug wires attached clear of the work area. I only removed the lower duct from the blower and the upper duct part that vents out of the engine compartment grill very little prep work involved. I also took a reference picture of the rotational position of the gear driven rotor using care to be directly above it and thereby not introducing a perspective error that would misinform concerning its fully seated position.
Once the hand brake is applied, the transmission put in neutral for the duration of the replacement, the distributor caps and distributor hold down nut are removed and the distributor is ready to come out I used the crowbar placing the bar’s heel on the engine case below the distributor as the fulcrum point and the crow bar’s claw on the bent end of the bar against the underside of the distributor where very light force is applied next to the drive shaft driven rotor housing.
It took very little force to break the O-Ring’s initial resistance for removal. I then took a 2nd picture pulling the distributor out just beyond where the drive gear slid off its engagement inside the engine recording the offset of the rotor caused by its disengagement with the drive gear. I used the 2nd picture to preposition the rotor when reinserting the distributor once serviced.
Be aware there are only two shops that get consistently high marks for rebuilding this part on Rennlist, Mark Cohen (770.365.1601) of Powder Springs, GA & Steve Weiner at Rennsport Systems (http://rennsportsystems.com/). Be sure to tape a piece of hose over the drive gear to protect it for shipment. Other rebuilders seem to have problems getting the correct bearings, washers and other small parts that may be needed. I also understand that the major cause for a rebuild redo is the previous improper installation of a bearing on a previous servicing. Seeing that this is likely a once in the ownership life of the car who needs the aggravation of using an untested source of rebuilding."
Andy
Other rebuilders seem to have problems getting the correct bearings.
Andy
Exactly Andy. Would you like me to produce a Rennlist thread where this well known shop that claimed to rebuild over 300 dual distributors tells me the bearings used are a "deep groove ball bearing" when in fact they are an "angular contact bearing".
Its why I mentioned above to ask for the original bearings back and placed into the boxes the new bearings came in.
Another game some play is they turn down the shafts to 12.00 mm (from 12.45 mm) in order to use a standard 7201 bearing which costs $25.
I'd suggest anyone to order the correct bearings themselves and just pay the shop to do the installation if they feel they cannot do it themselves.
And there's the vast majority of 993 owners that are driving around with distributors "rebuilt" using belts that suffer from premature ozone cracking because the shop saved $3 by using a belt that Bosch stopped using in 1994...
kudos to you for trying to keep people honest with the bearings!
 01-06-2019, 09:47 PM