When you click on links to various merchants on this site and make a purchase, this can result in this site earning a commission. Affiliate programs and affiliations include, but are not limited to, the eBay Partner Network.
@Alfa40 you have me convinced to change directions and ditch my old OE tape headunit for one of these continental ones. Thanks for sharing! Do you have any details of any extras you needed to purchase besides the headunit such as a wiring harness(s)? I don't want to splice into the factory one.
Thanks
First of all, you'll have to decide between the available models. Four of the six models have bluetooth. You now need to decide if you need CD or Digital Radio (DAB). I went for the TR7412UB-OR, which has Bluetooth, but neither CD nor DAB. The reason I decided against the latter was that a separate antenna needs to be mounted on the windshield, and that looks hideous.
The speaker cable on the car is an ISO connection that fits right into the radio. For the power cable, you can buy this adapter from BergfillFX for 16$ shipped. All that was left on my car was to connect one cable from the adapter to the ashtray light, so that the radio knows when to power on the button lights (which will then turn on when the dashboard lights come on). I used a Posi Connector for this task and it worked very well. If you really didn't want to do any splicing, then you'll have no lighted buttons. But the Posi connector is like a needle, so I can't think of a less intrusive splicing option, I bet it would be almost invisible if taken off again.
Lastly, Tore told me that some cars need the power cable for the antenna spliced into the harness. You can use the same posi-connector as above, but it was already done on my car, so no need. Instructions can be found on BergfillFX's website. The metal frame that came with the radio was a perfect fit for the dashboard opening, taking the old frame out should be very easy.
By the way, the bluetooth connection protocol even allows you to advance/pause/play songs and pick up/hang up calls directly from the headunit, without taking your phone out of your pocket. It picks the connection back up after days of parking, with no new pairing needed!
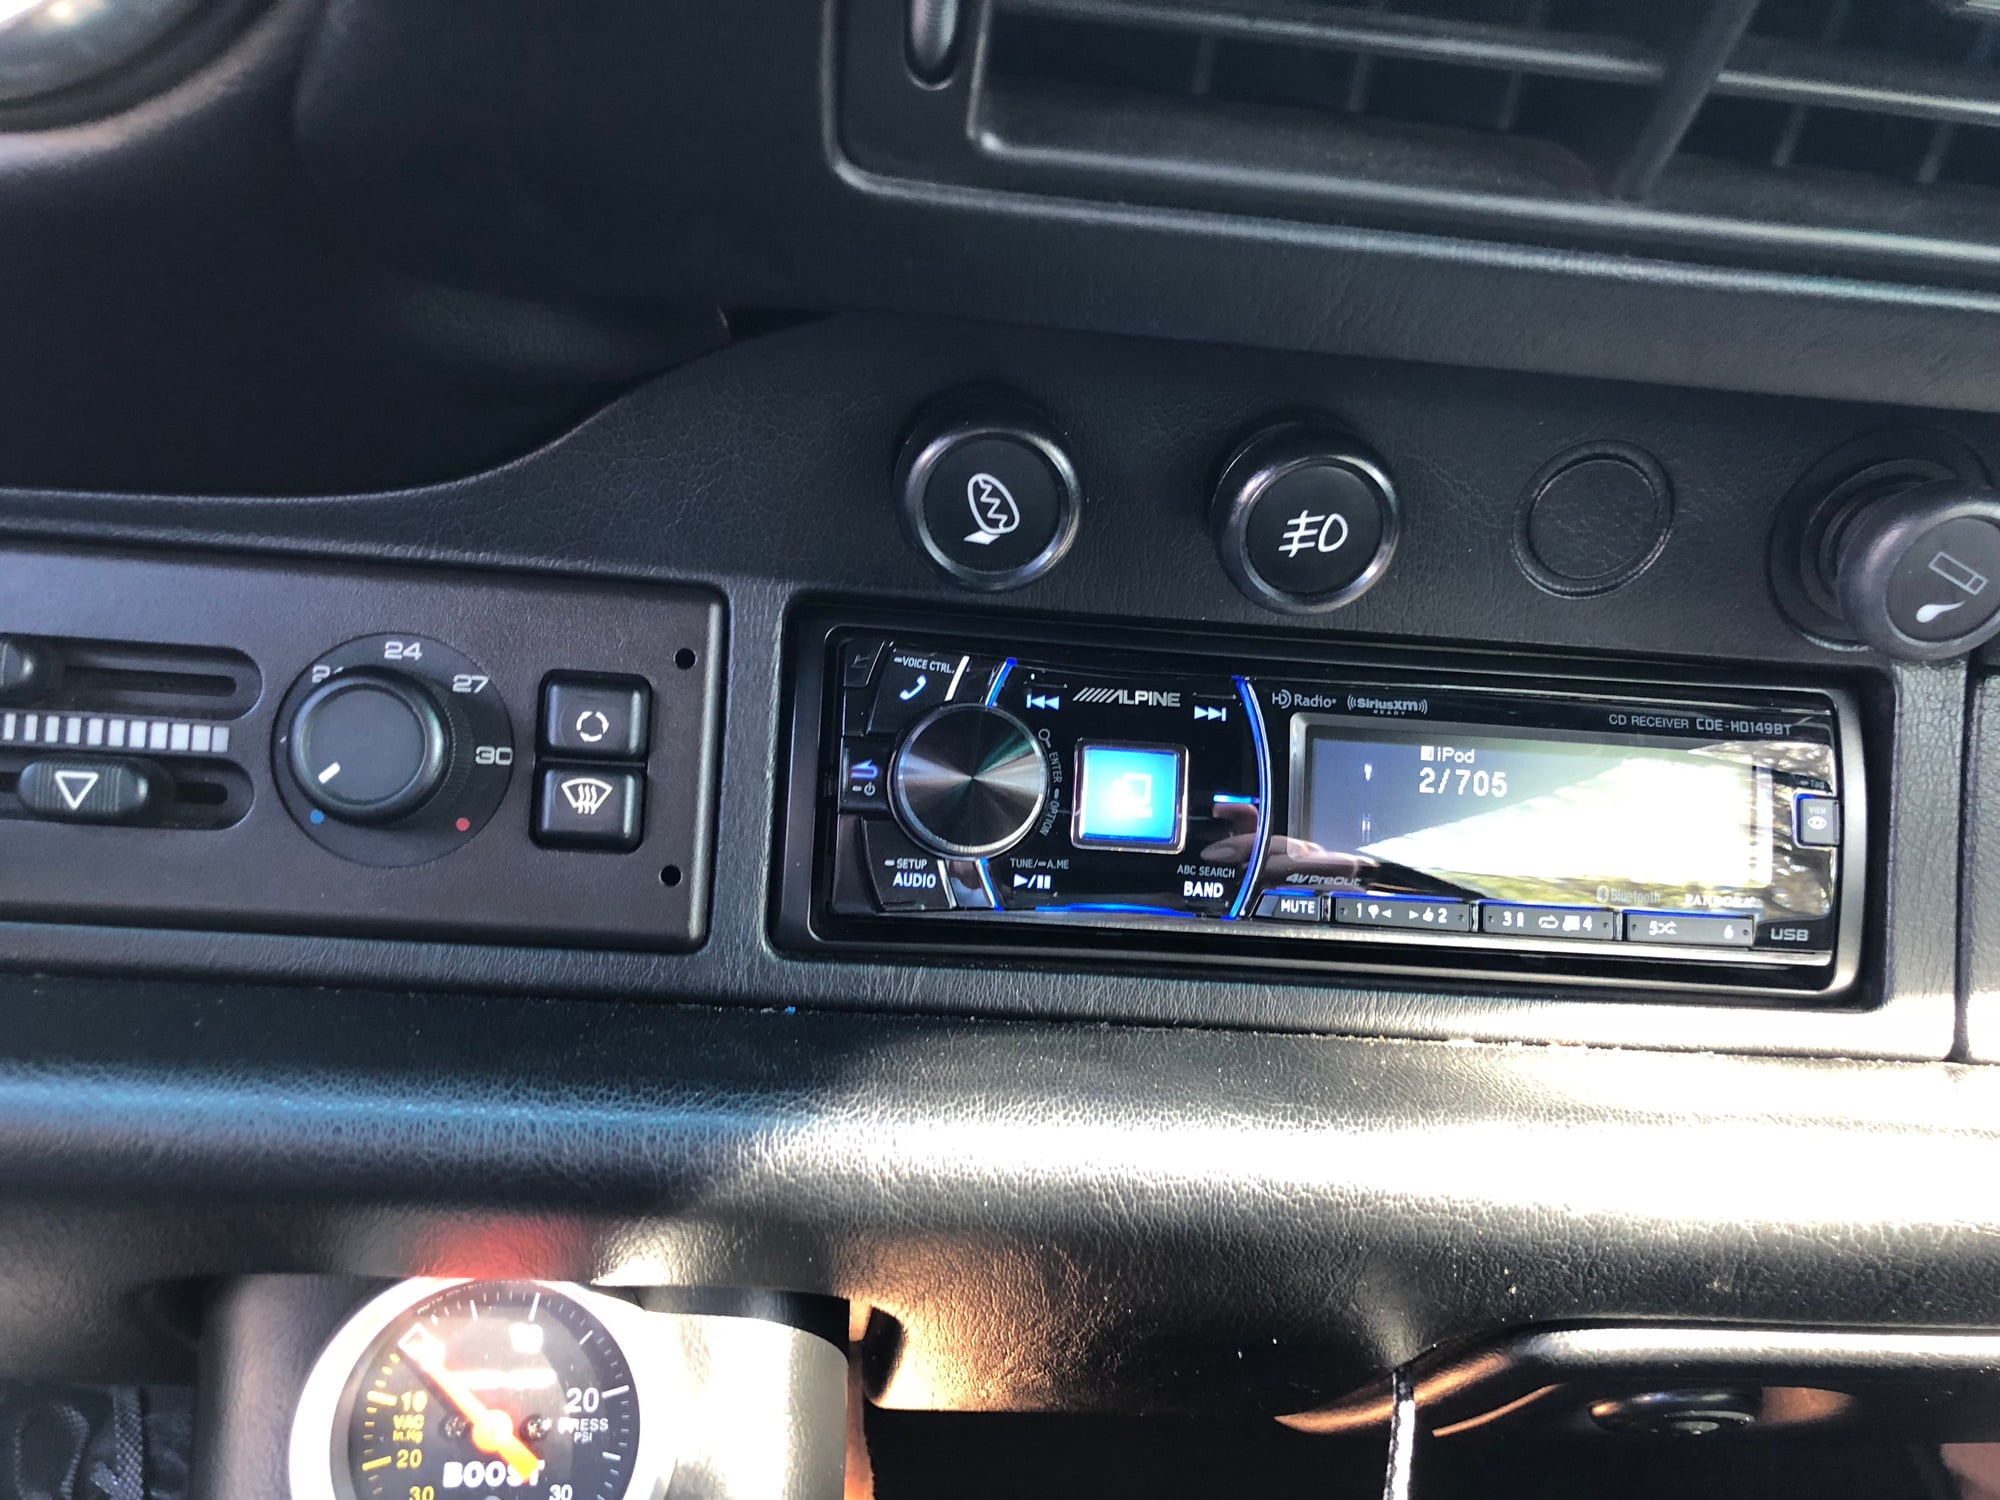
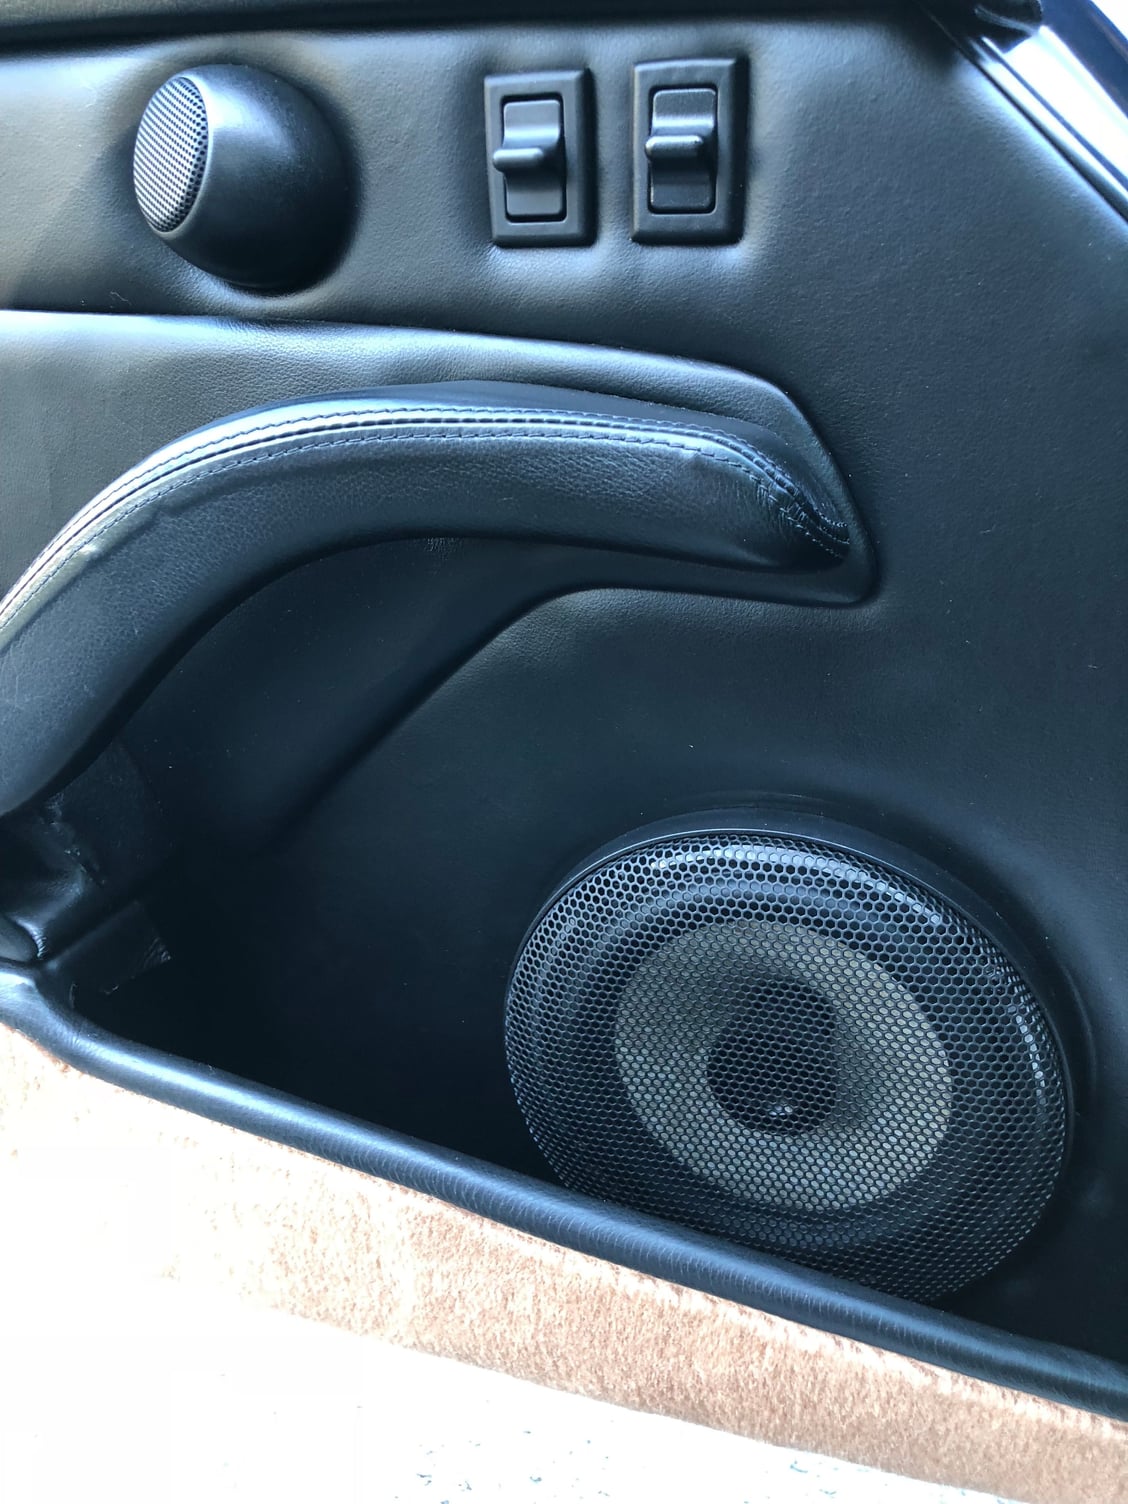
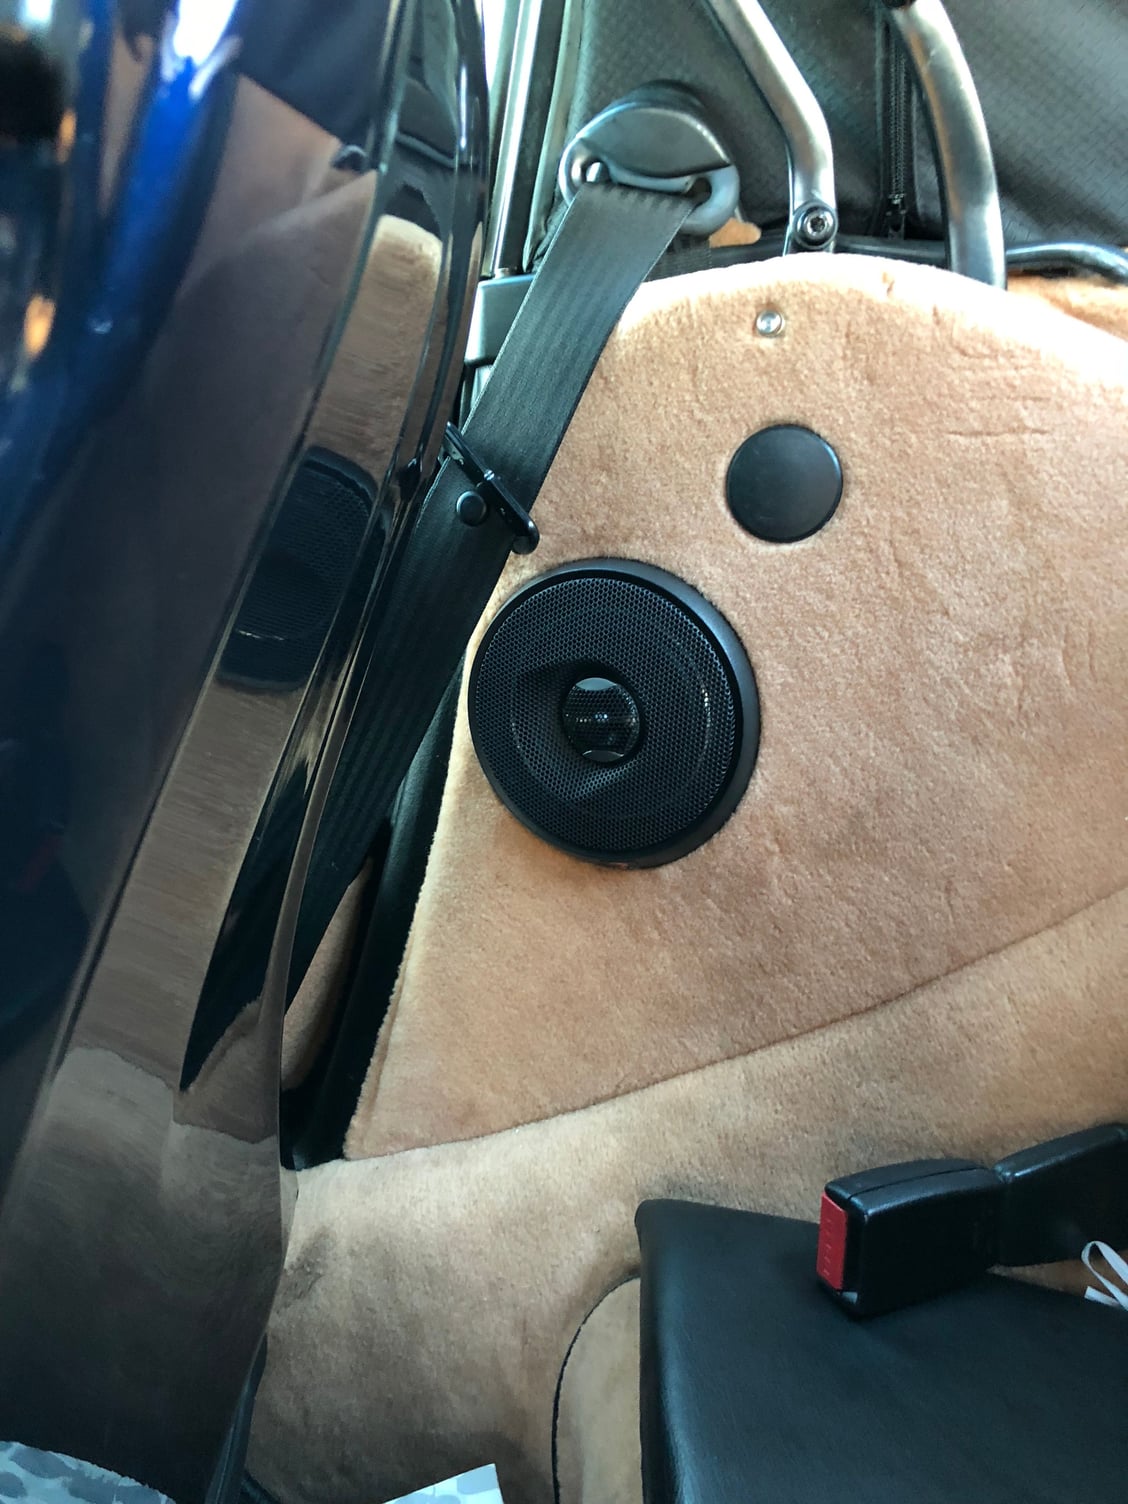
Hi all. Thanks for everyone for posting your perspectives. I chose a little different route since I have a cab and a modified exhaust that removes any notion that I will get an audiophile's sound system. The PO had already put a different head unit and speakers when the interior was re-done. It is a non-Hifi model so there was no aux amp under the seat. I decided to make things as simple as possible but get better quality sound. I was able to drop in 6.5" Focal PC165 Coax speakers in the door (keeping the original tweeters as they were still working) and 4" Focal PC100 Coax speakers in the rear side (see pictures below). I decided to go for the Alpine CDE-HD149BT with it's 17.5 watts per channel. However, the manager at Audio Images in Burlingame CA (no affiliation) suggested that these speakers didn't need a huge amp as the Component Focals that many have installed. Instead he recommended an Alpine Mini 4 channel amp that is about 1/4 the size of the radio. They were able to install the head unit, amp and crossovers in the dash without any cutting. If you avoid putting the crossovers in the doors, it will make them last longer. The original speakers and crossovers that were removed (Infinity) were rusted with corroded connections. Unfortunately, whoever installed the system did a pretty bad hack job. It really would have been a DIY if the wiring and corrosion wasn't so bad. (the crossovers were duct taped to the back of the speaker magnet!). They also soldered the antenna connector together because it was broken. Just a nightmare. The guys at Audio Images fixed everything and showed me each step they took the fixed and install the new system. I would recommend them highly if you don't want to DIY. They completed everything in 6 hours. I like having a separate USB cable as I use my iPhone for Nav and calls. The microphone is hidden underneath the steering wheel. We tested the phone system and it works perfectly. The sound is amazing even without a subwoofer. The two tweeters really enhance the sound and clarity. Audio Images do a lot of custom motorcycle stereos and all have 2 tweeters because there is nowhere for sound to bounce. This is the same for my cab. Here is what it looks like:
Hey all, starting my install. Any suggestions where to put the crossovers? Mine are sort of big as they are an old-school mbquart reference set. The space under the passenger seat is taken with my amp. I will be getting RS door cards eventually so the storage compartment outside the standard door card will not work either.
@rockdoc you mention you put the crossovers inside the dash. Where?
Thanks
Hey Samurai,
How did you feed your speaker wire thru the door to your amp? I'm in the process of installing my Focals, but trying to figure out the best way to route them to my AMP under the passenger seat. Thanks.
I don't have pictures yet and will post it when I do. I basically fished the wire through the door shell/door jam grommet that carries all of the electrical wires into the door. I started fishing the wire from the door shell. Once I got it through the large part of the grommet made a small incision on the small side and then continued fishing it through the door jam into the dash by following he wires into the cabin. Once done I electrical taped the wire bundle together to seal the grommet back up.
I did this with a pair of wires as I have a high and low from the cross over which is in the dash and not the door shell.
I ended up installing one crossover above the dead pedal kick panel and the other one behind the glove box without removing the dash. Then fished the wire under the passenger track mat area to the passenger seat which is where my amp is.
Did something similar with my power line from the battery. I used the grommet for the frunk release latch to fish from the frunk into the cabin which is next to the steering column u joint.
Use some spray silicone lubricant to make the grommet slippery so the wire slides easily through.
Now waiting for my head unit harness as I ordered the female instead of the male one.
would love to see pics of your finished install or any of the process as well. thanks!
Sounds great with just front 6.5 MB quart components, amp, and a small sub. Also tried it without the sub and good as well. Since I got my sub for free installed it
Sounds great with just front 6.5 MB quart components, amp, and a small sub. Also tried it without the sub and good as well. Since I got my sub for free installed it
Just curious - anyone look into using the Focal ISU 130 - it�s a 5 1/4� component systems that seems like might have a shot at fitting without significant mods or cutting door panel?
Generally bigger is better with door speakers. Just a little work with a Dremel to widen the speaker cut out is all you need to do. You will put on new speaker grills anyways so you already lost the "stock" aspect of the speakers when you replace them too.
You can sometimes get 1/2" spacers to help with the factory opening issue. they are black abs plastic as I recall, stacking them is also possible, to get further clearance.
Thanks, those pics really helpful - need to have a few more pressing things done to my C2S - you know, like brakes... but will definitely be swapping out the speakers sooner rather than later
Did you by chance buy the Focal ISU 130 speakers? I also am interested in some speakers that will just drop in and a lot of the Focal speakers that have been mentioned in this forum are discontinued. Tweeter may also work in stock housing…. Thanks for any feedback.

 03-27-2018, 04:59 PM