
GT4 "Short" shifter install on 991 Carrera S
 12-10-2016, 06:50 PM
#1
RL Community Team
Rennlist Member
Rennlist Member
Thread Starter
There are a few other threads on this, including some with pics / videos. However I'm of the opinion that there can't be enough pictures. So I decided to do a "how-to" thread while installing the GT4 shifter on my 991 C2S.
Caveats - I wanted to take more pictures but I didn't take as many as I would have liked. Also, I took more pictures during re-assembly than disassembly, so you may notice in some of the pictures that the GT4 shifter is already in. No bother.
The other caveat - this isn't intended to be a complete installation guide. As always, this is simply to help those who are comfortable with DIY and have tackled removing automotive trim and components before. It's not hard, difficulty is probably a 4 or a 5. But please don't do this if you're not comfortable. I don't want anyone ruining their car.
Having said that, if a dealer attempts to charge you more than 2 hours for this, they are ripping you off. I started at about 8:45 at night and proceeded until I was done with disassembly and ready to swap the shifter. Then the next day I swapped the shifter and re-assembled. Total time was about 2:20. I went slowly and deliberately, taking pictures and referring back to them to make sure everything was good. Plus there was the inevitable delay from stopping and re-starting. I'd say if I were going to do it again, i could do it in 1:30. Maybe 1:00 if I didn't disconnect the PCM.
Tools needed:
- T20 Torx driver. I have a T20 bit that fits on a 1/4 in ratchet and a screwdriver type tool.
- One or more automotive trim removal tools (or a butter knife if you are adventurous).
- Side cutters (for cutting zip-ties)
- Two 1/4" zip ties
- Small screwdriver for releasing the electrical connection clips
- Flat head screwdriver (or a small pointed trim tool)
- Small pliers
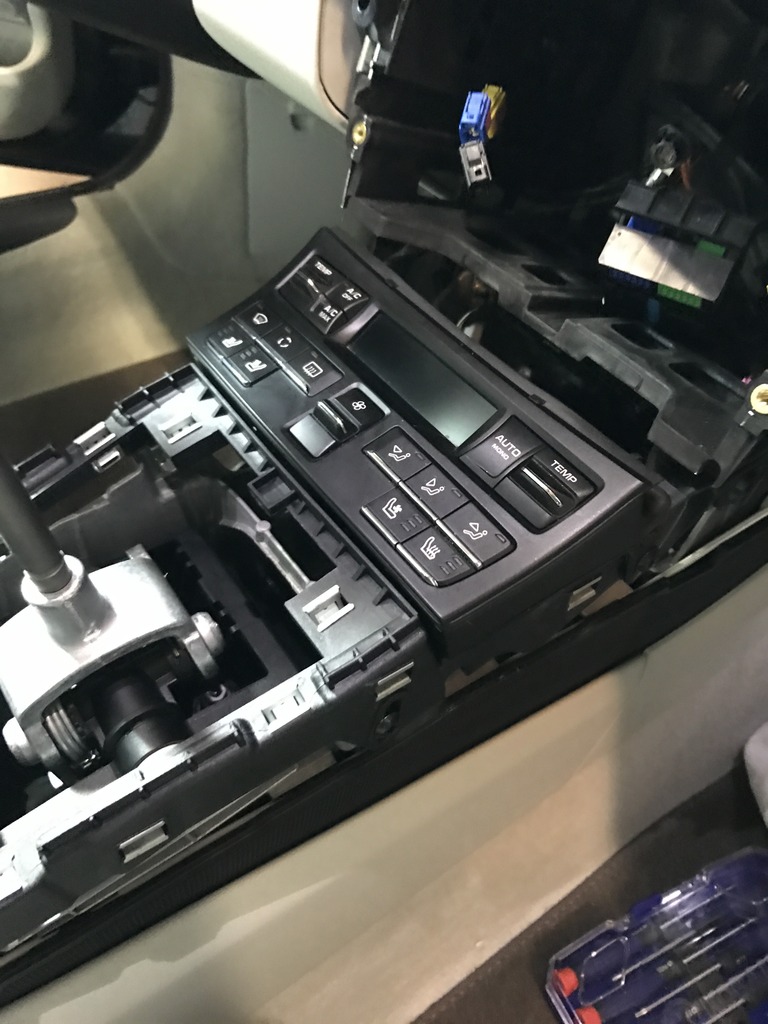
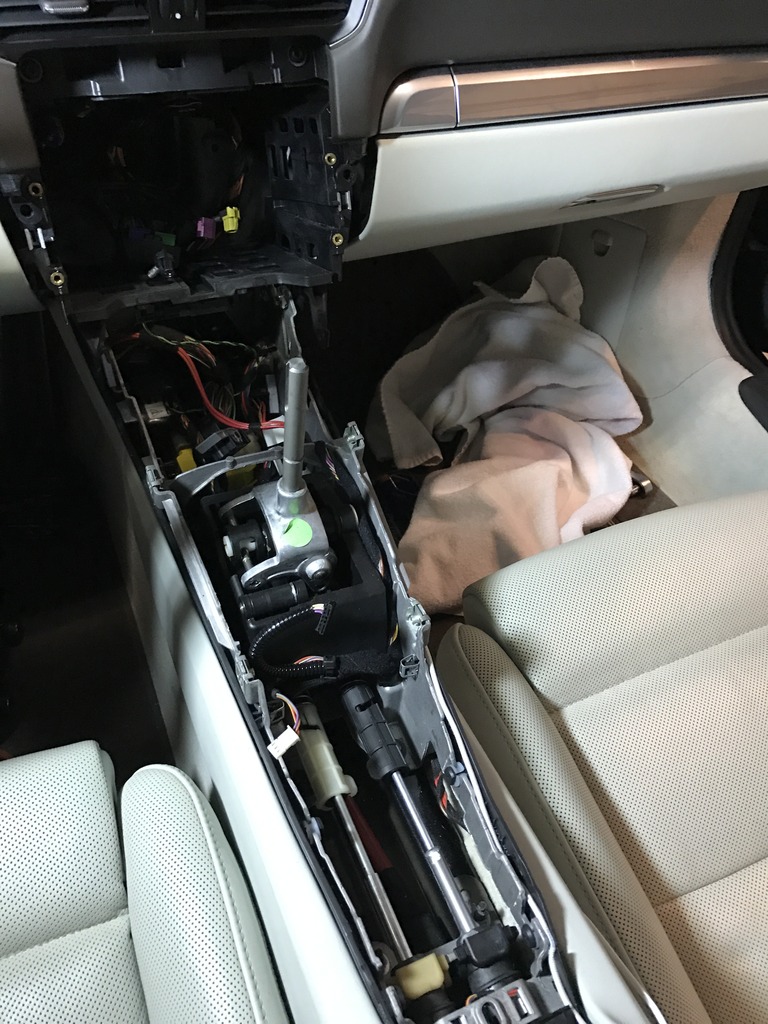
To start disassembly, understand that there is a "skeleton frame" that sits underneath all the console equipment. The HVAC controller, shift boot, hazard switch, multi-function switch bank, storage tray, side panels and silver trim piece all simply snap onto this skeleton frame. You will need to remove everything from this frame, then the PCM, then the frame itself in order to remove the shifter.
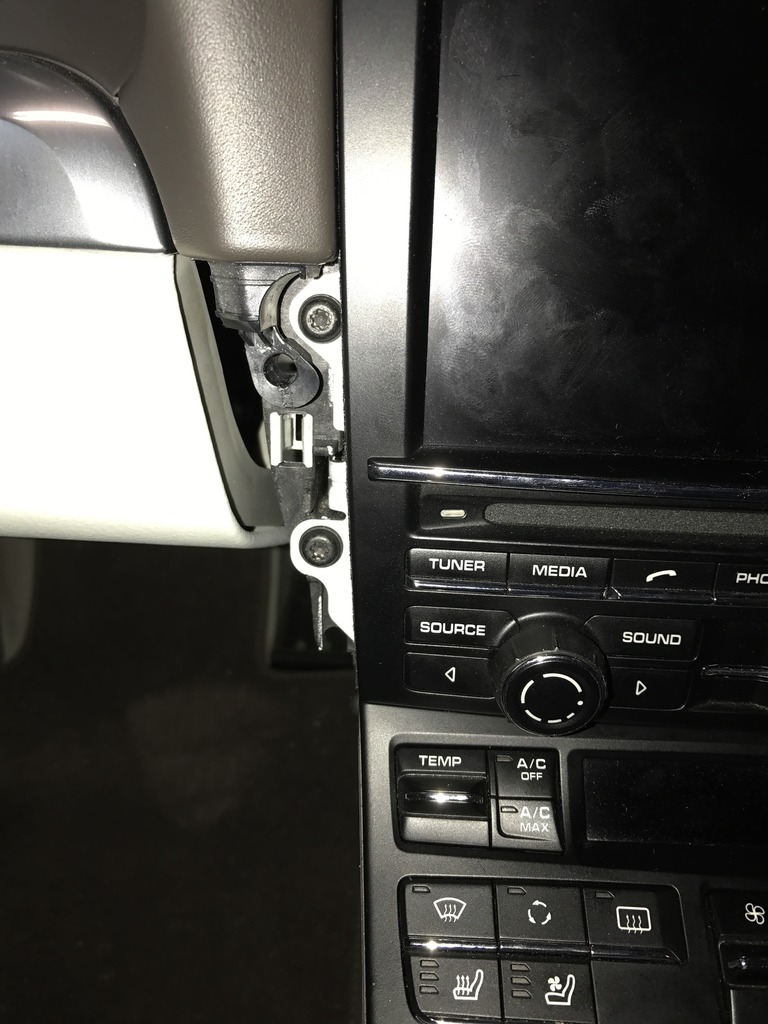
Start by removing the side panels. They just snap off. Start at the rear of the console near the storage tray, and put the trim tool between the console side panel and the main part of the panel. Lever it back and forth until you hear a "pop" and the fastener releases. Pull until you get all the fasteners off up to the HVAC control area. You will then need to pull the entire panel straight back toward the rear of the car to release it.
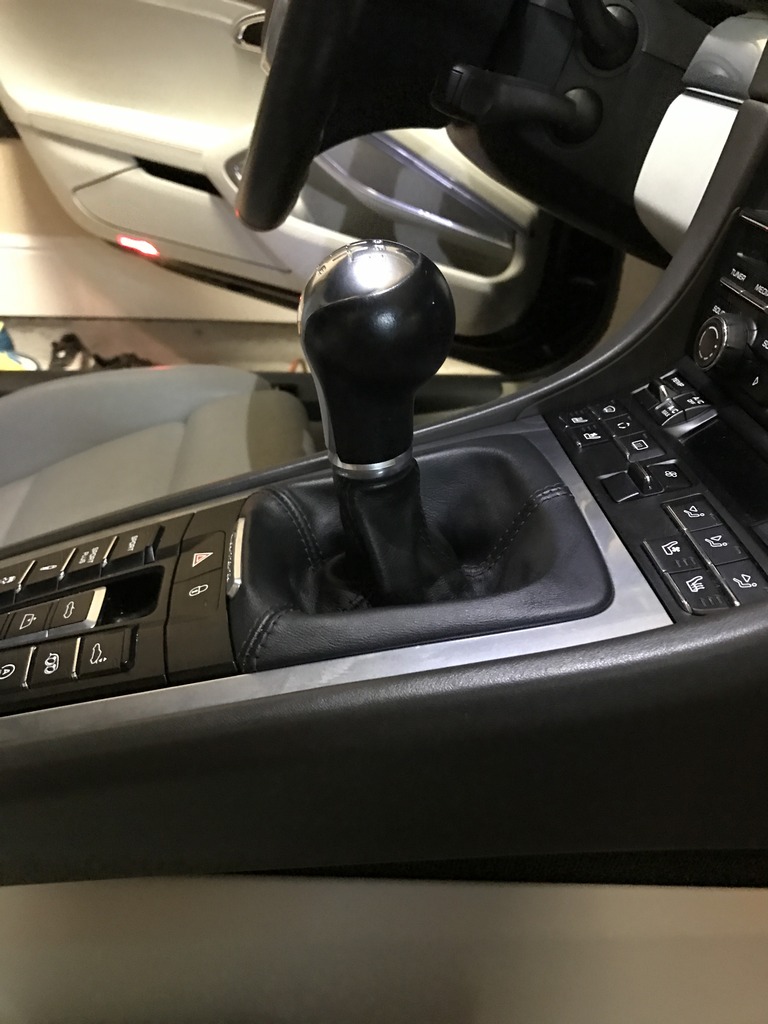
(This picture shows the new shifter).
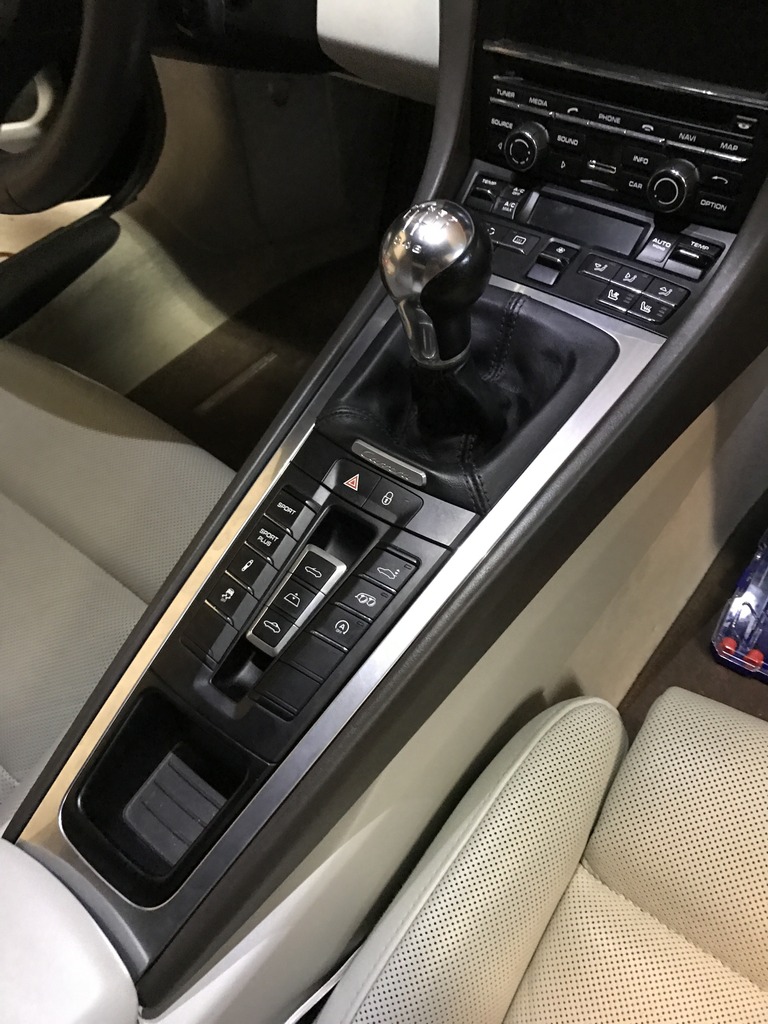
Next you will need to remove the silver trim panel (or Carbon or brushed aluminum, etc.). This also just pops off. Be careful, the aluminum one is just coated plastic. Again, start at the back and simply pull with your hands up until they pop.
Next, there is a rubber gasket that sits under the silver piece. Simply peel it off. It should now look like this:
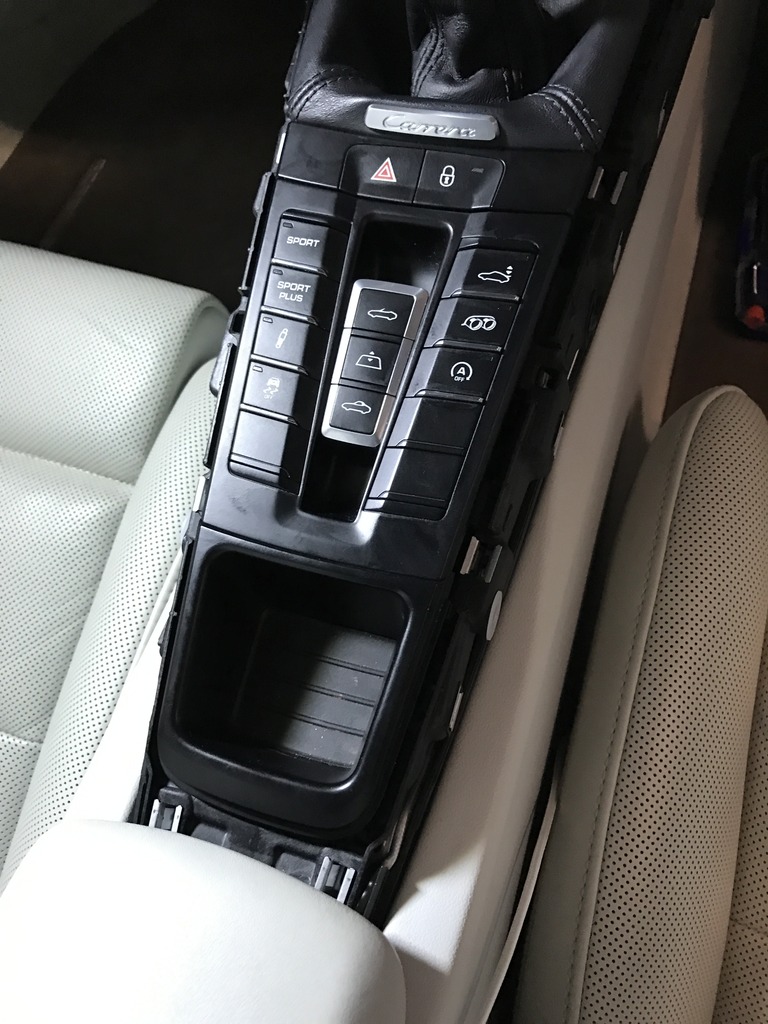
Next to remove is the control panel that has the sport button, sunroof / roof buttons, PSE, etc. Again, this simply pops out. Grab it on either side and pull straight up. Gently but firmly. It's attached with only one wire. Use the small screwdriver to release the connector.
Next, take the storage tray at the rear and push it forward toward the shifter. It will pop right out.
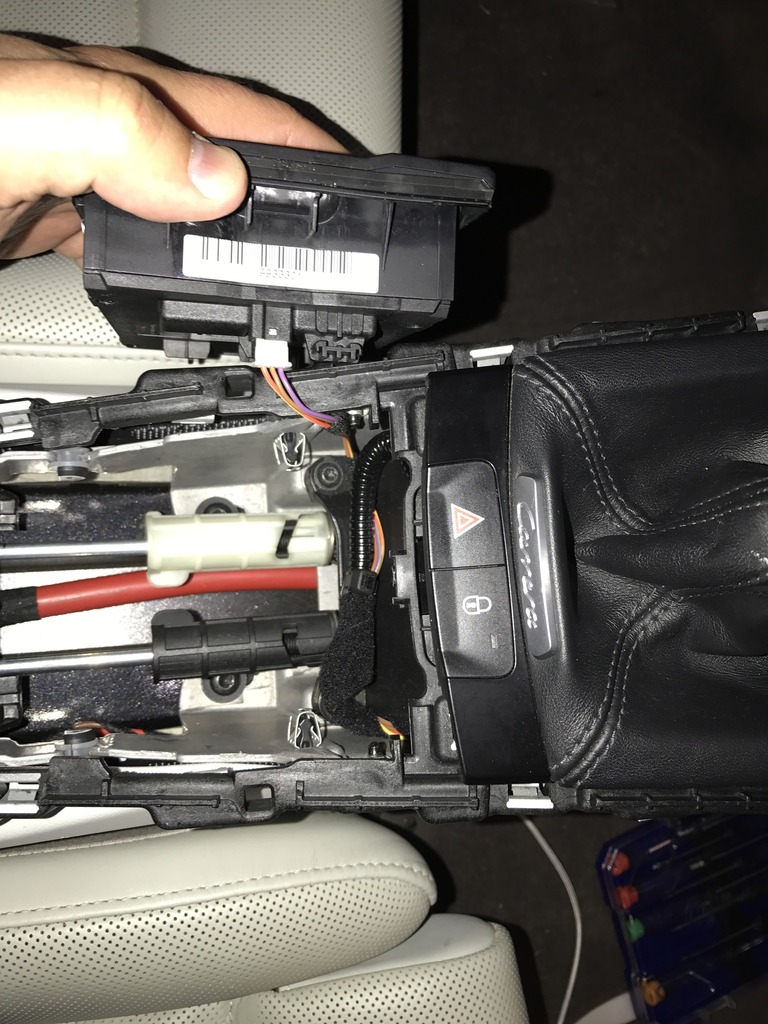
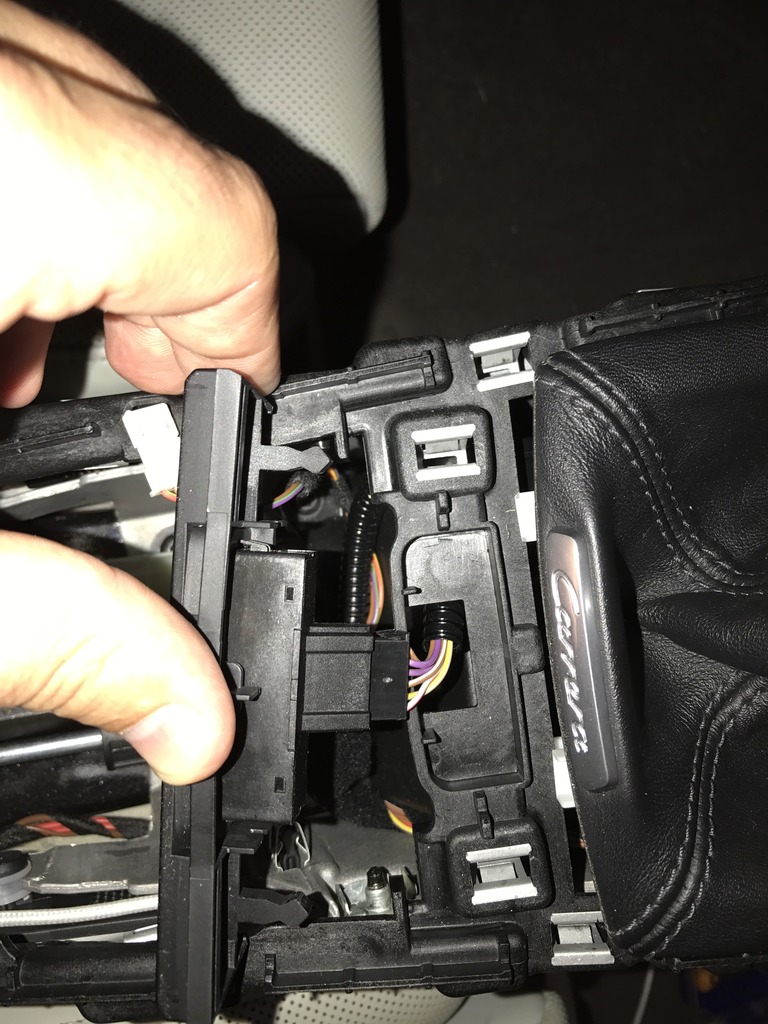
After that, release the panel with the lock button and hazard switch. Again, just pull straight up on either side. It is attached with two tabs and one connector.
Now, you will need to release the shift boot. The front is secured with a straight push connector:
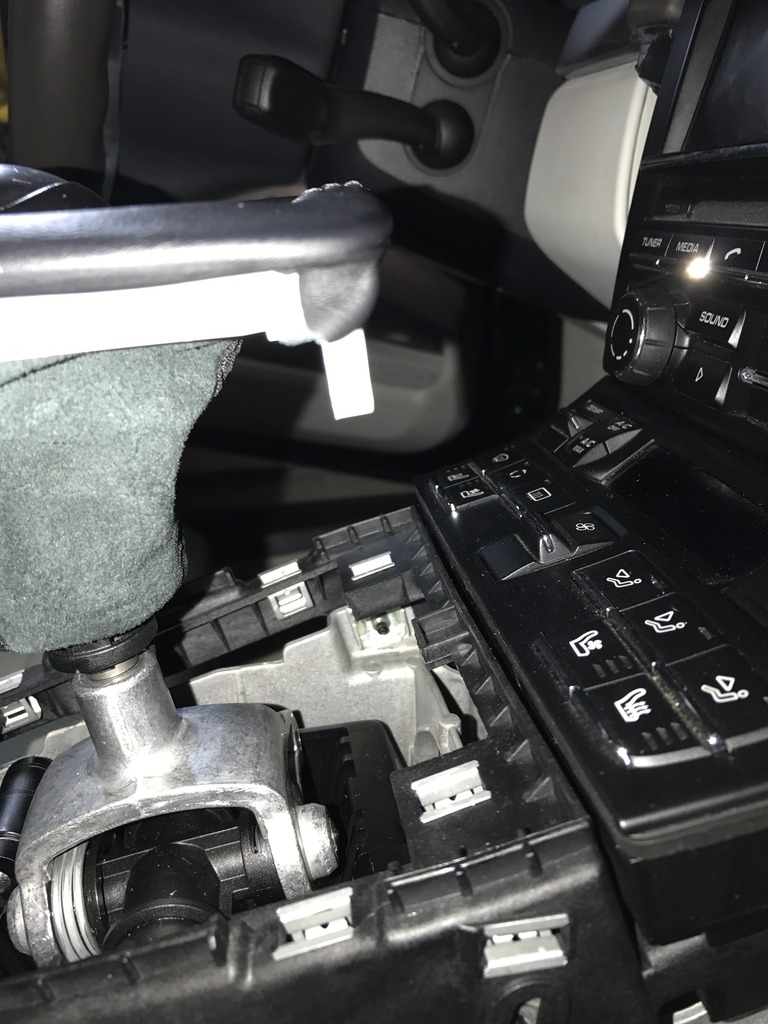
The rear of the shifter hooks onto the skeleton frame.

Next, you will need to remove the shift boot. Turn the plastic sleeve underneath the shift **** 1/4 turn until you hear a click. The shift **** will slide off with only a little resistance.
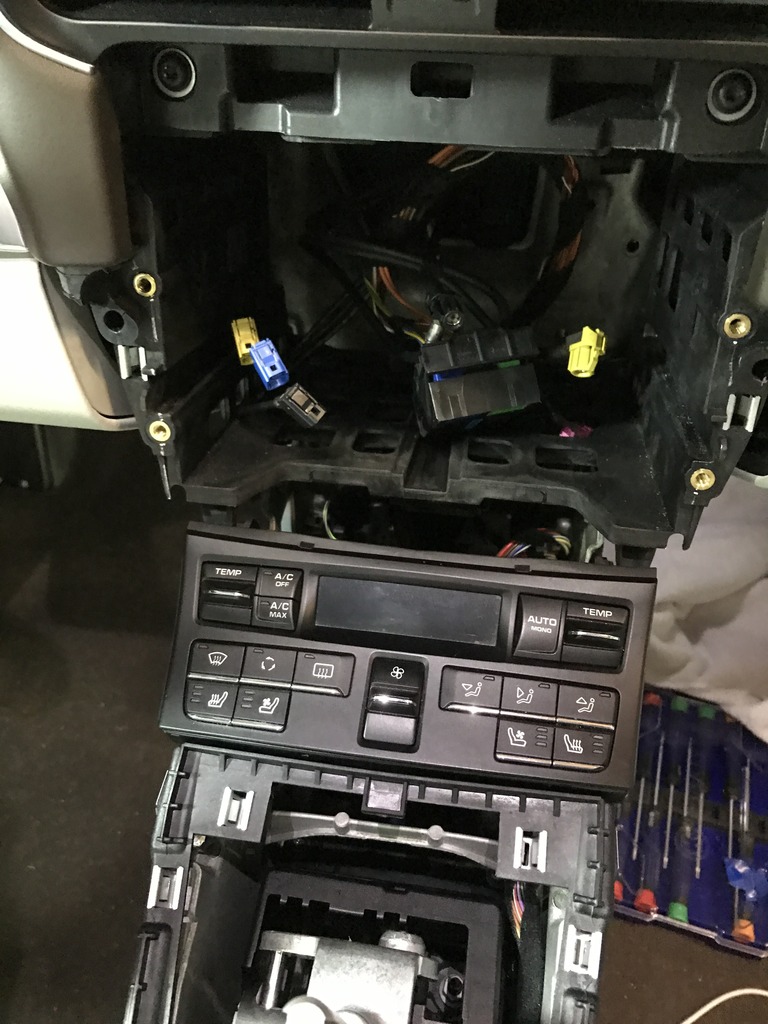
You will need to remove the PCM before you remove the HVAC controller, as the PCM sits on top of the forward edge of the HVAC control switches. The PCM is held on by 4 T20 screws. (They are removed in this pic)
Closeup:
EDIT with 2020 update!!!
The below steps to remove the connections to the PCM are optional. They make life easier but take some time. If you are dexterous, or have someone helping, you can simply pull the PCM out, hold it to the side, pull out the climate control panel per the instructions below, and then put the PCM back in place, without screwing it down until the end. Warning, the corners are sharp and you could scratch your glovebox or steering wheel if you are not careful. Use a towel or have someone hold it.
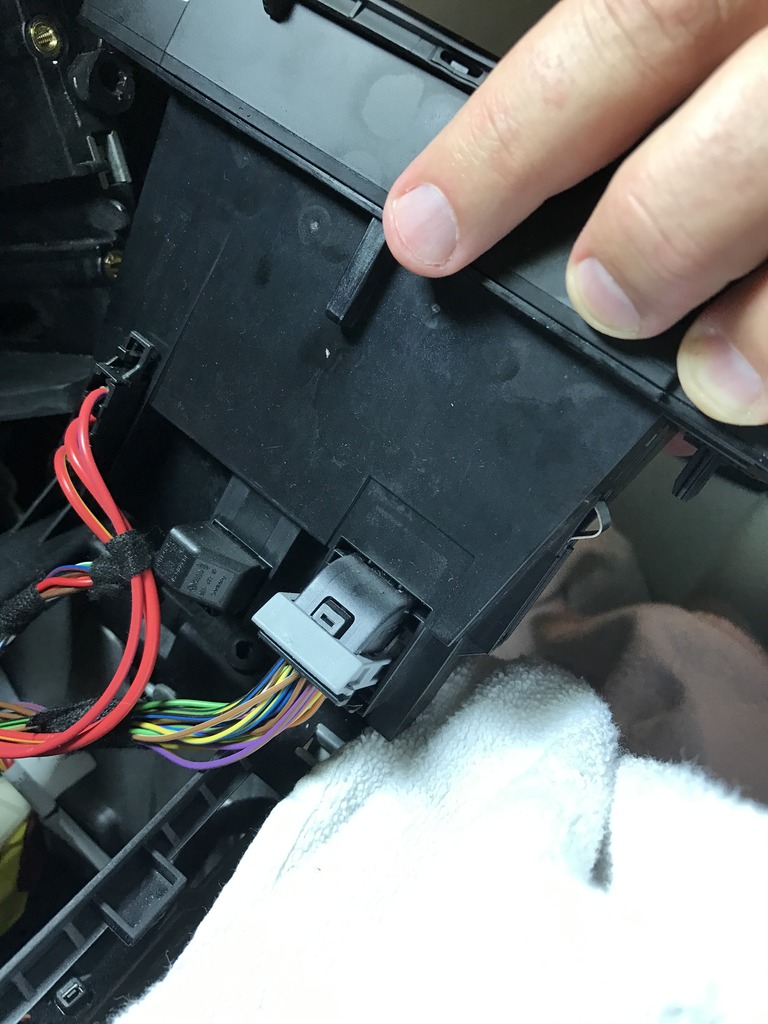
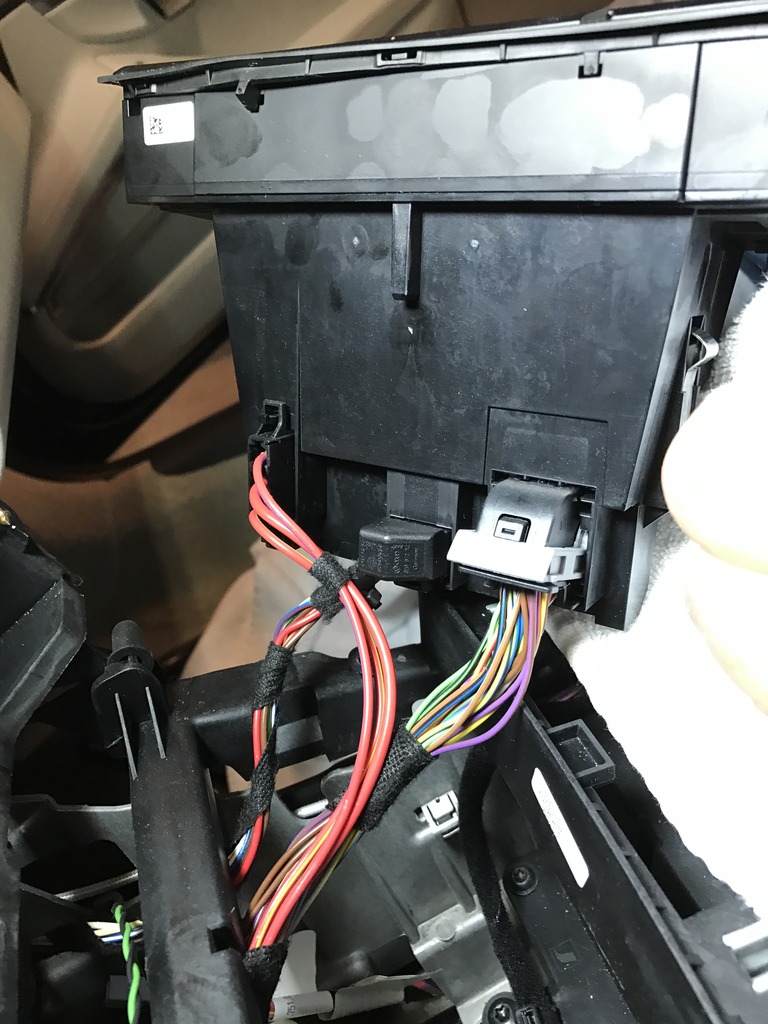
You will need to review several connectors from the rear of the PCM.
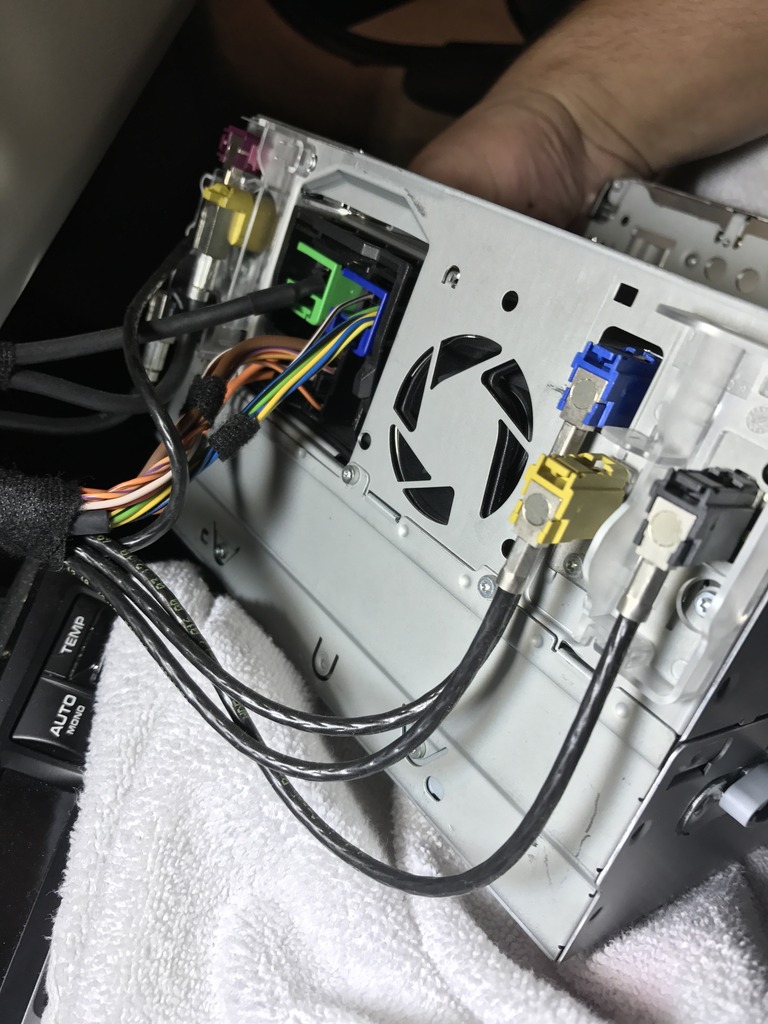
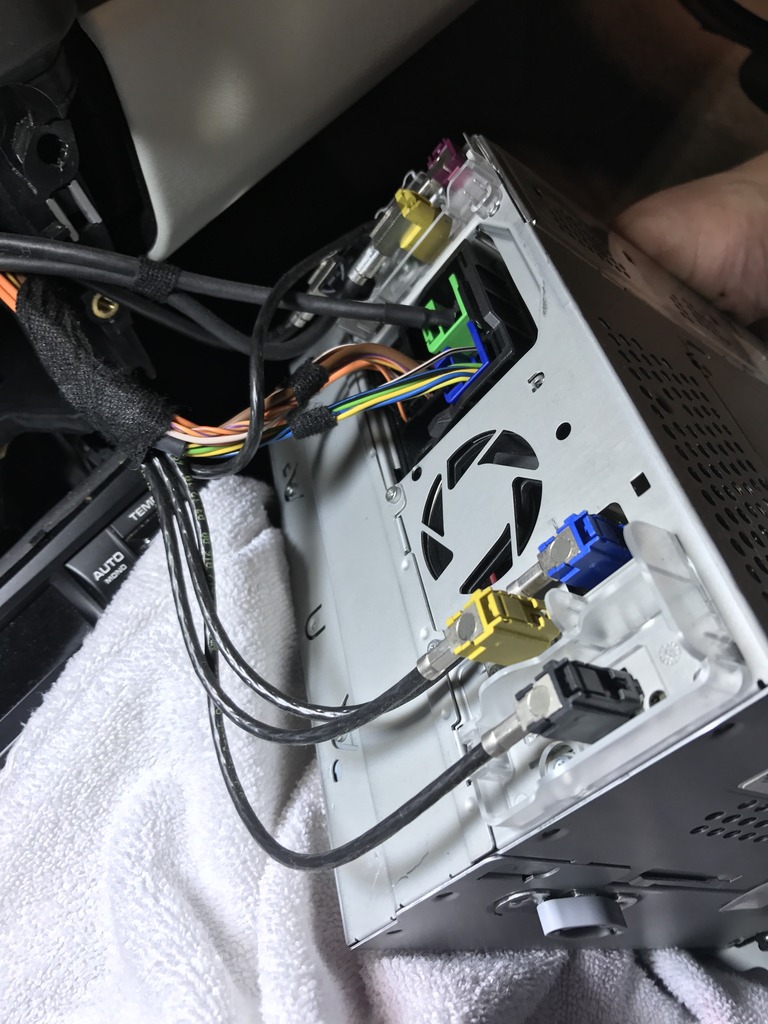
You will need to remove the blue, yellow and gray connectors on the right. Just push down the release tab and pull off. Likewise on the left, release the black, purple and yellow connectors. Don't worry later, they are different style connectors, you won't confuse the two yellows.
The multi connector in the middle pops off in one piece. There is a lever on top that you pull back, and then the whole thing just slides out.
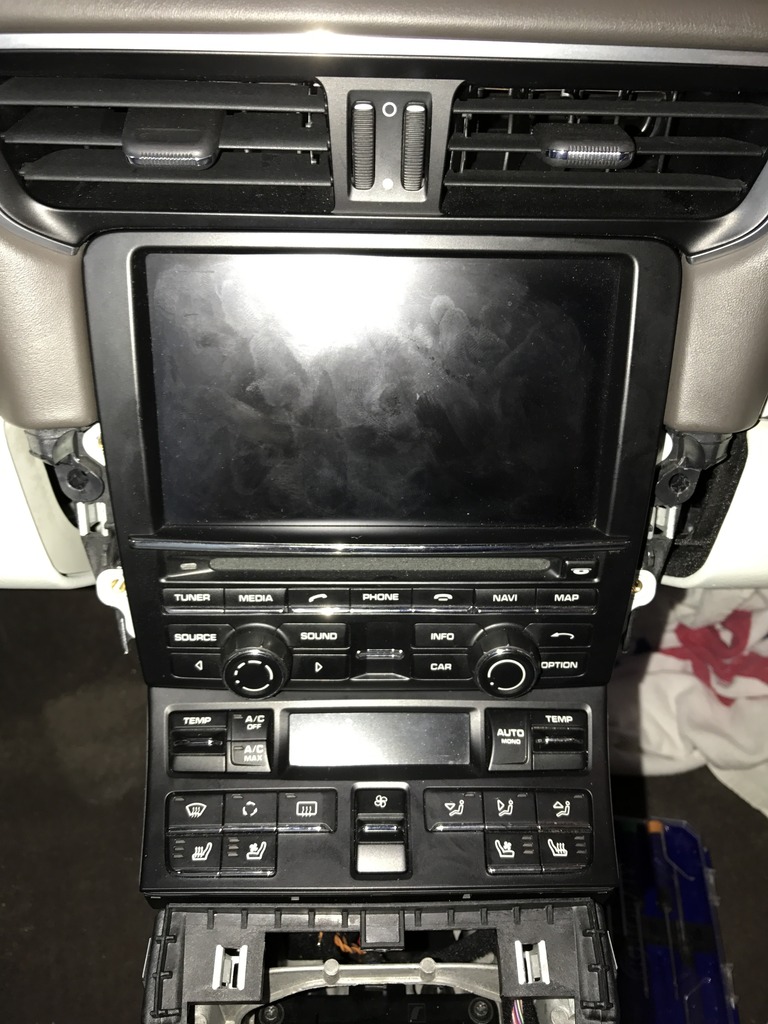
You are now able to release the HVAC panel. It just pulls straight out. It's got three connectors.
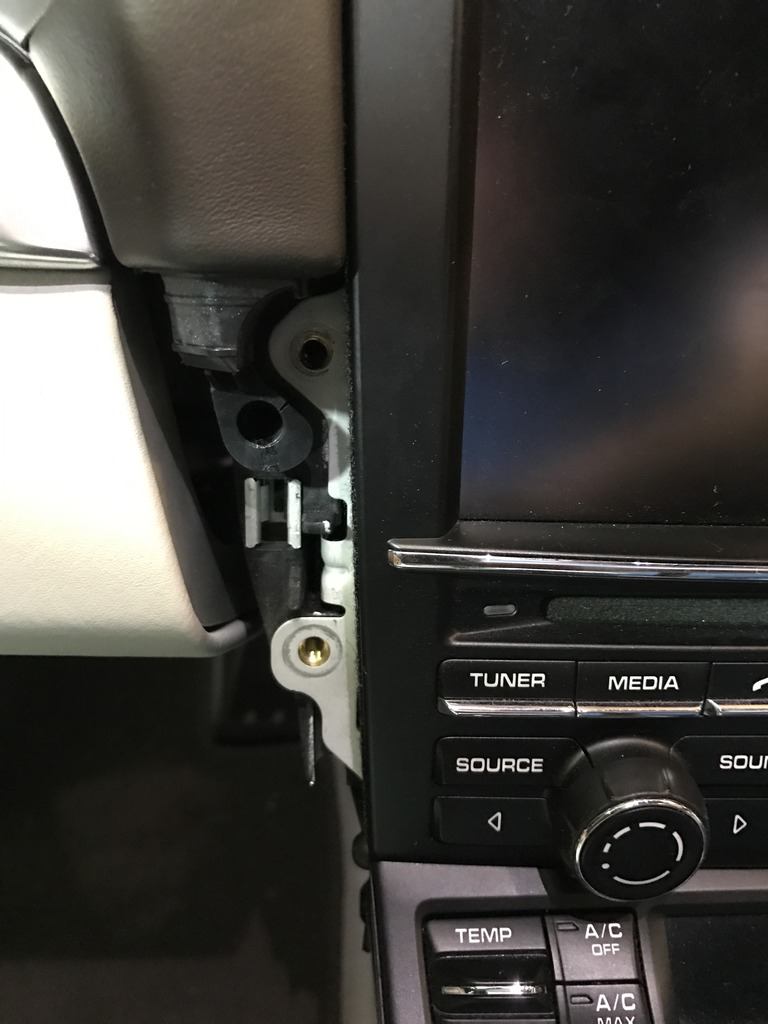
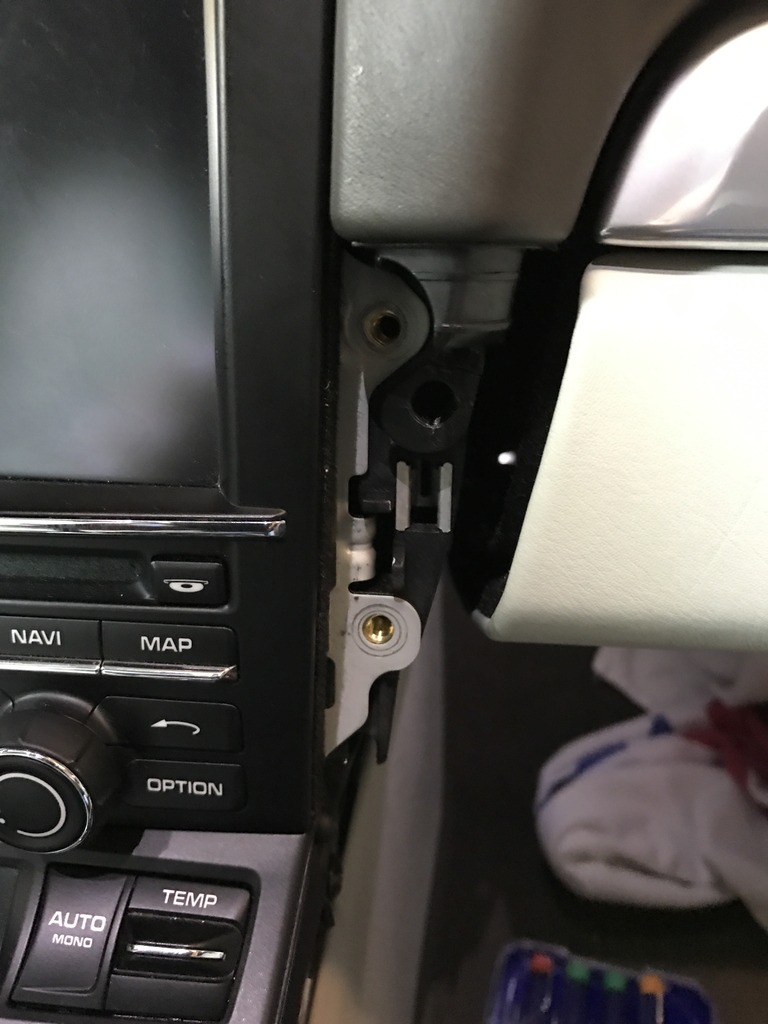
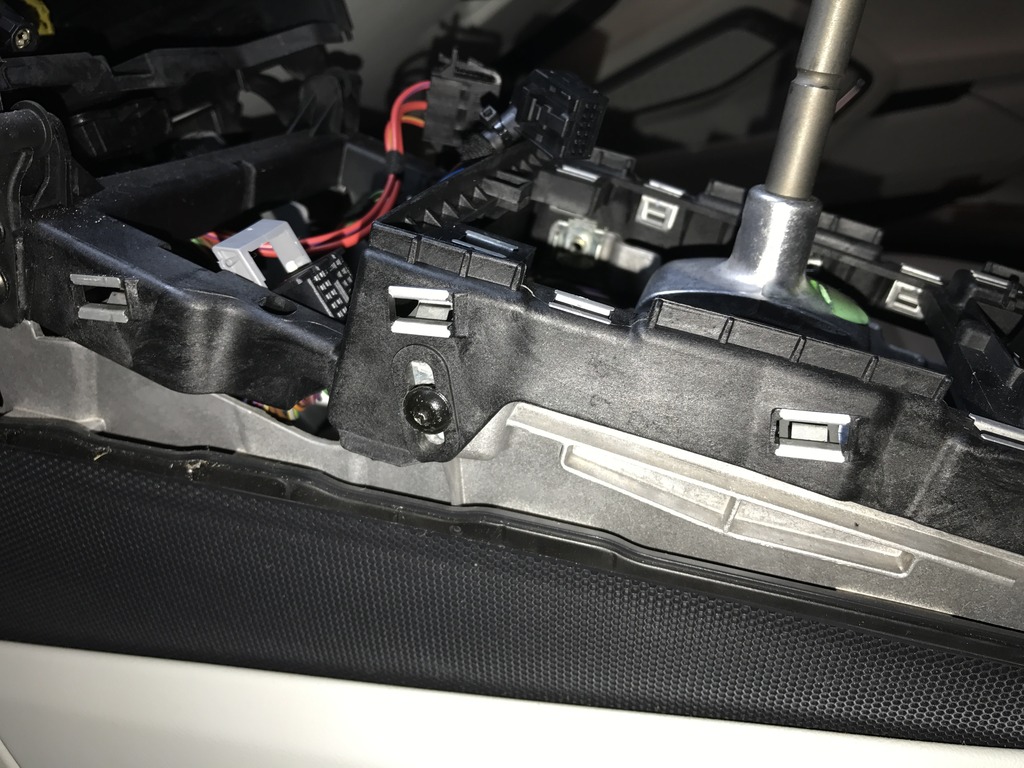
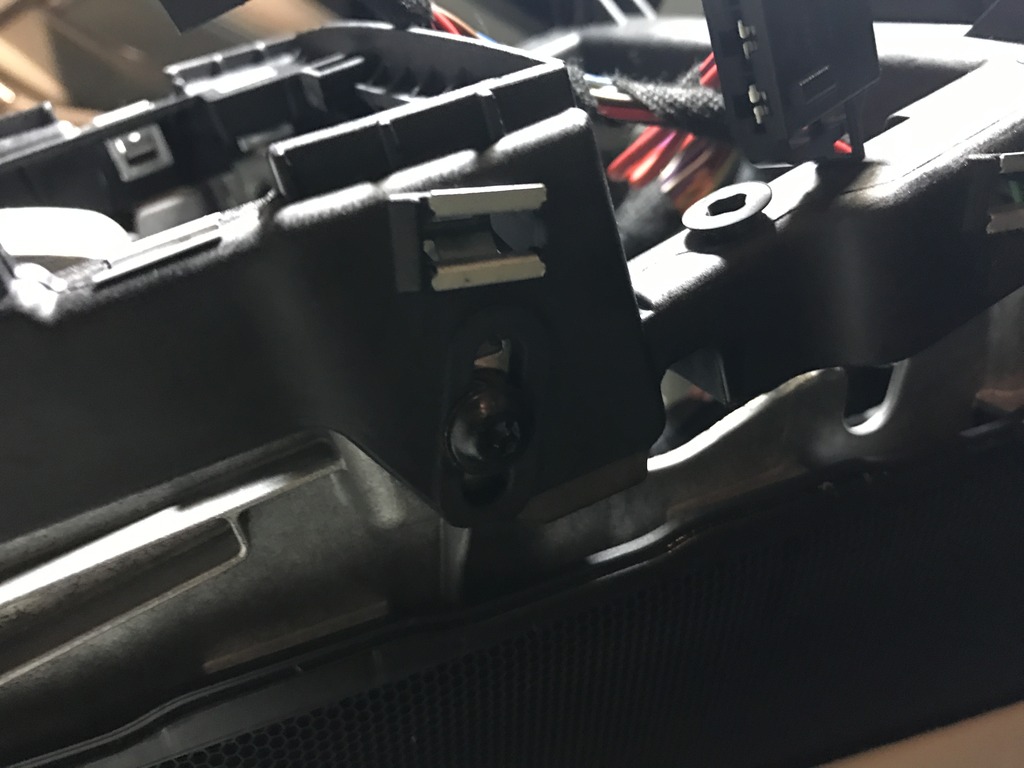
Next, you need to remove the skeleton frame. It's held on in two ways...with 6 T20 screws, plus it's popped in front and rear. First, remove the 6 screws.
Next, pull up the skeleton frame at the rear. Sorry I didn't get any pics here. It's held on at the extreme rear of the frame, just pull up.
The front is a bit tricker. It's held in by a sort of clip that needs to be pried outward to release it, while pulling back on the frame. You can see them here. Use a trim tool or screwdriver.
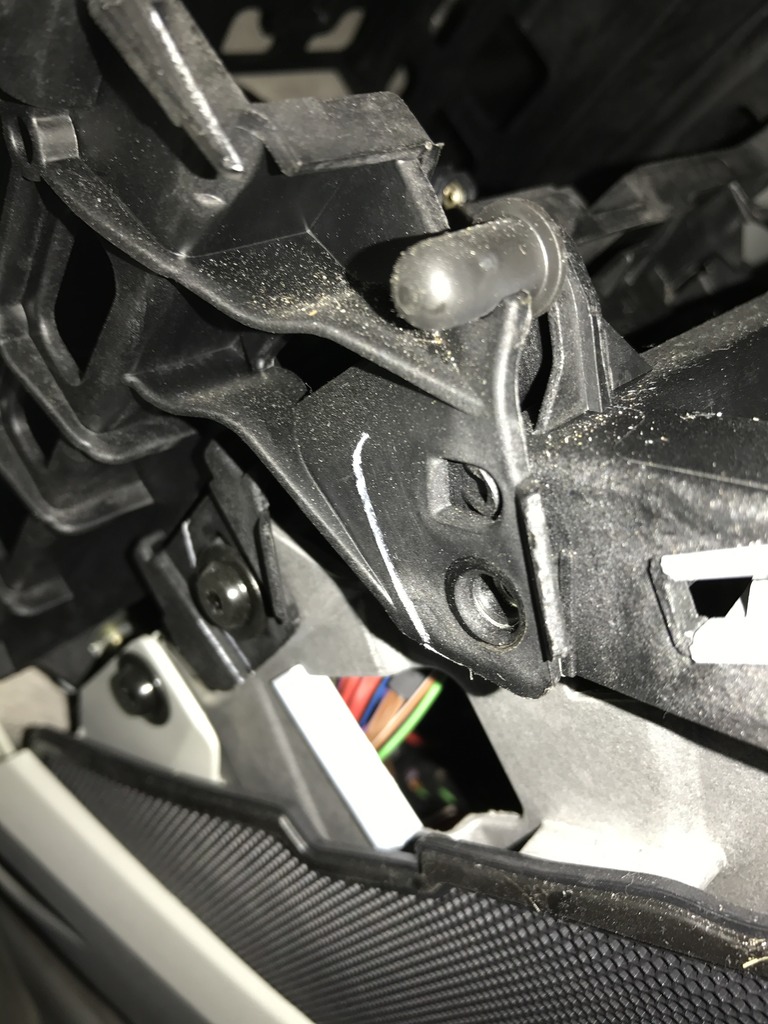
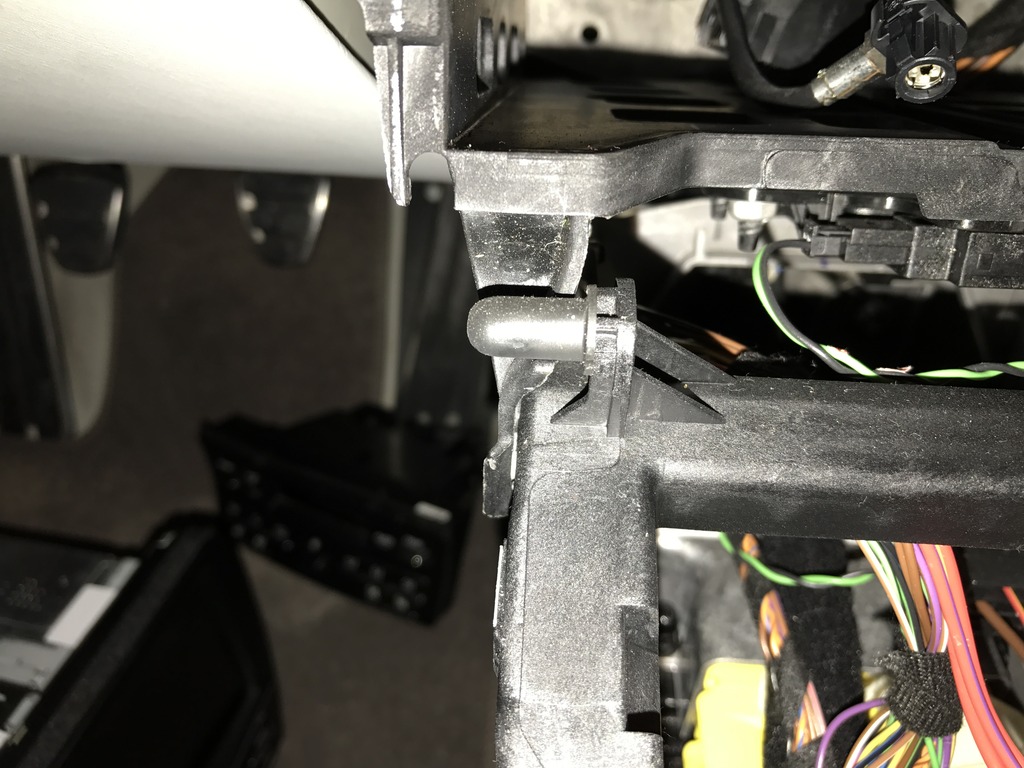
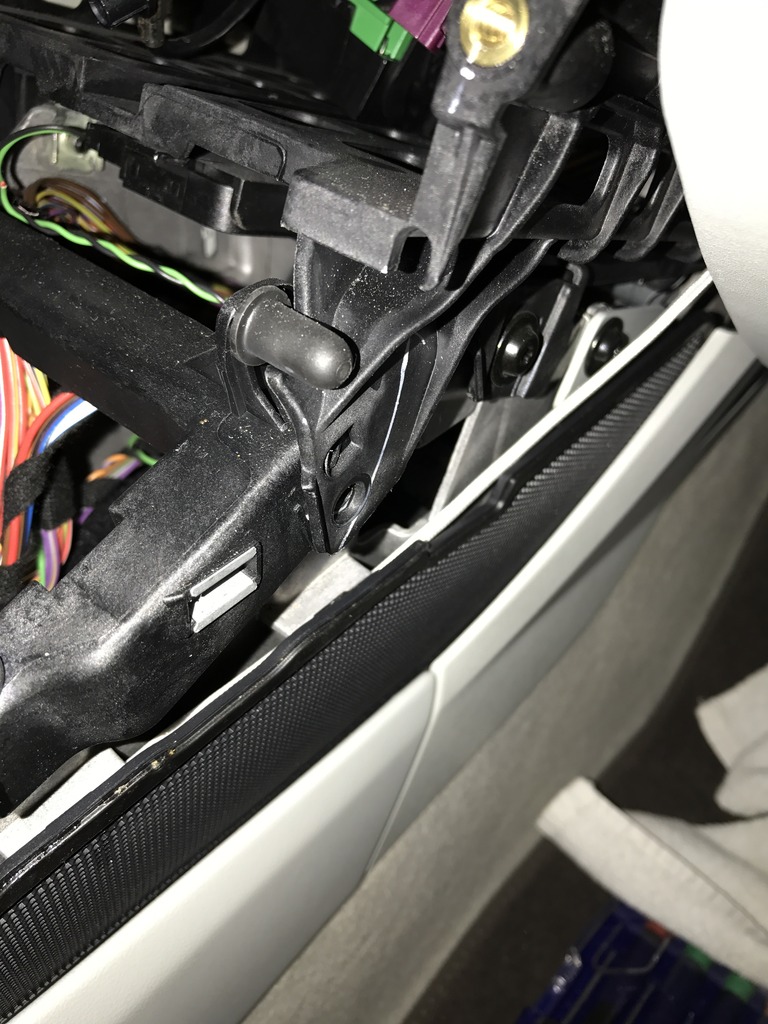
The tabs are just below the "nubs", which simply sit on the other frame as a positioning device.
Now, there is only two more step to go before shifter removal.
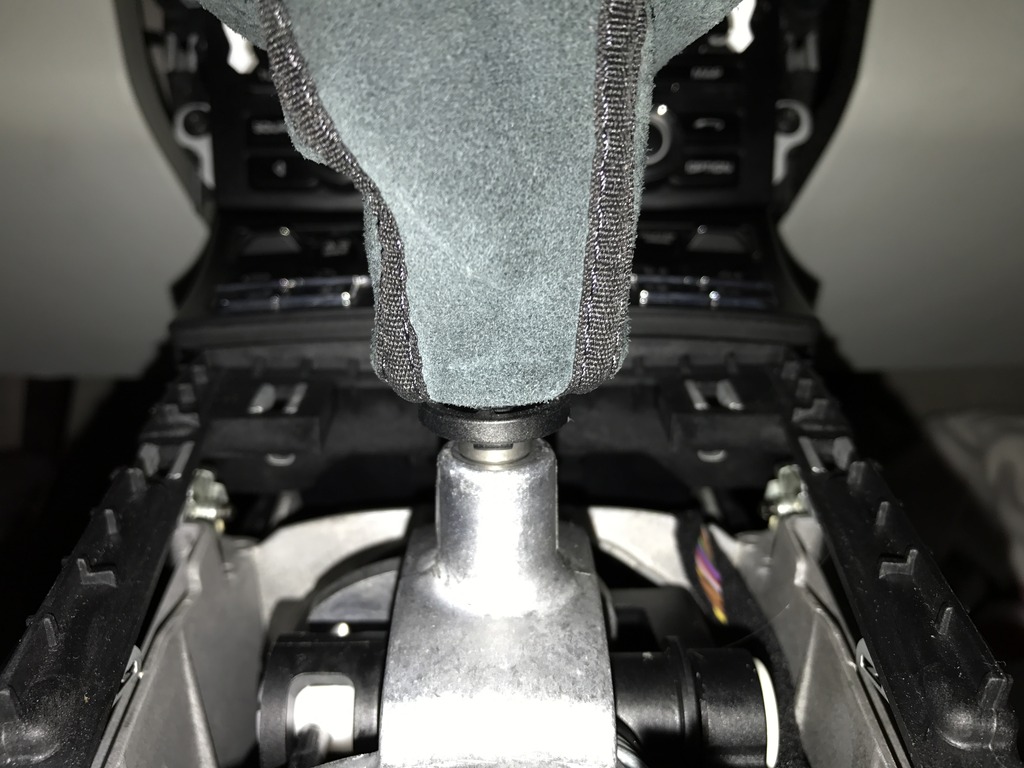
First, there is a cable that runs to the hazard switch that is zip-tied to the front and the rear of the shifter base. You can see the black zip-ties securing it down here:

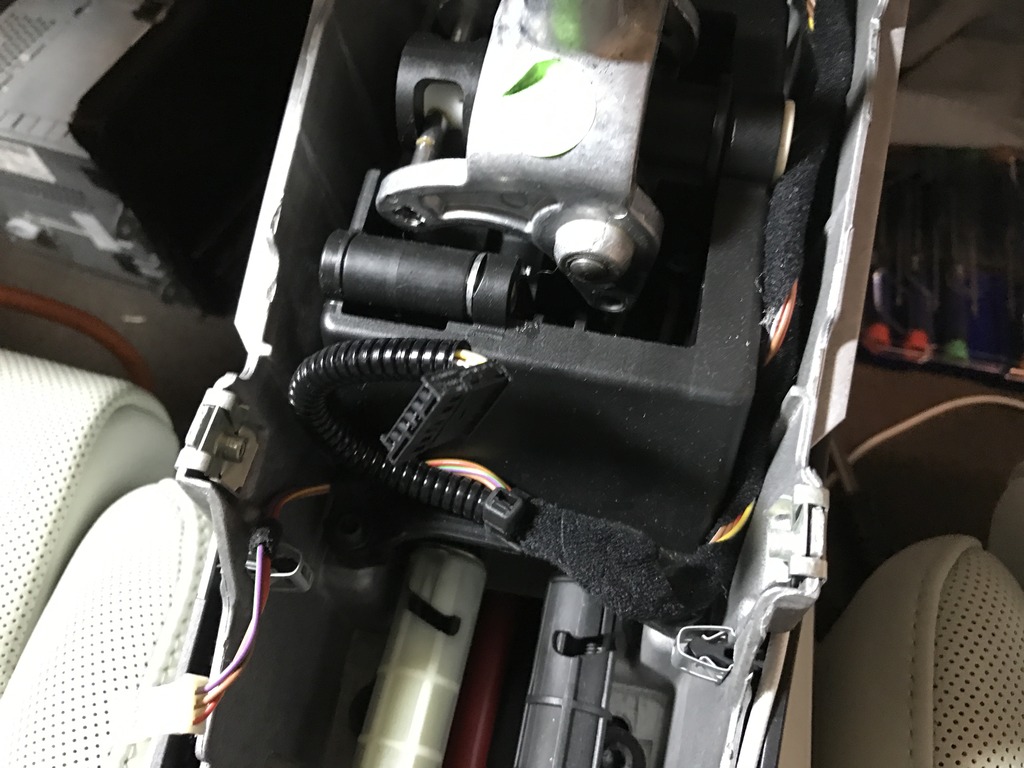
CAREFULLY cut the zip tie to release the wires. Do not try to pull it out, you will break the retainer. Later, when you remove the shifter, you will see the retainer is attached to the base of the shifter.
Here you can see the shift cables and the bayonet connectors that connect them to the shifter. These connectors work by rotating outward after being pushed forward. I would advise you to play with the empty connectors on the new shifter you are about to put in. You will quickly see how easy they are to open.
Snap on the shifter stabilizer (the red thing that comes with the shifter) then open the bayonet connectors (don't worry, the shift cables won't come flying out). Now you can see that you can mark the cables right at the edge of the bayonet connector. I used blue electrical tape.
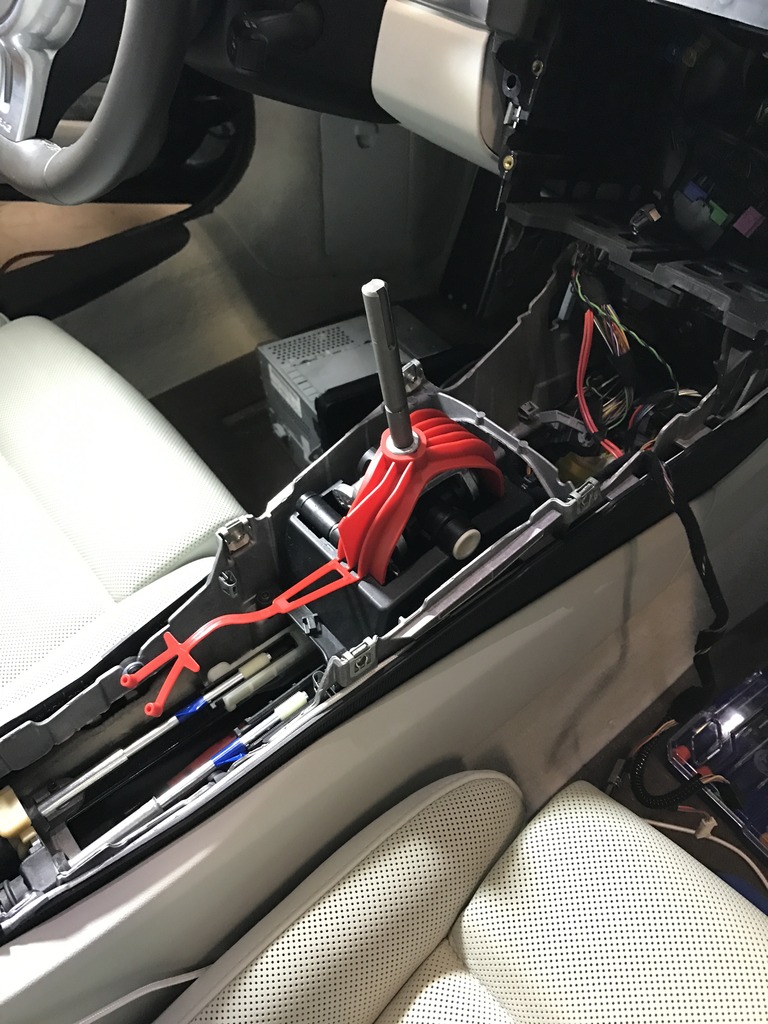
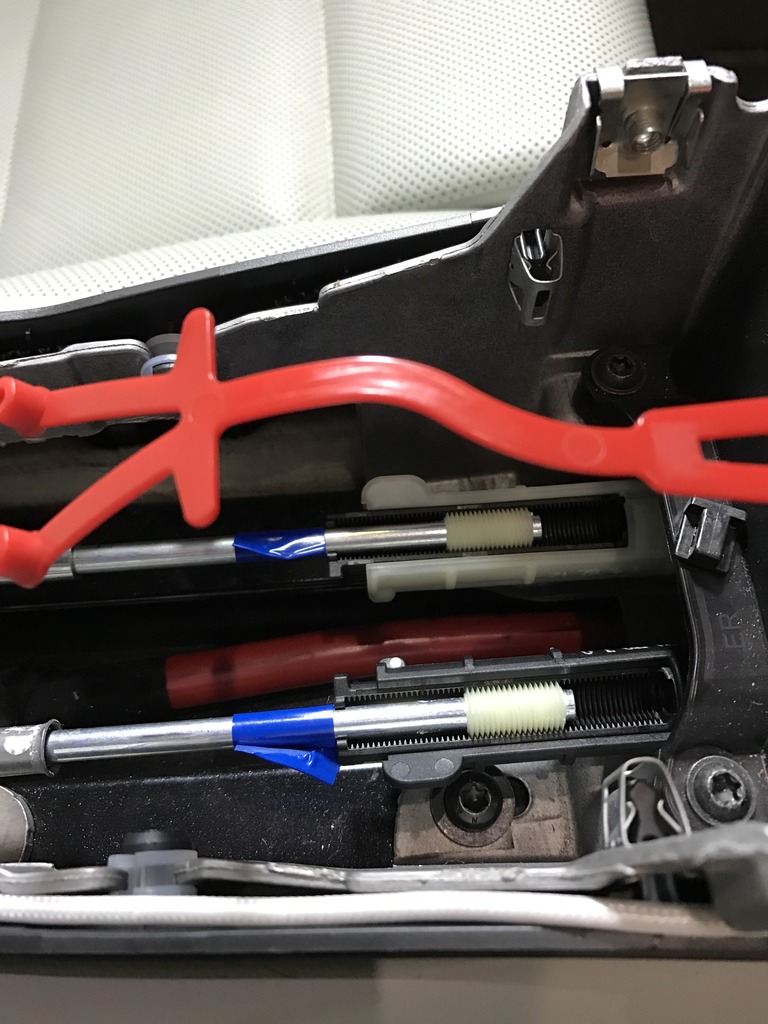
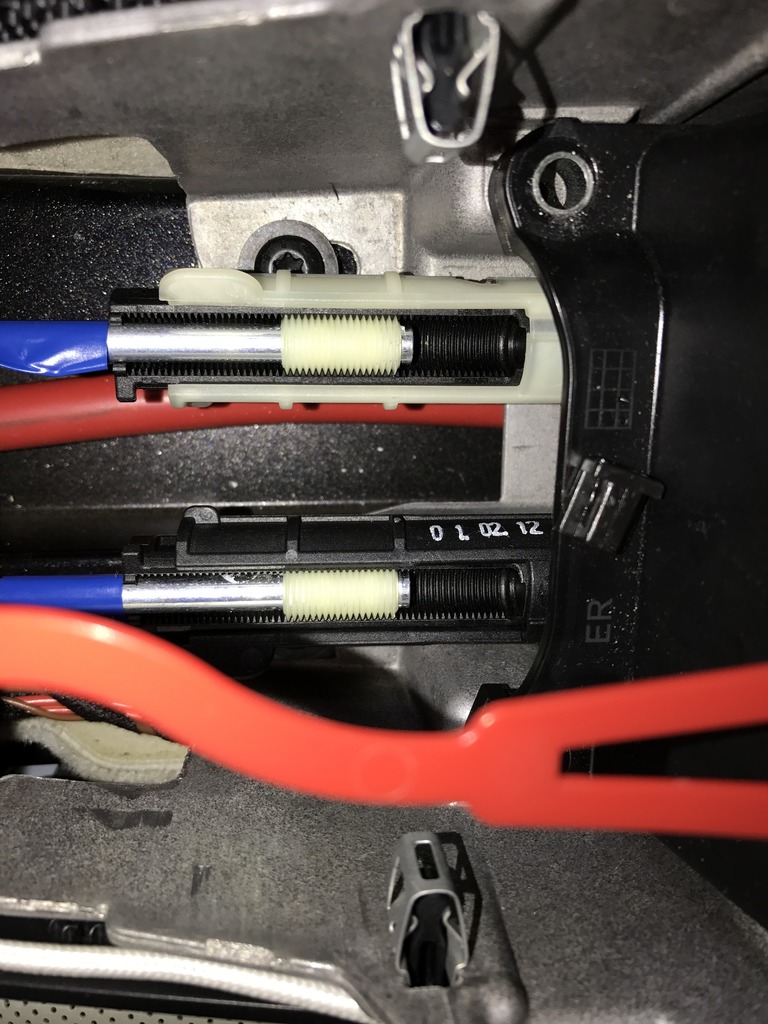
Once they are marked, simply pull up on the cable right at the back of the bayonet connector. With some slight resistance, it will pop out.
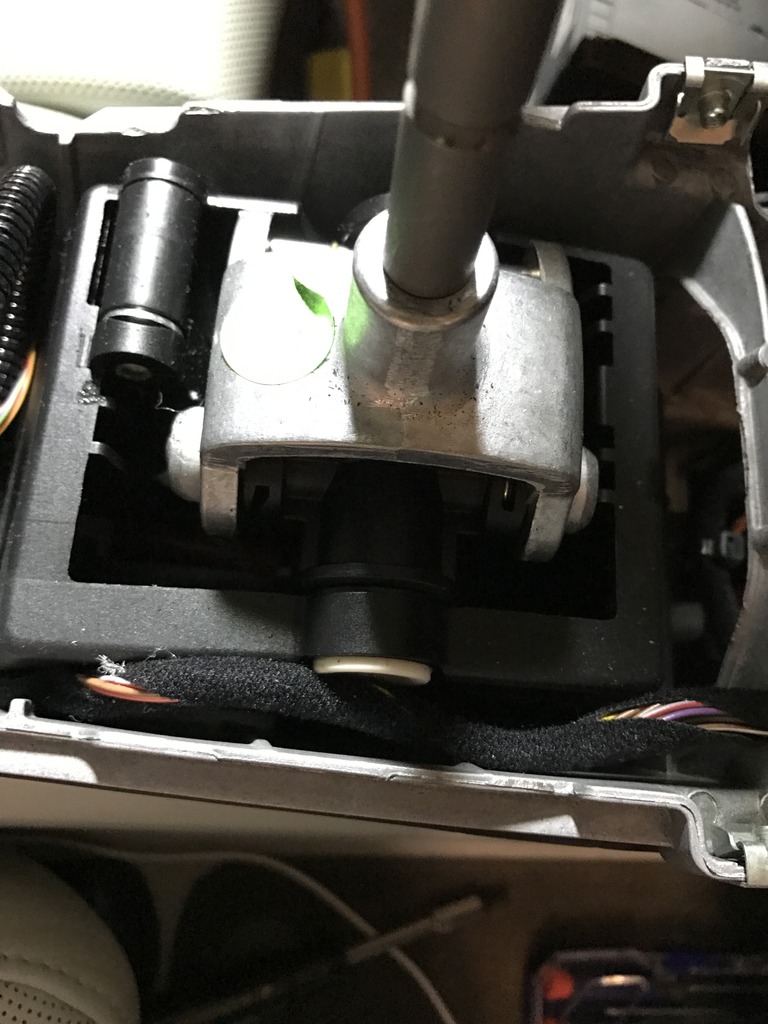
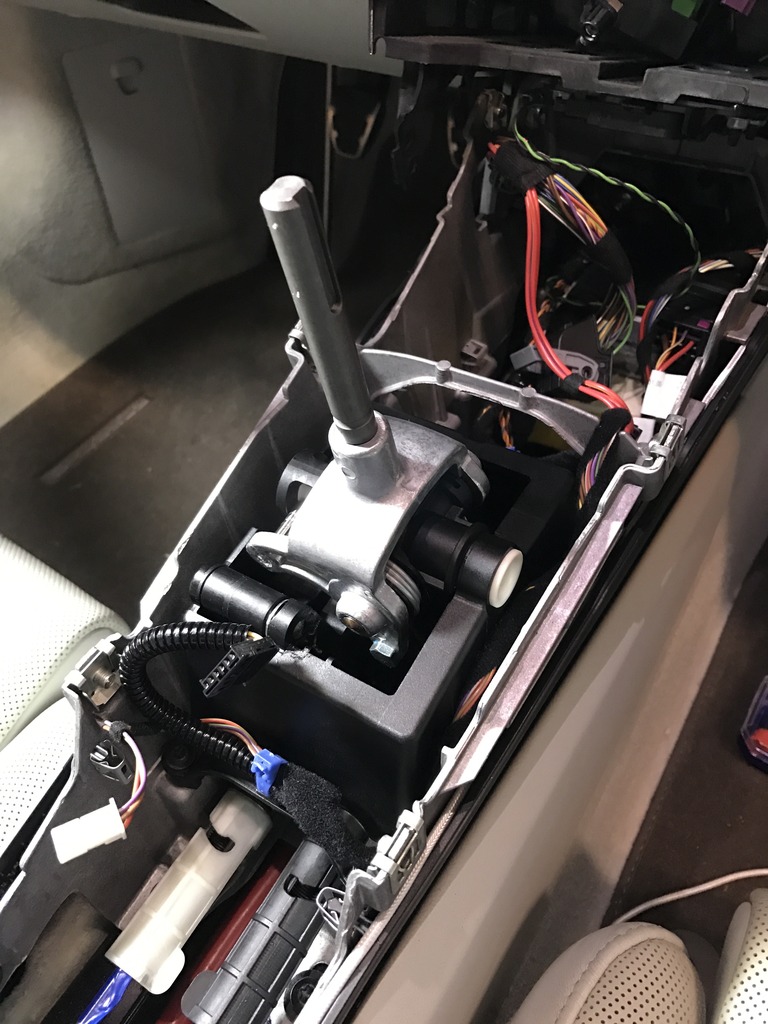
Now, the shifter itself is connected with four T20 screws. Remove them, then remove the shifter.
Now, you're on your way to re-assembly!
First, transfer the cable stays from the old shifter to the new. Sorry, I didn't get good pics of this. Use a pliers to squeeze them together underneath and push up. They will pop off the shifter base. Simply push them onto the GT4 shifter base.
Install the new shifter. I had originally thought the only difference was the length of the shift shaft itself. I was wrong. Side by side, you will notice that there is an additional spring on the GT4 shifter. It re-centers the shifter much more strongly than the stock shifter. You will notice when all is buttoned up that it's much more difficult to move the shifter out of the center position.
After installing the shifter, re-position the shift cables inside the bayonet connectors. Simply use your tape / paint mark to align the shift cable back into the same spot in the shifter (I like the tape method myself), and rotate the bayonet connectors to close them.
Next, re-secure the hazard signal button wiring to the shift base.
Re-secure the skeleton frame. First at the front back into those funny clips (those posts rest on the little guide on the front). Then push down in the back. Then screw in the 6 screws.
Next, re-connect the wires to the HVAC panel and snap back in place.
Next, re-connect the wires to the PCM and push them back into the dash. Then slide the PCM back in and re-secure with the 4 screws.
Next comes the hazard warning panel. 1 connector, snap back in.
Next comes the shift ****. Put back on the shaft, and turn the collar. Hook the back of the gaiter on to the bar on the skeleton frame, then push the connectors on the front down.
Next comes the storage tray. Set in, push back.
Next comes the multi switch panel. 1 connector, snap straight back in.
Put the rubber gasket back on.
Snap the aluminum / silver / carbon fiber frame back on. Push down.
Finally, put the side panels back on. Carefully line up at the front, and gently push forward until they "chunk" into position on the guides. Then simply snap in position.
You're done, unless I forgot something!
Overall, it's a good deal stiffer, but I am getting used to it. You certainly won't go in reverse by mistake! The added spring on the lateral positioning motion really helps to define the difference in the gates. Much more positive going into 5th and the 5-6 shift is much better. Also, the 7-5 downshift and the 6-4 downshift is much more positive. You won't select 3rd or 2nd by mistake.
For a $250 mod, this makes a HUGE difference!
PM me with questions or ask here. Be more than happy to help. And if you are in Houston, I'd be more than happy to help.
Caveats - I wanted to take more pictures but I didn't take as many as I would have liked. Also, I took more pictures during re-assembly than disassembly, so you may notice in some of the pictures that the GT4 shifter is already in. No bother.
The other caveat - this isn't intended to be a complete installation guide. As always, this is simply to help those who are comfortable with DIY and have tackled removing automotive trim and components before. It's not hard, difficulty is probably a 4 or a 5. But please don't do this if you're not comfortable. I don't want anyone ruining their car.
Having said that, if a dealer attempts to charge you more than 2 hours for this, they are ripping you off. I started at about 8:45 at night and proceeded until I was done with disassembly and ready to swap the shifter. Then the next day I swapped the shifter and re-assembled. Total time was about 2:20. I went slowly and deliberately, taking pictures and referring back to them to make sure everything was good. Plus there was the inevitable delay from stopping and re-starting. I'd say if I were going to do it again, i could do it in 1:30. Maybe 1:00 if I didn't disconnect the PCM.
Tools needed:
- T20 Torx driver. I have a T20 bit that fits on a 1/4 in ratchet and a screwdriver type tool.
- One or more automotive trim removal tools (or a butter knife if you are adventurous).
- Side cutters (for cutting zip-ties)
- Two 1/4" zip ties
- Small screwdriver for releasing the electrical connection clips
- Flat head screwdriver (or a small pointed trim tool)
- Small pliers
To start disassembly, understand that there is a "skeleton frame" that sits underneath all the console equipment. The HVAC controller, shift boot, hazard switch, multi-function switch bank, storage tray, side panels and silver trim piece all simply snap onto this skeleton frame. You will need to remove everything from this frame, then the PCM, then the frame itself in order to remove the shifter.
Start by removing the side panels. They just snap off. Start at the rear of the console near the storage tray, and put the trim tool between the console side panel and the main part of the panel. Lever it back and forth until you hear a "pop" and the fastener releases. Pull until you get all the fasteners off up to the HVAC control area. You will then need to pull the entire panel straight back toward the rear of the car to release it.
(This picture shows the new shifter).
Next you will need to remove the silver trim panel (or Carbon or brushed aluminum, etc.). This also just pops off. Be careful, the aluminum one is just coated plastic. Again, start at the back and simply pull with your hands up until they pop.
Next, there is a rubber gasket that sits under the silver piece. Simply peel it off. It should now look like this:
Next to remove is the control panel that has the sport button, sunroof / roof buttons, PSE, etc. Again, this simply pops out. Grab it on either side and pull straight up. Gently but firmly. It's attached with only one wire. Use the small screwdriver to release the connector.
Next, take the storage tray at the rear and push it forward toward the shifter. It will pop right out.
After that, release the panel with the lock button and hazard switch. Again, just pull straight up on either side. It is attached with two tabs and one connector.
Now, you will need to release the shift boot. The front is secured with a straight push connector:
The rear of the shifter hooks onto the skeleton frame.
Next, you will need to remove the shift boot. Turn the plastic sleeve underneath the shift **** 1/4 turn until you hear a click. The shift **** will slide off with only a little resistance.
You will need to remove the PCM before you remove the HVAC controller, as the PCM sits on top of the forward edge of the HVAC control switches. The PCM is held on by 4 T20 screws. (They are removed in this pic)
Closeup:
EDIT with 2020 update!!!
The below steps to remove the connections to the PCM are optional. They make life easier but take some time. If you are dexterous, or have someone helping, you can simply pull the PCM out, hold it to the side, pull out the climate control panel per the instructions below, and then put the PCM back in place, without screwing it down until the end. Warning, the corners are sharp and you could scratch your glovebox or steering wheel if you are not careful. Use a towel or have someone hold it.
You will need to review several connectors from the rear of the PCM.
You will need to remove the blue, yellow and gray connectors on the right. Just push down the release tab and pull off. Likewise on the left, release the black, purple and yellow connectors. Don't worry later, they are different style connectors, you won't confuse the two yellows.
The multi connector in the middle pops off in one piece. There is a lever on top that you pull back, and then the whole thing just slides out.
You are now able to release the HVAC panel. It just pulls straight out. It's got three connectors.
Next, you need to remove the skeleton frame. It's held on in two ways...with 6 T20 screws, plus it's popped in front and rear. First, remove the 6 screws.
Next, pull up the skeleton frame at the rear. Sorry I didn't get any pics here. It's held on at the extreme rear of the frame, just pull up.
The front is a bit tricker. It's held in by a sort of clip that needs to be pried outward to release it, while pulling back on the frame. You can see them here. Use a trim tool or screwdriver.
The tabs are just below the "nubs", which simply sit on the other frame as a positioning device.
Now, there is only two more step to go before shifter removal.
First, there is a cable that runs to the hazard switch that is zip-tied to the front and the rear of the shifter base. You can see the black zip-ties securing it down here:
CAREFULLY cut the zip tie to release the wires. Do not try to pull it out, you will break the retainer. Later, when you remove the shifter, you will see the retainer is attached to the base of the shifter.
Here you can see the shift cables and the bayonet connectors that connect them to the shifter. These connectors work by rotating outward after being pushed forward. I would advise you to play with the empty connectors on the new shifter you are about to put in. You will quickly see how easy they are to open.
Snap on the shifter stabilizer (the red thing that comes with the shifter) then open the bayonet connectors (don't worry, the shift cables won't come flying out). Now you can see that you can mark the cables right at the edge of the bayonet connector. I used blue electrical tape.
Once they are marked, simply pull up on the cable right at the back of the bayonet connector. With some slight resistance, it will pop out.
Now, the shifter itself is connected with four T20 screws. Remove them, then remove the shifter.
Now, you're on your way to re-assembly!
First, transfer the cable stays from the old shifter to the new. Sorry, I didn't get good pics of this. Use a pliers to squeeze them together underneath and push up. They will pop off the shifter base. Simply push them onto the GT4 shifter base.
Install the new shifter. I had originally thought the only difference was the length of the shift shaft itself. I was wrong. Side by side, you will notice that there is an additional spring on the GT4 shifter. It re-centers the shifter much more strongly than the stock shifter. You will notice when all is buttoned up that it's much more difficult to move the shifter out of the center position.
After installing the shifter, re-position the shift cables inside the bayonet connectors. Simply use your tape / paint mark to align the shift cable back into the same spot in the shifter (I like the tape method myself), and rotate the bayonet connectors to close them.
Next, re-secure the hazard signal button wiring to the shift base.
Re-secure the skeleton frame. First at the front back into those funny clips (those posts rest on the little guide on the front). Then push down in the back. Then screw in the 6 screws.
Next, re-connect the wires to the HVAC panel and snap back in place.
Next, re-connect the wires to the PCM and push them back into the dash. Then slide the PCM back in and re-secure with the 4 screws.
Next comes the hazard warning panel. 1 connector, snap back in.
Next comes the shift ****. Put back on the shaft, and turn the collar. Hook the back of the gaiter on to the bar on the skeleton frame, then push the connectors on the front down.
Next comes the storage tray. Set in, push back.
Next comes the multi switch panel. 1 connector, snap straight back in.
Put the rubber gasket back on.
Snap the aluminum / silver / carbon fiber frame back on. Push down.
Finally, put the side panels back on. Carefully line up at the front, and gently push forward until they "chunk" into position on the guides. Then simply snap in position.
You're done, unless I forgot something!
Overall, it's a good deal stiffer, but I am getting used to it. You certainly won't go in reverse by mistake! The added spring on the lateral positioning motion really helps to define the difference in the gates. Much more positive going into 5th and the 5-6 shift is much better. Also, the 7-5 downshift and the 6-4 downshift is much more positive. You won't select 3rd or 2nd by mistake.
For a $250 mod, this makes a HUGE difference!
PM me with questions or ask here. Be more than happy to help. And if you are in Houston, I'd be more than happy to help.
Last edited by Needsdecaf; 03-21-2020 at 07:47 PM.
 12-10-2016, 07:16 PM
#2
Rennlist Member
Does it actually feel like a GT4 or Spyder? I had a GT4, and now a Spyder, and I don't think of either of them as stiff. Silky smooth, yet positive, a great combo.
12-10-2016, 07:20 PM
#3
RL Community Team
Rennlist Member
Rennlist Member
Thread Starter
Originally Posted by Selo
Does it actually feel like a GT4 or Spyder? I had a GT4, and now a Spyder, and I don't think of either of them as stiff. Silky smooth, yet positive, a great combo.
It's stiffer than why I was used to, but only in side to side motions. So it's not "stiff" so much as there is additional force required in that direction. For sure it's not cumbersome or anything like that. I suppose over time it will become second nature as I get more miles on it.
12-10-2016, 09:04 PM
#4
Three Wheelin'
Unfortunately it doesn't really feel like a GT4 or Spyder. Those shifters are sublime IMO. Light effort, crisp, notchy, near perfect. The GT4 in a 991 is better than stock for sure, but the effort is quite a bit higher in the GT4 or Spyder and doesn't feel as notchy and perfect.
12-10-2016, 11:34 PM
#6
RL Community Team
Rennlist Member
Rennlist Member
Thread Starter
Originally Posted by rkwfxd
Great write up Decaf. Between this and Frank's video I could do this on my own for sure.
Thank you
Thank you
12-12-2016, 02:49 PM
#7
Excellent writeup, thanks for taking the time...
Further question:
If the GT4 unit is sprung more strongly to get back to neutral - as you explained, how is that helping with the accidental 7 -> 4 shift ? You would think it would make it even more likely as when getting out of 7 it would pull you stronger towards the 3/4 plane. That aspect of the mod I find confusing.... seems contradictory, but i take your word for it, it's puzzling though ;-)
I think I can live with 7th now with practice and very rare use, but the 5->6 shift it the thing that still bothers me, it does not feel like a straight shot, I think I hit the lockout and it's more of a small zigzag... You make it sound like that is improved as well..
Thanks !!
Trending Topics
12-12-2016, 10:45 PM
#8
Rennlist Member
Did the same thing when I had my 2014 Cayman S (Cayman GT4 short shifter retrofit)...matter of fact it was like my 2nd or 3rd upgrade/mod other than the exhaust. Had dealer do it though but did not regret it. Shifting action was so much better!
12-12-2016, 11:28 PM
#9
RL Community Team
Rennlist Member
Rennlist Member
Thread Starter
Excellent writeup, thanks for taking the time...
Further question:
If the GT4 unit is sprung more strongly to get back to neutral - as you explained, how is that helping with the accidental 7 -> 4 shift ? You would think it would make it even more likely as when getting out of 7 it would pull you stronger towards the 3/4 plane. That aspect of the mod I find confusing.... seems contradictory, but i take your word for it, it's puzzling though ;-)
I think I can live with 7th now with practice and very rare use, but the 5->6 shift it the thing that still bothers me, it does not feel like a straight shot, I think I hit the lockout and it's more of a small zigzag... You make it sound like that is improved as well..
Thanks !!
Further question:
If the GT4 unit is sprung more strongly to get back to neutral - as you explained, how is that helping with the accidental 7 -> 4 shift ? You would think it would make it even more likely as when getting out of 7 it would pull you stronger towards the 3/4 plane. That aspect of the mod I find confusing.... seems contradictory, but i take your word for it, it's puzzling though ;-)
I think I can live with 7th now with practice and very rare use, but the 5->6 shift it the thing that still bothers me, it does not feel like a straight shot, I think I hit the lockout and it's more of a small zigzag... You make it sound like that is improved as well..
Thanks !!
I think that the stronger spring (actually an additional spring) forces you to use more oomph when moving the lever, which makes you control yourself your shift motion a bit more. If that makes sense.
Like I said, need more miles to really dial in what it's all about.
12-13-2016, 12:04 PM
#10
I've had this shifter sitting in my garage for a few months now, I have not felt adventurous enough to try it myself yet. This is an excellent write up, cheers from a fellow Houstonian!
12-13-2016, 12:59 PM
#11
RL Community Team
Rennlist Member
Rennlist Member
Thread Starter
Originally Posted by porsche_love
I've had this shifter sitting in my garage for a few months now, I have not felt adventurous enough to try it myself yet. This is an excellent write up, cheers from a fellow Houstonian!
12-13-2016, 01:18 PM
#12
Nordschleife Master
my only question (awesome DIY btw) is how much moisturizer do you use? reminds me of a 997.1 turbo i bought and entire interior was covered in lotion residue.
12-13-2016, 02:33 PM
#13
RL Community Team
Rennlist Member
Rennlist Member
Thread Starter
Originally Posted by rijowysock
my only question (awesome DIY btw) is how much moisturizer do you use? reminds me of a 997.1 turbo i bought and entire interior was covered in lotion residue.
Most of the pics were taken during the re-assembly process. The shifter internals are, shall we say, well lubricated. Got all over my hands and made a bit of a mess of the black bits.
10-29-2017, 12:49 AM
#14
Three Wheelin'
Just wanted to revive this thread of yours to say thank you for the write-up! Came on here tonight because I unfortunately broke a couple of clips on the side panels. Wish I would have found this before hand. I had a heck of a time finding a good write up and was going based on a Cayman guide.
For others that might repeat my mistake - what I did wrong was trying to pry the forward portion of the panels out towards the driver or passenger areas - rather than simply pulling straight back after having released the rest of the clips further back.
Hopefully I can glue the two broken clips back on
10-29-2017, 01:57 AM
#15
RL Community Team
Rennlist Member
Rennlist Member
Thread Starter
Just wanted to revive this thread of yours to say thank you for the write-up! Came on here tonight because I unfortunately broke a couple of clips on the side panels. Wish I would have found this before hand. I had a heck of a time finding a good write up and was going based on a Cayman guide.
For others that might repeat my mistake - what I did wrong was trying to pry the forward portion of the panels out towards the driver or passenger areas - rather than simply pulling straight back after having released the rest of the clips further back.
Hopefully I can glue the two broken clips back on
For others that might repeat my mistake - what I did wrong was trying to pry the forward portion of the panels out towards the driver or passenger areas - rather than simply pulling straight back after having released the rest of the clips further back.
Hopefully I can glue the two broken clips back on
You're very welcome!