
A/C Odor
 03-31-2013, 11:17 AM
#16
Instructor
Thread Starter
After 13 months, and 11.5K miles, the filters were quite a bit dirtier than I expected. Replacing them was relatively easy considering the owner's manual was useless because it just tells you to bring it in to the dealer. What happened to those DYI days?
Here's the particle filter...big difference
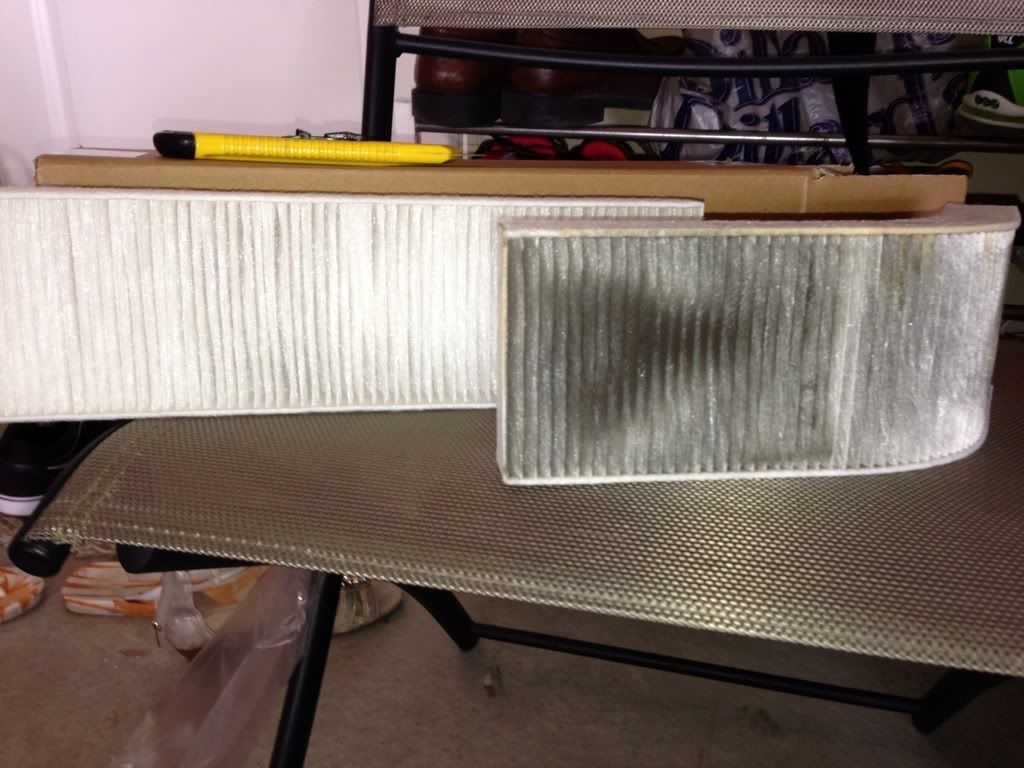
Here's the carbon filter...not as bad, but still dirty
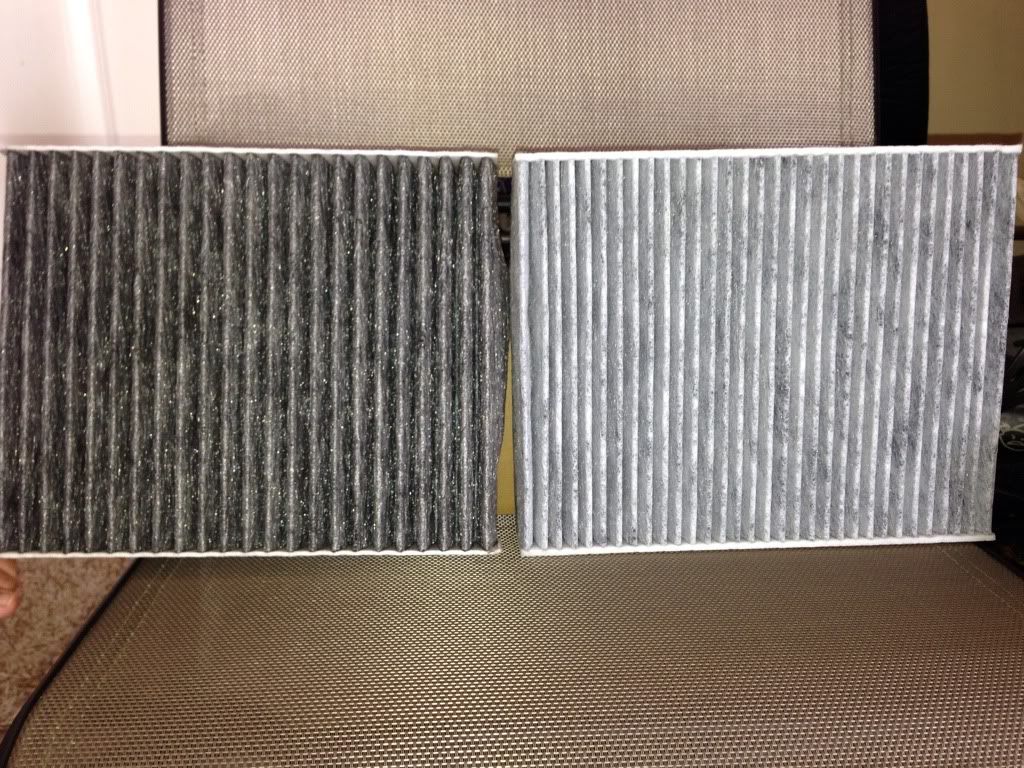
So far, so good. But, lets see if the odor comes back in a few days. Yep, I am still skeptical.
Here's the particle filter...big difference
Here's the carbon filter...not as bad, but still dirty
So far, so good. But, lets see if the odor comes back in a few days. Yep, I am still skeptical.
 03-31-2013, 12:43 PM
#17
Race Car
Pics of the operation?
03-31-2013, 02:45 PM
#18
Instructor
Thread Starter
no pic, but it's quite simple.
For the particle filter, pop the trunk. Remove the plastic cover by using the two hand holds near the struts. Just pull straight up, and toward the front of the car. The battery is right in the middle, and the filter housing is a black box to the left of the battery. Unlatch the 8 latches or so. The filter will slide right out. There is no "flow direction" on this filter, but I still notice how the letterings go and put the new one in the same way.
For the carbon filter, I lie on my back with my head where the passenger feet go...make sure you shampoo real well afterwards hehe. The first black box you will see under the glove compartment is the airbag. Between the airbag, and the firewall is a foam like cover. It's held up by 3 plastic screws. Remove them. You will see the black filter housing. This one has a flow direction, which points from the passenger side to the driver side. The filter has to be bent a little to slide out completely. It's ok since it's just paper. Slide the new one in with the arrow pointing the same way, then snap the lid closed again. Put back the foam cover, and the three screws.
The second one little is a little tougher because you're working upside down, but still an easy DIY job.
Kevin
03-31-2013, 03:03 PM
#19
Race Car
no pic, but it's quite simple.
For the particle filter, pop the trunk. Remove the plastic cover by using the two hand holds near the struts. Just pull straight up, and toward the front of the car. The battery is right in the middle, and the filter housing is a black box to the left of the battery. Unlatch the 8 latches or so. The filter will slide right out. There is no "flow direction" on this filter, but I still notice how the letterings go and put the new one in the same way.
For the carbon filter, I lie on my back with my head where the passenger feet go...make sure you shampoo real well afterwards hehe. The first black box you will see under the glove compartment is the airbag. Between the airbag, and the firewall is a foam like cover. It's held up by 3 plastic screws. Remove them. You will see the black filter housing. This one has a flow direction, which points from the passenger side to the driver side. The filter has to be bent a little to slide out completely. It's ok since it's just paper. Slide the new one in with the arrow pointing the same way, then snap the lid closed again. Put back the foam cover, and the three screws.
The second one little is a little tougher because you're working upside down, but still an easy DIY job.
Kevin
For the particle filter, pop the trunk. Remove the plastic cover by using the two hand holds near the struts. Just pull straight up, and toward the front of the car. The battery is right in the middle, and the filter housing is a black box to the left of the battery. Unlatch the 8 latches or so. The filter will slide right out. There is no "flow direction" on this filter, but I still notice how the letterings go and put the new one in the same way.
For the carbon filter, I lie on my back with my head where the passenger feet go...make sure you shampoo real well afterwards hehe. The first black box you will see under the glove compartment is the airbag. Between the airbag, and the firewall is a foam like cover. It's held up by 3 plastic screws. Remove them. You will see the black filter housing. This one has a flow direction, which points from the passenger side to the driver side. The filter has to be bent a little to slide out completely. It's ok since it's just paper. Slide the new one in with the arrow pointing the same way, then snap the lid closed again. Put back the foam cover, and the three screws.
The second one little is a little tougher because you're working upside down, but still an easy DIY job.
Kevin
04-01-2013, 09:45 AM
#20

The filter(s) are rarely the source of the mildew odor - that is the activated carbon you are seeing on it. As others have suggested, spraying the plenum under the filter with one of those deodorizers should clear it up.
04-12-2013, 02:22 PM
#22
Rennlist Member

Join Date: Apr 2007
Location: san diego
Posts: 122
Likes: 0
Received 0 Likes
on
0 Posts
been there, smells like a bad cigar in an outhouse, nasty
it is probably refrigerant leaking under the dash in a minute amount; need to remove dash and have mechanic find it (don't know much about AC but I believe it was a condensor) It drove me crazy! I spent weeks trying to figure this out and sprayed all kinds of likely carcinogenic products into my system to try to clean it out I also heard all of the other tips, mold, a dead mouse etc
it is probably refrigerant leaking under the dash in a minute amount; need to remove dash and have mechanic find it (don't know much about AC but I believe it was a condensor) It drove me crazy! I spent weeks trying to figure this out and sprayed all kinds of likely carcinogenic products into my system to try to clean it out I also heard all of the other tips, mold, a dead mouse etc
04-12-2013, 02:33 PM
#23
Instructor
Thread Starter
Amazingly changing the filters did the trick. If the smell returns in the near future then I'd take it in to the dealer so they can look at it, but for now the case is closed. Thanks to all for their inputs.