When you click on links to various merchants on this site and make a purchase, this can result in this site earning a commission. Affiliate programs and affiliations include, but are not limited to, the eBay Partner Network.
Super helpful diagram. When yanking the trim panel ended up snapping off the little C nubbin piece, oh well going to epoxy it back later. The front camera was pretty straightforward but man routing the rear was a pain. There was not much space around the b and c pillar and the USB cable was pretty beefy.
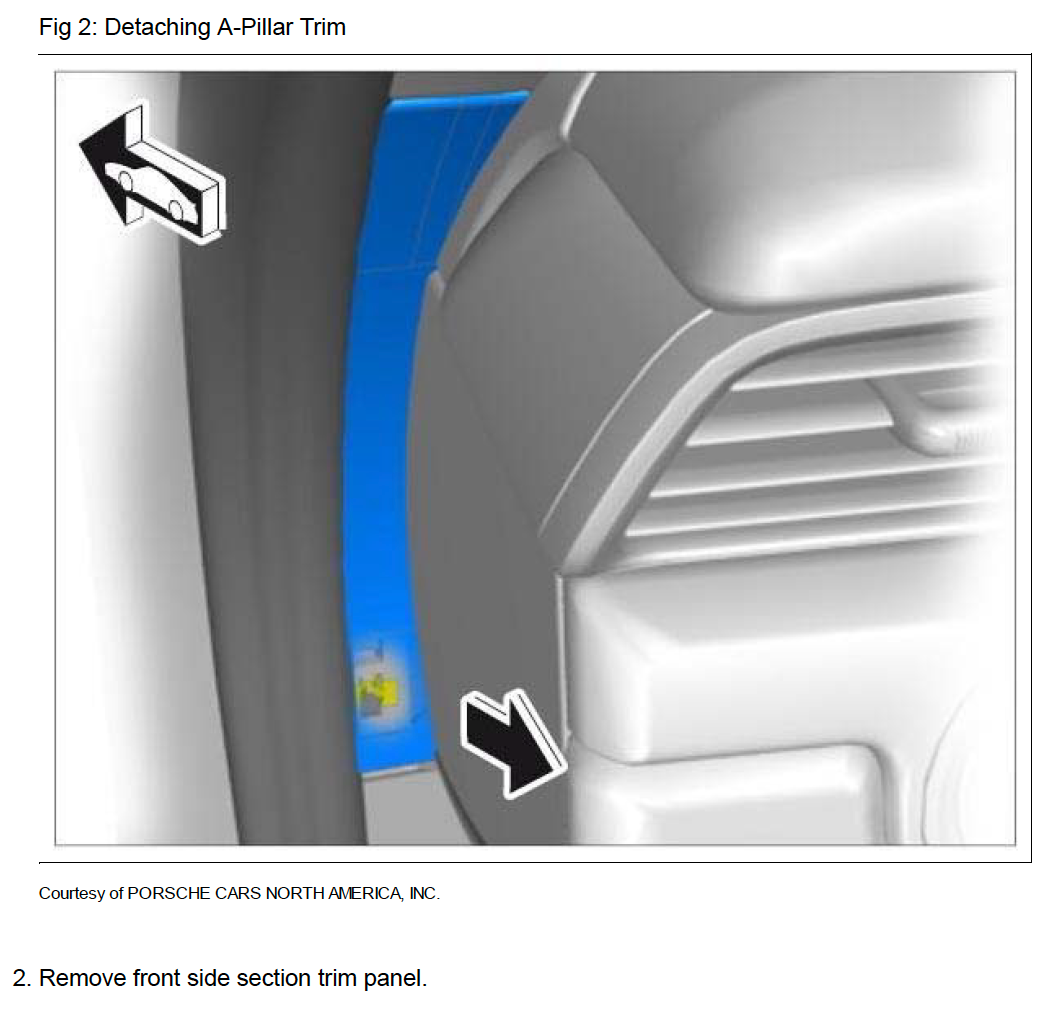
Super helpful diagram. When yanking the trim panel ended up snapping off the little C nubbin piece, oh well going to epoxy it back later. The front camera was pretty straightforward but man routing the rear was a pain. There was not much space around the b and c pillar and the USB cable was pretty beefy.
Yeah, I broke the same piece on my prior 991, but at that time I didn't realize the correct direction to pull on that panel. The good news is that even without that tab, everything else (rubber molding and the velcro parts) held that panel tightly enough in just the right spot that you could never tell the tab was missing.
StormRune, where did you get those screens? I�m planning on replacing some of the trims inside my 991.2 and could definitely use the official instructions!
Thanks!
Originally Posted by StormRune
Here's a couple of images that may help clarify my descriptions in post 3 earlier.
In the first picture that is a spring-snap that you release by pulling the bottom of the part shown in blue outwards using a trim tool. It's not clear but then the upper part of the blue piece slides down and out of the A-pillar trim (if it hasn't already been removed).
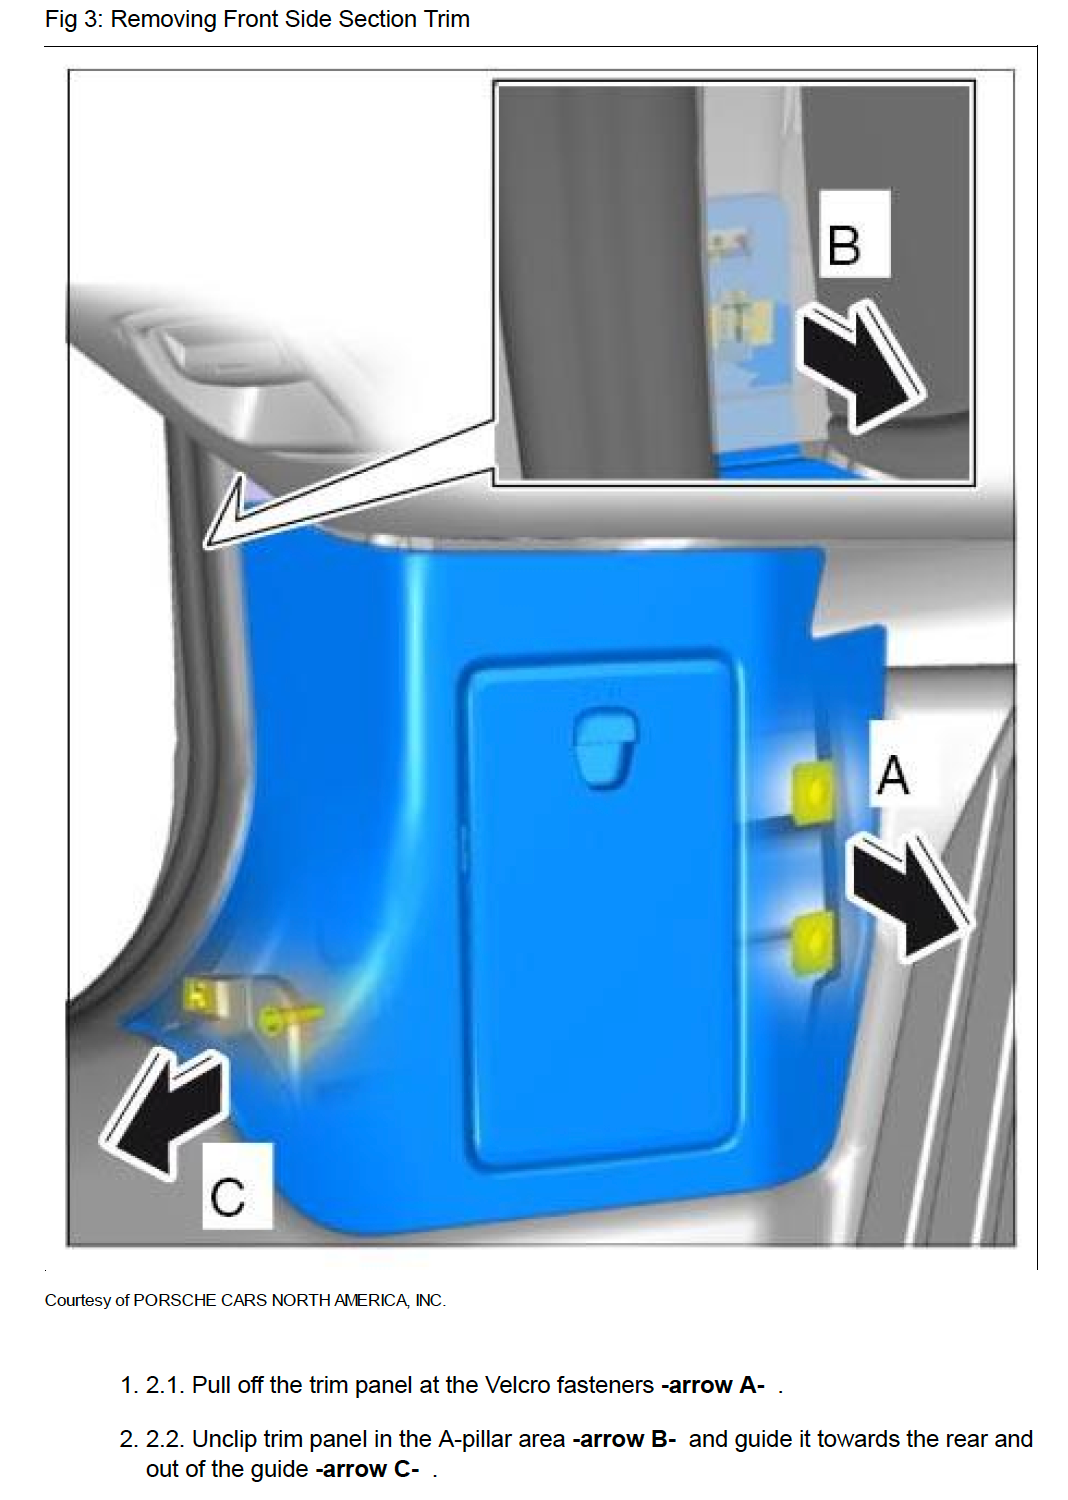
It may be hard to tell but the "C" arrow in the last image shows pulling the bottom out in a direction parallel to the door panel, towards the back of the car. Once the bottom is unsnapped, the bottom pivots outward and a plastic hook at the top of the trim pivots out of its slot.
StormRune, where did you get those screens? I�m planning on replacing some of the trims inside my 991.2 and could definitely use the official instructions! Thanks!
@dchang81 was the nub (the one that snapped off) part of the trim panel?
For the screenshots stormrune posted there's the shaded yellow pin at the C label. When pulling the other side I didn't realize that pin kept the trim in place and it snapped. I debated buying a new trim piece but I just epoxied it back together.
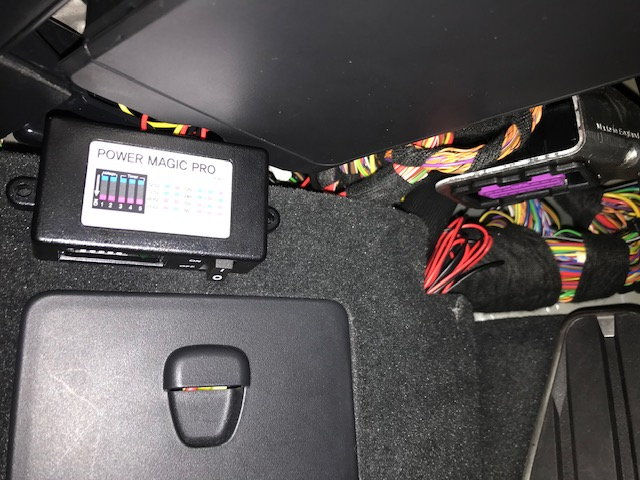
So I wish I had seen this post before my install today; it would have gone easier. I spent all this time taking pictures and StormRune already has better info so now I'll just have to trash them! I ended up breaking the pin in the last image (that others broke) but upon install it is still very stable. I can always go back and epoxy it if I really get bothered about it. In my case, I chose to install on the driver side in order to have easier access to the PMP if I want to turn it off for any reason. If you go the PMP route, I would ensure you have good crimpers - mine are crap and I ruined one tap.
It looks like you pulled off a nice clean install Wujohn. Yeah, it sounds like many of us have broken off that damned pin at arrow "C". Feel free to post your photos too, usually more angles and info are a good thing.
Interestingly, I had some warranty work done to repair a stuck-on radiator fan that must have required removing that panel. The dealer's service guy noticed the broken tab "C" and even though he didn't think he was the one that broke it, they replaced the panel for me under warranty. Now that was good customer service!
If you opt for the driver's side on a 991.2, I used B3 (Alarm Horn) for permanent power and D1 (Rear wiper - which I don't have) for switched power. The fuse box door closes completely with the taps but they are certainly right against the door.
Just a side note having done one, the fuse box comes apart very easy and you can get behind it and fit the fuse spring clips into the missing places for the factory look, no need to piggy back anything.
springs are common parts, I will take pictures later.
Thanks, any recommendations on dash came? Don't need anything fancy just reliable. Would be neat if there was a cabling solution that could power any device if I decide to change it.
12 years in business BlackVue, the world leader in dashcam technology that uses Sony CMOS sensors and chips and the workhorse of the industry, no fancy - just reliable, consistent, high definition recording 24x7. Discreet, low profile, non of the useless fancy LCD screens that just increase the profile of the cams, dash cam warning lights that can all be deactivated.
DR750S-2CH - Front and rear recording if you do not need the latest 4K recording capability, TBH this is more than good enough and the quality is benchmark of the industry.
DR900S-2CH - If you want the latest and greatest, front 4K rear 1080p.
Match either dash cam with their battery pack, no splicing, no hardwiring, you only need to use one of the 12V sockets (the one in the passenger footwell is the most ideal one). The battery pack can also be tucked behind the carpet, trim close to the firewall without having to bolt, screw anything in. Coincidentally the space around the passenger footwell close to the firewall has plenty of room to fit this snugly without it moving anywhere.
And then it's just patience and time to simply tuck all the wiring into the trim, don't even need to take any of the trim off, no ugly clips, no exposed wiring. Everything can be nicely tucked and hidden and it will look factory OEM + no potential parasitic draw from splicing or hardwiring.
Best of all, you get real-time notifications from the app (fully customized to your expectations) when a slight jolt or bump or vibration is felt in parking mode and also have the ability to view your dashcam via WiFi or Cloud with no additional charge.
As you can see from above, its very easy to un clip fuse box and fit the spring clips in the back, the plugs need pushing out and there is a white retaining strip that slides along holding them in place.
Then fit factory style fuses.
Best of all, you get real-time notifications from the app (fully customized to your expectations) when a slight jolt or bump or vibration is felt in parking mode and also have the ability to view your dashcam via WiFi or Cloud with no additional charge.
Assuming the unit is connected to wifi, right? Cause it doesnt have lte or anything. Kinda strange the 6000mAh battery is almost $400, ive heard there are a lot of issues with those batteries.
Is it easy to disable / power-off the camera if it is hardwired in? I want to use it when driving, shorter parking situations 10min -> 4hrs, but not at my house where i have a separate camera system.

 09-06-2018, 12:16 PM