Glove box removal
#1
Burning Brakes
Thread Starter
(In the interest of full disclosure, this is a cross post in 981 forum - I have both & the process, I thought, would be identical) Hi, I've searched in here but cannot find a documented process for how to remove glovebox - does anyone know of or have instructions please? Thanks! -Dom
#2
Banned
Join Date: Jan 2013
Location: Chicagoland Area
Posts: 26,141
Likes: 0
Received 5,413 Likes
on
2,516 Posts
#4
Rennlist Member
You will find the instructions at page 1327 (whole glovebox) and page 1319 (lid removal) of the document you can download at this DropBox link: https://www.dropbox.com/s/xg290nolfb...anual.pdf?dl=0
#5
Burning Brakes
Thread Starter
You will find the instructions at page 1327 (whole glovebox) and page 1319 (lid removal) of the document you can download at this DropBox link: https://www.dropbox.com/s/xg290nolfb...anual.pdf?dl=0
According to Porsche's TSI site, the procedures for R&R of the glove compartment involves the following:
WM681419: r&r center console cover (right side)
WM683019: r&r cup holder
WM701619: r&r dashboard trim panel-passenger side
WM961519: r&r footwell light (right side)
WM912219: r&r multimedia interface
WM681519: r&r glove compartment
Flickroll responded with an abundance of detail, I think I am all set - I wish I HAD found the manual more intuitive! :/ Thank you all for the responses!
#6
#7
Hi Dom. The glove box removal is not too difficult but is time consuming. First you need to remove the right side console leather trim panel. It is held in place by spring clips so you’ll need trim removal tools. Starting at the rear of the panel, pry the panel away from the console, and work your way forward. Stop when you get to about the gear shift and then gently bow it like a banana, aft end farthest away from the console. At this point, with the panel bowed, gently pop the remaining spring clips, Try not to pull the panel toward the door much. Just have the arrachment prongs lightly against the spring clip. Then pull it straight back, while still bowed. There is an attachment arm that will break if you pull the forward end too far to the right. I cover pry points with blue painters tape to prevent marring anything. The panel with the 12v socket should come off too, and unclip the wire to the socket and take the panel out of the car.
Next remove the trim piece to the right of the glovebox using trim tools, and also the end panel cover (the piece that faces the door. I also removed the a/c vent which is held in place be 2 ea. top and bottom spring clips. After it is out of its hole, disconnect the lighting wire.
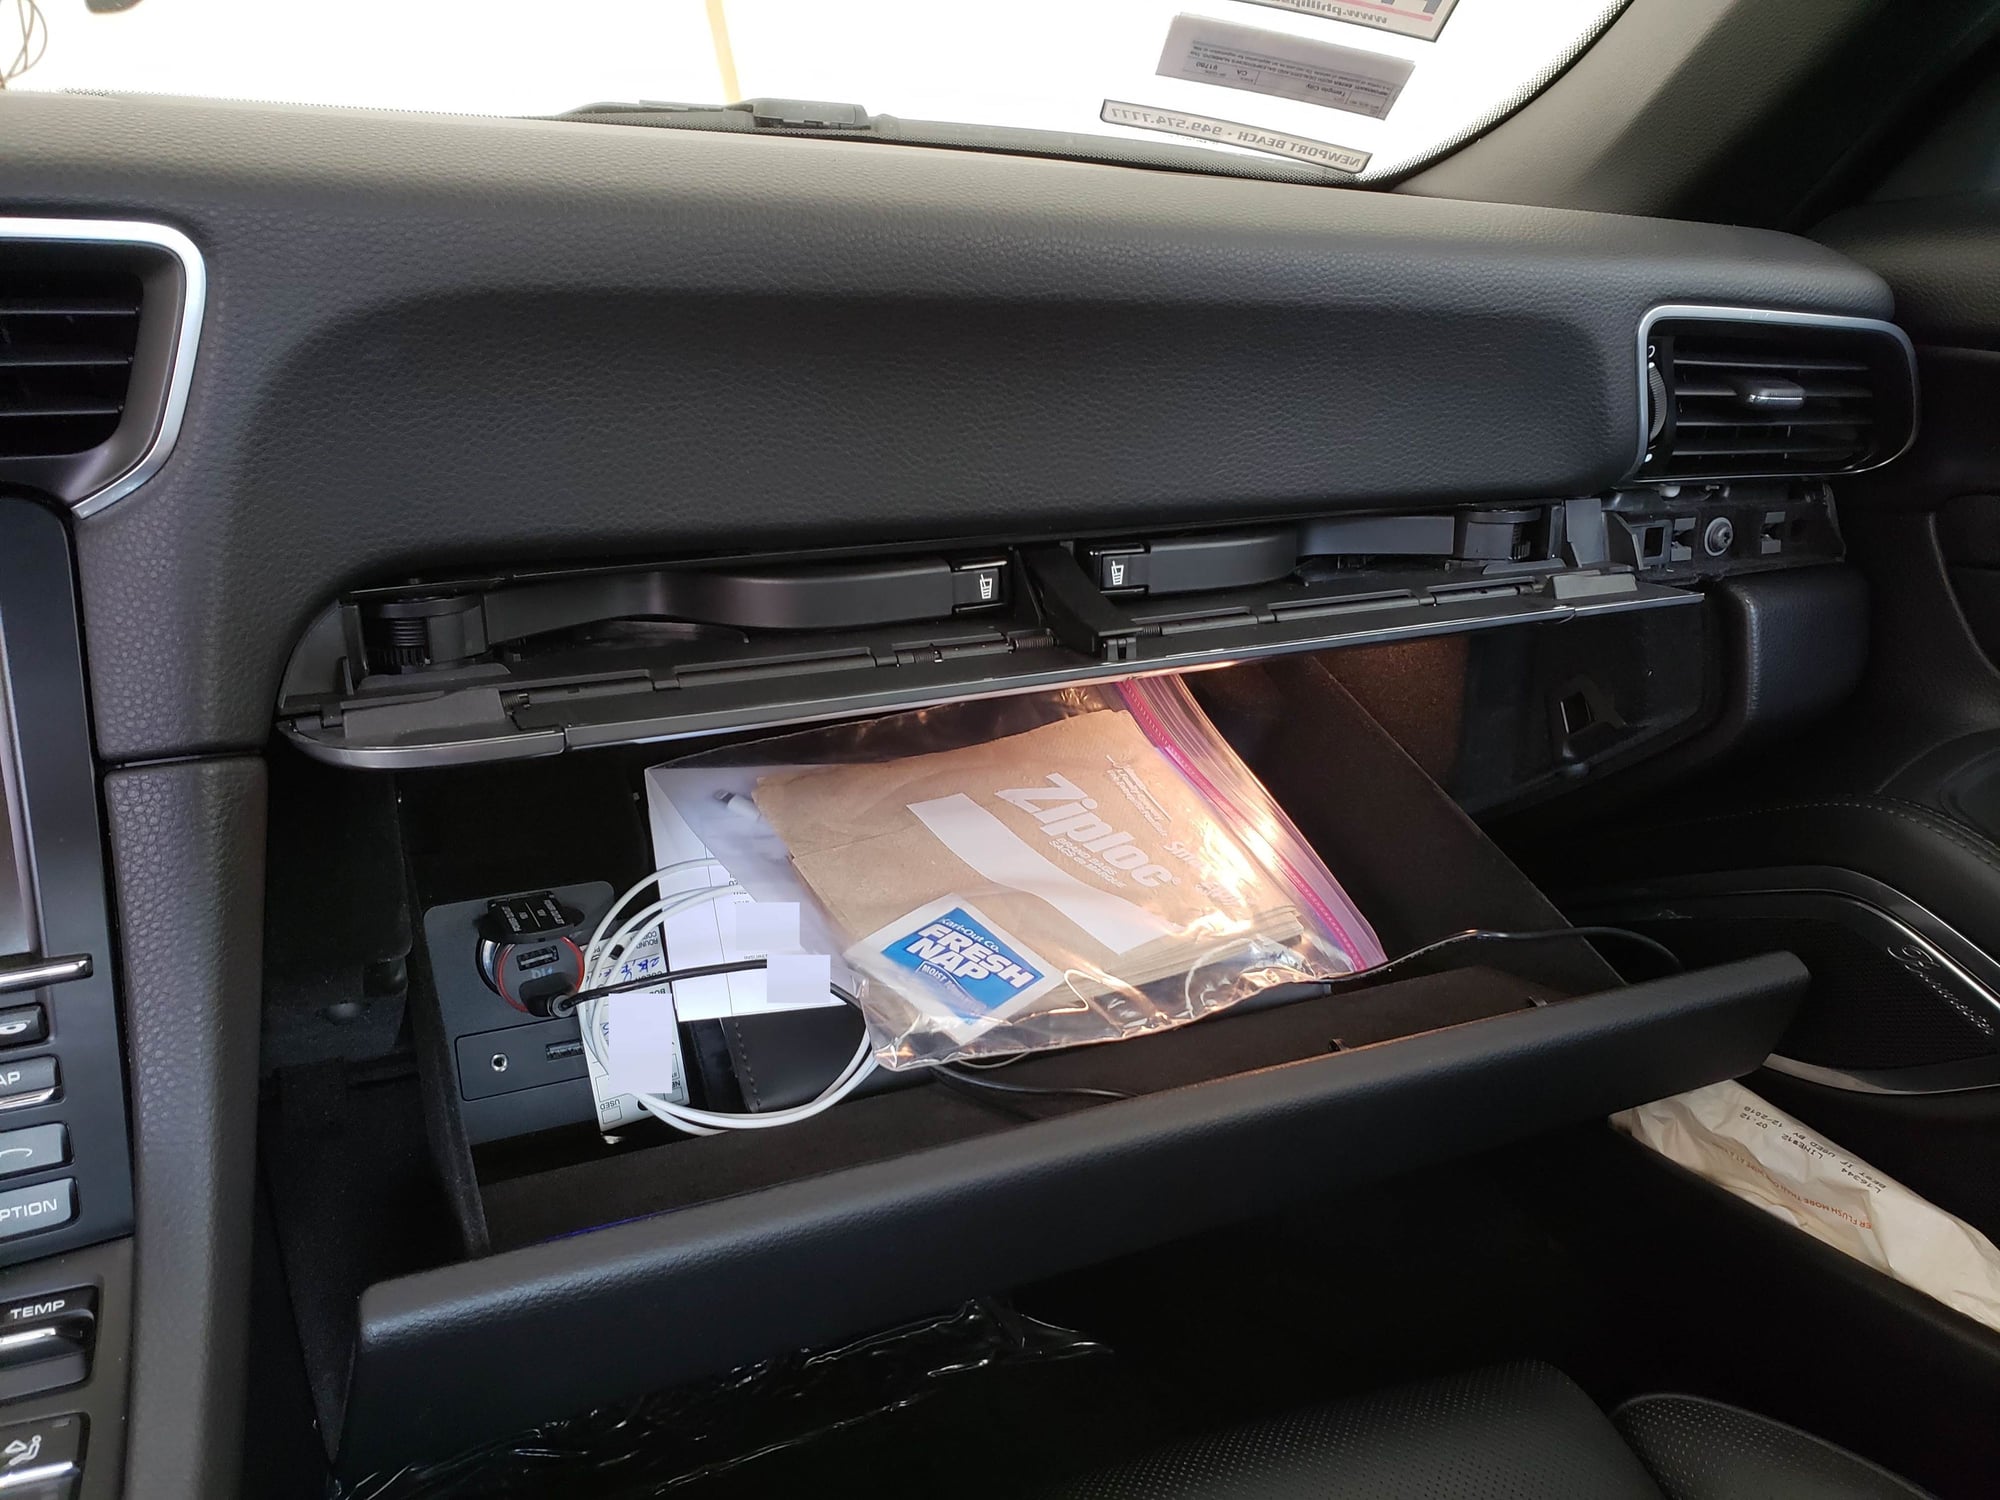
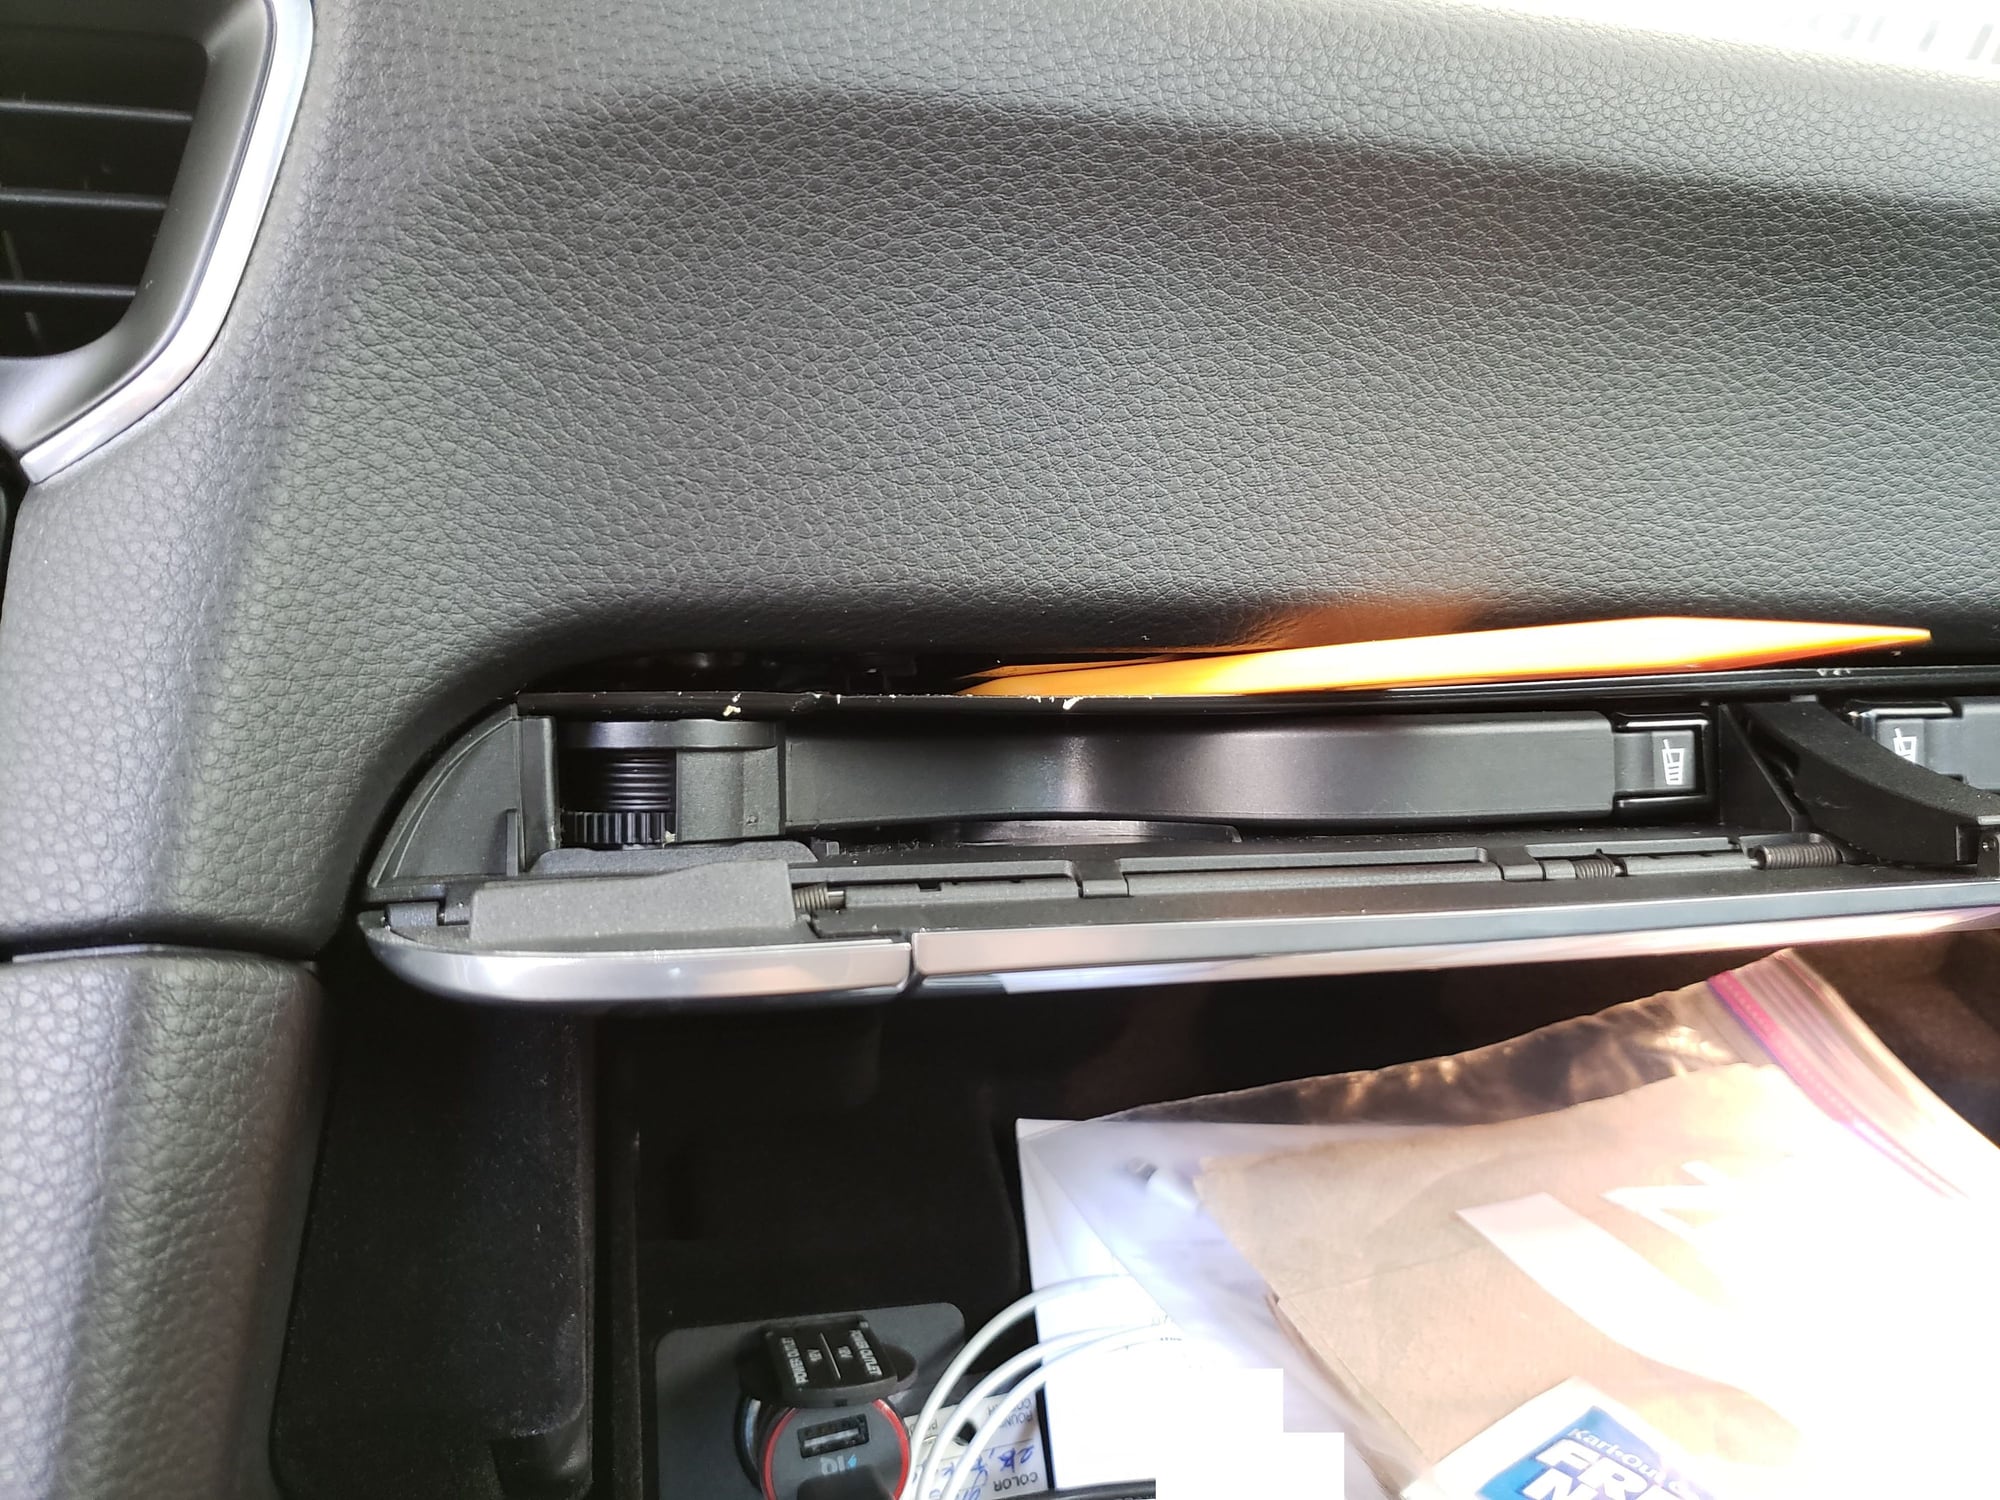
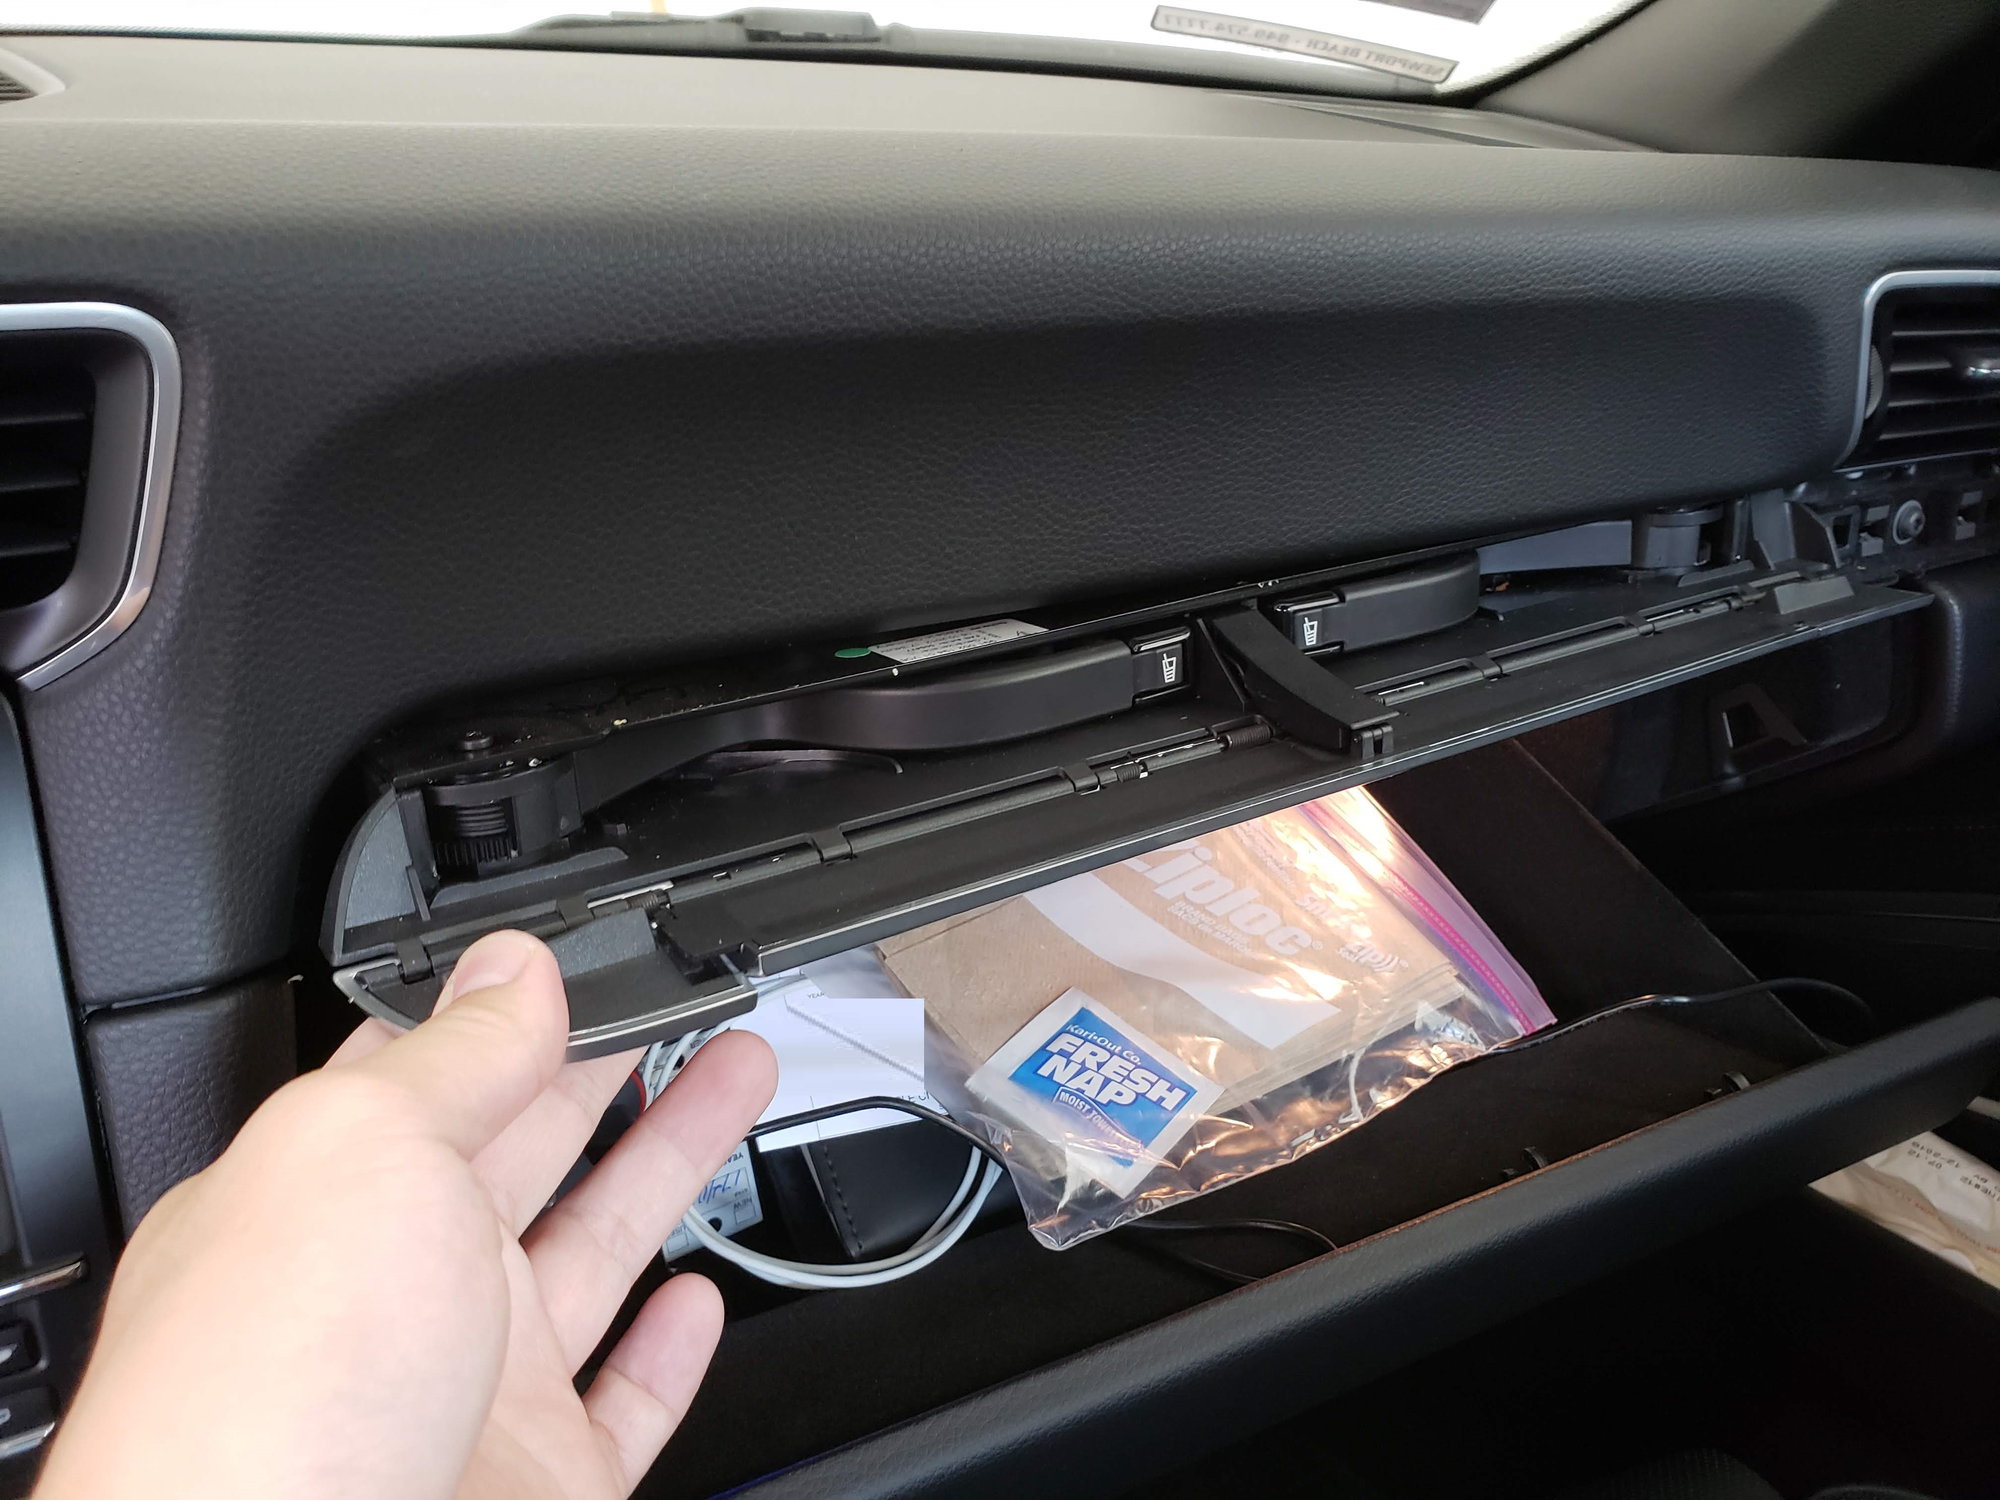
Now the cup holder has to come out. What I read and what I did is open the cup holder door and tightly grab the holder by the body, and not the door. Then a pretty firm tug will release the cup holder assembly which you can then set aside.
When I did the work I also had the right fuse panel cover removed (the piece with carpet on it), but not sure if it has to come out. You’ll be able to tell by looking. If you take it out, on the forward end pull that end to the center of the car, BUT NOT TOO MUCH. You are releasing 2 plastic Velcro pieces only. If you pull too much toward the center you will break a plastic alignment pin. Now pull the door gasket away from the car in the trim piece area. My car had some gooey black sealant which is difficult to remove so be careful and cover places that are exposed with tape. Then there is a plastic piece on the far right hand side between the A pillar cover and the fuse box panel you are removing. Pry it away at the lower end. Now pull the trim piece straight back and it will release.
Now to the glovebox. First line the area around the glovebox with towels or blankets so that when the glovebox comes out it won’t be damaged by anything. There are 2 torx bolts L&R at the bottom of the glovebox. They are in recessed receptacles and require a female torx socket to remove. Next there are 3 torx screws at the top of the glovebox that have to come out. There are 2 other screws that are the cup holder spring clips. These can stay in, but I took them out to straighten them a little as they were slightly bent when the cup holder assembly came out. Do not lose these as you can’t buy them, they come with the glovebox. Or so I was told by my local dealer parts dept. There are one or two screws under the right trim piece (can’t remener for sure but think there is only one. Also, inside the dash where you took the end panel off there is a screw that needs to come out. At this point you have removed all of the glovebox hardware, but the glovebox is basically where it is supposed to be. A gentle pull downward at the opening while supporting the rear of it will release it and you can lay it on the floor. The harness for the glovebox light heeds ro be disconnected. It is at the rear of the glovebox on the right side. You also need to remove the footwell light from the left side. This was not easy because it is in pretty tight, you are working in an awkward position, and the wire from the wire harness is not very long. Once you have released it the glovebox can be removed from the car.
You might be able to skip the console panel removal, but I took it out to avoid damage to it.
Hope this helps!
Edit: the leather console panel HAS to come out as it is hiding a screw that needs to be removed in order to take out the panel with the 12v socket.
Trending Topics
#8
Burning Brakes
Thread Starter
Answered Domís question. Here is my reply which might be helpful to others:
Hi Dom. The glove box removal is not too difficult but is time consuming. First you need to remove the right side console leather trim panel. It is held in place by spring clips so youíll need trim removal tools. Starting at the rear of the panel, pry the panel away from the console, and work your way forward. Stop when you get to about the gear shift and then gently bow it like a banana, aft end farthest away from the console. At this point, with the panel bowed, gently pop the remaining spring clips, Try not to pull the panel toward the door much. Just have the arrachment prongs lightly against the spring clip. Then pull it straight back, while still bowed. There is an attachment arm that will break if you pull the forward end too far to the right. I cover pry points with blue painters tape to prevent marring anything. The panel with the 12v socket should come off too, and unclip the wire to the socket and take the panel out of the car.
Next remove the trim piece to the right of the glovebox using trim tools, and also the end panel cover (the piece that faces the door. I also removed the a/c vent which is held in place be 2 ea. top and bottom spring clips. After it is out of its hole, disconnect the lighting wire.
Now the cup holder has to come out. What I read and what I did is open the cup holder door and tightly grab the holder by the body, and not the door. Then a pretty firm tug will release the cup holder assembly which you can then set aside.
When I did the work I also had the right fuse panel cover removed (the piece with carpet on it), but not sure if it has to come out. Youíll be able to tell by looking. If you take it out, on the forward end pull that end to the center of the car, BUT NOT TOO MUCH. You are releasing 2 plastic Velcro pieces only. If you pull too much toward the center you will break a plastic alignment pin. Now pull the door gasket away from the car in the trim piece area. My car had some gooey black sealant which is difficult to remove so be careful and cover places that are exposed with tape. Then there is a plastic piece on the far right hand side between the A pillar cover and the fuse box panel you are removing. Pry it away at the lower end. Now pull the trim piece straight back and it will release.
Now to the glovebox. First line the area around the glovebox with towels or blankets so that when the glovebox comes out it wonít be damaged by anything. There are 2 torx bolts L&R at the bottom of the glovebox. They are in recessed receptacles and require a female torx socket to remove. Next there are 3 torx screws at the top of the glovebox that have to come out. There are 2 other screws that are the cup holder spring clips. These can stay in, but I took them out to straighten them a little as they were slightly bent when the cup holder assembly came out. Do not lose these as you canít buy them, they come with the glovebox. Or so I was told by my local dealer parts dept. There are one or two screws under the right trim piece (canít remener for sure but think there is only one. Also, inside the dash where you took the end panel off there is a screw that needs to come out. At this point you have removed all of the glovebox hardware, but the glovebox is basically where it is supposed to be. A gentle pull downward at the opening while supporting the rear of it will release it and you can lay it on the floor. The harness for the glovebox light heeds ro be disconnected. It is at the rear of the glovebox on the right side. You also need to remove the footwell light from the left side. This was not easy because it is in pretty tight, you are working in an awkward position, and the wire from the wire harness is not very long. Once you have released it the glovebox can be removed from the car.
You might be able to skip the console panel removal, but I took it out to avoid damage to it.
Hope this helps!
Edit: the leather console panel HAS to come out as it is hiding a screw that needs to be removed in order to take out the panel with the 12v socket.
#10
When I removed my glovebox earlier this year, the only instructions I could find for cupholder removal was on Macarbon's website. They said use the 'pull hard' method to get it to release. While it worked, it bent the locking clips which you need to return to their original geometry. Problem is, once the cupholder is out there is no way to know what the original geometry was, so I had to guess. Also, if one of these locking clips break you are screwed because apparently they are part of the Glovebox assembly and are not available as a separate part. Dom991.1 figured out a better way that results in nothing being bent.
I had reason to remove my cupholder today and I reread this post, and I also searched online again. I found this thread:
https://www.planet-9.com/981-cayman-...alignment.html
Between Dom991.1 and the Planet-9 post, my cupholder came out very easily and I did not have to use the Armstrong method, which never did seem right once I saw how the glovebox is locked in place.
Hope this helps someone.
#11
When I removed my glovebox earlier this year, the only instructions I could find for cupholder removal was on Macarbon's website. They said use the 'pull hard' method to get it to release. While it worked, it bent the locking clips which you need to return to their original geometry. Problem is, once the cupholder is out there is no way to know what the original geometry was, so I had to guess. Also, if one of these locking clips break you are screwed because apparently they are part of the Glovebox assembly and are not available as a separate part. Dom991.1 figured out a better way that results in nothing being bent.
I had reason to remove my cupholder today and I reread this post, and I also searched online again. I found this thread:
https://www.planet-9.com/981-cayman-...alignment.html
Between Dom991.1 and the Planet-9 post, my cupholder came out very easily and I did not have to use the Armstrong method, which never did seem right once I saw how the glovebox is locked in place.
Hope this helps someone.
I had reason to remove my cupholder today and I reread this post, and I also searched online again. I found this thread:
https://www.planet-9.com/981-cayman-...alignment.html
Between Dom991.1 and the Planet-9 post, my cupholder came out very easily and I did not have to use the Armstrong method, which never did seem right once I saw how the glovebox is locked in place.
Hope this helps someone.
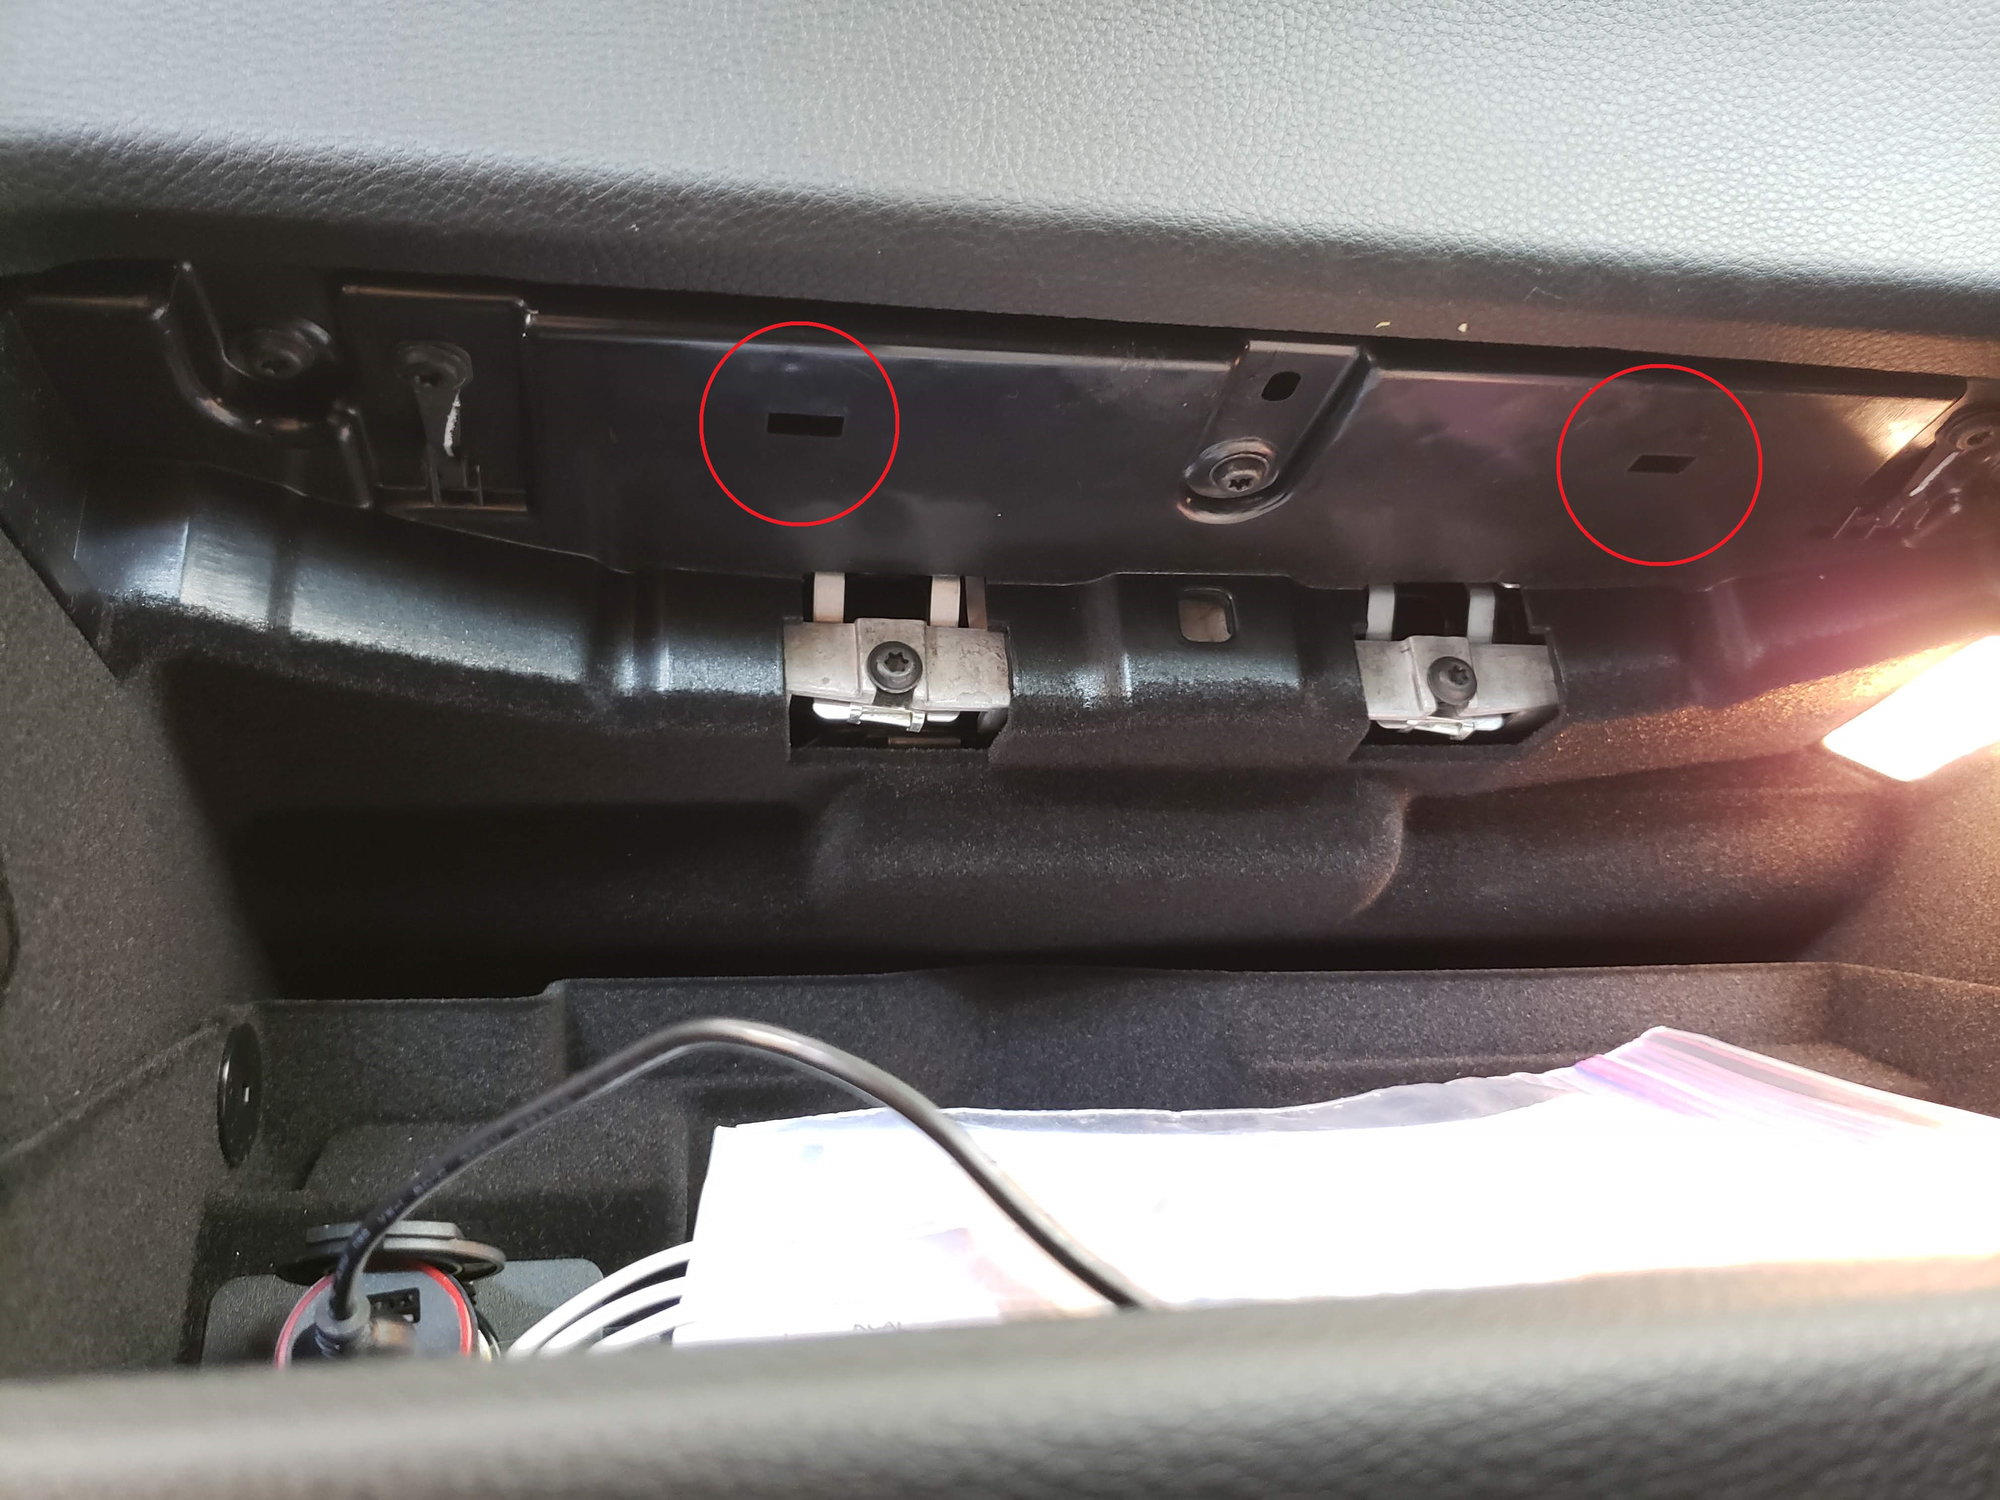
Thanks; this really helped me. Here is a pictorial guide. Literally insert plastic tool on left side and right side to hit those two clips. Will slide out with no resistance. If curious to see my project here is the link: https://www.6speedonline.com/forums/...mod-diary.html

Open cup holder. Open glove box.

A slightly thinner, flat, plastic pry tool would be perfect than the one shown.

Left side slides right out. Repeat for Right Side.

Yup these two clips!
#12
Pro
I just did this yesterday. Actually,
it's not the holes circled in the picture. See the metal clips just to the outside of the circles? Those are the clips to release the cup holder! Insert a screwdriver between the tabs and push them up. A plastic trim tool inserted as shown will let you see the clips easier and how to manipulate the screwdriver
I felt like a lock picker to get them released. Thanks for the rest of the info as it was very helpful!
Last edited by DanQ; 05-08-2020 at 08:09 PM.
#14
Just replaced the resistor today... not difficult, just time consuming; as has been mentioned.
I used a YouTube video that is pretty good but ends prematurely.
Be sure to protect the glove box once removed with a beach towel or something similar to avoid damaging it.
cheers.
I used a YouTube video that is pretty good but ends prematurely.
Be sure to protect the glove box once removed with a beach towel or something similar to avoid damaging it.
cheers.
#15
I just did this yesterday. Actually,
it's not the holes circled in the picture. See the metal clips just to the outside of the circles? Those are the clips to release the cup holder! Insert a screwdriver between the tabs and push them up. A plastic trim tool inserted as shown will let you see the clips easier and how to manipulate the screwdriver
I felt like a lock picker to get them released. Thanks for the rest of the info as it was very helpful!
it's not the holes circled in the picture. See the metal clips just to the outside of the circles? Those are the clips to release the cup holder! Insert a screwdriver between the tabs and push them up. A plastic trim tool inserted as shown will let you see the clips easier and how to manipulate the screwdriver
I felt like a lock picker to get them released. Thanks for the rest of the info as it was very helpful!


