When you click on links to various merchants on this site and make a purchase, this can result in this site earning a commission. Affiliate programs and affiliations include, but are not limited to, the eBay Partner Network.
From there website, I was able to find a local store that sells it (my usual big box shops didn't carry this), and just contacted them about buying a few.
Hi LDubz, sorry for the radio silence. Just been busy, and I have not been printing these since the 991 was phased out. I did reply to your PM just now and not sure about using these on the 718... If you print your own, yes the thread inserts need to be heated -- they melt into the plastic, which is what holds them tight. If you slide the threads onto the end of a soldering iron (say 600-700F), you can let them heat up and then use the soldering iron to melt them into the mount. I leave the threads proud by a couple mm's, and then flip the mount over and press them in the rest of the way by pressing the hole mount against a flat surface. That way the threads end up perfectly plumb and not cockeyed at all.
p.s., I've since discovered that McMaster sells a very similar thread insert, which tends to be easier to find and order. If you use the McMaster version, but be aware that the hole they melt into needs to be very slightly smaller or the threads might break loose in the plastic.
Sir, are you able to make more mounts in the future ?
I have a 718 GT4 coming soon, and I don't want they put some holes on my car.
I know it may not fit with 718, but I am ok to try them. Because if it can fit, that will be 100% better than 4 holes on my rear bumper.
(I already PM & Email you sir, I guess you may very busy during that time, and didnt saw them, but just try to let you know I am very interesting to have this mount.)
Last edited by ShiGureKaiSei; 03-06-2021 at 02:51 PM.
Sir, are you able to make more mounts in the future ?
I have a 718 GT4 coming soon, and I don't want they put some holes on my car.
I know it may not fit with 718, but I am ok to try them. Because if it can fit, that will be 100% better than 4 holes on my rare bumper.
(I already PM & Email you sir, I guess you may very busy during that time, and didnt saw them, but just try to let you know I am very interesting to have this mount.)
You really don�t need any fancy or expensive inserts to make this mount work. I modified the file to just press fit a 6mm Hex Nut in from the back. A lot thinner so can thin up the complete assembly and no worries about spinning an insert.
I installed it with 3M trim tape and it�s been in place for over 6 months in very hot and very cold weather with no issues. I recently had the rear bumper cover to install a new exhaust and we tried to remove the mounts, no way in hell, these will need to be cut off.
I�ll try to post a photo in the morning of the revised part.
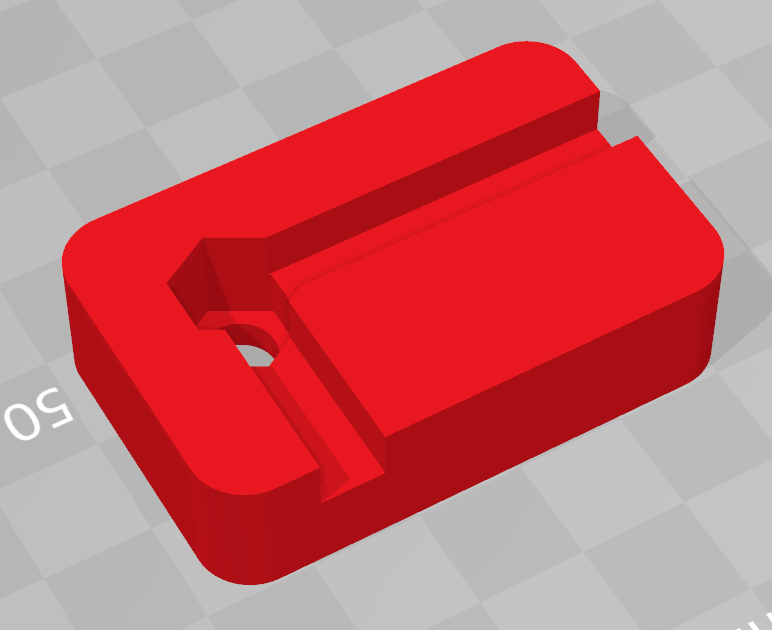
Here is the revised mount which uses a std stainless hex nut available at any big box store. The overall thickness is only 13mm total (1/2") so it keeps everything tucked in tight. I sized the hex pocket so the nut just snaps in as once mounted it cannot go anywhere.
Good Luck
Here is the revised mount which uses a std stainless hex nut available at any big box store. The overall thickness is only 13mm total (1/2") so it keeps everything tucked in tight. I sized the hex pocket so the nut just snaps in as once mounted it cannot go anywhere.
Good Luck
That's awesome! I ended up making the slot T-shaped so that the mount would fit on any of the 4 corners, in any orientation. I started out like the one above, but found it easier to make them all the same. The original model was really for the 991.2 cars, and I've since learned that the earlier 991's and newer cars have slightly bigger embossed circles on the bumper. That's why I've been hesitant to help new car owners. I now have a 992, so will be designing a new model for it soon and will post that too on thingiverse with the originals. I do like how the brass thread inserts melt into place and make for one secure assembly, but a hex cage like is a 3D printing staple, so I'm sure that will work fine too. I've since given up on the original source I posted for the threads in favor of similar threads McMaster sells. It was just too hard to track down the original supplier compared to McMaster who ships same day etc. The McMaster inserts do require a very slightly smaller hole to hold tight.
By the way, my original mount was 12mm thick, but I've been playing with designs and think the next one will be closer to 10mm. The way the plate is oriented in its little cubby though, I'm not sure it matters much. I liked the way my old one looked on the car, and it never looked like it was floating off the car, etc.
And another thing.... I'm into 3D printing, so that's how I made mine, but I'm sure you could get some 1/2 thick ABS plastic and route/drill to get to the same result. Or even helicoil a wood version....
The above file could be modified to accommodate the larger bumps by counterboring the area all the way down to the nut as the hex only needs to secure the nut. This could be made symmetrical but with 3D printing it doesn't really matter.
Not counting the four 3D printed parts, I had about $1.50 in four(4) SS 6mm nuts from Lowes/Home Depot. I did play with making them thinner but you can't notice the diff between 13mm and 10mm once on the car. Either way it's a cool design you started.
I ended up getting 6mm SS Torx security screws to attach the plate so it can't get stolen.
Last edited by tmarino; 03-07-2021 at 04:11 PM.
Reason: spelling
The above file could be modified to accommodate the larger bumps by counterboring the area all the way down to the nut as the hex only needs to secure the nut. This could be made symmetrical but with 3D printing it doesn't really matter.
Not counting the four 3D printed parts, I had about $1.50 in four(4) SS 6mm nuts from Lowes/Home Depot. I did play with making them thinner but you can't notice the diff between 13mm and 10mm once on the car. Either way it's a cool design you started.
I ended up getting 6mm SS Torx security screws to attach the plate so it can't get stolen.
Can't disagree with any of that. Making them symmetrical doesn't really matter if you're just making yourself a set. If you start making a lot of them, it's easier to just have one model. Less to keep track of, easier to deal with bad prints, less to screw up when shipping, more murphy-proof for people putting them on, etc.
Can't disagree with any of that. Making them symmetrical doesn't really matter if you're just making yourself a set. If you start making a lot of them, it's easier to just have one model. Less to keep track of, easier to deal with bad prints, less to screw up when shipping, more murphy-proof for people putting them on, etc.
Agreed, one symmetrical piece would suffice for sure


 01-25-2021, 11:38 AM