When you click on links to various merchants on this site and make a purchase, this can result in this site earning a commission. Affiliate programs and affiliations include, but are not limited to, the eBay Partner Network.
I got the correct Standard Size Add a Fuse from RadarMount today. I plugged it into the D6 slot which was empty (seat ventilation maybe?), connected the male end of the HardTap wire, all of which took 30 seconds. I started the car, turned on the radar detector and voila! Power! And it turned off immediately when I turned the key off. Super happy with this project - thanks to all for the help and input!
I have 2018 GTS and couldn't find a powered empty slot. Was it drivers or passenger side? What are your driving? Could you perhaps take a photo? Good update. Thank you.
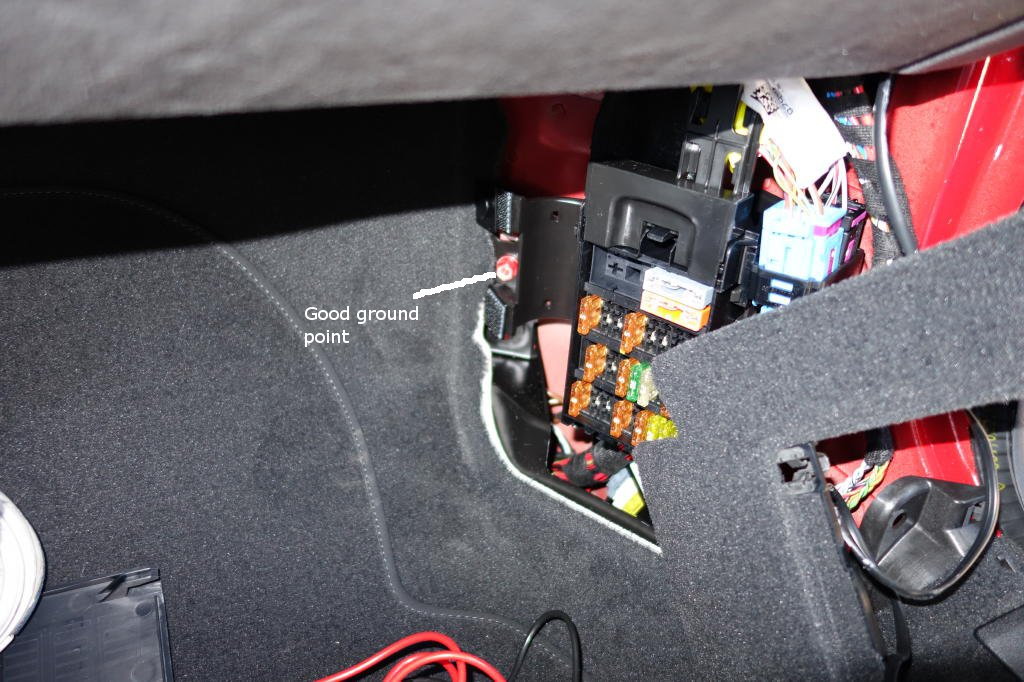
I have a 2017 GTS which has a lot of the equipment boxes checked, so a fair number of the fuse slots are used, but there were still a number of open ones in Row D in the passenger side footwell. I will take a photo tonight or tomorrow and post it, but I just plagiarized what was already described on here. To the left of the fuse panel behind the carpet cover panel (which comes off with not much effort) there was a nut screwed down onto a bolt that comes through the side wall (I think the nut was a 10mm). I took that nut off and put the ground wire ring on the bolt, tightened it back up. Plugged the Add a Fuse in and connected the HardTap to the RadarMount Add a Fuse (they have matching type male/female connectors, which is why I waited a few extra days to get it rather than just modifying one that was available at the auto parts store).
More info to follow when I'm near my car (at home).
TexasCarLover - I don't think this will be of too much help because I'm not providing any new information, but I'll give it a try in case there's some small, missing component which provides a clue:
I used this power wire from BlendMount to go from the mirror to the fuse panel in the manner I described above in my prior post:
Once I got the wires down in the area of the fuse panel, I attached the ring connector to the bolt highlighted in this picture from the original GT3 install thread that you linked in your original post on this thread:
I used this Add a Fuse which I got from RadarMount because it has a female connector style that matches up to the male connector of the BlendMount power wire:
I replaced the 2 amp fuse that came with the Add a Fuse with a 5 amp fuse (I didn't have a good reason for that, other than I thought I read somewhere that the V1 can sometimes draw 3 amps. I may be wrong on that. But it's working.). I connected the power wire to the Add a Fuse wire and then I inserted it in the fuse panel in location D7.
Here's a link the the pages in the owner's manual about the fuse locations, but I can tell you I don't think it matches up to my car exactly.
If you do the same and get no power, the other thing you could try is to put the Add a Fuse connector into one of the fuse locations that is already occupied by something else and see if that gives you power. If not, then there's a problem with the wiring or one of the fuses in your set up.
One thing I would have liked to do if I'd had all of the parts before I started running the wire would have been to just test out the power up to make sure it worked before I went through the process of running the wire. But I ended up getting what I needed in bits and pieces. In the end I was happy everything worked despite not doing this step first.
Hope this helps. PM me and we can speak by phone if that's easier. - Brian
Need some help. I followed this thread below to hardwire a Valentine radar detector but can't get power. Upon inspection of the vacant fuse port - or all of the vacant ports for that matter, there isn't power to any of them. So evidently on the passenger side Porsche doesn't give you excess accessory power. Thoughts?
Also I know about Waze and how radar detectors don't work etc etc. Really looking for electrical help on this one. Many thanks in advance.
Hey there, I have a V1 as well. What I did plug the cable from the V1 to the power outlet in the glove box. I mount the V1 via suction cup right under the passenger visor.
So
V1 suction under pass visor
Cable plugged into V1 run / tucked along windshield down a pillar into the glovbox
Cable plugged into cig lighter in the glovebox
The cig lighter shuts off 5 min after the car is powered off. Turns on when I start the car.
I mention this -
1. If its helpful for anybody vs. hardwire
2. Is there a downside of the method I just mentioned vs. hardwire?
The car I bought actually has a hardwire. However I'm currently using the glovebox cig lighter setup.
Not looking to hijack the thread, but offer a different option?
Last edited by mrmojom3; 09-24-2017 at 11:15 PM.
Reason: spelling
Thanks to those that posted DIY information on hardwiring the detector. The advise was very helpful.
I ran the power cable under the passenger side front edge of the headliner and between the windshield and the A-pillar cover by pushing the cord with a trim tool into these areas. There is no need to remove anything except the carpeted panel cover surrounding the fuse panel door. There are two hook and loop attachments under the forward edge of the cover. Once these are freed, gently pull downward on the cover. I coiled and zip-tied the wires and plugs, put foam rubber pieces around them (I detest rattles) and reinstalled the cover.
The install took about 40 minutes, while being extra careful with my new car.
Hey there, I have a V1 as well. What I did plug the cable from the V1 to the power outlet in the glove box. I mount the V1 via suction cup right under the passenger visor.
So
V1 suction under pass visor
Cable plugged into V1 run / tucked along windshield down a pillar into the glovbox
Cable plugged into cig lighter in the glovebox
The cig lighter shuts off 5 min after the car is powered off. Turns on when I start the car.
I mention this -
1. If its helpful for anybody vs. hardwire
2. Is there a downside of the method I just mentioned vs. hardwire?
The car I bought actually has a hardwire. However I'm currently using the glovebox cig lighter setup.
Not looking to hijack the thread, but offer a different option?
Is there an optimal method to enter the glove box from behind? Routed the wire around the pillar into the footwell but did not see an entry point to the rear of the glovebox because it seems to be in its own nook.
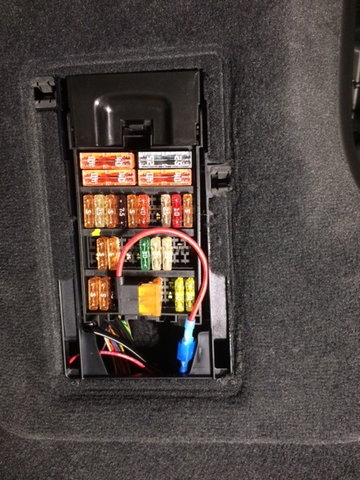
Just wired my detector up last weekend. Use the spare switched circuit in the passenger side fuse panel (see pic) along with a fuse tap, ground it on one of the nuts behind the panel, and viola! works like a charm.
.
@Code i ordered this exact fuse tap from Amazon and am awaiting my Blendmount hardwire kit for my R7. The hardwire kit appears to have a 2A in-line fuse. So would that negate the need to use the included 20A fuse that comes with the fuse tap?
Also, here is a pic of the hardwire kit. How do I connect this part to the fuse tap? Is there a way that the blue plastic connector attaches or do I cut and strip the tip off and crimp it to the blue fuse tap connector?
Thanks in advance.
Sorry, I haven't been on the forum in a while. I believe the fuse the tap comes with needs to be in used in order for the the tap to actually work. Having the fuse on the hardwire kit itself is a bonus. It has been a long time since I did this, and I no longer have the car, so it's tough to remember. As far as connecting the positive leads, I believe I snipped off the connector on the wire kit, stripped the end of the wire, and inserted it into the crimp connector the tap comes with.
This thread was very helpful. I just completed the successful installation of a hardwire for my R7. A few lessons learned & takeaways.
The blendmount, hardwire kit, and fuse tap are the way to go. And trim tools.
i don’t like or feel comfortable with pulling panels or trim. Something always goes wrong. In this case, two little metal clippy things came dislodged when I pulled the interior door sill. For the life of me, I could not figure out how to replace them, so I ended up leaving them out when putting back together. No worries because even without them, the sill trim panel clicked back into place securely with the other two connections and Velcro piece in the middle. I feel that isn’t in any way compromised.
Also, getting the rubber moulding to overlap the trim piece after installation was no easy task as it fits together very tightly. Thankfully I had an assortment of trim pulling tools which aided me in carefully working the rubber back over the plastic. Makes me realize the importance of periodically cleaning & maintaining these rubber trim pieces with the proper product. Given my vehicle is 4 years old, it seems to have been well maintained and cared for. If not, I could have easily seen a risk of cutting/tearing the rubber by accident.
The other issue I encountered is that I get the sense that the tucked away wires between top of windshield and trim, from the top right corner all the way to the rear view mirror, does not seem to want to snuggly hold the cables. I was able to easily press the cable behind these trim pieces with the dull end of a trim tool, but I sense they’re going to pop out even though I tucked them in well. They just seemed loose and floppy behind the trim. Time will tell. I was thinking of placing a small piece of black tape and wedge it into the corner hoping it will catch /adhere to the wires and keep them in place
In all took me about an hour as I was being super careful and meticulous. Could have done a sloppy job much quicker. I rate it one-beer to complete and level two due to panel trim work and wiring connections.
Last edited by Tier1Terrier; 12-09-2020 at 04:38 AM.
So out of nowhere today, two days after successfully installing the hardware, it stopped functioning. The radar detector works if I plug it directly into a cigarette lighter outlet but for some reason no power when connected to the hardwire tap. I checked the fuse at the panel and it’s still good. I’m concerned that the 2a fuse on the hardwire may have blown but why? At this point the only way I can find out is to dismantle the panels again and dig it out since I zip tied everything into place and can’t reach it without taking apart the right foot kick panel. Has this happened to anyone else?
Scratch that whole post. I think my ground connection was bad. I disassembled and reassembled and connected to a different ground point and all is working fine now.
Last edited by Tier1Terrier; 12-10-2020 at 05:53 PM.


 09-22-2017, 10:03 AM