
gago1101's DIY Audio Upgrade
 07-24-2015, 12:38 PM
#1
Rennlist Member
Thread Starter
Finally, after waiting for some time, doing lots of research, reading and watching Money's thread, I finally ordered and finished my audio upgrade. It was a painful wait to get some of the components in, but it is done.
Initially, I was going to do what Matt did: DSP under the seat and amp or amps in the frunk. But after I took out the seat and measured the space, I realized that the dsp and a compact amp will fit into the space. This makes things much simpler plug and play system.
I returned all the stuff that I had bought and went back to the drawing board. I ended up chosing the new Mosconi D2 100.4DSP for the combo dsp / 4-channel amp and Kenwood excel xr-600-1 for the sub amp. It was kind of a shot in the dark chosing the Mosconi amp, but it had raving reviews.
Here is the list, prices and pics.
1. Focal Utopia 165WRC 2-way speakers with beryllium tweeters.
Retails $2000. Paid $1065 new second had from eBay.
2. Footwell sub enclosure with JL Audio sub (10TW3-D4). Paid $ 1075 from Sound in Motion.
3. Mosconi D2 100.4DSP
Retails $900-1100. Paid $675 shipped from extreamaudio in Germany (through Amazon UK).
4. Mosconi Mos-Bts bluetooth module. Streams uncompressed music up to 24-bit 96khz directly to the Mosconi. Paid $100, again from extreamaudio in Germany.
5. Kenwood excelon XR600-1 600w into 2ohm load for sub amp. Paid $250 from sonix electronics.
6. Miscellaneous stuff: $150
Total: $3315
The power was brought in from the battery using a 4 gauge wire through the driver side footwell grommet. There was a nice area for ground within the space under the right seat where the amps went. The good news was that there was a remote power wire coming from the head unit together with the low level outputs. It is the black wire. Connect to remote in for the amps and they work in-sync with the head unit.
I also had to use a ground loop isolator / noise suppressor since the factory low level outs were picking up noise.
It took me 2 days to tune using my Fuzzmeasure sound analyzer. After everything, it sounds just spectacular. Spot on imaging and deep soundstage. Kind of surprised how well it sounded, but I think sitting very low in the Porsche with the tweeters high up helps a lot. Also the major upgrade I think is the CD-quality and high-res streaming. It sounds so much better tha same songs through the head unit using a USB.
I will include the details on the time delay & equalization next. I used an active setup with sub crossed at 60hz and tweeters at 2.5khz, all Linkwitz-Riley. The tuning is the fun part as you can play around endlessly.
Last edited by gago1101; 07-24-2015 at 03:05 PM.
 07-24-2015, 12:53 PM
#2
Rennlist Member
Thanks for sharing. Couple of questions:
1. How are you connecting to the OEM head unit? Some sort of CAN bus converter or line level from speakers?
2. Concerns on the amp under cover and heat?
3. Did you have to hack into any part of the harness to integrate?
Thanks
1. How are you connecting to the OEM head unit? Some sort of CAN bus converter or line level from speakers?
2. Concerns on the amp under cover and heat?
3. Did you have to hack into any part of the harness to integrate?
Thanks
 07-24-2015, 01:25 PM
#4
Rennlist Member
Thread Starter
2. I am using efficient class d amps, which in general do not get as hot. The Mosconi does warm up a bit, but I did cut an opening in the carpet (see attached image above) to get some cooling.
3. As mentioned above, you have low level outs coming from the head unit under the right seat in the OEM setup. Change those to RCA plugs. You have your speaker outs going out from the same location. Cut the plastic OEM harness and attach those cables to your amp speaker outs. It is pretty straightforward, almost plug and play. No need to get the head unit out
This setup is with the Sound Plus upgrade. Not sure if the wires will be at the same location with base audio.
You need to be careful not to blow your tweeters. Either use a dsp to set the crossovers or use passive crossovers.
Edit: forgot to mention. I did tap into the battery and brought it in through the opening / grommet on the driver's side.
Last edited by gago1101; 07-25-2015 at 01:31 PM.
07-24-2015, 03:44 PM
#5

Very nice! So how many of the OEM speakers did you replace and/or disable?
07-24-2015, 04:15 PM
#6
Rennlist Member
Thread Starter
Interestingly, but not a big surprise, the soundstage and the overall surround experience is better with just two-way hifi speakers and sub compared to its original 9 speakers.
07-24-2015, 04:30 PM
#7
Rennlist Member
Thread Starter
I don't have the exact numbers yet. The main weight is added by the sub. It is about 20 to 25 pounds. Otherwise the speakers, the DSP-amplifier combination, and the subwoofer amplifier together will not add more than 4-6 lbs.
I will do the exact calculations and measurements and will post the results on Monday.
I will do the exact calculations and measurements and will post the results on Monday.
Trending Topics
08-05-2015, 01:07 AM
#8
Rennlist Member
Thread Starter
Here are the Mosconi DSP settings I am using if anyone is interested.
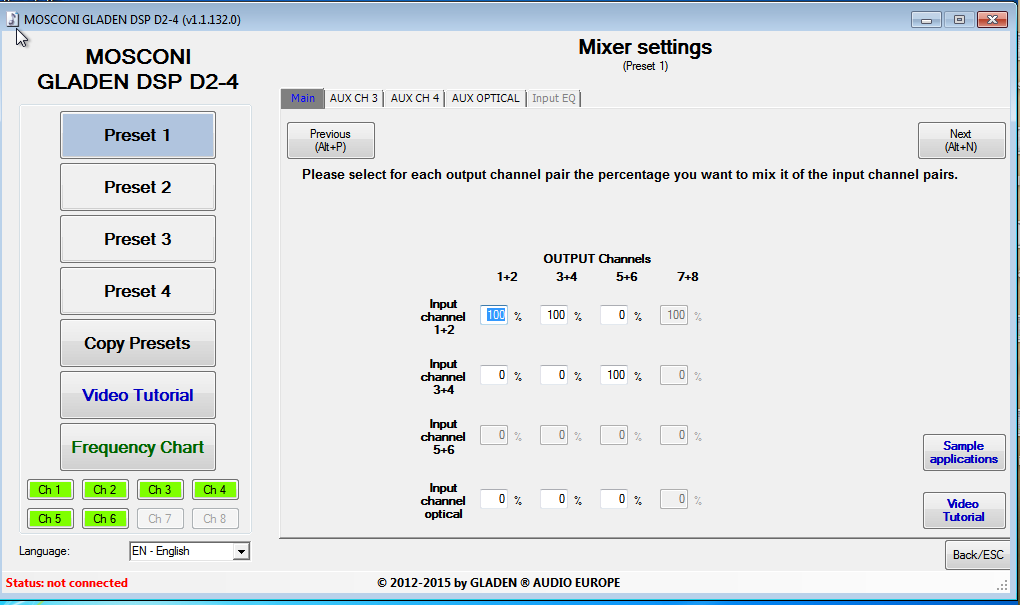
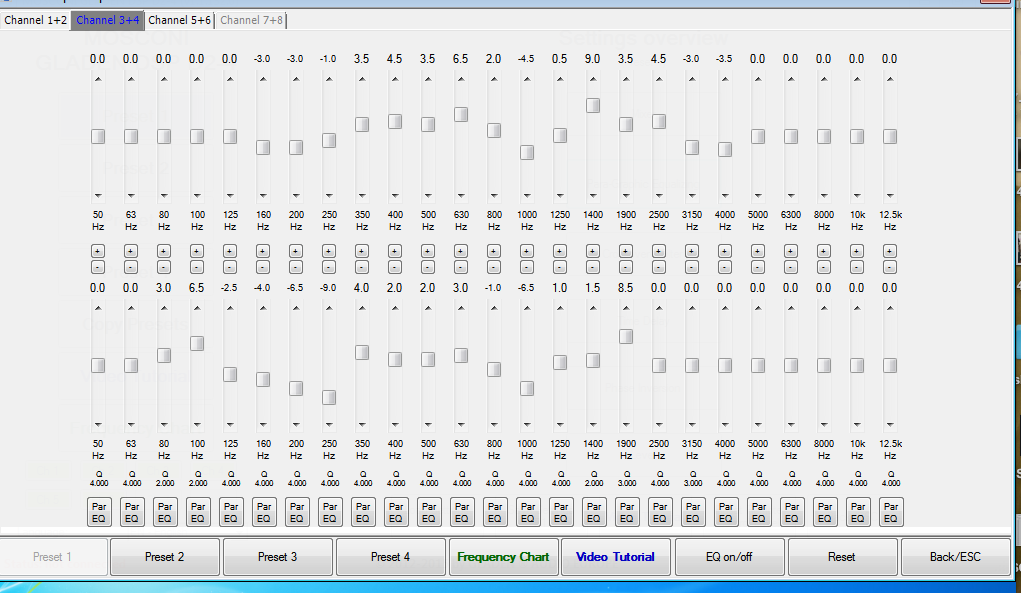


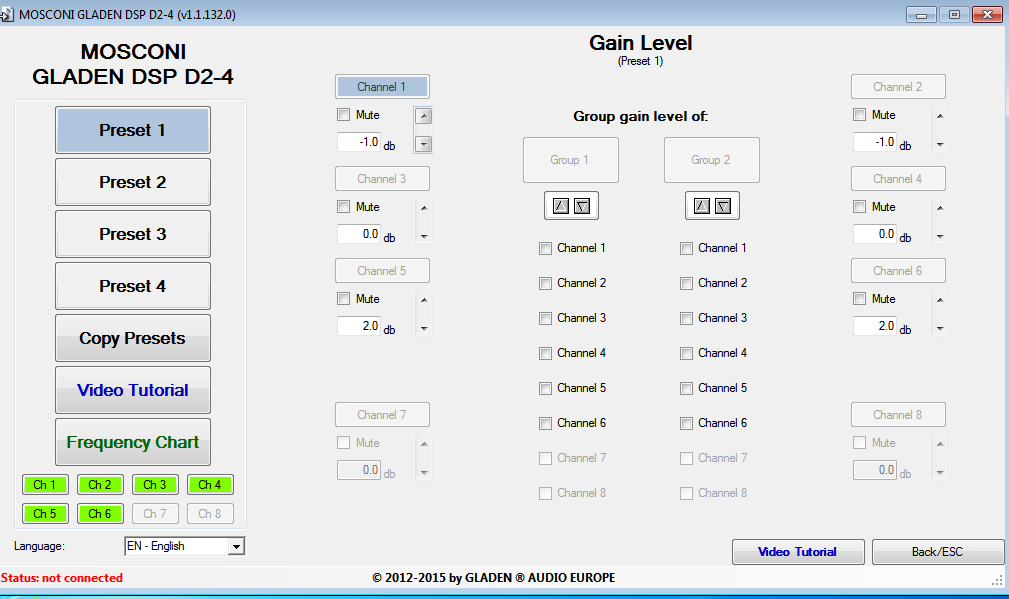
The time delay was set with the help of the time/step response curve from my fuzzmeasure application and microphone. The tweeters were not equalized. There are a lot of reflections in a small car, so it is hard to get a flat response. Even a small move of the microphone in the cabin will change the response. After playing with it for some time, I did my best and tuned it with my ears. The final response looks okay, but the sound is sweet.
Tweeters/woofers crossed over at 2.5Khz high pass / low pass, and the sub crossed at 100hz, all using 2 Butterworth filters on top of each other with 12db slopes.
