When you click on links to various merchants on this site and make a purchase, this can result in this site earning a commission. Affiliate programs and affiliations include, but are not limited to, the eBay Partner Network.
PLEASE could someone help me identify this issue with brakes
2007 987 Cayman (Base) MT
Hey guys,
I’m new here, but i’ve been reading forums on this site for a while now. As a 24 year old who’d like to get more into Porsches, I figured i’d make an account in hopes of meeting fellow enthusiasts.
I’ll try my best to keep this as short as possible. Before this, I didn’t work on cars that much besides normal maintenance things (brake pads, oil change, etc).
I’ve searched everywhere for possible solutions but I’m still a bit lost.
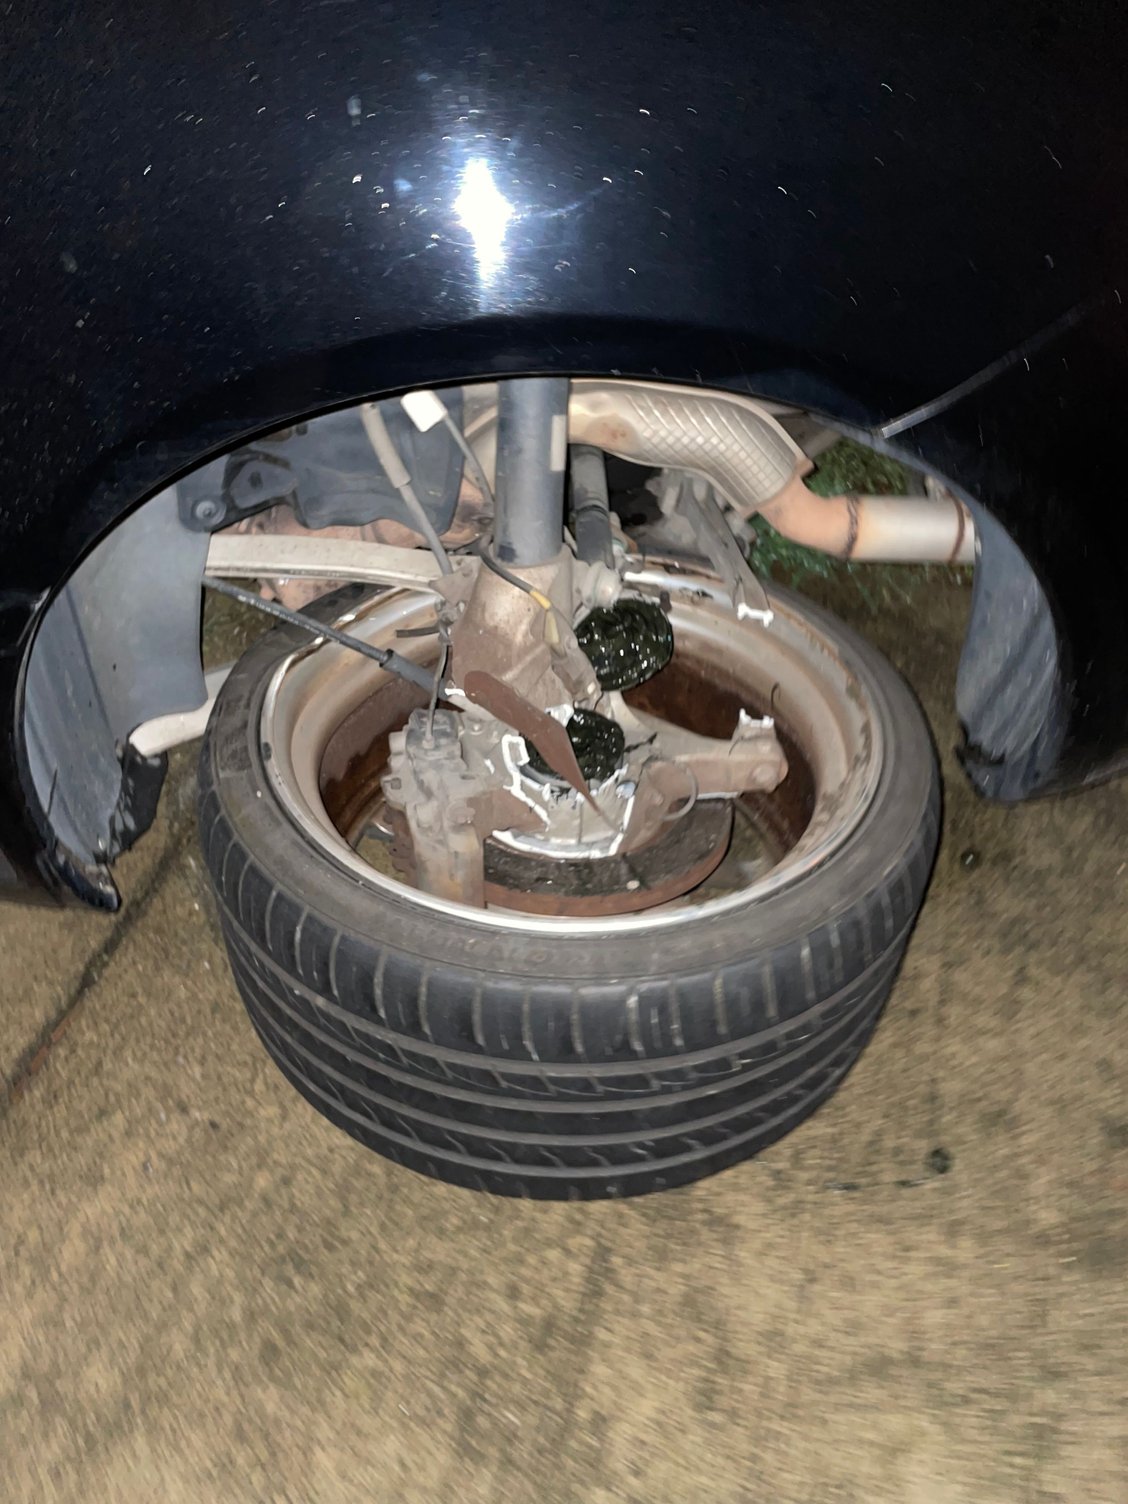
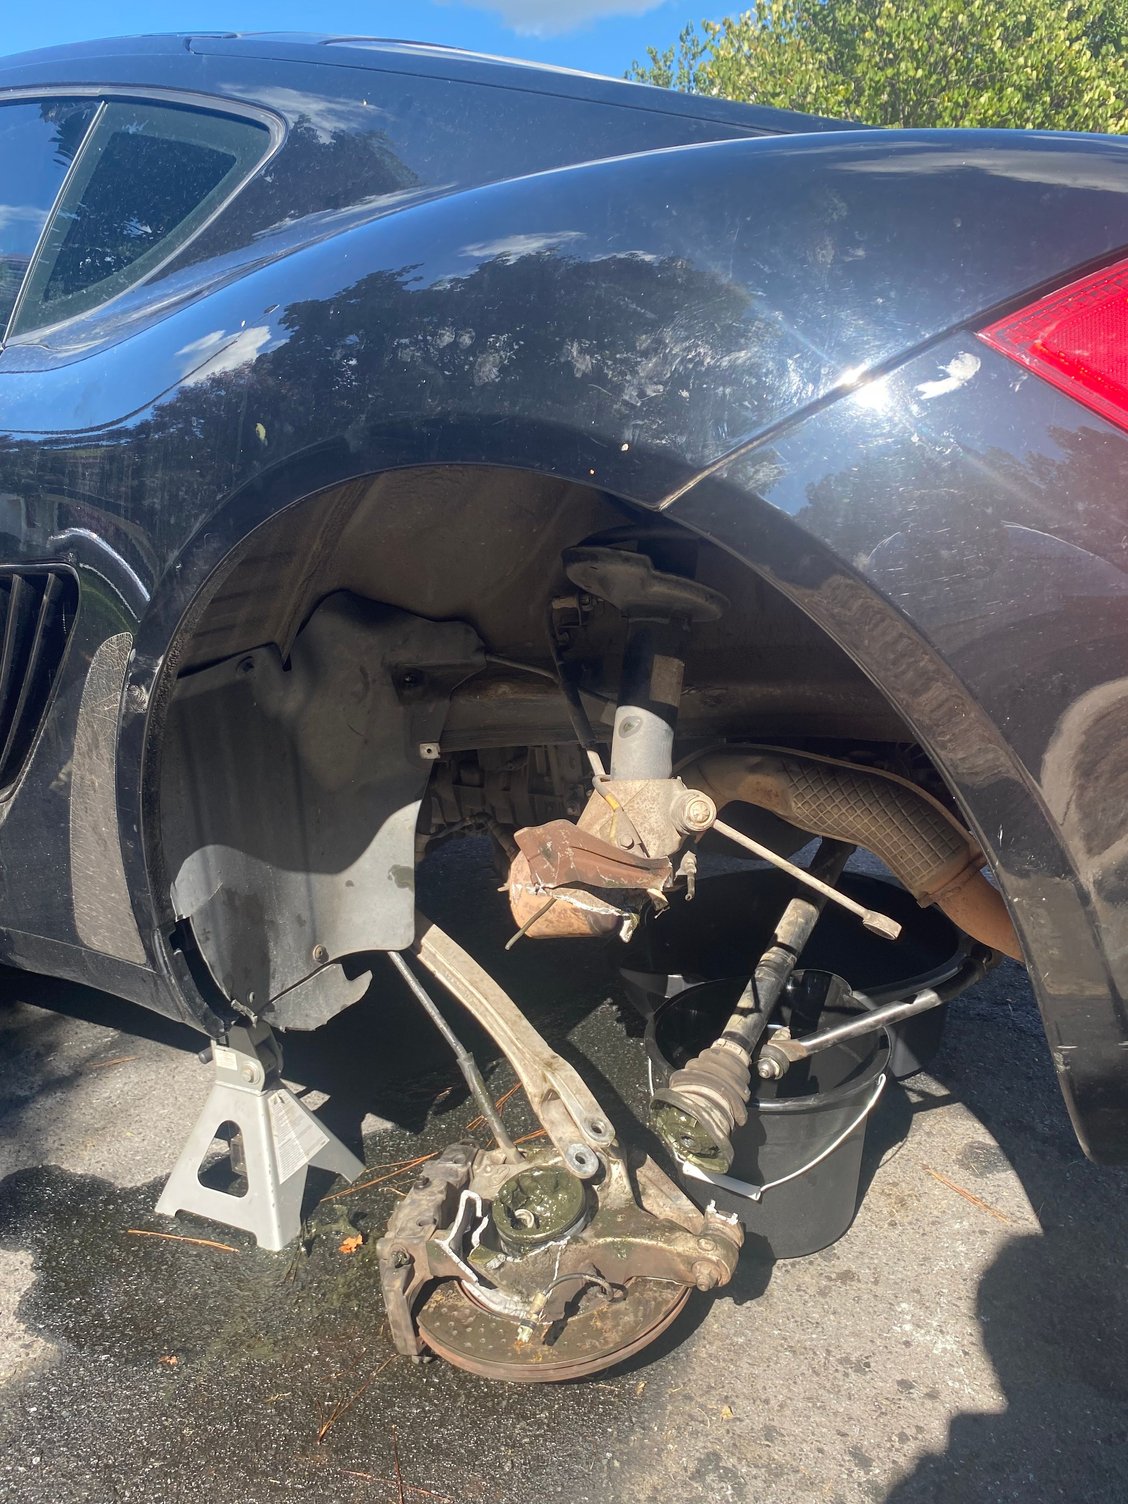
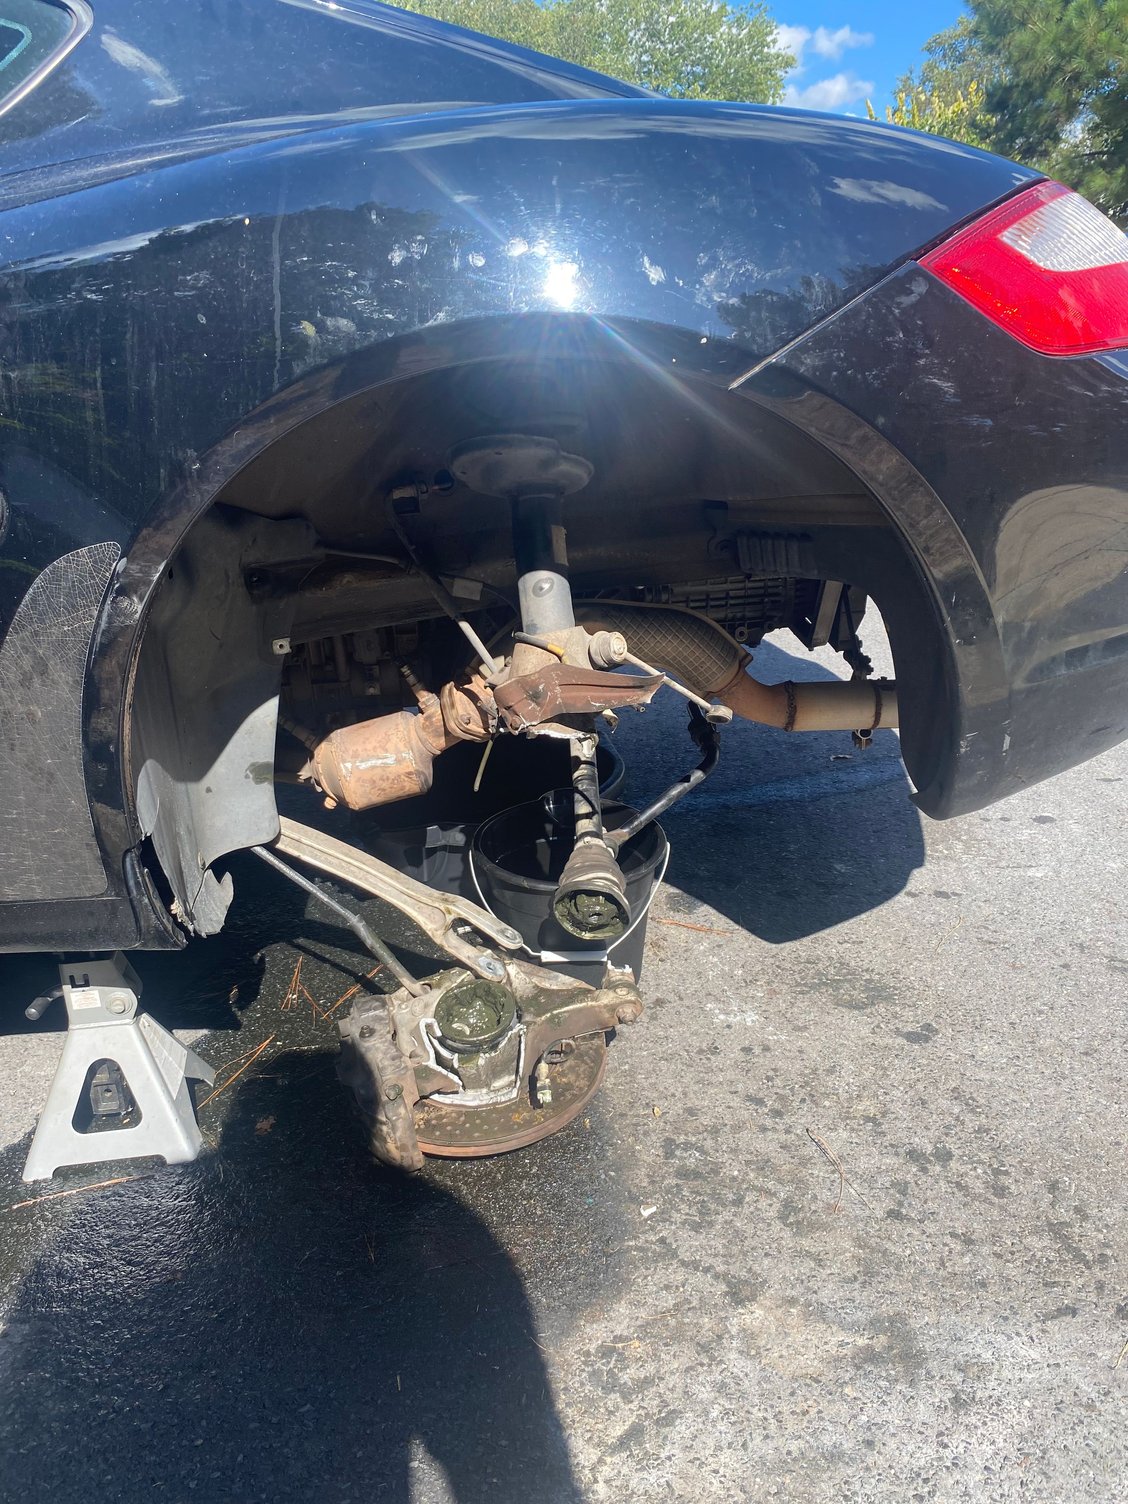
About 4 weeks ago, I was driving my 987 and took a turn a bit too fast and hit a curb. The driver side rear wheel took all the damage and completely destroyed several
parts. (pic below)
Thankfully, I was able to replace every single part. Axle, wheel carrier, control arms, brake lines, crossmember support, sway bar, etc. Since the brake lines pretty much ripped apart, I was able to replace those as well. I did also do a full brake bleed on all corners after I was done. I was an idiot and did not bleed the clutch though, maybe that’s the issue??
I’ve got everything put back together but after bleeding the brakes, the brake pedal is now extremely stiff. It’s almost like the rears aren’t being used (although they are properly installed and the pistons in the calipers are still fairly in good condition). I bled them again, but still the same issue. It’s rock hard and it does stop the car, but you must apply lots of pressure and it slows down, but it’s VERY slow.
I’ve taken my car to get an alignment (there’s a shop literally right up the street, so not a far drive, maybe 2-3 min) and the tech said it’s most likely the booster.
Ive read several things about a stiff pedal and everyone always says the booster, which makes sense, but to me I almost feel like it may be a vacuum leak since prior to this, everything worked fine. If hitting the curb did indeed somehow destroy the booster as well, then so be it. I am not sure where exactly the vacuum lines are that are on the rear drivers side.
Obviously I will get a new booster + master cylinder if needed, but i checked the MC and there’s no leaks anywhere near it, and none under the car or from any of the brake lines. I’d like to rule out a vacuum leak before buying a booster. Is anyone familiar with any vacuum lines near the driver side rear axle or strut? I’m hoping i may have just damaged one of the lines which I’m sure I can easily replace.
The issue is, I’m just not really sure which line is which, and I don’t really see any cuts or anything on the lines when i’m under the car.
Any help is much, much appreciated.
PS. Please forgive me for being a noob, replacing more than 15 different parts was the hardest thing i’ve done on this car lol, but I had my work looked over by the tech and all was good!
If you bleed the brakes by the pedal method it can damage the MC or booster, especially on an older booster. What happens is you're overextending the rubber diaphragm in the booster by pushing it beyond where it typically goes. The way to help avoid this is to put a block or something under the brake pedal so that it can't go all the way to the floor during bleeding. So it's entirely possible you damaged the booster when you did your bleed.
To verify, pull the vacuum hose from the booster and see if the booster holds vacuum. Usually you'd use a small vacuum pump for this but maybe a shop vac or something could be jury-rigged to work? Basically with your foot off the pedal the booster should hold vacuum if it's applied to the vacuum port. If it does not then the diaphragm is torn and it's booster replacement time.
Thanks for your response! I should’ve mentioned that I used the Motiv power bleeder and I didn’t bleed using the pedal.
I’ll test the vacuum today.
Dumb question, but i’m assuming i leave the car on while testing vacuum?
You can test the check valve by starting the car and running it for a few minutes to let the vacuum stabilize. Press the brake pedal and hold. While holding the brake, shut the car off. If the pedal rises within a few seconds you've got a bad check valve. It shouldn't rise for about 30 seconds. The rise is apparent.
Second test, with key off, is pump the brake 3 or 4 times and hold. Start the car while holding the pedal down. The pedal should sink. If it does not sink then the booster is not working properly.
Last test. run the car for a few minutes then shut it down. Pump the pedal a few times. With each pump the pedal should rise.
There is a rubber diaphragm that separates the engine side from the pedal side. A valve at the vacuum hose from the engine that introduces vacuum. Another valve at the pedal opens when you push the pedal allowing air into the booster at the pedal side of the diaphragm. When air is introduced at the pedal side it create a pressure differential allowing engine side of the diaphragm, with the vacuum, to contract and push on the MC.
If either valve is not working properly or has a leak or if the diaphragm has a leak, the booster will not work correctly.
Wow, you really whacked that curb!
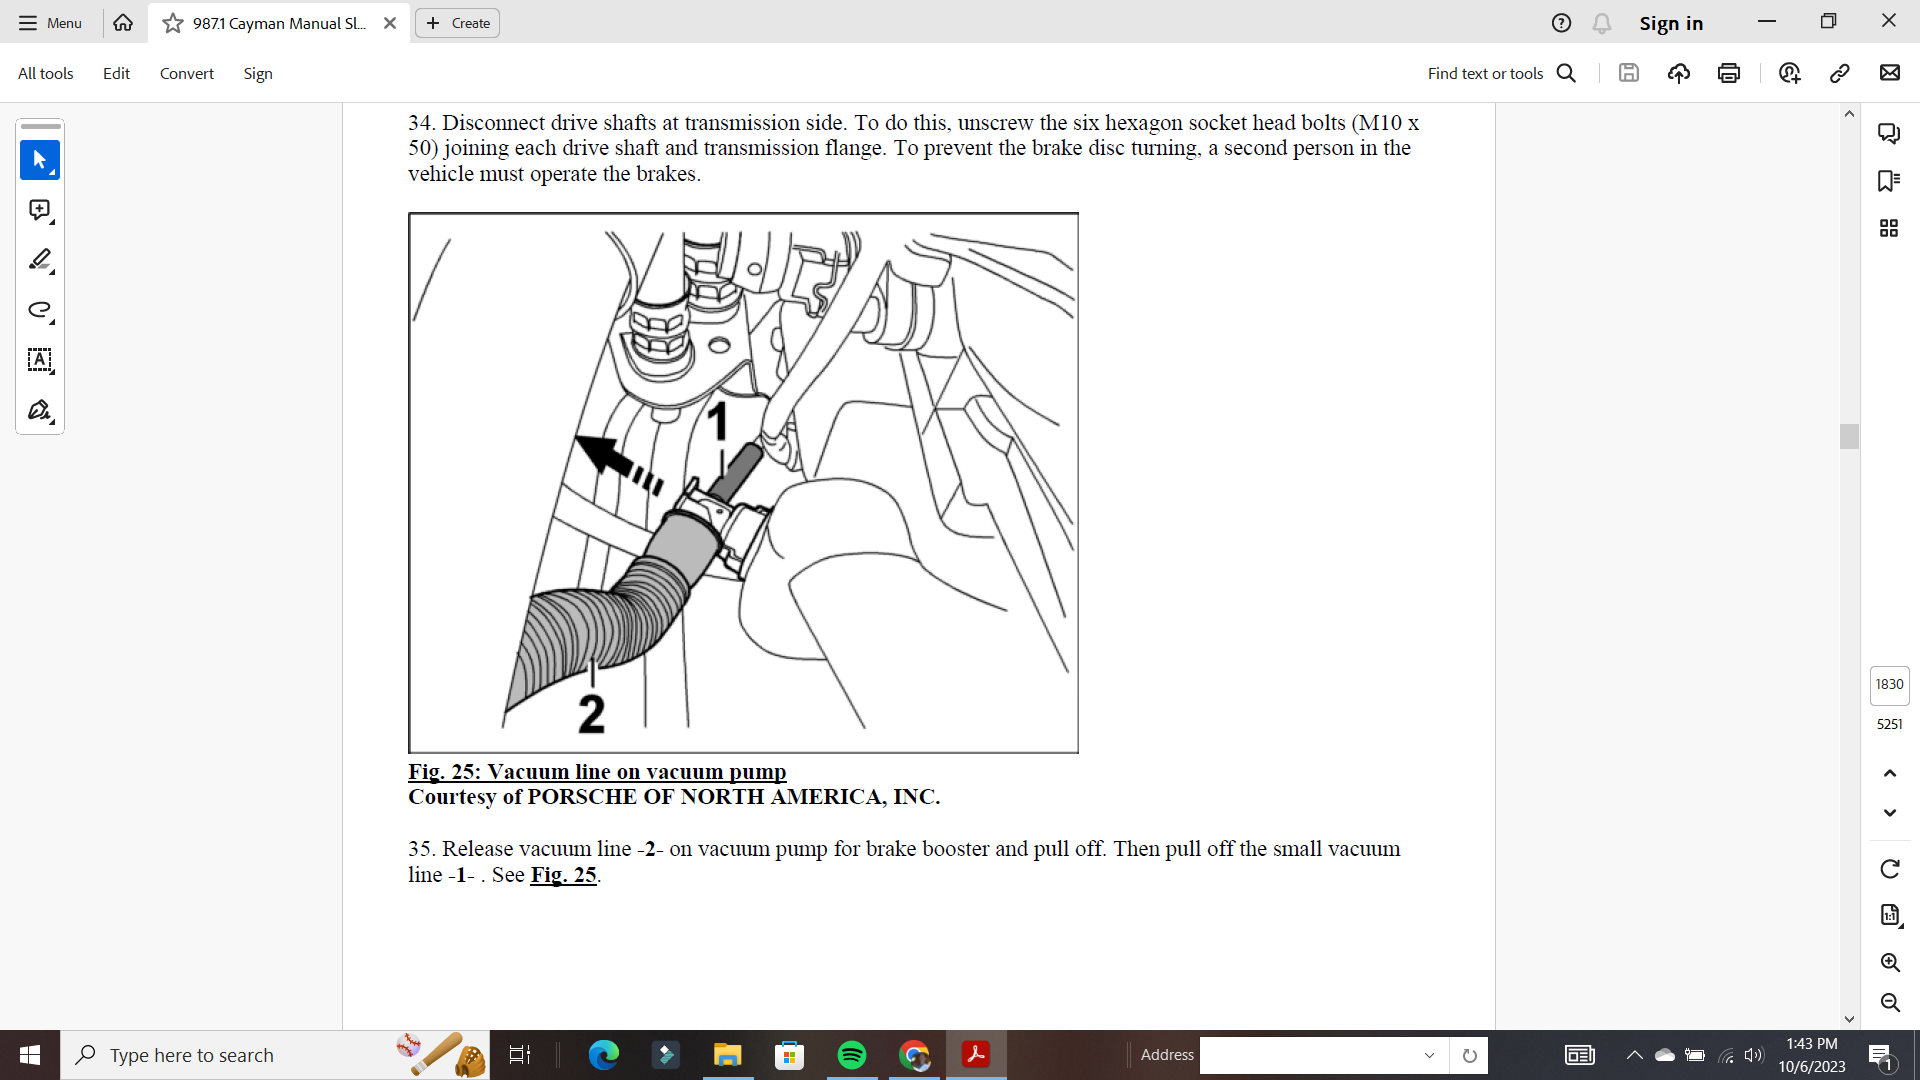
There is an engine driven vacuum pump that supplies vacuum up front to the brake vacuum booster. The line runs in the general vicinity of where you incurred all the damage. I'm sure that is much more to the story about how you affected all the repairs but certainly someone looked at and confirmed that the vacuum lines were operational? Your symptoms sound exactly like the vacuum booster not being active, in which case you are required to use extreme leg muscle to slow the car down. The checks that @plafondles recommends should establish whether the booster is working but my simple minded test is to get out on a flat lonely road, turn off the engine, and get on and off the brakes. If you don't feel any difference in the braking feel, the brake booster is not working. So check the integrity of the vacuum line before you do anything else.
You can test the check valve by starting the car and running it for a few minutes to let the vacuum stabilize. Press the brake pedal and hold. While holding the brake, shut the car off. If the pedal rises within a few seconds you've got a bad check valve. It shouldn't rise for about 30 seconds. The rise is apparent.
Second test, with key off, is pump the brake 3 or 4 times and hold. Start the car while holding the pedal down. The pedal should sink. If it does not sink then the booster is not working properly.
Last test. run the car for a few minutes then shut it down. Pump the pedal a few times. With each pump the pedal should rise.
There is a rubber diaphragm that separates the engine side from the pedal side. A valve at the vacuum hose from the engine that introduces vacuum. Another valve at the pedal opens when you push the pedal allowing air into the booster at the pedal side of the diaphragm. When air is introduced at the pedal side it create a pressure differential allowing engine side of the diaphragm, with the vacuum, to contract and push on the MC.
If either valve is not working properly or has a leak or if the diaphragm has a leak, the booster will not work correctly.
Thanks so much man! Going to try all this shortly and report back.
Wow, you really whacked that curb!
There is an engine driven vacuum pump that supplies vacuum up front to the brake vacuum booster. The line runs in the general vicinity of where you incurred all the damage. I'm sure that is much more to the story about how you affected all the repairs but certainly someone looked at and confirmed that the vacuum lines were operational? Your symptoms sound exactly like the vacuum booster not being active, in which case you are required to use extreme leg muscle to slow the car down. The checks that @plafondles recommends should establish whether the booster is working but my simple minded test is to get out on a flat lonely road, turn off the engine, and get on and off the brakes. If you don't feel any difference in the braking feel, the brake booster is not working. So check the integrity of the vacuum line before you do anything else.
Yeah.... it was storming extremely hard when it happened, so I shouldn't have turned so fast lol. The tech didn't look at the lines but looked at everything else I replaced. Unfortunately, after doing the alignment he didn't have any more time to begin testing vacuum lines, etc. So I am back at home trying to figure it out myself lol. I guess i'm just confused on how anything in the front (where the booster is + some of the lines) could have gotten damaged. No damage happened anywhere except the rear driver's side. The front driver's side did not even touch the curb. I will report back though! Thanks for your response!
Think of where the vacuum source is coming from, my friend The booster's vacuum is supplied by the engine, so there is a hose somewhere that has to run from the engine (near the back of the car) to the booster (at the front). Idk where that hose is, but I would take @harveyf word that it is near where your damage occurred.
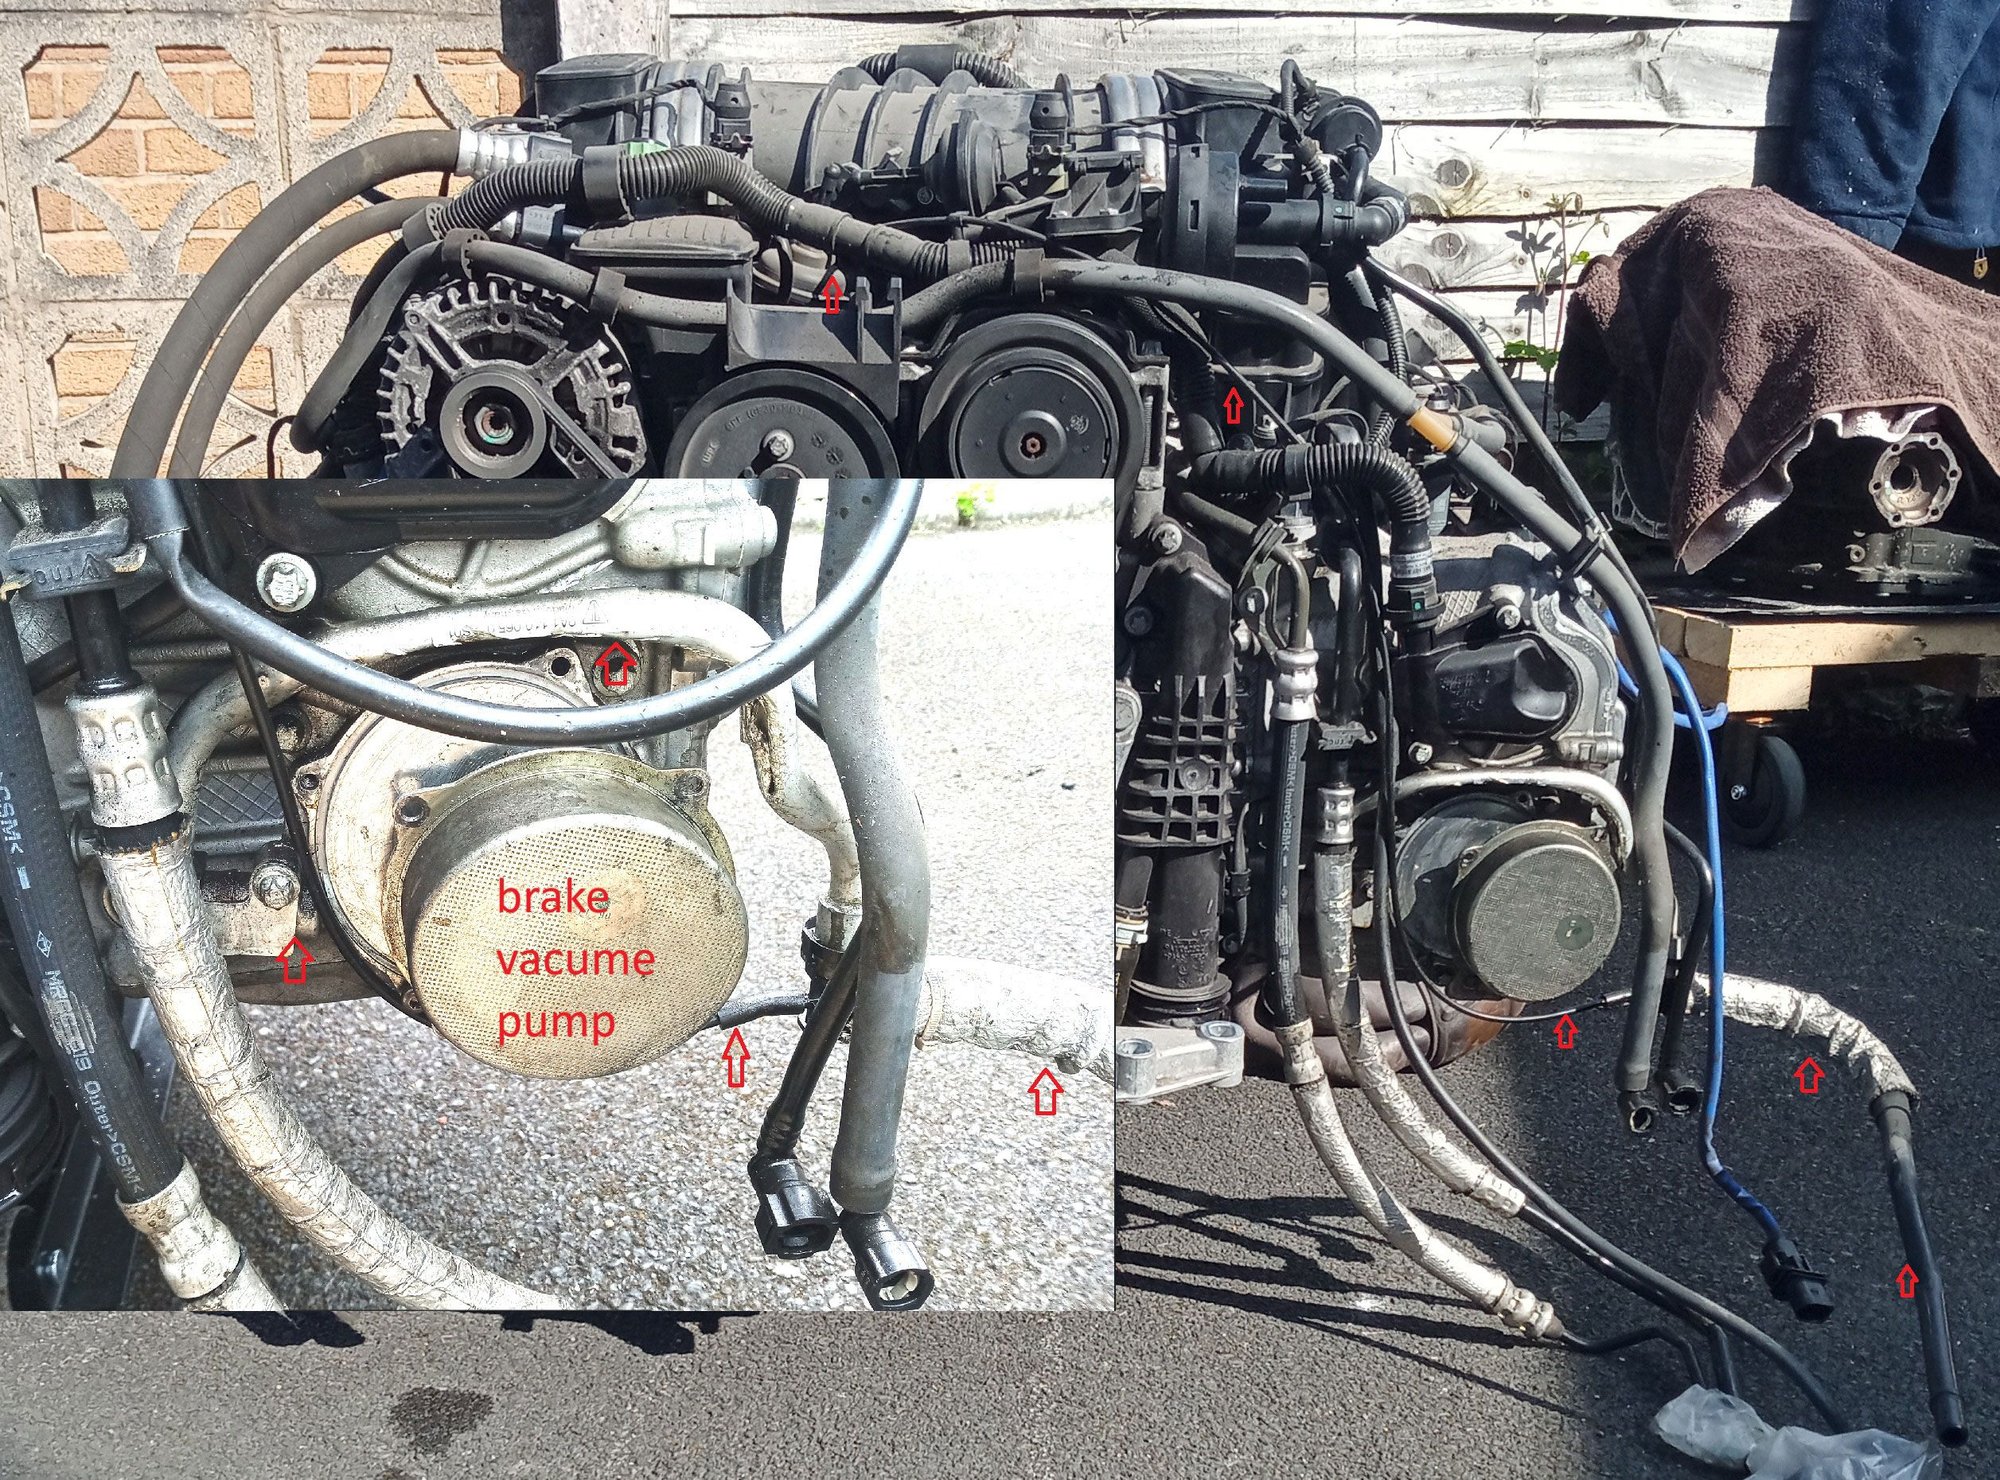
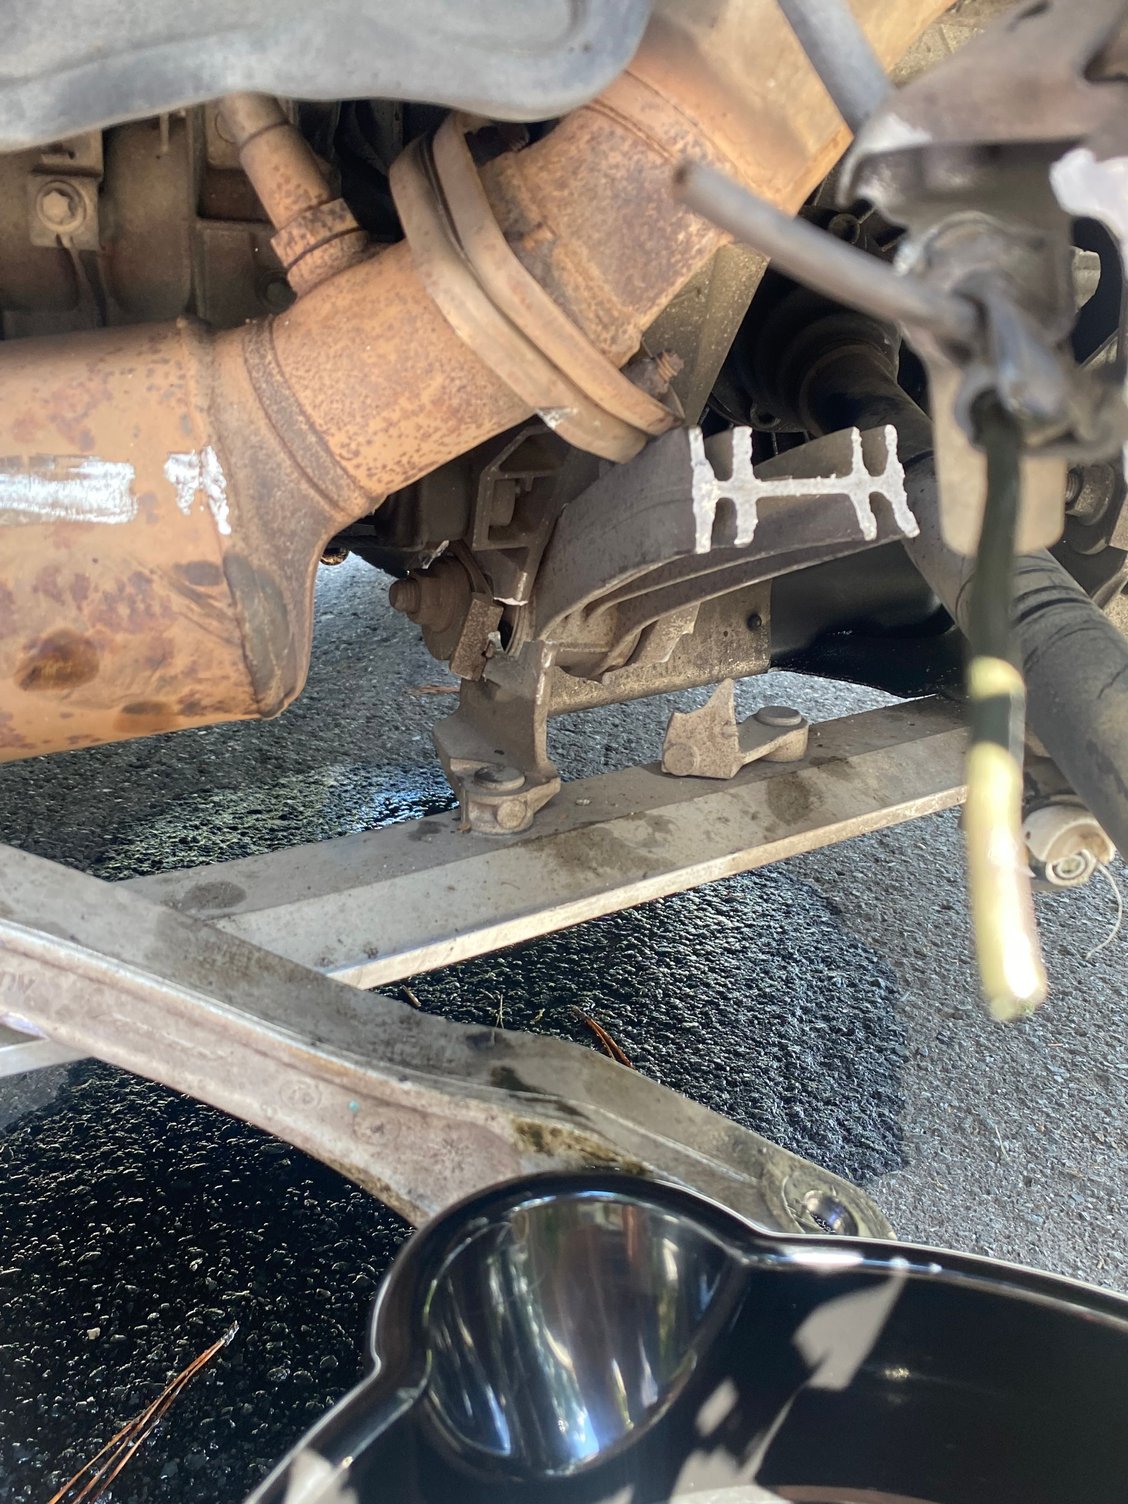
The vacume pump failure was the reason I dropped the engine on mine. The symptom you describe of the brakes working but the heavy brake pedle is the exact symptom and the description of the I experience driving her home on a tow for 50 miles (worst drive of my life :-). Here's a pic showing the parts you need to check thoroughly.
First off, I wanna say thank you to all of you for your help. I am glad i joined this forum.
Secondly, I FOUND IT!! after 50+ hours changing everything else, and then another week of trying to figure out if I need to buy a booster, the time has come!!!
So I’ll try my best to explain which line it was, because I can’t find the part # on it and it’s a bit tough for me to identify it on the PETs. I wish i took photos of it but I was too excited to see if it was really the issue.
There are 3 lines that run along the side skirt driver side. One of them goes up and into what looks like an oil pump or the vacuum pump? and then it also goes further up. So basically, the line is almost like an L. It goes up and has a part where it connects to the pump and then it also has a line that connects to something above.
I looked at pretty much all the vacuum lines and jiggled them around to see if anything was loose, and this line I am describing happened to be broken. It was VERY hard to figure out because no noise was made and the line was still very close to the pump and looked connected. I jiggled it, and that’s when I saw the bracket was broken and it actually wasn’t connected.
So with my old damaged break lines, I cut one of them and used it to connect the vacuum hose into the pump, to just test it out. I got in the car, turned it on and immediately felt the vacuum lower my brake pedal. I took a VERY short drive (50-100ft) and the vacuum was 100% back.
I still am not sure exactly which part this is, but I know i’ll need to replace it. If anyone has any recommendations for a temporary fix, that’d be great. The line is only broken where it connected to the pump. The top of it where the other line is, is completely fine.
Apologies in advance if this may sound confusing. As I said I am a noob 😐
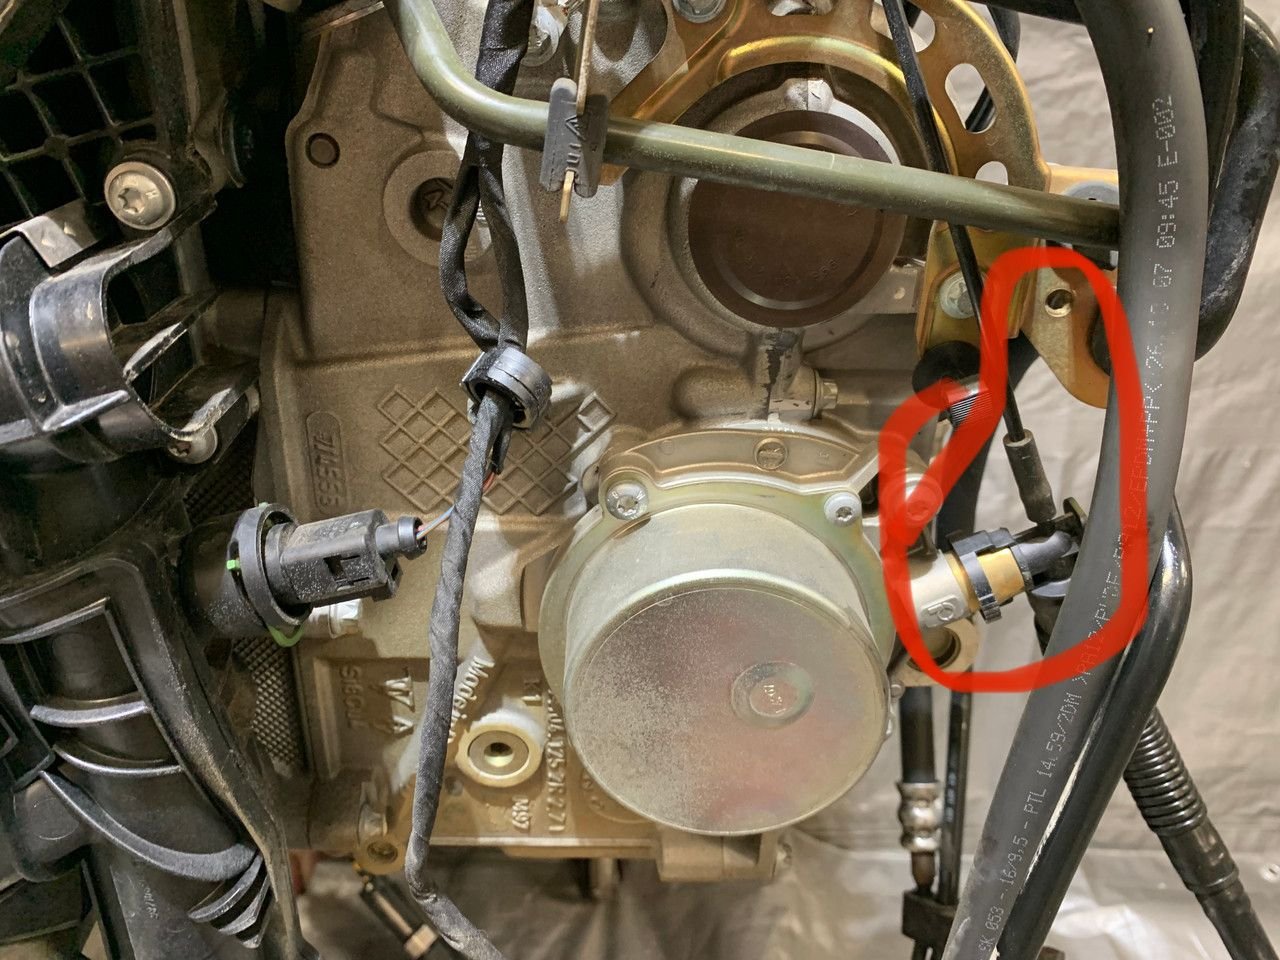
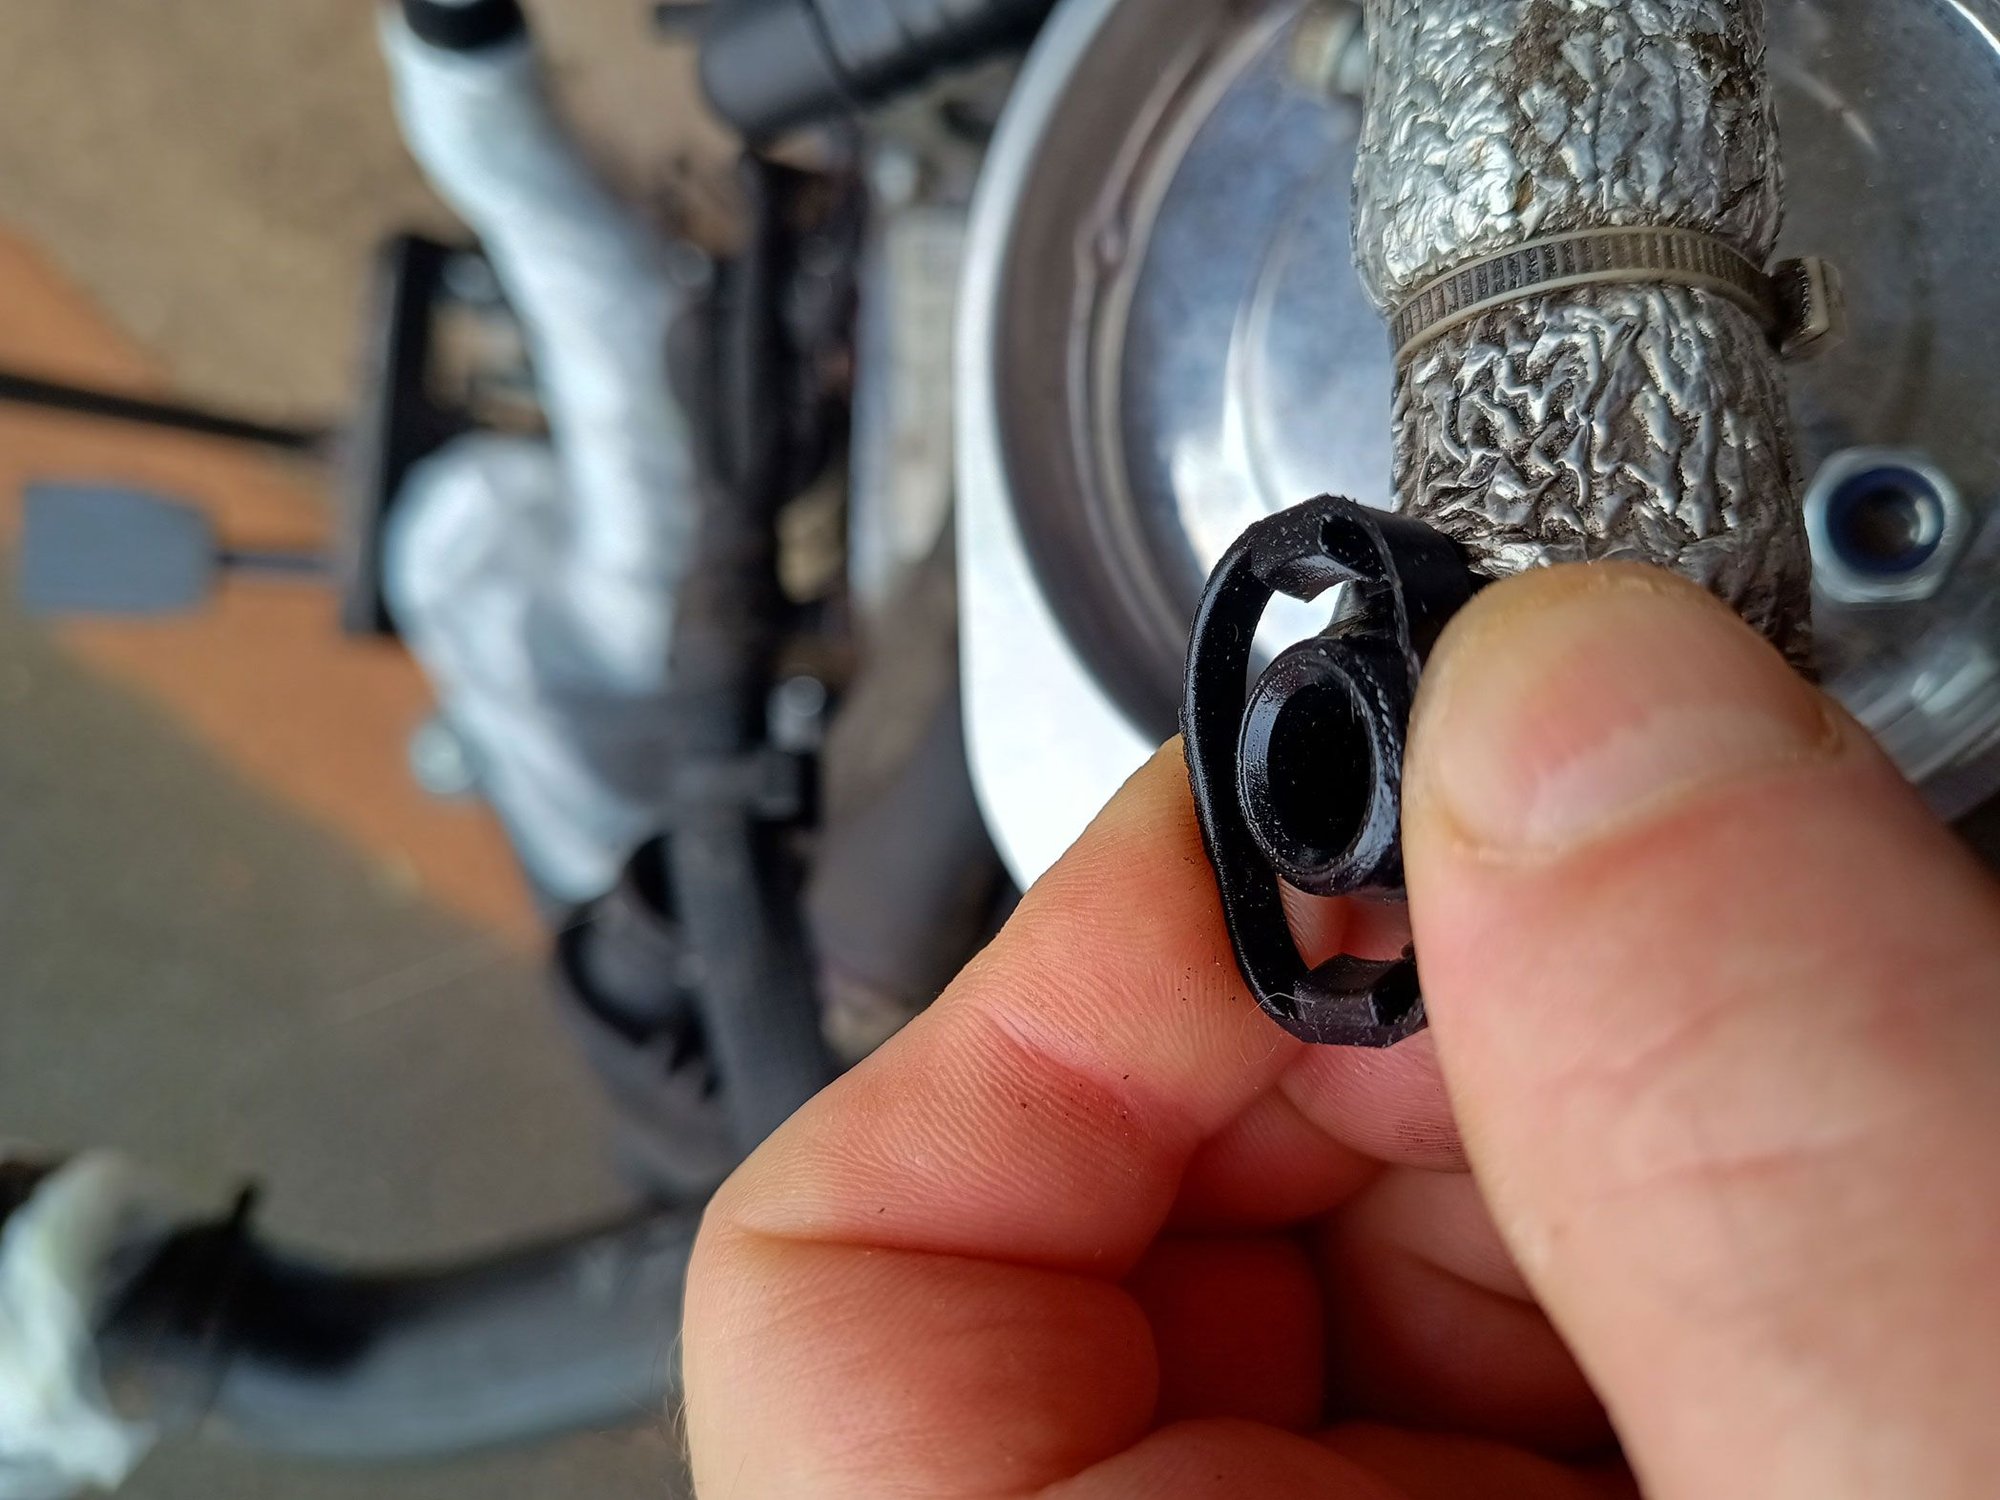
I THINK it is this line. it looks just like it. and i was able to take off that black plastic bracket that’s holding the line to the pump, since it was broken.(not my
photo)
If it's the T-piece broken search for "brake vacuum line 98735557502" although some places are saying it's now superceeded by 98735557503. I broke mine by accident, the small spigot part that T's off and the rubber connector to the hardline - seems pretty delicate
Here are some of the smaller parts numbers listed (sorry it's EU based - I've have all this stuff saved and it was a pain to find in the first place so I hope it's slightly helpfull) - https://www.design911.co.uk/porsche/...2/vacuum-pump/
Hey man! Thanks so much for the info. I’ll look into it more. Any idea how to replace this line? I know the bottom part (along the side skirt) just pops right off, but it’s the top of the T that i’m kinda lost on. Since the bracket broke off, do you know how to take the top line off? I’m not sure where it leads too.
Squeeze the serrated sides to release the T hose connector and it should pull right off, pic shows how it works. I wouldn't worry about the thin hardline at this point, I'd just replace the T hose and connect everything back up.
Squeeze the serrated sides to release the T hose connector and it should pull right off, pic shows how it works. I wouldn't worry about the thin hardline at this point, I'd just replace the T hose and connect everything back up.
Thanks again man! I can’t thank you enough.
so it’s t hose connector (the one in the photo you shared) that broke. like I said, I am just not sure where the line attached to the top goes. I think it comes out? I’m going to take a photo today to try and show you the part i’m talking about.
The clamp/bracket that you squeeze is what broke, so there’s no connected between the hose and the pump. but the line that runs up is still connected.

 10-05-2023, 09:22 PM


 The booster's vacuum is supplied by the engine, so there is a hose somewhere that has to run from the engine (near the back of the car) to the booster (at the front). Idk where that hose is, but I would take @harveyf word that it is near where your damage occurred.