When you click on links to various merchants on this site and make a purchase, this can result in this site earning a commission. Affiliate programs and affiliations include, but are not limited to, the eBay Partner Network.
Congrats.
Supernice result and completely reversible!
Yup.
That's what made it attractive to start...
Other mods, or reversion, can follow.
It's nice to confirm the content of the existing connector, so that others could avoid the need to tap or run other wires, merely to run a clock...
A few dollars of parts, and it plugs straight into the existing loom.
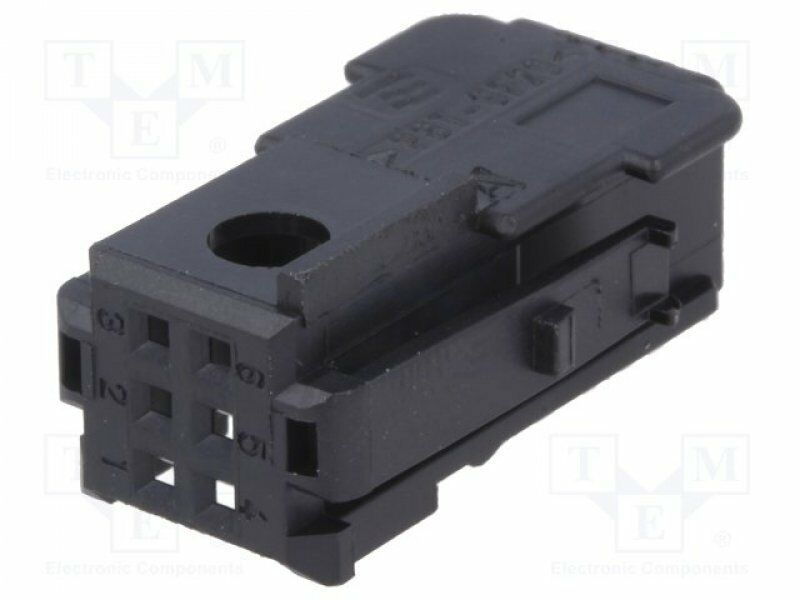
With this information, it seems everything needed to power a conventional 52mm dash clock is right there in the (BMW part numbered) MQS / TE Connectivity connector.
All that is needed is a pigtail to connect the clock spade connectors to the car's MQS plug.
The MQS body needed:
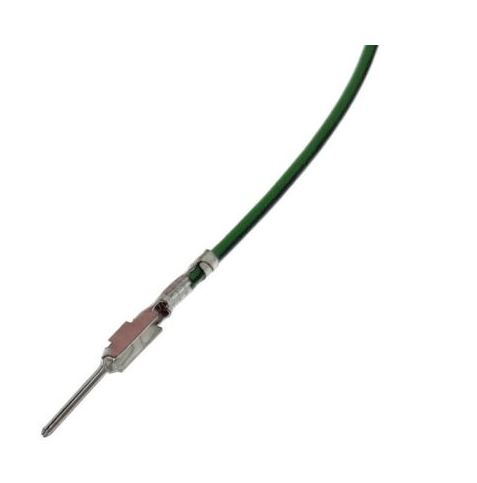
With male pins:
.
Great write up.
where did you get the MQS connector (part # ?) and the male pins?
I hope you don't say "Akihabara" but "the internet" ;-)
where did you get the MQS connector (part # ?) and the male pins? I hope you don't say "Akihabara" but "the internet" ;-)
Brilliant joke.
I laughed out loud...
Internet...
The connector's BMW part number led me to the MQS number 953382, which can be found on eBay.de pretty easy here.
The pre-terminated 2.54mm pins too here.
Some retro shopping for the MQS series connectors shows a few cleaner looking bodies, some too I suspect with locking tabs for the pins - negating the need for epoxy to hold everything together.
It would be interesting to know if the CAN / loom wire designations are the same across models, but as 30, 31, and 58 are close to universal for dash stuff, I would guess so...
What model are you contemplating?
If you do it, post pics!
Thanks for the great DYI, I just finished mine.
No pictures as I picked the same VDO clock and my install looks exactly like yours
One little improvement over yours:
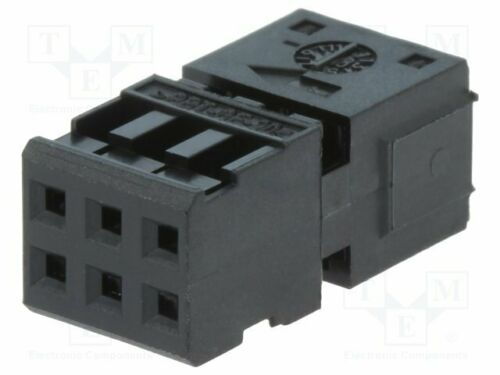
I used this connector: Rcpt HSG for MQS 6W , with this one the pins click right in, no epoxy needed https://www.ebay.com/itm/RCPT-HSG-FO...99ca%7Ciid%3A1
Thanks for the great DYI, I just finished mine.
No pictures as I picked the same VDO clock and my install looks exactly like yours
One little improvement over yours:
I used this connector: Rcpt HSG for MQS 6W , with this one the pins click right in, no epoxy needed https://www.ebay.com/itm/RCPT-HSG-FO...99ca%7Ciid%3A1
Yup!
That looks similar to the body I saw when I was looking after I made the epoxy version.
So much better for sure.
If I was to do it again, that's so much better.
Pics still needed!
What generation did you install in, and how does the illumination (DIN terminal 58) operate?
Lights on of course, but also 30 seconds on for door open, and lock?
Pic attached. My car is a 2009 997.2
Yes, the behavior of the illumination is as you described:
it goes on for ~30 seconds when you open / close the door, or when you turn on the lights (but even then it turns off after 30 sec again)
I have the suspicion that it's always on when the engine is running, need to verify. I noticed when I drove through a short tunnel yesterday that the illumination was on even though I hadn't turned on the lights
One lesson learned: before you insert the VDO clock, you need to take out the original lens, otherwise you can't adjust the clock.
One more thing: I had enough parts left to build a second harness. So if anyone wants to tackle this project but doesn't want to source all the parts, here's your chance.
$20 shipped in the 48 lower states, PM me if you're interested.
One lesson learned: before you insert the VDO clock, you need to take out the original lens, otherwise you can't adjust the clock.
Interesting.
I removed the stop watch (and glass) as one unit, and the installed the VDO clock from the front, so it sits like a conventional through-dash gauge; proud of the silver swiveling bezel in the pod.
You have installed the clock from the rear, and used the locking screws to secure?
It looks neater, but might not be as firm?
Though, the snug fit from the rear, and the locking screws seem to be pretty firm, and based on the size match its possibly the same as the OEM mount for the stop watch.
Assume it still swivels too?
Great to see the pic accordingly, and good to know the illumination works consistently too!
Thanks, as your neat pigtail set shows how easy it is to avoid tapping the loom or running extra wires to the fuse box or similar.
I too have some left over pre-terminated wires / MQS pins and and if anyone wants them they can have for postage cost:
Interested to know how the oil temp install process goes...
See ya!
Possibly! What model or do you have a pic? I'm trying to match the white tach, speedometer, etc as closely as possible. Thanks!
won't work then, mine is white on black, just like the VDO clock I installed
I have a 997.2 4S with the white instruments, which I totally hate, any chance I have to turn anything into white on black I take it
Interesting.
I removed the stop watch (and glass) as one unit, and the installed the VDO clock from the front, so it sits like a conventional through-dash gauge; proud of the silver swiveling bezel in the pod.
When I took out the Sport Chrono unit, the protective glass didn't come out.
But yes, I used the 4 adjustment screws and it swivels just like the Sport Chrono did
So your plan must be to install an oil temp sensor at the engine and then pull a wire all the way to the front?
I had to pull a wire from the rear of the car to the front to install a rear-view camera. It can be done, but man that was a major pain in the neck with backpain and scratched hands and arms.
Let us know how it goes
IN case you *ever* want to install a rear view camera I'd do the wiring while you're already in there. You only want to do this once.
EDIT: my comments apply to a 997, it's probably easier in a Cayman
Thanks for the tips! Yes, will be tapping into the driver side under the air filter. I "think" i can follow lines recently put in for PDK cooler, and then run up the center console. I'll report back on how it goes.
Thanks for the offer on the gauge. I'm not particular on colors, so i don't mind the white gauges, but just want them all to match as closely as possible.


 05-10-2019, 09:20 AM