When you click on links to various merchants on this site and make a purchase, this can result in this site earning a commission. Affiliate programs and affiliations include, but are not limited to, the eBay Partner Network.
The original poster used the piece from that eBay seller. I did contact them and they said they wouldn't have the in for a while (I read that as never). I rolled the dice and went with a different seller.
Seems they all come right from China. Hard to tell the quality. They seemed sturdy. They were packed very well. The black paint I added around the edges made them a bunch better for very little effort. There was a very little scratch in the paint which I also touched up with black paint that made it invisible. I'll see how it works out in the end. Any imperfections are only thing's I'd see. I'm a tad OCD with my cars (not, alone, i'm sure). If I ever have to redo, I'd do better the second time around now that I know what's involved.
Give it a shot.
Thanks for the rec. I went ahead and bought them and received the lenses already. Came super fast. The quality looks good all around including the shade of the grey ring. I couldn't distinguish it from the original lens on the car. Now to get the remaining tools for this project.
Has anyone done the lens replacement over a year ago? I am wondering how these aftermarket covers hold up to UV over time. I have sanded and polished headlights in the past and tried a few different UV topcoats, but they never seem to last very long. The last thing that I want to do is replace the covers on my 981 which look fine from 5 or more feet away with something that in the future is going to turn yellow and look bad from 50 feet away.
Job completed, it's a lot of work and it is quite time consuming but I did it the Dremel way and have some tips and tricks.
First - we need TOOLS.
Using a Dremel 3000 and a reinforced Dremel disc 426 (I used two discs for one headlight lens and I did a LOT of cutting). A Dremel silicon carbide grinding stone cone (I will go over this later). Welder glue if you break any tabs. Gloves, glasses, a plastic trim tool, exacto knife set, an L pick, pliers, needle nose pliers, a couple of flat had screw drivers, a blower, a block of wood (prevents wobbles). Towel to work on. Mask and microfiber (not pictured).
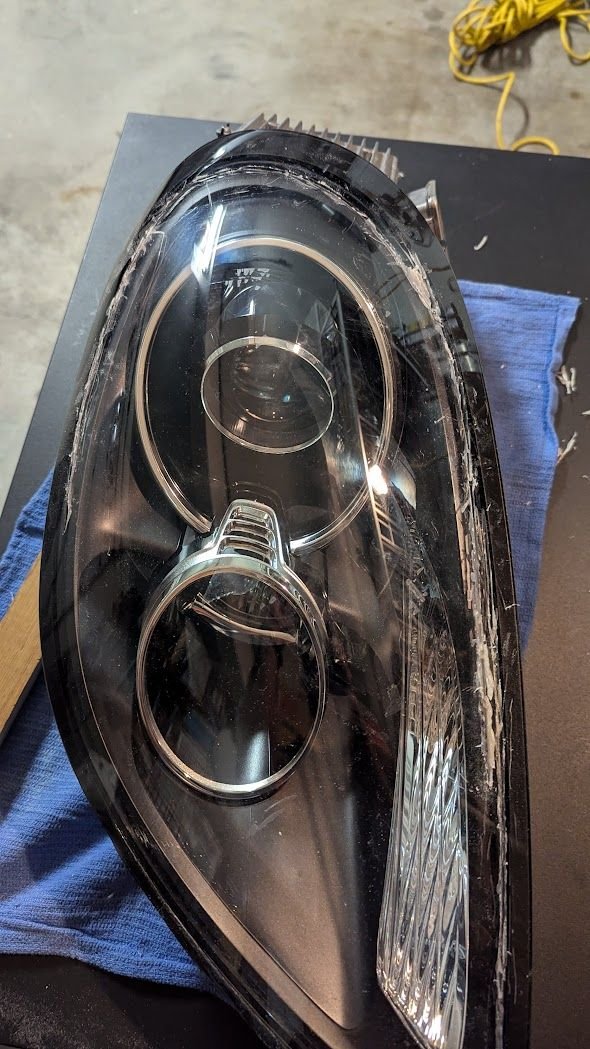
Step 1 - take a look into the lens and you will see the original silicone inside you want to cut on the inside of the rim first, as close as possible. I used Dremel speed 8 most of the time, with a steady hand this is actually quite easy to use. It's just time consuming. I originally came too far inside.
Starting to cut with the Dremel. It makes a LOT of hot plastic, These thick melted bits solidify quickly and can be shaved off with an exacto knife. You want to do this to keep bits from flying at you or scraping your hands against these new formed bits.
I started to cut notches around the entire rim of the lens and then from I pryed off the surrounding housing. That way I could expose the backside of the lens that is sandwiched in between the channel. The screw driver is there to show you how shallow of a cut this is, and a reminder to be very steady with your cutting. By cutting off the outer rim you can safely see the rest of the lens and know where to cut.
A total and mangled mess. The hot plastic forms into opaque white plastic. This is thankfully easy to cut off with a simple exacto knife set. All of that was cleaned up.
Cutting the lens off from the backside so I can later pull the headlight housing off. Note, that the bottom corner was very difficult to cut off. I recommend going from the backside of the housing. Mine has a couple of indents from the hot plastic that rested on it. My Dremel never cut into it but that is visible after competition.
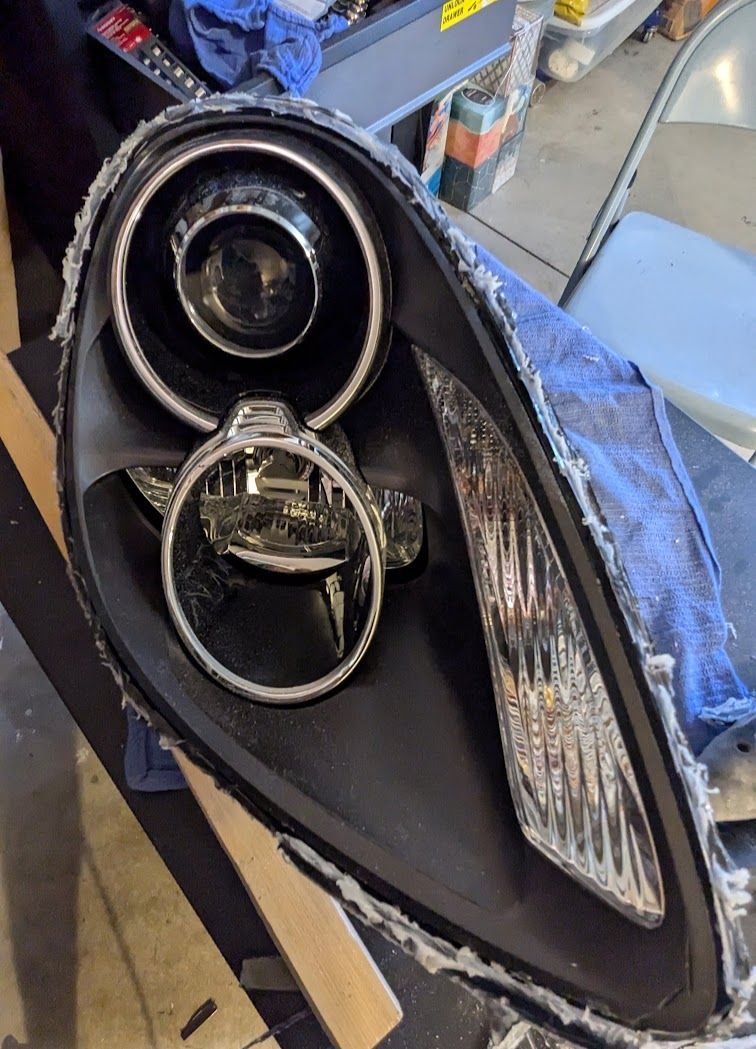
Don't waste too much time until you get here with the exacto knife. This is where you want to start really running the blade inside the channels on both sides. But also to remove the inside housing you will need to cut some old silicone off. The housing has several shallow tabs and a couple larger taps that slot in at the top and the bottom. The housing pulls out straight forward. I recommend removing it and setting it aside until later.
Backside of housing so you can see the tabs.
Side view of main housing.
You will need to remove the turn signal bulb when removing the housing. There is a circular cover next to this bulb, just remove it from the slot. Don't touch this bulb with your hands they are $10 each. Any grease should be wiped off with alcohol and a lint free cloth.
At this point, the inside housing has been removed, and the channel is fully visible. Run your knife around it repeatedly. There will be a TON of silicone. I spent way too much time looking and wondering... don't waste time, just keep going and going and going inside and out. Then use the L pick to pull the silicone out of the channels. Keep going more than you think. More will keep coming, you won't even believe how much is in there and how little will hold that rim in.
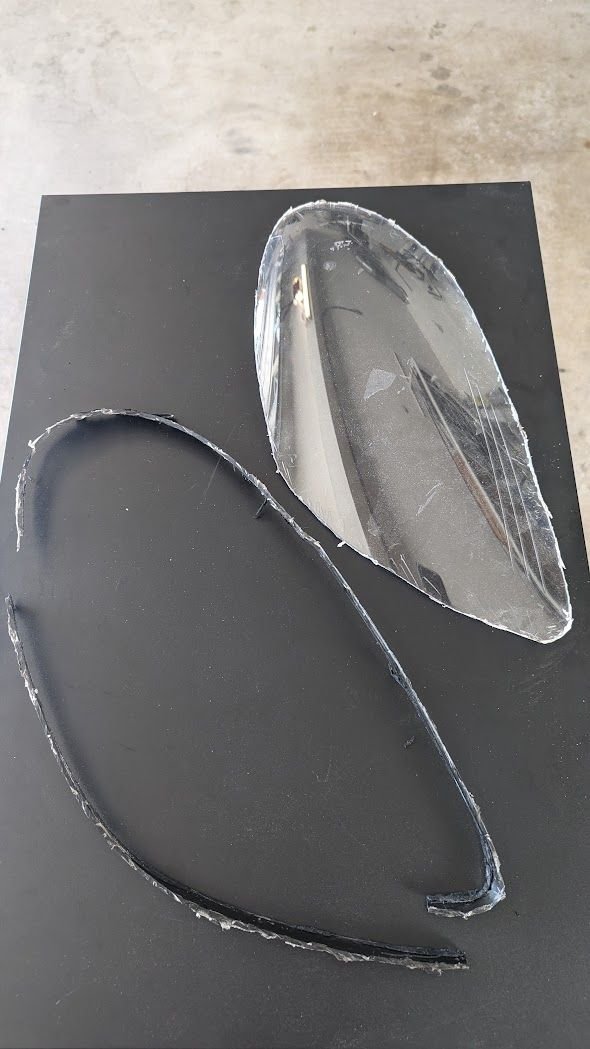
Eventually you can try to pull it with your pliers and see what comes out and for me I got it out in two pieces,
Not pictured - a ton of shredded plastic, bits, dust, debris, a mountain worth dumped in the trash.
Alright now use the exacto knives and your screw drivers to clean the gunk out of the channels. Remove as much as possible. If you think you got it out, you didn't. Spend another ten minutes.
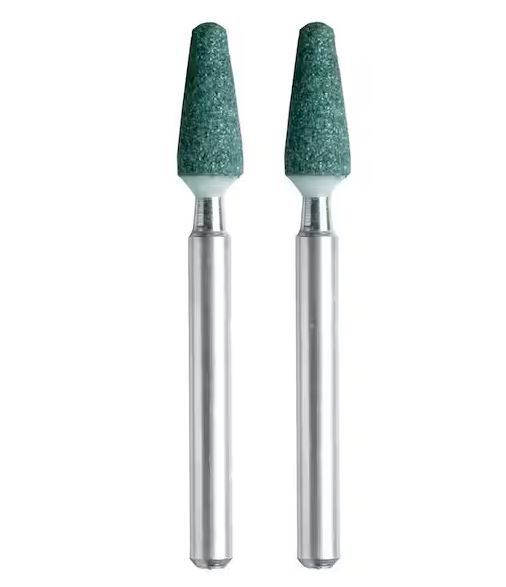
At this point I became very tired and looking through the Dremel kit I found a silicon carbide grinding stone cone. I asked chatgpt if I could use this against plastic and silcione and it said not really, but then I told it the plastic channel was not getting cut or marred by all the metal screw drivers and exacto knives. It said I could use this something like Dremel 408 or 432 fine grain sanding band but that wasn't going to fit in the channel.
So I took the grinding stone cone and tried it against some of the old pieces of plastic and tried to remove the silicone... and it worked very well as long as you can keep control. I made mince meat of all that messy silicone shredded all over. Some of the channeling had very very surface level scuffs but nothing to be concerned about at all whatsoever. If you can use a Dremel to cut the lens you're advanced enough to use this too. Also using the needle nose pliers in the open position and running it through the channel was like using two screw drivers at once to clean it out. This tool was narrow enough to fit within the channel and still leave some space.
At this point the channel was clear enough, flip the headlamp over, shake out all the bits. Use the cordless air duster tool (or compressed air), and blow everything out. Spot check every piece for dust and use a clean microfiber lens cleaner (like for eyeglasses) to clean any dust that won't blow off.
At this point, I tossed the butyl in my oven for 20 minutes at 220 F. While that was heating up, I put the main housing back in as well and test fitted my lens.
Inserted the butyl into the channel in one long rope and added a little extra in the wider areas and put the lens back on.
For all the extra stuff I ordered, here are the links:
Lens Cover: https://www.ebay.com/itm/385560509984
From: us-motorsportltd
The quality is great, it looks EXACTLY as the original lens all over it. I'm glad several others here bought from him and gave good feedback.
Has anyone done the lens replacement over a year ago? I am wondering how these aftermarket covers hold up to UV over time. I have sanded and polished headlights in the past and tried a few different UV topcoats, but they never seem to last very long. The last thing that I want to do is replace the covers on my 981 which look fine from 5 or more feet away with something that in the future is going to turn yellow and look bad from 50 feet away.
We have headlight lenses in use from over 3 years ago and no premature failures.
YMMV depending on the source of the covers as we have seen varying levels of quality but adding PPF goes a long way to adding durability and keeping them looking like new.
-Paolo
__________________
We Renew Cracked, Chipped, Crazed, or Clouded Headlights
1491 Polaris Pkwy. Unit 121
Columbus, OH 43240
email: info@RENNLIGHTS.com www.RENNLIGHTS.com
We have headlight lenses in use from over 3 years ago and no premature failures.
YMMV depending on the source of the covers as we have seen varying levels of quality but adding PPF goes a long way to adding durability and keeping them looking like new.
-Paolo
Do you have a preference on PPF? Since you've been doing so many headlights, what's easy to apply and which do you think is a good one to use overall?
I have been stuck on removing the RTV, fwiw, 50% alchol won't soften it, 90% alcohol won't soften it much, WD40 slightly softens it. I Have been scraping with screw drivers and blades. I am going to try a brass flat wire brush and a nylon one and then a stone grinding tool like above, and some Motsenbocker’s Lift Off Spray silicon remover overnight. Their is so much of this stuff. I plan to clean it, paint the inner dark gray housing I accidentally marred, then use hondabond to seal it for 3 days, then hand sand the uv coating off the new lens then clear coat it with Spray max 2k Clear coat Headlight clear. In my experience automotive clear coat lasts forever, longer than any PPF. As long as you don't use wax on it for 3 months while the clear coat is still off gassing otherwise they will yellow.

 08-03-2024, 11:45 PM