When you click on links to various merchants on this site and make a purchase, this can result in this site earning a commission. Affiliate programs and affiliations include, but are not limited to, the eBay Partner Network.
So, I need a little more guidance on the replacement parts for the Tension Pulley and the Idle Pulley. Specifically, finding the Idle Pulley by itself, or can the Tension Pulley be used for both?
I would prefer to NOT spend $100 to $130 for an assembly and just use the Pulley off of it....
The Tension Pulley and Idler Pulley are different in sizes.
I just double checked in the garage with my old parts still laying on the bench.
They look alike; but, the width is off by 3-4 mm.
The bearings are slightly different also.
So, they are not interchangeable.
Yes. I bought the Idler pulley assembly for $120. I agree, it is painful.
Particularly when you pull the pulley off the new part and throw the metal in the recycling ben.
As mentioned earlier, BOTH of the old pulleys looked and felt great.
They did not needed to be changed at 60,000 miles.
Thus, most just change the serpentine belt.
You can at least change the tensioner pulley and the serpentine belt.
I bit the bullet and changed both pulleys and serpentine belt.
I got your PM. Just wanted to answer on the board so others can learn.
One more question...... To remove the carpet to access the front engine cover, which plastic trim pieces did you remove? The Manual says the Side Trim around the Seat Belts mechanism, then the full side trim to the floor, then the top "Grab Bar"....... how much is really necessary?
@981KMAN the aluminum cross member bar will need to be removed as that'll allow you to remove the carpeted area. The carpeted part has holes in it that the aluminum cross member bar goes over.
Yes, the trim around each seatbelt is a pain.
For me, it was the worse part of this job.
I used plastic trim tools to work the edges.
Then pull up, forward, and towards the midline of the car. To the PDK shifter.
Then slide each individual trim down each seat belt.
Pay attention to all the little "clip fittings'' under the trim.
You do NOT need to remove the Full Side Trim to the Floor.
Then move to the Center "Grab Bar'' bolts.
Then the "Grab Bar" trim. Lifts out.
Then wrestle the "front engine cover, sound deadening, carpet thingy" out.
I completed the Drive Belt replacement on my 2015 Cayman today. Also replaced the Pulleys on the Tensioner and the Idler.
I wanted to say thanks to everyone on this message thread that provided great input and guidance. Here is what I learned, did right, and did wrong.....
Short recap;
Removed plastic Trim around Seatbelts (Pops up from the back first)
Removed Carpet /Sound Deadening - Just pulls out & off.
Removed Access Cover (10mm Bolts and Nuts)
Removed Engine Mount Bolt and Spacer (used Tie-wrap method to control) (Small hands would be best to do this)!
Removed Original Belt. I got it wedged between the Crankshaft Pulley and the metal shroud. So I had to cut it to remove.
Replaced Idler (Deflection) Pulley. Had to purchase whole assembly, yet just used the Pulley.
Replaced Tension Pulley - Had issues with this, explained below.
Installed new Belt - Went on very easy.
Started Car - all looked good
Replaced all covers and trim in reverse order.
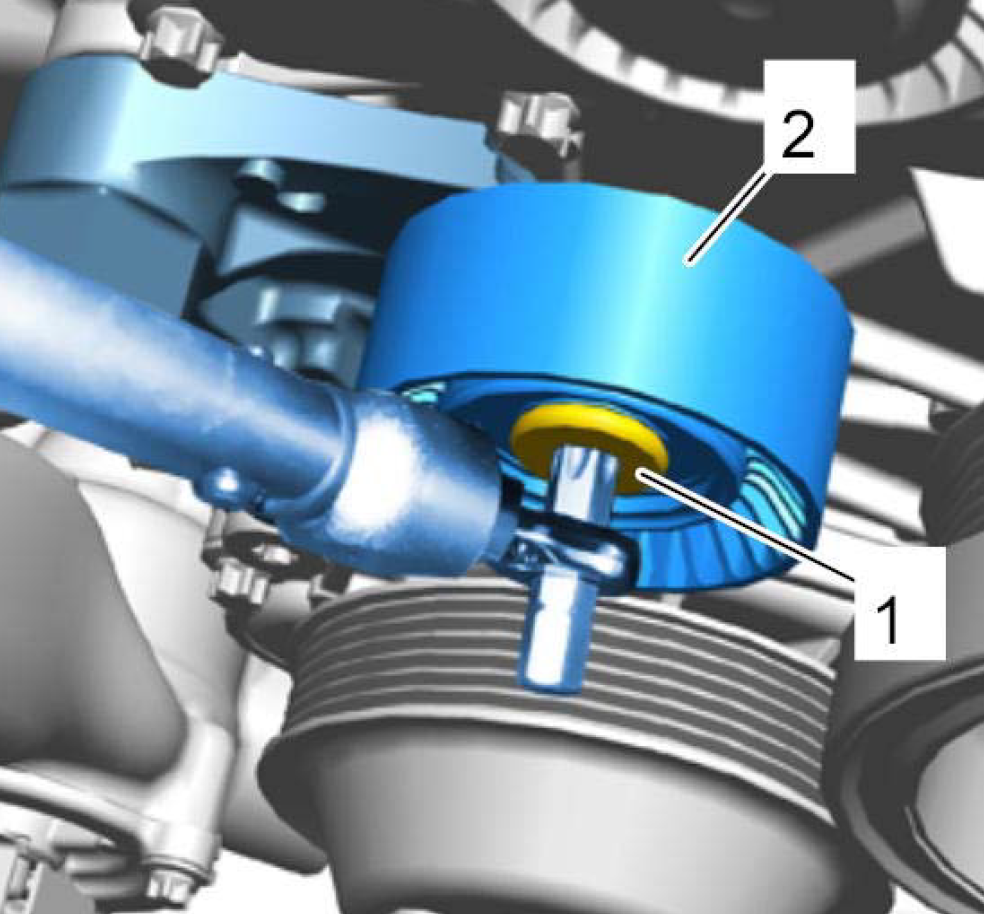
So what did I do wrong..... My only issue was with the replacement of the Tension Pulley. The space available is small and does not allow for a ratchet wrench with a socket Torx Bit. So I used the Socket Bit and placed an small adjustable wrench on the Bit section. This worked, yet I dropped the Bit while tightening the screw (crap ). 2 hours later, after jacking up the car and removing the bottom shield, then searching around awhile, I found the bit. . I could not use a Torque wrench on the screw, so I had to use my "Calibrated Hand" to tighten the Tension Pulley Screw, based on what I felt when tightening the Idler Pulley Screw with my Torque wrench. The tools as shown in the Service Manual is what should be used.... lesson for next time.
Plain Torx Bit and a Box Wrench that fits the Bit. The picture shows more room then what's really there.
My car has ~82K miles, so the replacement of the Drive Belt was late. However the old belt looked in very good condition, with the rubber soft and flexible. The bearings on the 2 Pulleys I replaced also seemed in good shape, yet they had ~82K miles of wear and I was in there.... so they were replaced. I'm not sure why Porsche has this item Replaced at 60K miles based on the good condition of my Drive Belt at 82K miles?
The entire job took me 4.5 hours, including the 2 hour delay finding the Torx Socket Bit that I dropped. I should be set for another 60 - 80K miles!
Thanks again to everyone for some great information!!!
Along with a long list of other maintenance just completed on my car, I replaced the drive belt. I found the tools in the photo below to be worth the money spent.
The 16mm S-bend box wrench came in a set from Harbor Freight. Their Icon line of tools are of surprisingly high quality and a great value. The Icon tools are made in Taiwan.
I didn't use the Craftsman box-end wrench. Only showing it side-by-side to show how thin the box end is on the Icon wrench compared to the Craftsman. This is crucial for working on the bolts that attach the motor mount to the front of the engine. I also installed a Function First front motor mount bushing so had to remove the entire motor mount bracket from the front of the engine. I'm not sure I would have been able to do the job without this Icon wrench. The other short Torx bits are very useful for working on the tensioning roller and bracket. The low profile 3/8" ratchet combines with these short Torx bits to fit in some tight areas.
Nice find on the 16mm S shaped wrench. I also did the FF1 engine mount insert and had to heat and bend a sacrificial cheap box wrench to remove the upper right bolt on the engine mount.
Jim
Along with a long list of other maintenance just completed on my car, I replaced the drive belt. I found the tools in the photo below to be worth the money spent.
The 16mm S-bend box wrench came in a set from Harbor Freight. Their Icon line of tools are of surprisingly high quality and a great value. The Icon tools are made in Taiwan.
I didn't use the Craftsman box-end wrench. Only showing it side-by-side to show how thin the box end is on the Icon wrench compared to the Craftsman. This is crucial for working on the bolts that attach the motor mount to the front of the engine. I also installed a Function First front motor mount bushing so had to remove the entire motor mount bracket from the front of the engine. I'm not sure I would have been able to do the job without this Icon wrench. The other short Torx bits are very useful for working on the tensioning roller and bracket. The low profile 3/8" ratchet combines with these short Torx bits to fit in some tight areas.
To install the Function First front motor mount bushing, did you need to drain coolant/ disconnect hoses?
To install the Function First front motor mount bushing, did you need to drain coolant/ disconnect hoses?
I will be interested in Okie's reply but I drained the coolant and disconnected the two radiator hoses to provide room to remove the engine mount and fit the FF1 insert. I saw no way to remove the mount without disconnecting the two hoses. My understanding is that on the earlier 986/987 cars the engine mount could be removed without draining the coolant.
Jim
To install the Function First front motor mount bushing, did you need to drain coolant/ disconnect hoses?
Originally Posted by Jim981CS
I will be interested in Okie's reply but I drained the coolant and disconnected the two radiator hoses to provide room to remove the engine mount and fit the FF1 insert. I saw no way to remove the mount without disconnecting the two hoses. My understanding is that on the earlier 986/987 cars the engine mount could be removed without draining the coolant.
Jim
Correct, there is no way to do the FF1 motor mount installation without getting those two coolant hoses out of the way.
FWIW, I took very careful measurements with the coolant drained and refilled, and after purging the air from the system using the workshop manual method I only needed to add about 10 oz of coolant to top it off. I used the Airlift vacuum tool to refill the coolant. I was able to get an indicated 27 in Hg of vacuum as indicated on the Airlift gage before I turned the valve to start the fill process. I put the fresh coolant on my Boxster's rear fender on some thick padding to protect the paint and bodywork. The bottom of the 5 gallon bucket sits about a foot above the top of the coolant reservoir using this approach. I have exact numbers of coolant drained and refilled if anyone's interested.
Last edited by okie981; 06-16-2022 at 02:08 PM.
Reason: typo
Nice find on the 16mm S shaped wrench. I also did the FF1 engine mount insert and had to heat and bend a sacrificial cheap box wrench to remove the upper right bolt on the engine mount.
Jim
Yep, that upper-right (driver's side) bolt is a real bitch. But with this s-bend wrench it's possible to get 90 degree turns of the bolt with each wrenching iteration for most of the bolt driving process. For a portion that reduces down to 45 degrees per iteration. I found that leaving the engine lowered about 35mm (measured at the motor mount area) it was easier to get this bolt out and in. The engine can be raised up for the remainder of the process.
Correct, there is no way to do the FF1 motor mount installation without getting those two coolant hoses out of the way.
FWIW, I took very careful measurements with the coolant drained and refilled, and after purging the air from the system using the workshop manual method I only needed to add about 10 oz of coolant to top it off. I used the Airlift vacuum tool to refill the coolant. I was able to get an indicated 27 in Hg of vacuum as indicated on the Airlift gage before I turned the valve to start the fill process. I put the fresh coolant on my Boxster's rear fender on some thick padding to protect the paint and bodywork. The bottom of the 5 gallon bucket sits about a foot above the top of the coolant reservoir using this approach. I have exact numbers of coolant drained and refilled if anyone's interested.
^^^This.
I also used the Airlift and pulled 25 in of vacuum with the same 5 gallon bucket procedure and also only added a small amount of coolant to top it off. I also used the same procedure when I added the center radiator. I left the engine cover loose for several heat/cool cycles including some with the bleeder valve on the reservoir tank in the open position to make sure I had a complete bleed before I buttoned everything up.
Jim

 10-19-2021, 03:11 PM


 ). 2 hours later, after jacking up the car and removing the bottom shield, then searching around awhile, I found the bit.
  . I could not use a Torque wrench on the screw, so I had to use my "Calibrated Hand" to tighten the Tension Pulley Screw, based on what I felt when tightening the Idler Pulley Screw with my Torque wrench. The tools as shown in the Service Manual is what should be used.... lesson for next time.