When you click on links to various merchants on this site and make a purchase, this can result in this site earning a commission. Affiliate programs and affiliations include, but are not limited to, the eBay Partner Network.
My next "first time" DIY project (drive belt replacement 981) is around the corner and unfortunately I couldn't find many detailed information about it on the internet. There are few brief videos and descriptions but none of the Videos shows the entire procedure. I was wondering if someone can give me some more details on some of the steps:
- There are lots of discussions about getting out the spacer after the engine mount bolt is removed. It is not very clear how that is done. Some say you have to screw it before to tap it out and some say just tap it out. My question is: If you remove the bolt, is the spacer more or less stuck in between and you can tap it out? I am aware of the fact, the it is pretty risky step and this thing can fall in the black hole but there are some good tips how to avoid this. My main concern is how to get the spacer lose and out.
- How to tension the new belt? I know there is a tensioner, but how far do you tension the new belt and how far do you turn the tensioner?
- When you put the bolt back, what are the torque specifications for this bolt? The only information I could find was on a german forum and they recommended 50nm(37ftlb), is that correct?
It appears there is not much experience with this topic on the 981. I am just going to go for it and try to shoot a video. The most difficult part seem to be to get the spacer out without loosing it and placing the new belt. From the few report I could find on the internet, it seem not that difficult. Will report back soon.
- How to tension the new belt? how far do you tension the new belt and how far do you turn the tensioner?
All the tensioners I've worked on (and the one in the 987 video) were spring loaded so they automatically set the tension correctly.
Use the wrench to squeeze the spring and loosen everything up so you can remove and install the serp belt.
Installing the new belt usually involves looping it over the pulleys and wheels in a particular sequence. Not rocket science and should become obvious after a failed attempt or two.
Are you just going to replace the serp belt?
I plan to replace everything .. pulleys, waterpump and the serp belt.
This should be an easy DIY. Just a tight working space.
The best video I've seen is from SummitLife for a 987.. fingers crossed it's not too different. https://youtu.be/8mL0na2nlaA
- How to tension the new belt? how far do you tension the new belt and how far do you turn the tensioner?
All the tensioners I've worked on (and the one in the 987 video) were spring loaded so they automatically set the tension correctly.
Use the wrench to squeeze the spring and loosen everything up so you can remove and install the serp belt.
Installing the new belt usually involves looping it over the pulleys and wheels in a particular sequence. Not rocket science and should become obvious after a failed attempt or two.
Are you just going to replace the serp belt?
I plan to replace everything .. pulleys, waterpump and the serp belt.
This should be an easy DIY. Just a tight working space.
Thank you my friend, appreciate it! For now I think I am going to do the belt only and for the next round will do everything else too. The Video you sent is legit and was already helpful for me to get an idea with the belt and the tensioner.
I am using the following videos and threads to prepare:
I think one of the main differences between the 981 and the earlier models is, that for 981 you have to remove the engine mount bolt and the spacer to sneak the belt in and out. That seem to be the most "difficult" part of the entire procedure. There are some torque recommendation for the bolt but I am not sure I can sneak a torque wrench with socket in this tight area, so I might just use an ordinary wrench and just snug tighten it.
My Dad will be there, so hope we can get a decent Video.
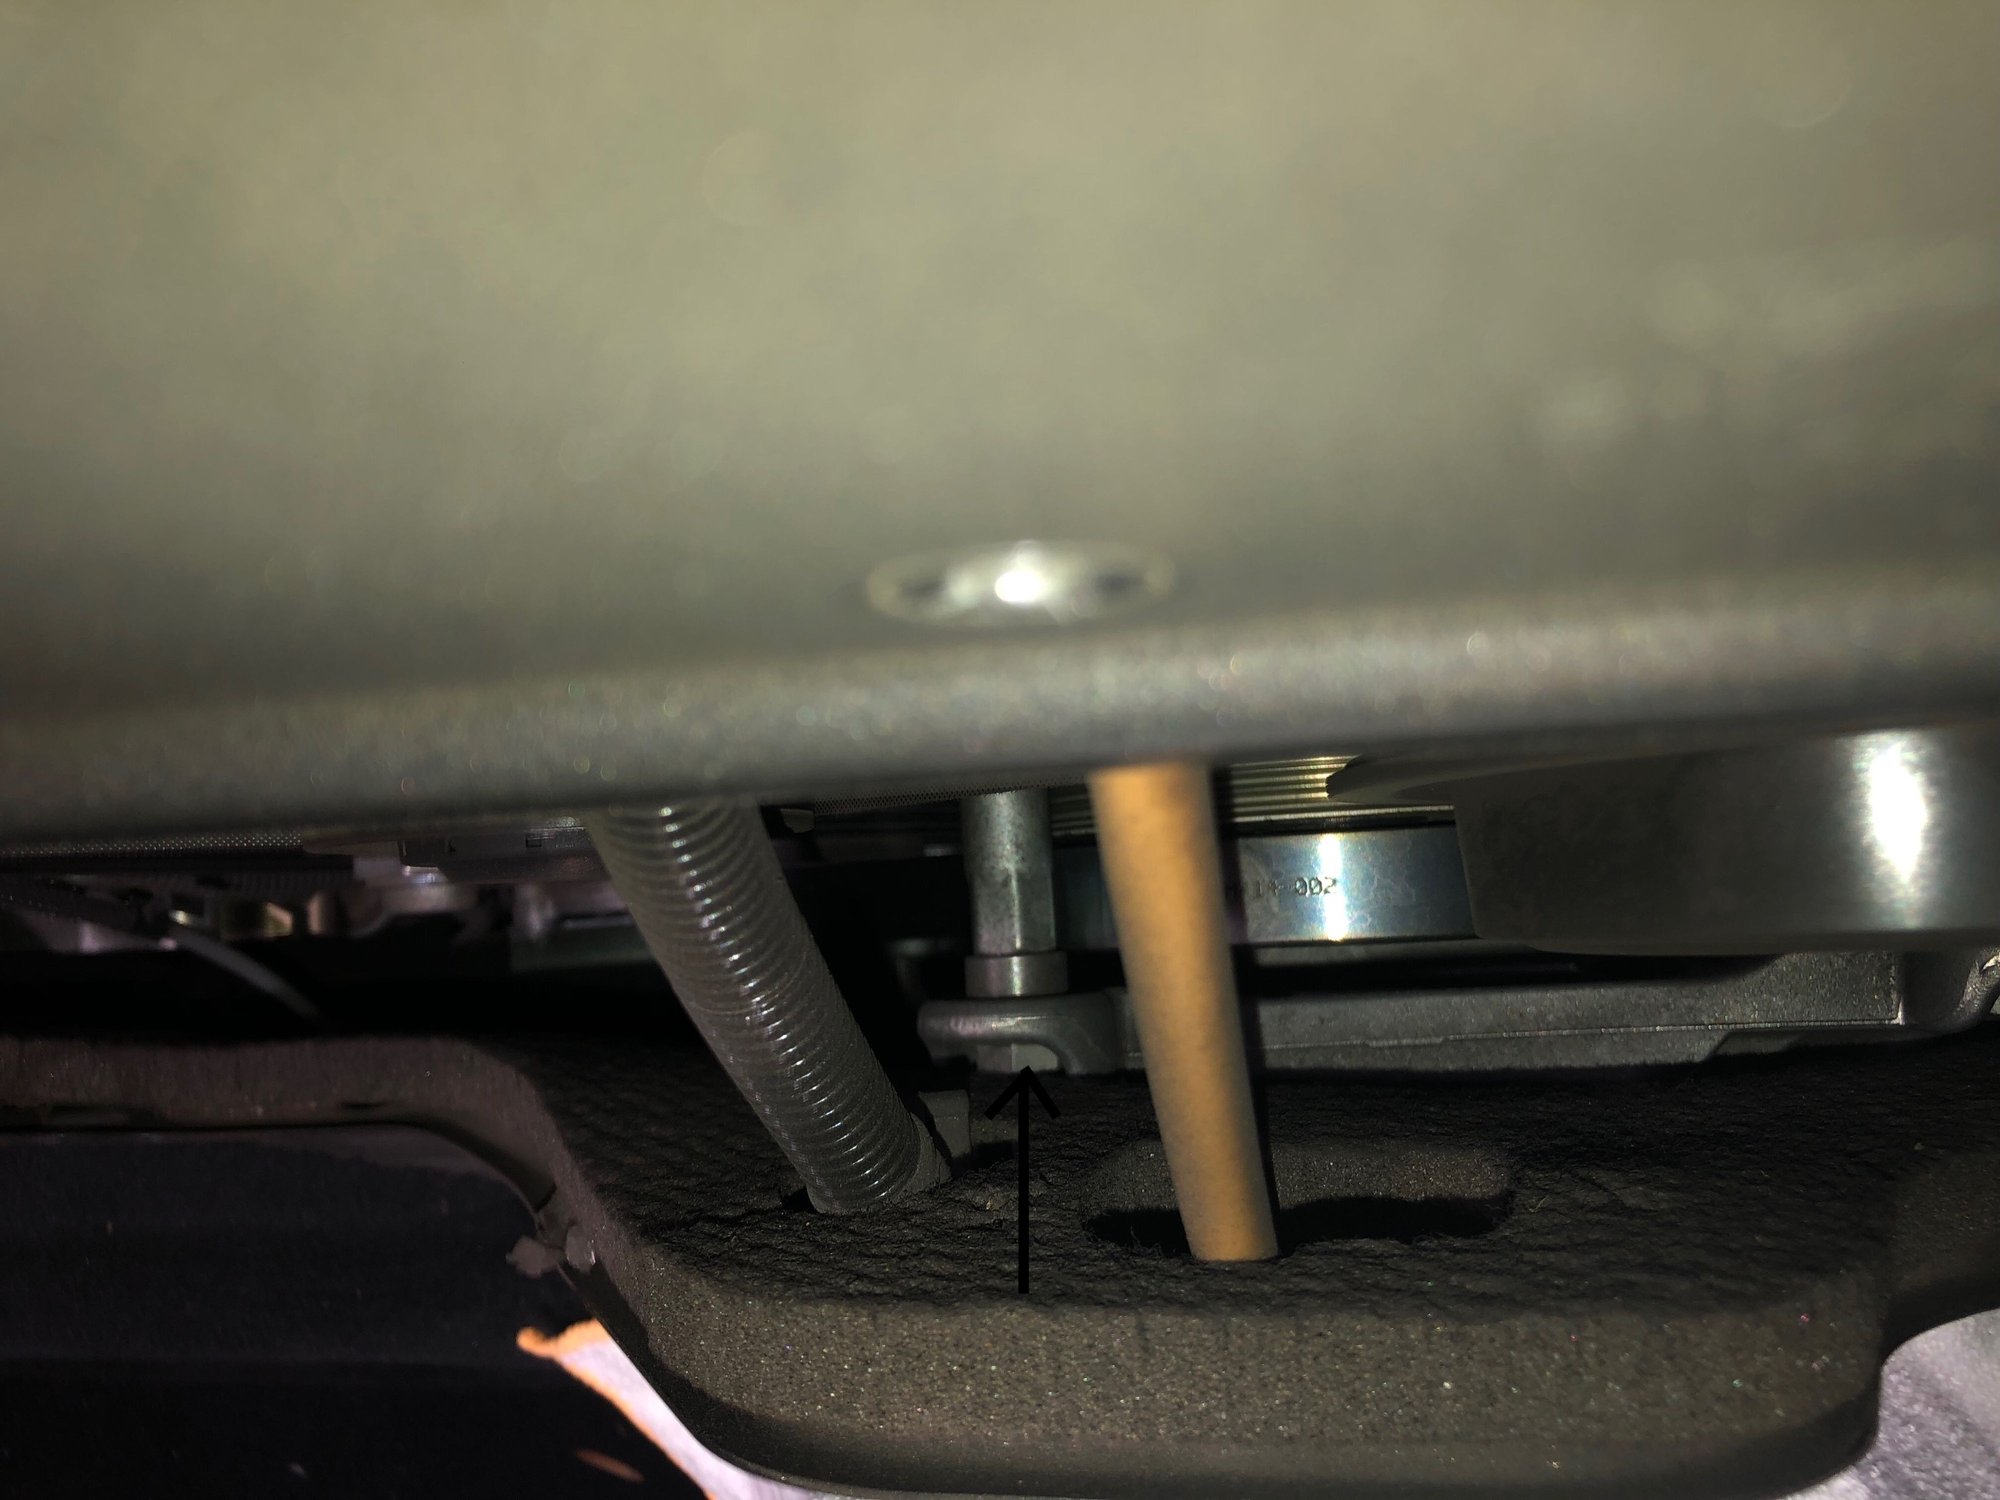
I actually wanted to start with the job next week where I have more time but wanted to have a look into the area and just removed the carpet and opened the engine cover. It was super easy and straight forward. Few observations thus far:
- As @CaymanCrush already mentioned, the tensioner is spring loaded, I tested it using a 30mm wrench.
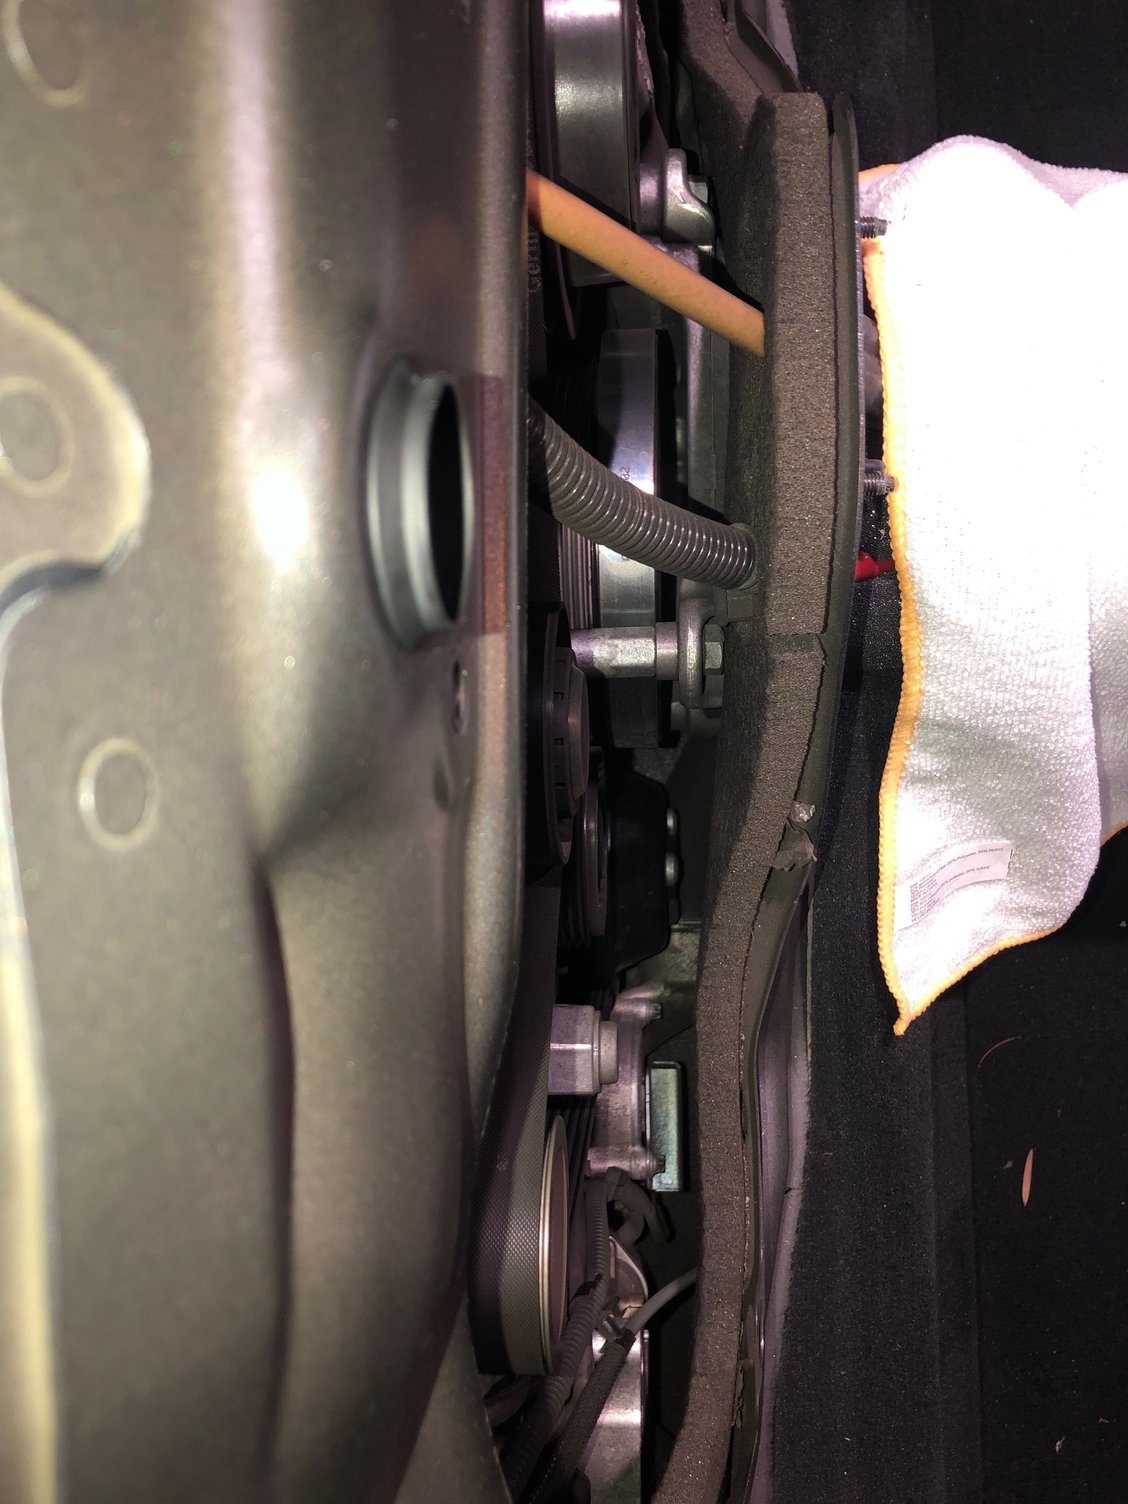
- The area around the engine mount bolt is super tight. I still need to get a 16mm wrench, but I am not sure if I can fit and use it in that area (see below)
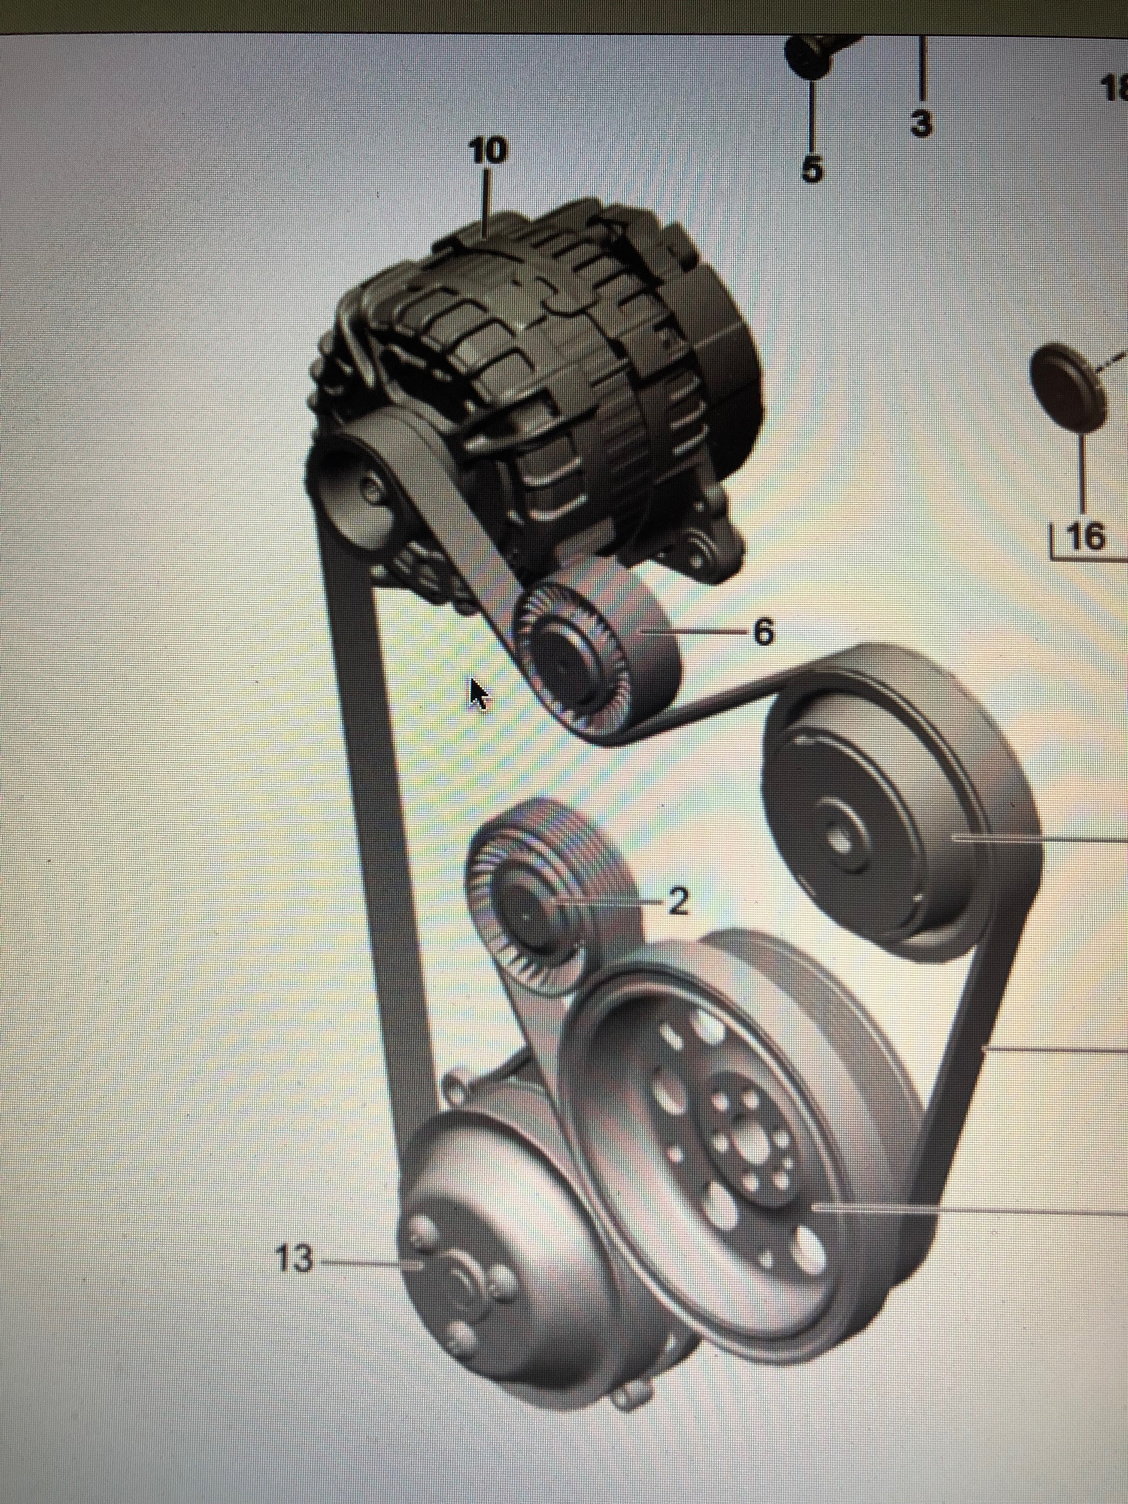
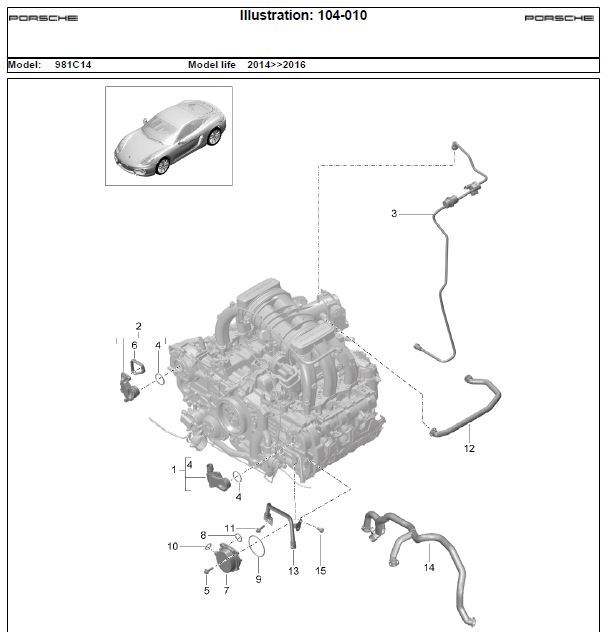
Once the bolt and spacer are out, the entire job seem to be not that difficult. For overview, find below the belt diagram.
Will report more next week.
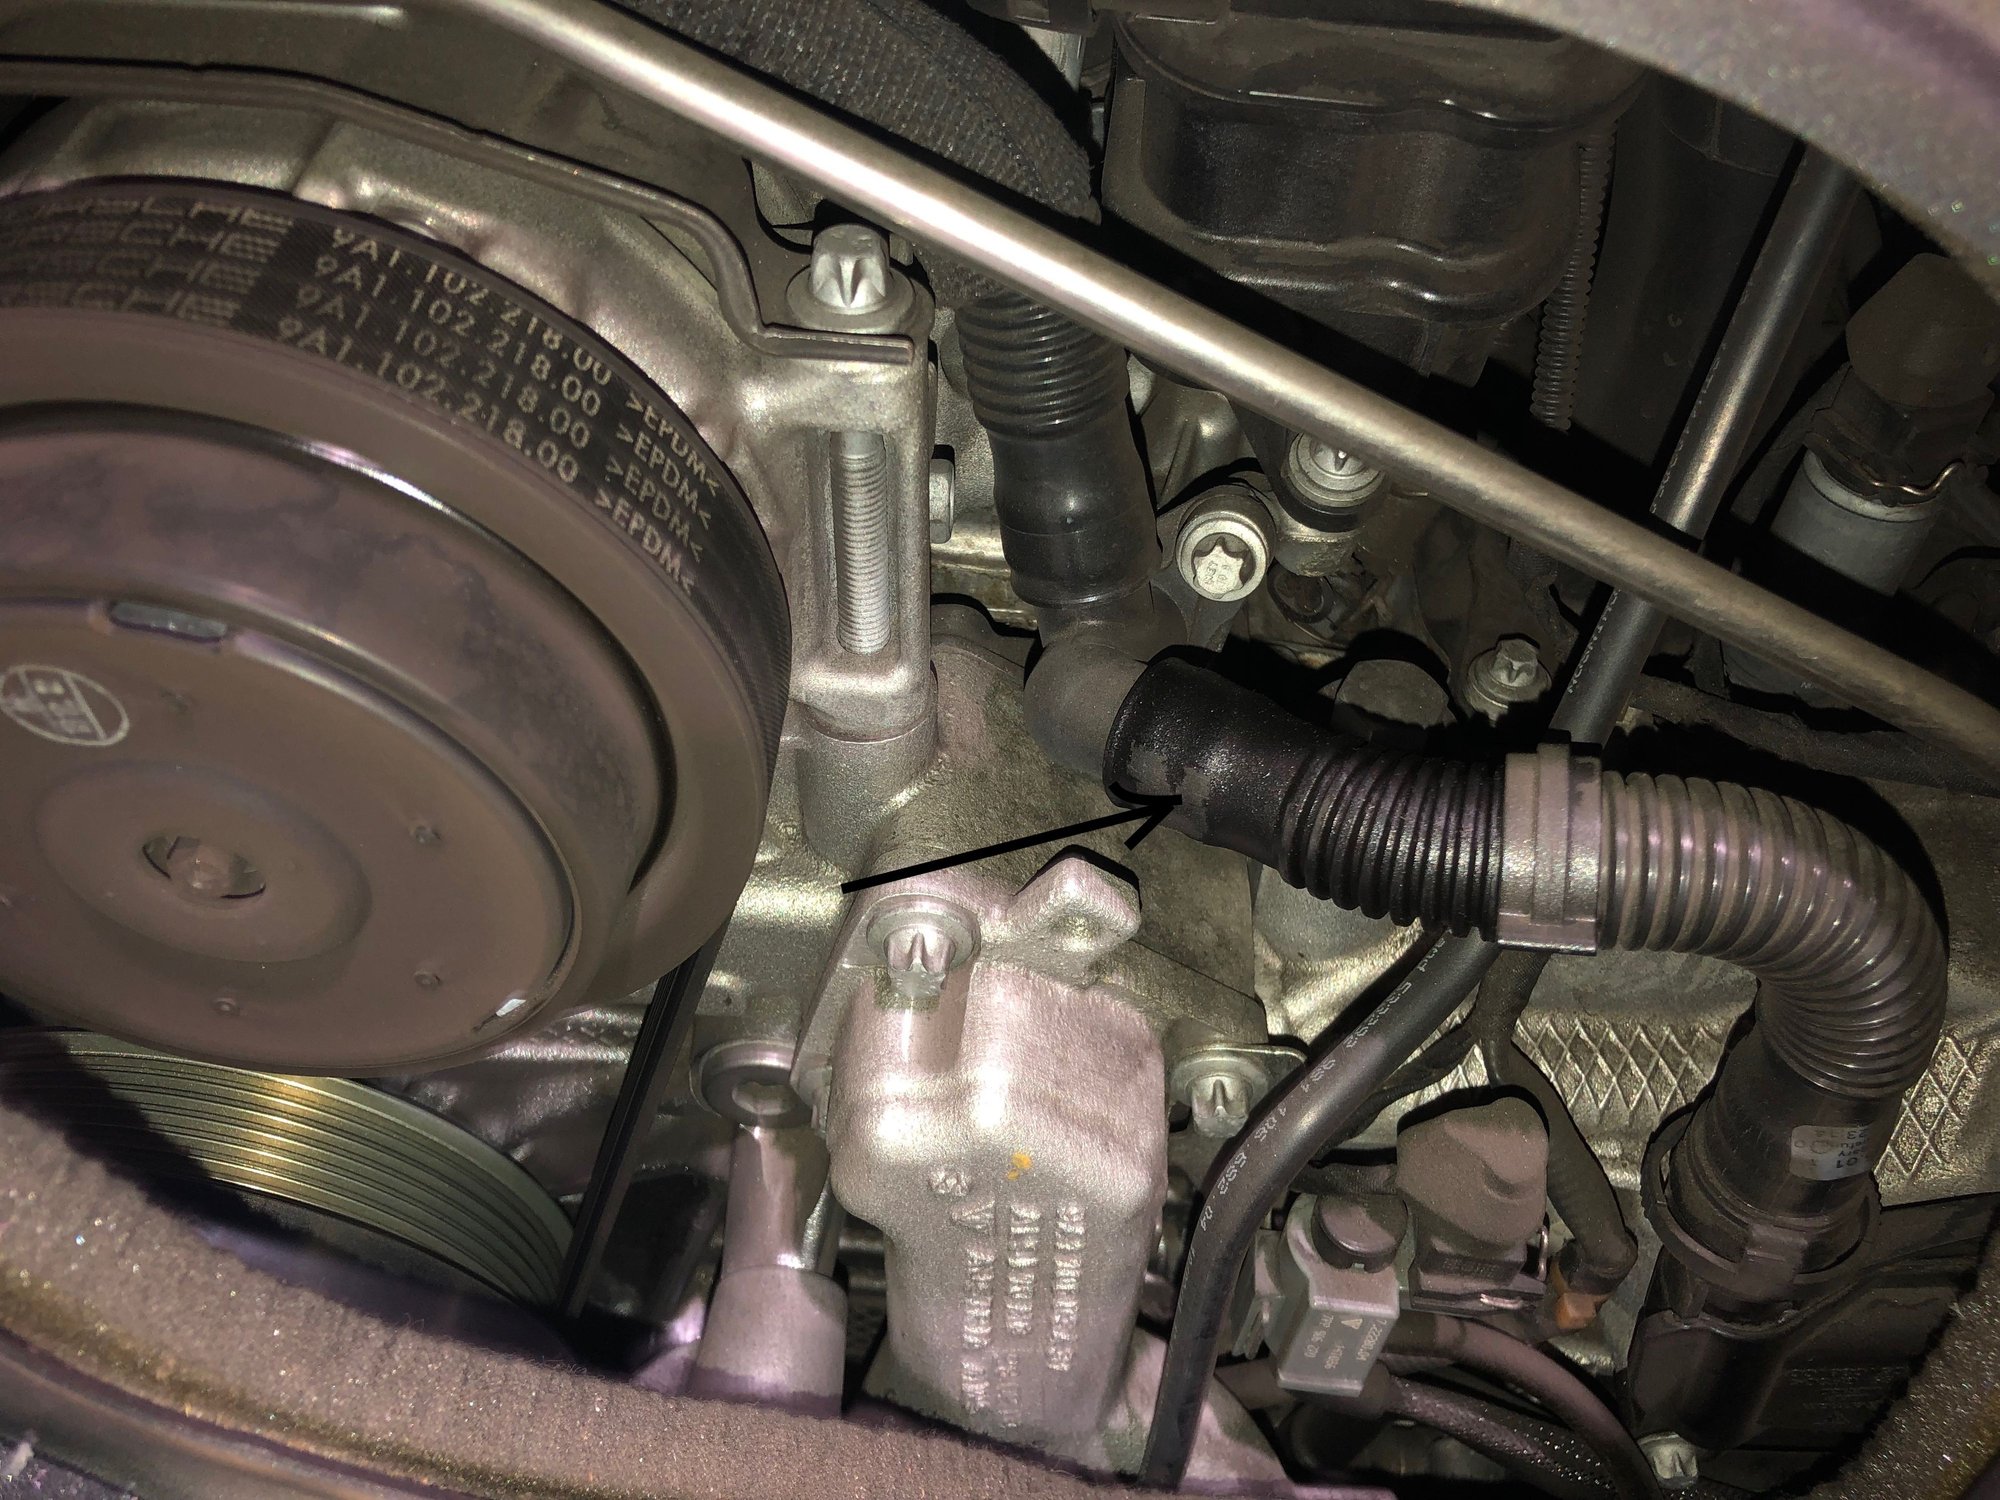
PS: I noticed the end of one of the hoses is wet/oily, any idea what hose this is and if it is normal (see below)
I've done the belt change once. The spacer part of the job is awkward and the most difficult part of the job. My biggest worry was dropping the spacer or bolt, which would make for a lot of unnecessary work retrieving it. So my suggestion from experience is to get some rags and carefully tuck/line the area under the spacer and where the bolt pulls out so if you drop the spacer or bolt it won't go far. Then use a needle-nose vice-grip on the spacer and a magnet on a stick and stick it to the bolt as you work. The spacer (for me) stayed pinched in it's location after the bolt was removed so I had to pry a bit to release it.
It feels like the job will take forever because of the access, but if you stay patient it goes quicker than you would think.
I had to torque by feel because of the limited access, and don't forget to remove the rags when you are finished.
Thank you for the tips. I bought two magnet sticks and am planning to put some cloth underneath. Plan to put the magnet stick on one side and hit the spacer from the other side against the magnet stick. The magnet is pretty strong, so hope the spacer won't fall down.
I would have completed the job yesterday but realized that I did a rookie mistake and didn't check for the 16mm wrench in my toolbox to remove the bolt. It is interesting that in 3 wrench sets the 16mm one is missing, but I have the 30mm one I agree with you and anticipate the bolt/spacer part as the most difficult part of the job.
Do you know what the hose in the image above is? The hose is sweating and oily at on end (as shown in the image). The part number is 9a1.107.515.01 it seem that there is replacement item nr for it, I can not find much under this part number.
I would have completed the job yesterday but realized that I did a rookie mistake and didn't check for the 16mm wrench in my toolbox to remove the bolt. It is interesting that in 3 wrench sets the 16mm one is missing thanks
Do you know what the hose in the image above is? The hose is sweating and oily at on end (as shown in the image). The part number is 9a1.107.515.01 it seem that there is replacement item nr for it, I can not find much under this part number.
thanks
You can download a .pdf of the parts catalog from the Porsche website. That part number is shown as a crankcase breather line (#14).
It should be dry so I'm guessing it's become a little loose over time and heat cycles since it's plastic. I'd just wipe it down for now as that's probably just a few drops seeping out...doesn't take much for oil to wick all over the place.
Definitely seems like the 981 access is less than the 987.
This is definitely something my Indy has to take care of. I already ordered the part and called my Indy and he told me it is doable without taking out the engine. As mentioned in the other thread, it is not only a small piece of hose, it is an entire unit (Nr. 14 in your diagram) which has to be replaced. I have an appointment soon to have my indy to take care of it. What a PIA, thank you Porsche for using quality parts so that we have lots of fun figuring out how to replace them!!!!
WTF!!! Everyone warns about taking care of the spacer, and guess what: I took care of it and had a rag under and a strong magnetic stick on the other side, so the spacer was saved!
But the freaking bolt: First of all it took for ever to get it loose and as I put the tie wrap around it, it was not tight enough and this damn thing fell into the black hole under the engine. I have two magnetic stick and tried to find the bolt for over an hour but no chance (any idea where these things fall into?) So we broke up mission impossible for today and I ordered one of the endoscopic cameras for my phone and will try it again in 1 or 2 days.
Couple of tips so far:
1. The bolt takes for ever to get loose but when it is loose, it is loose and it will immediately fall down when the tie wrap is not tight enough --> Make sure that you wrap it around the bolt as tight as possible and to be on the safe side hold the magnet next to it, so that you don't end up where I am now.
2. To work on the bolt, you can only work from the passenger side. I did a mistake and worked on the spacer from the passanger side as well. When you have a rug under, you tend to hit the spacer to the other (driver)side and down. On the other side, there is one of the pulleys and because the rag covers it you might hit the spacer between the pulley and part of the body. This is exactly what happened to me and it took some effort to hit it out of this space between the pulley and the body. When you want to hit out the spacer, go to the driver side and hit it to towards the passenger side. There is nothing on the passenger side and the spacer should come out pretty easily, but again don't forget the magnet on the other side and the rag underneath.
3. Once the spacer is out, use the 30mm wrench to loosen the tensioner and take the belt off one of the upper pulleys. Getting the belt out is quite a fight, just make sure not to put to much force while pulling which might damage the pulleys. I think using a ruler helped a little and the fact that there was two of us was helpful too. Retrospectively I should have taken a scissors and cut that thing, would have saved me lots of time and I would have put much less stress on the pulleys. Next time I will definitely cut it and pull it out.
4. Inspect your Belt before hand. My old belt looked almost better/newer than the new Belt. I know my fellow german friends from Stuttgart have a very high safety tolerance with there replacement recommendations, but I think this belt would have worked for another 60k miles. I just did this job because: 1. I had already bought the belt, 2. Everything was already open and 3. Just for the kick of it
Next step is to find the bolt and put the new belt on. From all the reports I have seen, putting the belt on is less complicated than removing it. So I hope it is true and once I find the bolt everything is straight forward.
Thus far moral of the story: What ever job you do on your porsche, never loose the respect. I was pretty cocky and thought that this is a piece of cake. I even put my timer on and thought that this job can be done in less than 30 min....Hmm, we all know what happened!!
Anyway stay tuned, next episode will follow on Thursday.
Update: Finally found that SOB, was hiding just few inches below the area it fell down from. Will finish the job tomorrow. Sorry for all my swearing, at the end of the day it is all fun stuff
Great post and lots of good tips there. Good luck on the remainder of the project and looking forward to your report. Also, hope that breather 'hose' replacement goes easily.
WTF!!! Everyone warns about taking care of the spacer, and guess what: I took care of it and had a rag under and a strong magnetic stick on the other side, so the spacer was saved!
But the freaking bolt: First of all it took for ever to get it loose and as I put the tie wrap around it, it was not tight enough and this damn thing fell into the black hole under the engine. I have two magnetic stick and tried to find the bolt for over an hour but no chance (any idea where these things fall into?) So we broke up mission impossible for today and I ordered one of the endoscopic cameras for my phone and will try it again in 1 or 2 days.
Couple of tips so far:
1. The bolt takes for ever to get loose but when it is loose, it is loose and it will immediately fall down when the tie wrap is not tight enough --> Make sure that you wrap it around the bolt as tight as possible and to be on the safe side hold the magnet next to it, so that you don't end up where I am now.
2. To work on the bolt, you can only work from the passenger side. I did a mistake and worked on the spacer from the passanger side as well. When you have a rug under, you tend to hit the spacer to the other (driver)side and down. On the other side, there is one of the pulleys and because the rag covers it you might hit the spacer between the pulley and part of the body. This is exactly what happened to me and it took some effort to hit it out of this space between the pulley and the body. When you want to hit out the spacer, go to the driver side and hit it to towards the passenger side. There is nothing on the passenger side and the spacer should come out pretty easily, but again don't forget the magnet on the other side and the rag underneath.
3. Once the spacer is out, use the 30mm wrench to loosen the tensioner and take the belt off one of the upper pulleys. Getting the belt out is quite a fight, just make sure not to put to much force while pulling which might damage the pulleys. I think using a ruler helped a little and the fact that there was two of us was helpful too. Retrospectively I should have taken a scissors and cut that thing, would have saved me lots of time and I would have put much less stress on the pulleys. Next time I will definitely cut it and pull it out.
4. Inspect your Belt before hand. My old belt looked almost better/newer than the new Belt. I know my fellow german friends from Stuttgart have a very high safety tolerance with there replacement recommendations, but I think this belt would have worked for another 60k miles. I just did this job because: 1. I had already bought the belt, 2. Everything was already open and 3. Just for the kick of it
Next step is to find the bolt and put the new belt on. From all the reports I have seen, putting the belt on is less complicated than removing it. So I hope it is true and once I find the bolt everything is straight forward.
Thus far moral of the story: What ever job you do on your porsche, never loose the respect. I was pretty cocky and thought that this is a piece of cake. I even put my timer on and thought that this job can be done in less than 30 min....Hmm, we all know what happened!!
Anyway stay tuned, next episode will follow on Thursday.
Update: Finally found that SOB, was hiding just few inches below the area it fell down from. Will finish the job tomorrow. Sorry for all my swearing, at the end of the day it is all fun stuff
Well, I did try to warn you about the bolt (as well as the spacer). It takes some serious dexterity to maneuver the bolt in and out. You needed to stuff more rags back in the area where the bolt retreats to.
I didn't find removing the belt any more difficult than installing it. As I stated, it takes patience to do this project, and then yes, it does go along surprisingly well. Maybe you set yourself up for problems when you put yourself on a timer. Trying to do in in an expected time frame adds pressure to perform. Good luck with the rest of the job. Looks like you have it pretty much licked now!
Fingers firmly crossed you find and retrieve that bolt.
When you do..
Thank you! I found it last night and updated my post. It was such a pain, I even jacked up the car on one side hoping it would slide to the other side and I could get an idea where it is. At the end, it was hiding just few inches below its fixation point and I could grab it with my fingers.

 09-26-2019, 01:55 AM