
Aw what the heck! Fan'ectomy
 08-12-2012, 05:33 PM
#1
Rennlist Member
Thread Starter
Join Date: Apr 2005
Location: Houston, TX
Posts: 372
Likes: 0
Received 0 Likes
on
0 Posts
Preamble:
This AM I was so upset with the Targa I put an add up for sale here on RList. Unfortunately it violated a rule since I'm no longer a paid-up member (oops) so ok add comes down; no biggie. So after backing the car into the garage I said to myself just pull the darn fans. Even if I do get a buyer that has to be fixed by me or them, so I'll give it a shot. You see one of the things causing me to want to part with the Targa is the poor A/C. In my car I believe the issue to be primarily the front two HVAC fans since I know one is darn near dead, and the other squeaks.
I have pulled the fan motors and for those of you thinking it's too big a job I say - turns out it's not. A little bit of finness is required at triggering the plastic fan clips so I've put good photos of them in this diatribe.
Start to Fans Extracted: 90mins.
1. Battery disconnected [13mm wrench]
2. Fuse block pulled up from mount point [philips screw driver & bungee]
3. Fan resister pack unmounted from firewall [10mm bolts top center of firewall]
4. Gas tank strap removed. 13mm socket
5. Fill and vent hoses loosened
6. Gas tank pivoted forward a couple inches
7. Firewall 8mm (head size) bolts removed L & R side
8. ABS sensors unplugged and pulled clear of FW
9. Firewall lifted up out of the way
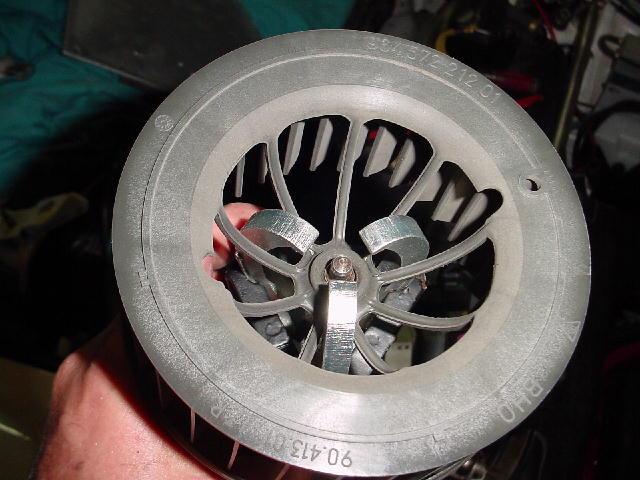
10. Spring clips popped off two fan scrolls
11. Fan cover and interior venturi removed
12. Two small phillips removed from each fan itself - rotate assembly to see and loosen. In my car they were visible in the inner edge of the squirrel cage at the notched cuts when you orated around.
13. Insert screw driver into upper slot at 12 o'clock position until you hear click, then pivot fan down.
14. Repeat at 6 o'clock position pulling lower edge of fan up and forward toward front of the car.
15. Remove fan from HVAC casing by pulling forward and ensuring the squirrel cage clears the case edges.
16. Disconnect the wires and
17. !PooF! the fan is in your hand.
Probably old news for most folks but the first time I went into get under those particular covers and spray some lubricant around it seemed like this was a big job. Second time in - I'm kicking myself for having waited so long to do this.
SO what's next? I can clearly see and feel that the bushing the centers the electric fan motor shaft is gone on BOTH fans. Driver's side worse than pass side. You can see in one of the photos the angle the fan runs at relative to the back plate. This is not good. So the motors are going to a machinist friend of mine who swears he can make replacement bronze bushings or something that will permit the fans to work. If that fails then it's off to a DC Motor shop to try and breath some lift back in these.
I cannot stand the idea of paying $900 each for these things and there HAS to be a solution that doesn't mean buying other worn fans from a yard. So I all give this a go. Here are some photos for those of you stuck in similar quandaries...
This AM I was so upset with the Targa I put an add up for sale here on RList. Unfortunately it violated a rule since I'm no longer a paid-up member (oops) so ok add comes down; no biggie. So after backing the car into the garage I said to myself just pull the darn fans. Even if I do get a buyer that has to be fixed by me or them, so I'll give it a shot. You see one of the things causing me to want to part with the Targa is the poor A/C. In my car I believe the issue to be primarily the front two HVAC fans since I know one is darn near dead, and the other squeaks.
I have pulled the fan motors and for those of you thinking it's too big a job I say - turns out it's not. A little bit of finness is required at triggering the plastic fan clips so I've put good photos of them in this diatribe.
Start to Fans Extracted: 90mins.
1. Battery disconnected [13mm wrench]
2. Fuse block pulled up from mount point [philips screw driver & bungee]
3. Fan resister pack unmounted from firewall [10mm bolts top center of firewall]
4. Gas tank strap removed. 13mm socket
5. Fill and vent hoses loosened
6. Gas tank pivoted forward a couple inches
7. Firewall 8mm (head size) bolts removed L & R side
8. ABS sensors unplugged and pulled clear of FW
9. Firewall lifted up out of the way
10. Spring clips popped off two fan scrolls
11. Fan cover and interior venturi removed
12. Two small phillips removed from each fan itself - rotate assembly to see and loosen. In my car they were visible in the inner edge of the squirrel cage at the notched cuts when you orated around.
13. Insert screw driver into upper slot at 12 o'clock position until you hear click, then pivot fan down.
14. Repeat at 6 o'clock position pulling lower edge of fan up and forward toward front of the car.
15. Remove fan from HVAC casing by pulling forward and ensuring the squirrel cage clears the case edges.
16. Disconnect the wires and
17. !PooF! the fan is in your hand.
Probably old news for most folks but the first time I went into get under those particular covers and spray some lubricant around it seemed like this was a big job. Second time in - I'm kicking myself for having waited so long to do this.
SO what's next? I can clearly see and feel that the bushing the centers the electric fan motor shaft is gone on BOTH fans. Driver's side worse than pass side. You can see in one of the photos the angle the fan runs at relative to the back plate. This is not good. So the motors are going to a machinist friend of mine who swears he can make replacement bronze bushings or something that will permit the fans to work. If that fails then it's off to a DC Motor shop to try and breath some lift back in these.
I cannot stand the idea of paying $900 each for these things and there HAS to be a solution that doesn't mean buying other worn fans from a yard. So I all give this a go. Here are some photos for those of you stuck in similar quandaries...
 08-12-2012, 06:04 PM
#2
Three Wheelin'
Well done. I probably need to do this preemptively.
 08-12-2012, 06:26 PM
#3
Rennlist Member
This post is why you shouldn't sell your car. Your posts are so helpful.
08-12-2012, 06:39 PM
#4
Rennlist Member
Thread Starter
Join Date: Apr 2005
Location: Houston, TX
Posts: 372
Likes: 0
Received 0 Likes
on
0 Posts
Well I can say that going in to see the fan but not pull them and do the "spray lubricant around" approach gets you two things. One is the fans spin a litter free'er and in my case quit chirping for a few weeks. Two is that for the first few days it smelled like I had a can of PB Blaster fogging my face. Result - in the end just not worth it. No amount of lube will re-center the fan motor shaft in the front.
If yours are not already pooched, then I might suggest pulling and lubricating them out of the car with the methods decried in some of the other posts about these fan motors. I was hopeful that mine weren't gone - but I can see now I have to either:
a. Recondition with custom made bushings. This won't rebuild the motor itself but should keep a still electrically viable motor in service longer. Turn custom bushings F&R on each motor and give it a shot. We'll see what my machinist friend says about how much those bushings would cost and how long they would last. My main concern is that without a way to sinter (right term?) material to the inner bushing surface, I don't exactly see how to keep the new bushings lubricated. Although maybe an approach of building lubrication capillary tubes could work...
b. Rebuild at a DC motor shop if they will touch it. The outward inspection of the brushes shows one side wearing more than the other, in the same pattern on both L & R side fans. I'm guessing the brush gets progressive more 'eaten' as the front bushing wears and the shaft falls from the parallel to the ground normal position. I would hope that replacement parts for other commercial Bosch fans might cross-map.
c. Find a similar Bosch unit and make an adapter collar to have it fit in the 964 housing. Time to find someone with a Bosch contact and send a bottle of Scotch for a cross-map to some other motor that gives close-enough characteristics.
If any of those three ideas work - then I'll kit things up for other people who find the idea of paying $900ea for these stupid little fans (+ labor for those who can't stand this sort of stuff) as ridiculous as I do. That's Ferrari level price gouging and I don't have a horsey on my hood! Maybe if A/C can work enough so that I can drive it to work without becoming drenched - then it will stay in the stable.
Trending Topics
08-12-2012, 11:48 PM
#8
Rennlist Member
Option C is great, little project like that is something I look forward too in the future to avoid the insane prices on some parts. Looking forward to an update.
Was this this source of your air conditioning problems. What else is driving you to sell the car?
Was this this source of your air conditioning problems. What else is driving you to sell the car?
08-13-2012, 12:38 AM
#9
Racer
Join Date: Sep 2006
Location: Auckland NZ & Newcastle AU
Posts: 437
Likes: 0
Received 1 Like
on
1 Post
This information MIGHT be of help to you for repairing the right side blower only (dark grey fan).
After some digging around online, I am fairly certain that the Bosch motors from the right sided blower were the same as those used in the blowers for Mercedes 190 and W201 cars WITHOUT air conditioning in the early 1990s. The way that I know this is that they both seem to share the Bosch motor numbered 0 130 063 023.
Here is a picture of the Porsche part:

And here is a picture of the Mercedes part:

The Mercedes part has been picked up by aftermarket manufacturers and is available cheaply online - however, the motors for these parts are not original Bosch units, but are likely made in Asia. I bought one from this store for �48.99 (~ US$76.78) and the postage to Australia was relatively cheap and fast:
Euro Automotive Parts - MERCEDES 190 SERIES 1982-1993 HEATER BLOWER MOTOR
If you wanted, you could go for an OEM Mercedes part that would likely have an original Bosch motor in it, but you are paying a lot more. Still cheaper than the Porsche part:
MB Specialist.com - Blower
If you decide on the Mercedes part as a donor, you will have to extract the squirrel cage fan from your current Porsche unit and fit it to the motor from the Mercedes part.
Jeff Curtis has previously posted HERE a method of safely extracting the squirrel cage from the motor, using a Posi Lock puller. These photos from Jeff's great post:
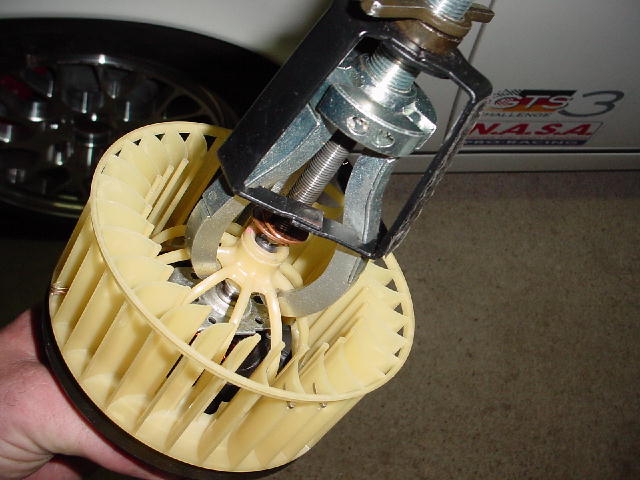
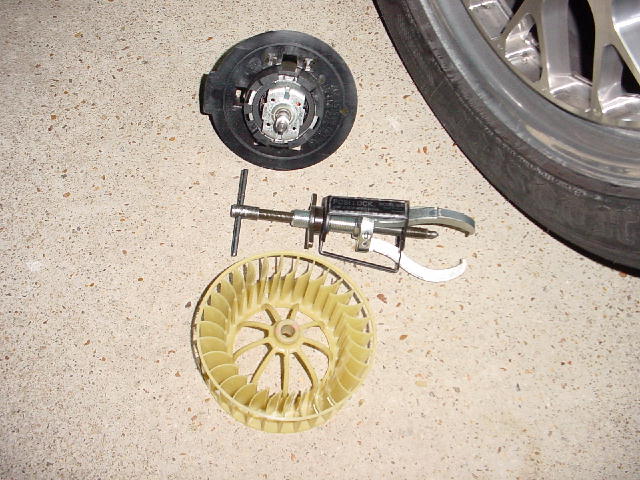
The puller used by Jeff is available online for a small outlay:
mile-x.com - Posi Lock 102 Gear Puller
If you figure $100 for a cheap Mercedes donor blower and $100 for the Posi Lock puller, you're still coming in at considerably less than the US$700-900 for a replacement Porsche part.
DISCLAIMER: I have not personally confirmed that the Mercedes motor is directly compatible with the Porsche one, as I have not yet pulled the one in my car to compare. However, I am fairly certain that they are in fact the same motor.
After some digging around online, I am fairly certain that the Bosch motors from the right sided blower were the same as those used in the blowers for Mercedes 190 and W201 cars WITHOUT air conditioning in the early 1990s. The way that I know this is that they both seem to share the Bosch motor numbered 0 130 063 023.
Here is a picture of the Porsche part:
And here is a picture of the Mercedes part:
The Mercedes part has been picked up by aftermarket manufacturers and is available cheaply online - however, the motors for these parts are not original Bosch units, but are likely made in Asia. I bought one from this store for �48.99 (~ US$76.78) and the postage to Australia was relatively cheap and fast:
Euro Automotive Parts - MERCEDES 190 SERIES 1982-1993 HEATER BLOWER MOTOR
If you wanted, you could go for an OEM Mercedes part that would likely have an original Bosch motor in it, but you are paying a lot more. Still cheaper than the Porsche part:
MB Specialist.com - Blower
If you decide on the Mercedes part as a donor, you will have to extract the squirrel cage fan from your current Porsche unit and fit it to the motor from the Mercedes part.
Jeff Curtis has previously posted HERE a method of safely extracting the squirrel cage from the motor, using a Posi Lock puller. These photos from Jeff's great post:
The puller used by Jeff is available online for a small outlay:
mile-x.com - Posi Lock 102 Gear Puller
If you figure $100 for a cheap Mercedes donor blower and $100 for the Posi Lock puller, you're still coming in at considerably less than the US$700-900 for a replacement Porsche part.
DISCLAIMER: I have not personally confirmed that the Mercedes motor is directly compatible with the Porsche one, as I have not yet pulled the one in my car to compare. However, I am fairly certain that they are in fact the same motor.
08-13-2012, 03:56 PM
#11
Technical Guru
Rennlist Member
Rennlist Member
You can make a puller for about $12 out of a pipe flange, 2 j-hooks, a bolt and some nuts and washers. I may still have some pictures, that I'll look for tonight.
As well there is always Harbor Freight...
As well there is always Harbor Freight...
08-13-2012, 06:00 PM
#12
Addict
Rennlist Member
Rennlist Member
Great post as all of us are going to face this problem if we use our AC. "Sintered" part of the process for making "oilite bronze". If you make the new bushing from oilite bronze, it will be impregnated with oil throughout the metal part. Fresh oil is exposed as the bearing wears, but eventually it will wear out. The first 20 years are the toughest because more cars are daily drivers. The next set should last a very long time.
Thank you very much!
Thank you very much!
08-13-2012, 11:06 PM
#13
Racer
Join Date: Sep 2006
Location: Auckland NZ & Newcastle AU
Posts: 437
Likes: 0
Received 1 Like
on
1 Post
To the OP:
If you've got your blower motors out and taken apart, could you kindly have a look for the Bosch motor part number for the left blower (off-white coloured fan)?
That might let us track down a compatible part, similar to the right blower motor as posted above.
If you've got your blower motors out and taken apart, could you kindly have a look for the Bosch motor part number for the left blower (off-white coloured fan)?
That might let us track down a compatible part, similar to the right blower motor as posted above.
08-14-2012, 12:46 AM
#14
Cruisin'

Join Date: Jun 2012
Posts: 9
Likes: 0
Received 0 Likes
on
0 Posts
I did a post a while ago. Do a search for" Front Blower Motor Bearing Fix" in the 964 form. It shows how to get the motor apart to work on the bearings and a way to replace the POS bushing with a ball bearing. If you have a machinist friend I would turn/mill a holder for the bearing in lieu of the spring clip and use a couple of screws to hold the holder to the motor. This would be a bulletproof design. Mine has held up for weeks being used every day.
https://rennlist.com/forums/964-foru...fix-964-a.html
https://rennlist.com/forums/964-foru...fix-964-a.html
08-14-2012, 02:46 PM
#15
Rennlist Member
I did a post a while ago. Do a search for" Front Blower Motor Bearing Fix" in the 964 form. It shows how to get the motor apart to work on the bearings and a way to replace the POS bushing with a ball bearing. If you have a machinist friend I would turn/mill a holder for the bearing in lieu of the spring clip and use a couple of screws to hold the holder to the motor. This would be a bulletproof design. Mine has held up for weeks being used every day.
https://rennlist.com/forums/964-foru...fix-964-a.html
https://rennlist.com/forums/964-foru...fix-964-a.html