When you click on links to various merchants on this site and make a purchase, this can result in this site earning a commission. Affiliate programs and affiliations include, but are not limited to, the eBay Partner Network.
I'm in the process of several updates to my 93 968. One of them is replacing shocks (non-M030). After much research, including availability of OEM shocks, I decided to go with Koni's all the way around and use their cut-a-strut insert (as Koni calls them) on the fronts.
As others have noted, @Jason @ Paragon provides great information and support for the Koni inserts and installation. I spoke with him prior to purchasing the inserts from Paragon and he answered all of my questions. I highly recommend Jason and Paragon. The Paragon write-up on the install is located here on their site: https://www.paragon-products.com/kb_results.asp?ID=50
Additionally, I viewed the official Koni install video here:
I found it easier to measure and cut the OEM 968 Sachs body by following the method in the Koni video. This is purely because I was using a tape and getting it close enough to the Sachs body for an accurate measurement was easier using the Koni method.
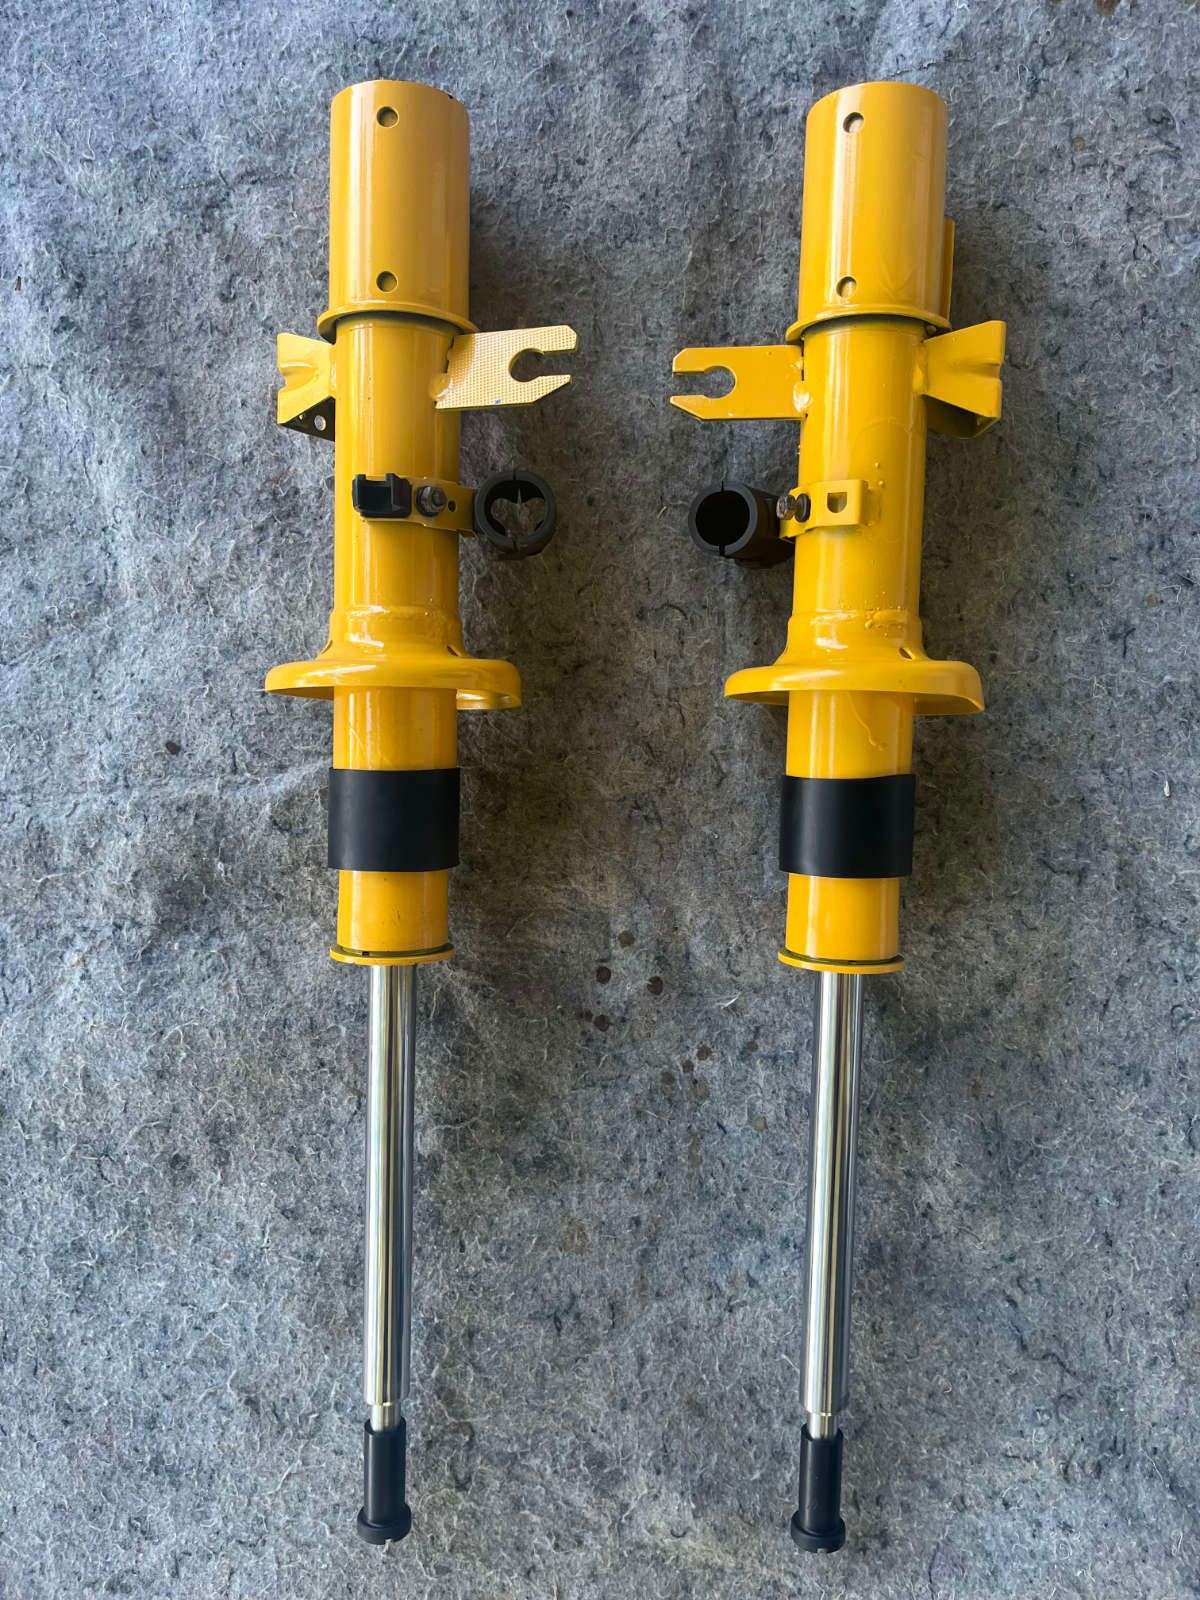
I cleaned and painted the Sachs bodies. I used Rust-oleum Gloss Marigold. The Koni inserts are below the black rubber sleeves in the photo. The painted Sachs bodies are above the rubber sleeves.
Had exactly the same Komi inserts set up on my CS/S a few years ago. With the right geometry setup (sprint/hillclimb in my case) they have transformed the handling - amazing. Adjustable all round and dialed in perfectly. If it was good enough for works driver Richard Attwood and his 944 back in the day, then it's good enough for me!
The Koni insert is a nice and simple upgrade giving you adjustment at the top. The only addition to this struts capability on the Koni M030 setup is the ride height adjustment of the aluminum collars. Paragon and others produce a similar ride height adjustment collar for the standard strut/housing as an additional option. I also noticed the club sport front springs were brought back by Porsche Classic. Not all club sports had M030... and there was a non M030 spring that should produce a slight lowering of the front end without going to the ride height adjustment collar. You can also purchase the black plastic cap/dust cover from Porsche that covers the adjustment point and mounting nut to properly trim the engine bay like the factory did on the M030 cars that had the adjustment point poking its head up above the strut mounts. 999-703-355-40 Only about $5.00 from your P supplier, Not many times do you get two of anything from P and the shipping cost more...
Informative and helpful thread - thanks! I'll be doing this myself in the coming weeks, adding in the adjustable ride height collars too (and getting Paragon to do the cutting / modification for me). Looking forward to the transformation.
Thanks for the kind words everyone. It was a simple, straight-forward procedure that I think everyone can accomplish. It took me about 90 minutes to drill, drain, and cut the Sachs bodies (although I let them drain longer and then cleaned them). I was concerned that one of my initial 3mm holes for draining was not centered, which I thought would cause centering the 14mm hole while drilling challenging. I ended up using a conical drill rasp to open the hole and ensure I got it centered. I found it easier to see the center by viewing from inside the cut Sachs body, as opposed to outside.
Nice work. In my case, I went with Bilstein inserts and had the adapters welded to the tubes. Negates the need for bump stops and dust covers. Love how it does make the car ride and handle better.
lol. None. I�m just speaking generally. I take so long to accomplish anything, when it�s time to button things up, I just do it asap.
Ah, I get it now. I was thinking I missed an opportunity to get some expert advice on the Koni insert installation. I do the button things up ASAP approach too!
Post installation adjustment I feel is a bit of 'suck it and see approach'. I'm certainly no expert, but for me I leave them at the setup the geo guru did for me (metal marker pen) then adjust half a turn each side of that for fine tuning. To ensure full range function I occasionally go fully soft and drive for the day then fully hard then reset back to original setting.
I'll let you know in (hopefully) a week or so when I get my car back ... it's at the shop for some unrelated work so Jason is kindly sending my struts & shocks straight there so they can swap them out.
For DC's dreadful streets I'll probably incline to the softer end of the spectrum, maybe full soft plus a quarter turn. I've run adjustable Konis on two previous vehicles; E46 at full soft which felt about right, and B6 S4 at half way which was great on the twists but too bumpy day-to-day.
 05-20-2024, 10:30 PM