When you click on links to various merchants on this site and make a purchase, this can result in this site earning a commission. Affiliate programs and affiliations include, but are not limited to, the eBay Partner Network.
Alternator tensioner bolt broke off inside its bracket
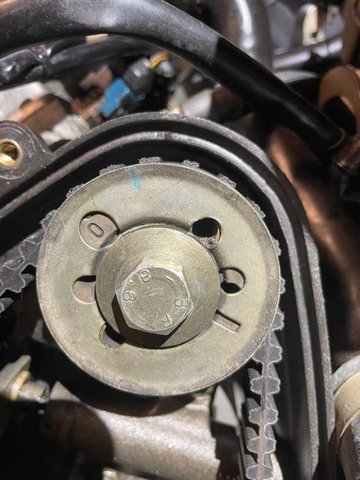
My car has recently been making a God-awful screeching noise upon start-up, and I've discovered the reason - the bolt that holds the alternator tensioner rod to its bracket sheared off, and unfortunately the remnant of the bolt is buried several millimeters inside the bracket that it's screwed into, as shown below:
The top picture shows the tensioner rod to show where the missing bolt belongs, and the bottom photo shows my predicament. As you can see, the bolt sheared off in a very unfortunate manner, leaving nothing to grab onto, to say the least. I know there are all sorts of bolt removal devices, but my particular challenge is that there isn't much room, certainly no room for a drill, unless I take off at least the radiator fans, if not the radiator, which I'd very much like to avoid because of the mess it makes. Is anyone aware of a broken bolt removal gadget that can work in a very tight space such as what I have? Thanks.
Short drill bit with a right angle drill. Otherwise you'll probably have to start making room. Should turn easily once it starts spinning as there "shouldn't" be any thread locker on it. Good Luck!
Check my math, but I think that bracket hole goes all the way through. Is there more room to work on getting it out from the side opposite the radiator?
Cloud - I advise / encourage a couple of things here. First, purchase a "shorty" left-hand drill bit. They are available; I have a set. This and an angle drill may get you in there, but I suspect that the fans and possibly the radiator may also have to be removed. The angle drill will have to be reversible as the left hand bit obviously requires reverse rotation. If the fastener is not seized into the aluminum, the left had bit will often "grab" it as you're drilling and spin it out. If it is seized, this will be more of a chore and best performed by removing the bracket from the engine so that the drilling can be precise. As you likely know, the last suggestion requires timing belt disassembly.
On that subject, I would check to insure that the balance shafts are in time. Over the years I've seen a lot of power steering brackets, fasteners and even one pump break from vibration. If the idler pulley directly above the bottom balance gear is spaced too far away from the balance gear, it allows the belt to jump teeth on the bottom balance shaft because it doesn't have as much contact with the belt as the top balance shaft does. This causes a vibration that is often not felt in the cabin. The bolt you pictured would typically not just break off by itself. Since there does not appear to be a lot of corrosion on your car, it would have to have been seized in the threads and break when loosening was attempted, or it broke from vibration. You need to insure that it's not the later because that same vibration is what cracks oil pump pickup tubes. I have pics of this damage also. I hope this helps and call me if you have any questions.
Check my math, but I think that bracket hole goes all the way through. Is there more room to work on getting it out from the side opposite the radiator?
Space is limited no matter which way you attack. Radiator fans in the front; sway bar, power steering pressure hose and rack in the rear. All items named are removable, it just depends on which bear you want to wrestle...
Thanks for the inputs. Yes, after doing some checking, it looks like there's no alternative to removing at least the fans, and probably the radiator, since I will need to get a drill in there. I suspect the bolt remnant will come out fairly easily once I have access to it.
As far as what caused the bolt to break, that actually does have me worried. I've noticed more vibration lately, and I need to track down the cause. Both my engine mounts have failed recently, and I replaced them with Lindsey super-mounts (I think that's what they're called), but the rubber isolation piece of the right mount failed multiple times after I installed it. I was noticing a lot of driveline vibration, so I went ahead and had a new torque tube built and added Black Sea super-bearings (with over 130,000 miles on a track car, it was probably due no matter what), and I did the window sealant trick on the transaxle mount. This has taken care of the driveline vibration, and the engine mounts haven't failed since the torque tube replacement. But there's still more vibration coming from the engine than there was before. I replaced the belts at the same time as I replaced the engine mounts, and I have to admit, I really struggled to get the marks on the balance shaft pulleys to line up. I seem to be "half a tooth" off, which means that it's going to be off whether I move it over one tooth, or leave it where it is. This has me puzzled; I'm not sure if the vibration is being caused by the firmer-than-stock mounts, or from the balance shaft belt being off, and if it's the latter, I don't know what to do about it.
Are you sure that you have the thrust washers for the balance shaft belts oriented correctly? I'm talking about which mark gets lined up in the little window. That's an easy thing to mess up and, unfortunately, it works in all orientations. I wonder if that's not contributing, somewhat, to your observation about being a half tooth off.
The other thing you might check is the tensioner for the balance belts. If that's not done correctly I think that it can contribute to causing the lower balance shaft to be off just a little bit. Like, maybe half a tooth.
Good luck
I quintuple-checked that the thrust washers were oriented correctly, so I'm pretty sure that's OK. The tricky thing is that I would expect more vibration to be transferred to the chassis because of the firmer-than-stock engine mounts, so it's hard to discern whether that is the cause of the increased vibrations I'm feeling, or if there is something else wrong.
I made a lot of progress today, but am left with questions that have me stumped, and an issue I can't figure out. After I removed the radiator, it was easy to remove the remnant of the alternator tensioner bolt - I didn't even have to use the bolt extractor - just the act of drilling into it was enough to turn it out the backside of the threaded hole. I also discovered the source of my vibration:
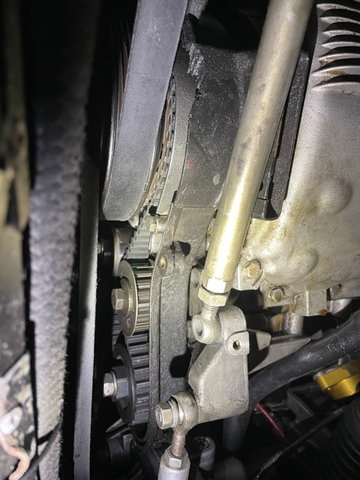
As you can see, the lower balance shaft belt is about 90 degrees off (the top shaft was close to being correctly aligned). But I have no idea how this could have happened. There's no sign of damage to the belt, which I would have expected after skipping so many teeth. The belt was a little loose - it didn't feel loose enough to me to allow it to skip so many teeth, but I suppose it's possible. All of the bolts holding the sprockets, the tensioner pulley, and the idler pulley, were nice and tight. So I've been attempting to put the belt back into proper alignment, but I'm not having any success - no matter what I do, I end up about half a tooth off. Before I show what I mean by that, I wanted to show that I appear to have the upper and lower BS belt's sprocket's keyways lined up correctly:
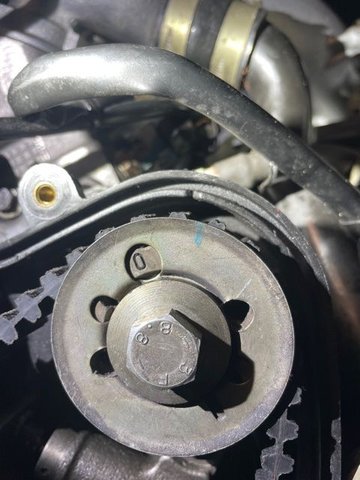
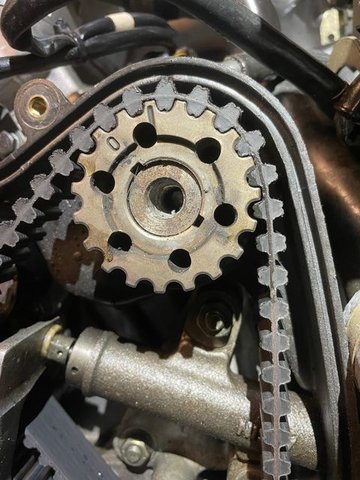
Top sprocket, cover plate off
Top sprocket, cover plate on
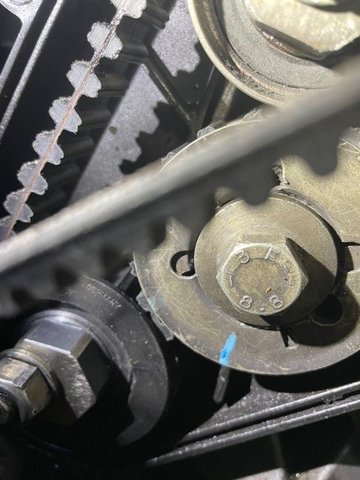
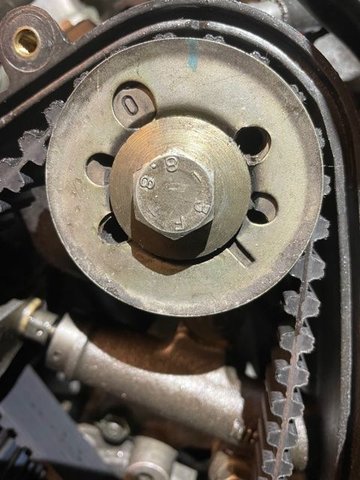
Bottom sprocket, cover plate off
Bottom sprocket, cover plate on
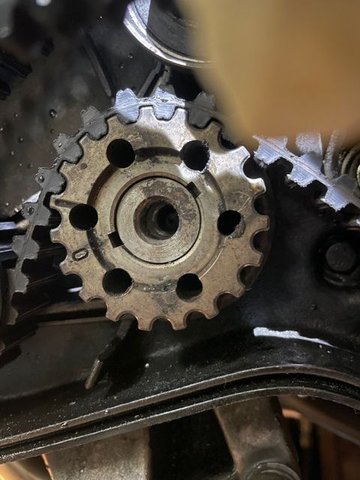
Now, to my immediate problem: I'm not having any success getting both sprockets to simultaneously line up with their alignment keys or tabs with the belt tensioned. When I align the bottom sprocket, the top sprocket is about half a tooth off, and vice versa. Because it's a half tooth off, it doesn't help to rotate the sprocket in the direction that it's off, because that pushes it half a tooth off on the other side of the indent in the plastic belt cover. It it were a whole tooth off, it would be no problem, but it's about half a tooth off:
Top sprocket, with bottom sprocket aligned, and the belt tensioned.
Any idea what I'm doing wrong? And what could have caused the belt to come loose enough to move by 90 degrees - I'm sure I tensioned it properly the last time I replaced it. Thanks.
Cloud - I mentioned the cause in my earlier reply - post #4. The idler above the bottom balance gear has to be positioned 1 mm away from the gear or the belt will jump teeth because of how little contact the belt has with the bottom gear. There is a tool and instructions for setting this distance. This is the most common mistake that people make when setting up balance shafts on our engines. I can see in your pics that the idler I�m referring to is far out of proper position. I don�t have an engine with the timing cover off right now but can possibly find some pics to post - let me look. Also, balance shaft marks aren�t always �perfect � on alignment. As close to the mark as you can get is all that you can do and the tensioner to the left of the bottom balance gear will tension the belt whether it is turned clockwise or counterclockwise, but it must always be clockwise because that �wraps� more of the belt around the gear. Call me if you need.
The green arrow and the red arrow indicate the areas where a gap of no more than 1 mm is crucial and the specified gap for the red arrow is actually .5 mm (.020�). Also notice that the tensioner to the left of the bottom balance gear is rotated clockwise. This is a 944 setup as evidenced by the mechanical tensioner for the T belt but it illustrates what is important. Correct those gaps and you will end your balance belt jumping teeth ordeal. This is the spacing tool that fits where the red arrow points.
Cloud - I mentioned the cause in my earlier reply - post #4. The idler above the bottom balance gear has to be positioned 1 mm away from the gear or the belt will jump teeth because of how little contact the belt has with the bottom gear. There is a tool and instructions for setting this distance. This is the most common mistake that people make when setting up balance shafts on our engines. I can see in your pics that the idler I�m referring to is far out of proper position. I don�t have an engine with the timing cover off right now but can possibly find some pics to post - let me look. Also, balance shaft marks aren�t always �perfect � on alignment. As close to the mark as you can get is all that you can do and the tensioner to the left of the bottom balance gear will tension the belt whether it is turned clockwise or counterclockwise, but it must always be clockwise because that �wraps� more of the belt around the gear. Call me if you need.
Cliff
This. on the balance belt, proper tension will be achieved in two places. one allows the idler to be in the proper position and the other doesn't. Been there
Overall belt length will effect the relative timing between the two balance shafts. There is always a tad of stretch as a belt runs in so with the lower cog aligned, I'll err the upper cog notch past the mark if needed.
Thanks very much - you're right - the gap between the idler and the lower sprocket is way too large, and I can see how this could cause the belt to jump teeth. I would have bet your next five paychecks that I set this correctly (I was prepared to inform you that the apparently large gap in my picture was caused by the camera angle...), as I'm very aware of this requirement, but either I neglected to set it properly, or it somehow moved since I set it. I will set it correctly, and keep the covers off for awhile so I can check it (and the tension and other key clearances) periodically. The spec for the dimension where your green arrow is pointing is actually a 0-1 mm deflection (as opposed to a gap) - a lot of people don't know that. This was set correctly on my car, unlike the gap where your red arrow is pointing.
It still bugs me that the timing marks are so far off on my car - I swear I've been able to set them pretty much right on target in the past, but I suppose there are variations in belt lengths that result in small deviations in the alignment of the marks.
Thanks again for noticing the error in my gap - much appreciated.
Excellent suggestions by chudson. His post #10 mentions the importance of tightening the tensioner clockwise. I'll be this is the issue. Let the tensioner go completely loose, then tighten to spec CW. I'll bet your BS marks will then like up perfectly.
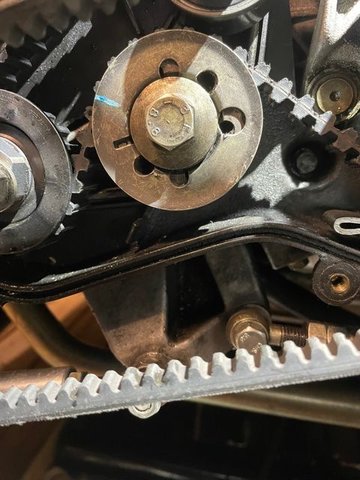
Well, it's maybe a little better, but the top sprocket is still about a half tooth off after loosening the adjusting eccentric and tightening it clockwise:
Top sprocket, after tightening eccentric clockwise Bottom sprocket, after tightening eccentric clockwise
There's no slack in the belt anywhere, so I don't see any way to get the marks any closer, so I think I'm going to have to call it done. Does anyone have any other suggestions? Does this match others' experience? I did set the idler pulley to be 0.5mm above the run of the belt below, and it slightly deflects the run of the belt above, so hopefully my days of skipping teeth are behind me.

 07-31-2021, 02:07 AM


 that I set this correctly (I was prepared to inform you that the apparently large gap in my picture was caused by the camera angle...), as I'm very aware of this requirement, but either I neglected to set it properly, or it somehow moved since I set it. I will set it correctly, and keep the covers off for awhile so I can check it (and the tension and other key clearances) periodically. The spec for the dimension where your green arrow is pointing is actually a 0-1 mm deflection (as opposed to a gap) - a lot of people don't know that. This was set correctly on my car, unlike the gap where your red arrow is pointing.