When you click on links to various merchants on this site and make a purchase, this can result in this site earning a commission. Affiliate programs and affiliations include, but are not limited to, the eBay Partner Network.
Going above & beyond the Carrera RS conversion in the factory manual.
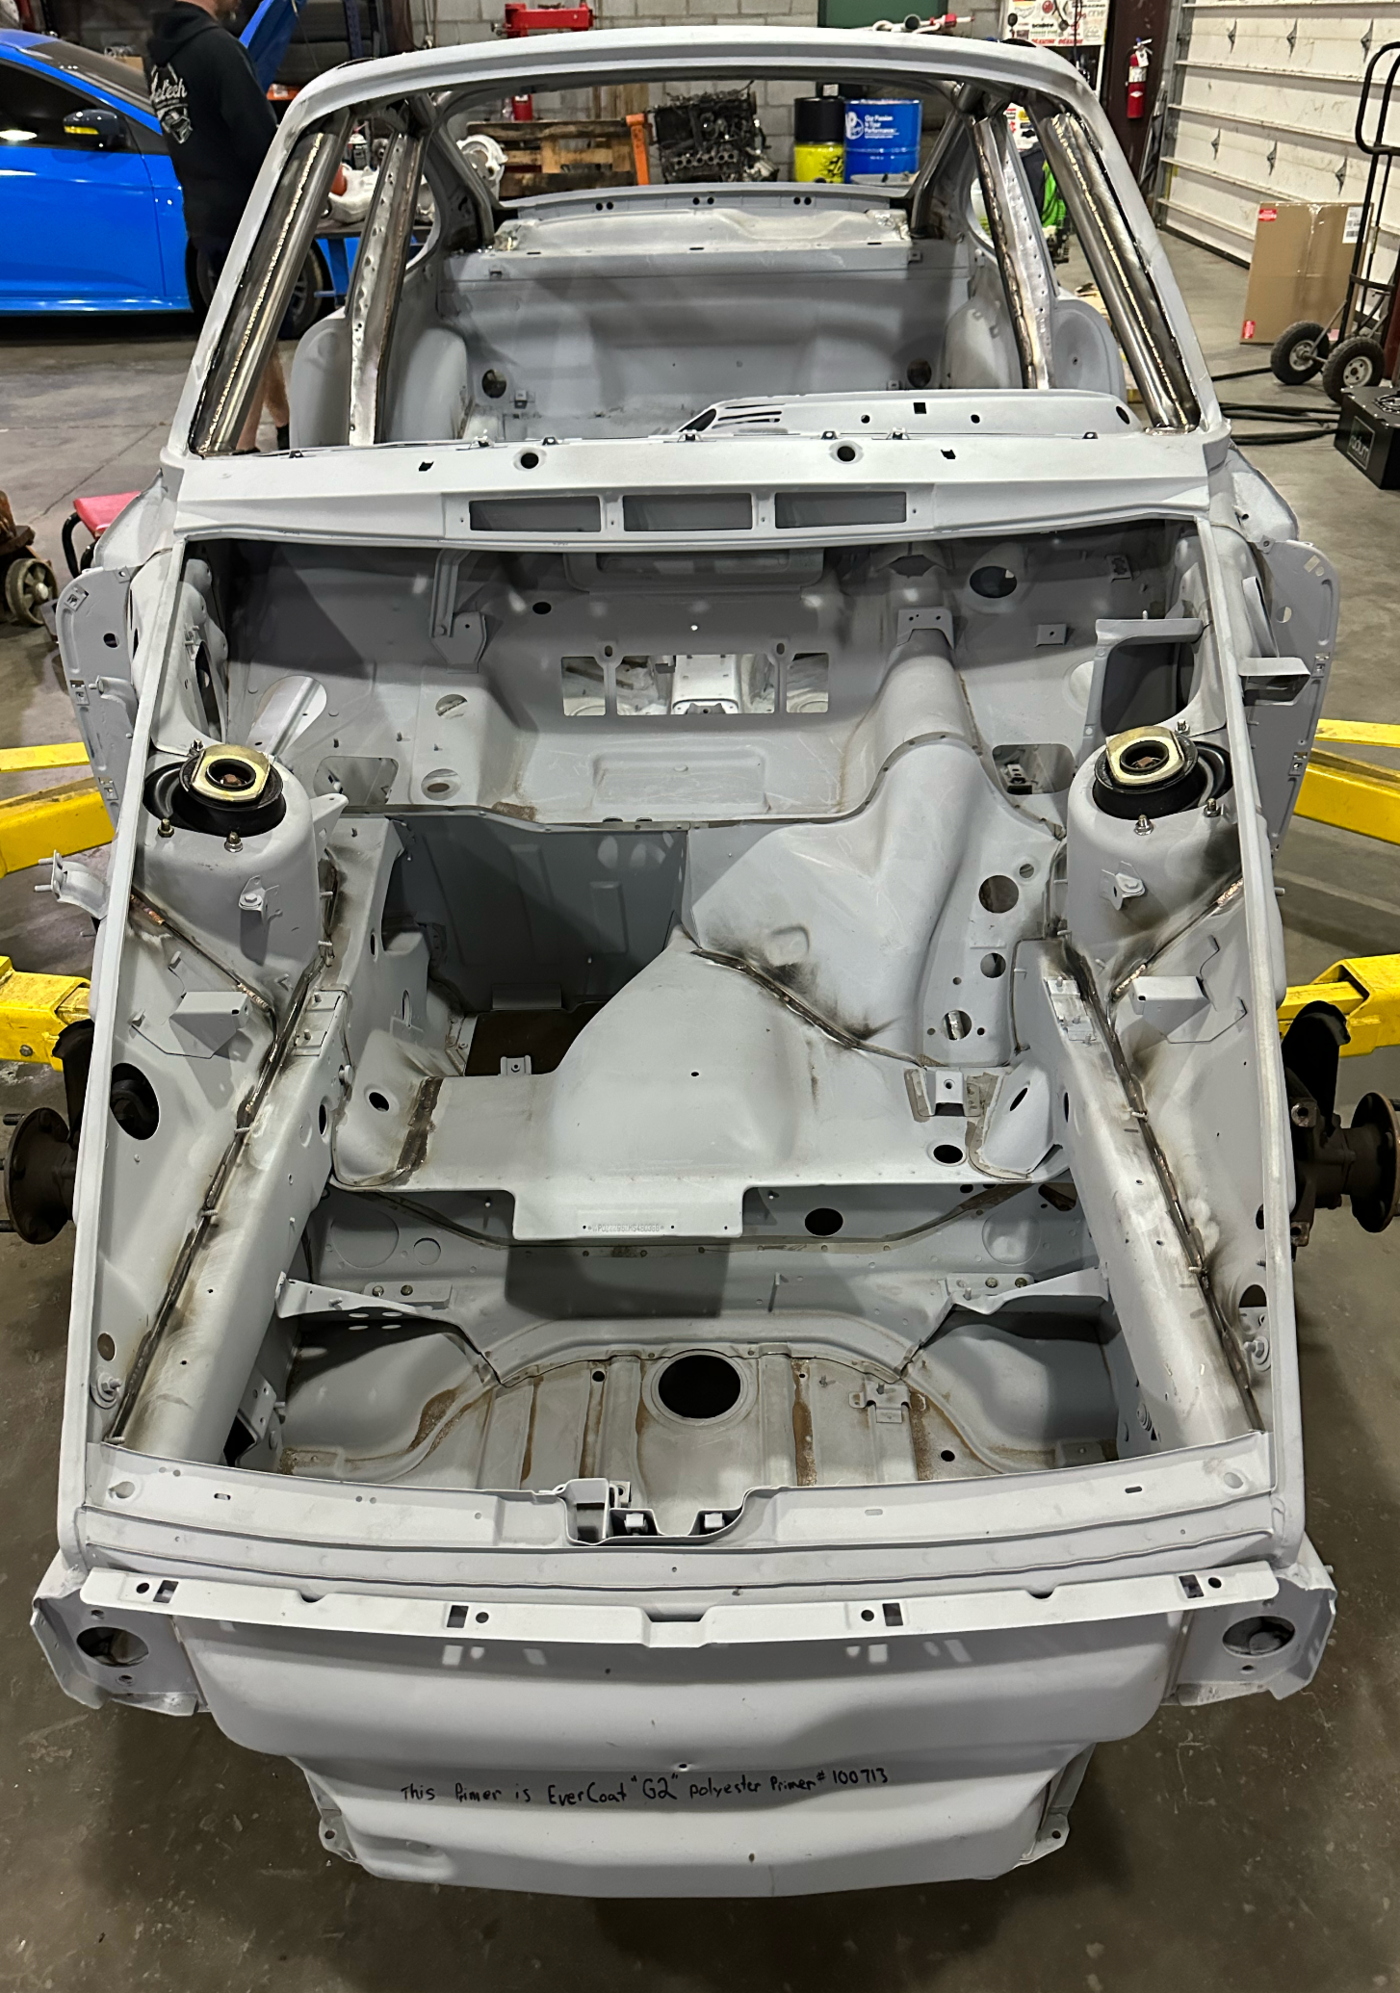
As I'm sure you know, the seam welding instructions are actually pretty limited, focused largely on the center tunnel, rear floor pan, and rear suspension mounting points.
There's no reinforcement of the front strut towers, or of the frame rails to the chassis in the front pan or engine compartment, or tying of the floor pans together, etc.
We're therefore doing something more along the lines of what Geoffrey did in his build way back in 2006 or so.
Going above & beyond the Carrera RS conversion in the factory manual.
As I'm sure you know, the seam welding instructions are actually pretty limited, focused largely on the center tunnel, rear floor pan, and rear suspension mounting points.
There's no reinforcement of the front strut towers, or of the frame rails to the chassis in the front pan or engine compartment, or tying of the floor pans together, etc.
We're therefore doing something more along the lines of what Geoffrey did in his build way back in 2006 or so.
I see that. Geoffrey's build was epic and he was very talented. When he sold that car to Theo from Alex Job racing I was bummed. A great buy at what he let it go for and a loss to the community. The factory did some funky things back then as well with roll cages mounted to the floor vs the tub. I can say when we removed the sunroof from my C2 and replaced it with a factory skin we bonded, welded and crimped it together. The factory only specifies crimping IIRC. It made a considerable improvement in reducing flex. I have heard some say that overdoing it can cause the thinner panels to rip apart around the welds. I believe that is why Porsche stitch welded everything. But I haven't seen any evidence of it happening first hand. The front strut towers seem to hold up to abuse. My **** Box has 800 pound springs up front with 120k+ track miles and I see no signs of fatigue. Although my son will be driving it and either he will over fatigue them or me. He loves to hit the turtles hard.
Yes, I have to assume that the factory made choices based on cost and production efficiency as well as strength and stiffness.
I figure while we're in there it's easy enough to do a little extra -- if I pay for a couple extra hours of welding that offer no real gains in stiffness or strength, no great loss, but if I change my mind later it's a big job to go back to bare metal!
There's a lot of great information on these forums (and the other forum) from the early 2000s that is so so helpful... long discussions on chassis stiffening, data from people's (and Porsche's own) experimentation with race cars, etc. But there's also a lot of speculation that ends up getting repeated in later threads until people start taking it as fact, which is fascinating to trace back over the years.
Do remember that the 964 was unloved for so long and when I started here there was practically nothing known about these cars. There is still so much to be learned. When Adrain released his book it clarified a lot of things however a fair amount of data was incorrect and is still being corrected to this day.
I got to ask... For someone who is contemplating a full restoration, do you have a great system for labeling and storing items as you remove them? I am assuming this isn't your first 964 tear down?
I have a system, and we'll see how effective it is when I go to reassemble everything!
Every connector that gets unplugged or hose that gets disconnected is labeled on each side with a
. (e.g., Red 1 plugs into Red 1, Blue 32 plugs into Blue 32).
All hardware that is removed goes into a ziploc bag labeled with where it came from (e.g., Passenger rear brake caliper)
I used a head-mounted GoPro to record most of my disassembly process. Not sure if it will come in handy, but I figure if I totally forget how something went together I can go back through the footage.
Of course, the service manuals and the parts catalogue are super helpful for this too.
I have a system, and we'll see how effective it is when I go to reassemble everything!
Every connector that gets unplugged or hose that gets disconnected is labeled on each side with a numbered, colored sticker. (e.g., Red 1 plugs into Red 1, Blue 32 plugs into Blue 32).
All hardware that is removed goes into a ziploc bag labeled with where it came from (e.g., Passenger rear brake caliper)
I used a head-mounted GoPro to record most of my disassembly process. Not sure if it will come in handy, but I figure if I totally forget how something went together I can go back through the footage.
Of course, the service manuals and the parts catalogue are super helpful for this too.
Wow, ok - that's good to hear. I would need to do it this way as well. Numbered stickers seems like a great idea!
This phase of fabrication is essentially done and I'll be picking up the chassis next week to go to the paint shop.
There's still body work to be done, but they'll take care of that before paint.
The car went on the rotisserie to finish up the seam welding underneath -- gotta make sure that all the spots in the factory manual are covered!
Interestingly, a couple of the spots around the rear axle mounting points that the factory says to stitch were already stitched -- maybe this was done on the Turbos?
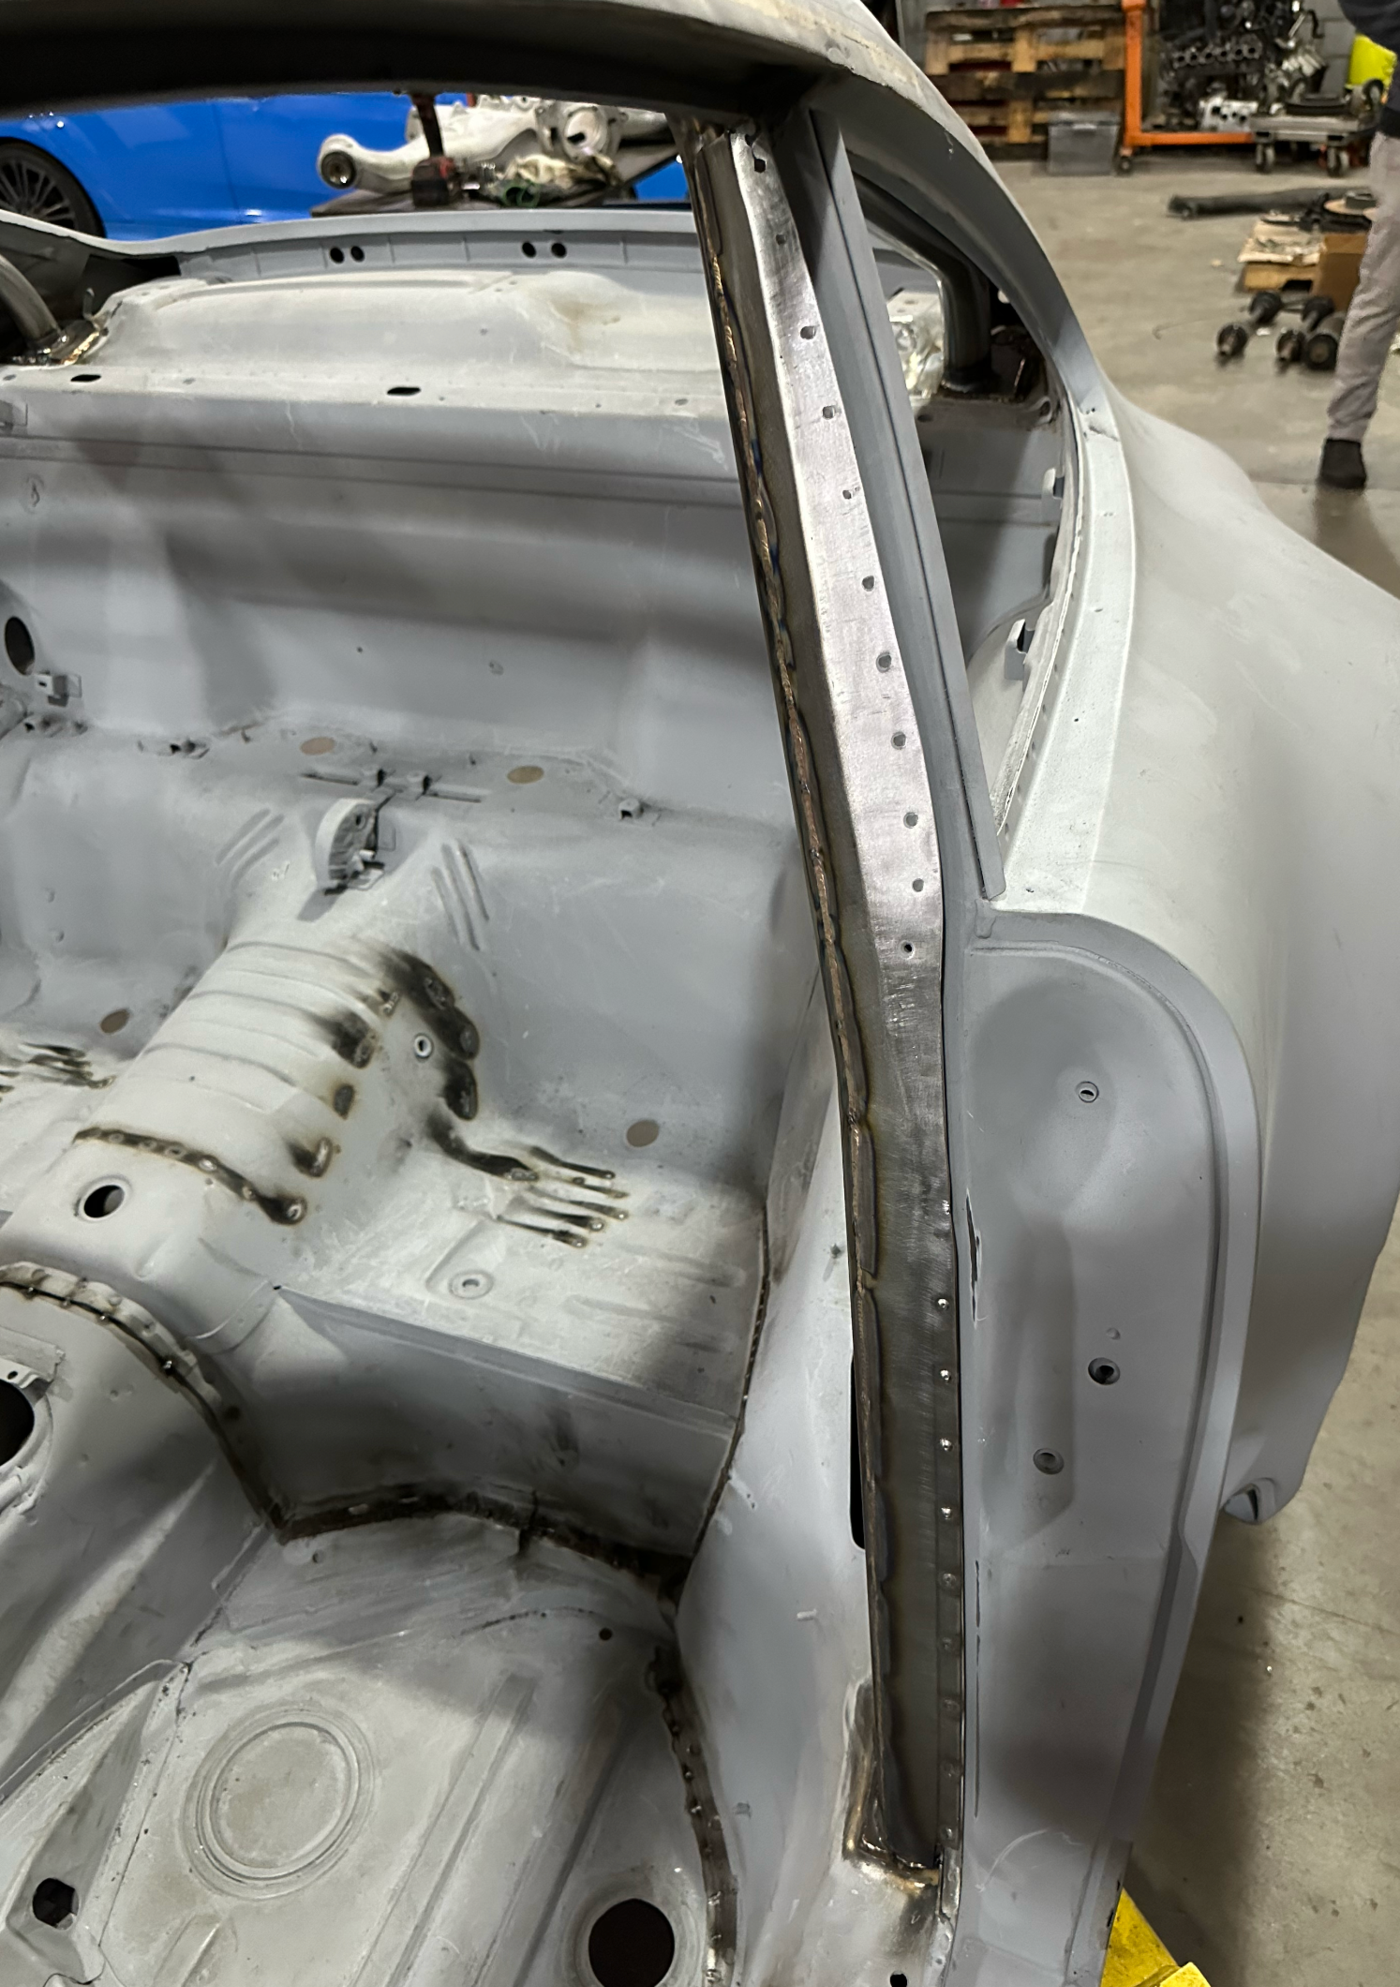
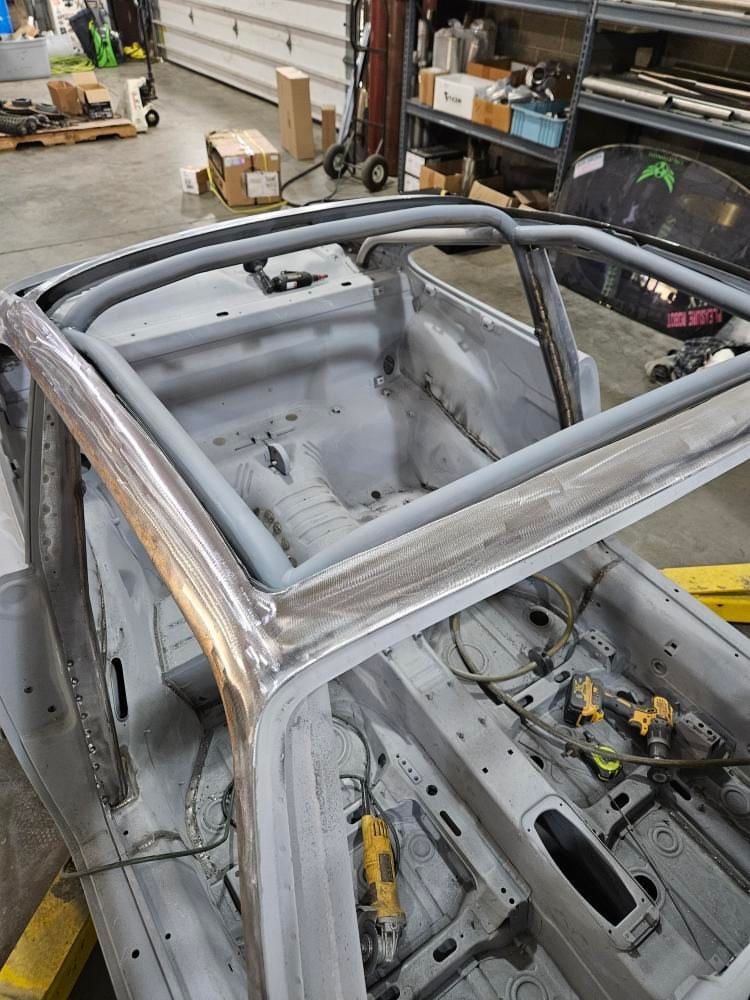
The integrated cage also went in. Note how the cage is fully tied to the A and B pillars with gussets. This should help with stiffness as well as make for smoother upholstery.
I was really surprised at how neatly the tubing tucked behind the A pillar.
My expectation was that I would lose a lot of the 964 open greenhouse feel but the tubing is placed such that it almost disappears when you're in the driver's seat position.
It looks thick from this angle, but when you're in the car it might add 1/4" to the visual thickness of the pillar.
Note that primer? That's a mistake. Unfortunately I didn't think to ask the paint shop if the blaster should use a specific product and the car is going to be epoxy primered.
A pricey lesson: all that Evercoat G2 will have to be stripped off. I guess it kept it from flash rusting over the summer.
Here's a closer view of how the B pillar was done. The gusset is actually blended into the spot welded plate that Porsche uses on the lower half of the door frame.
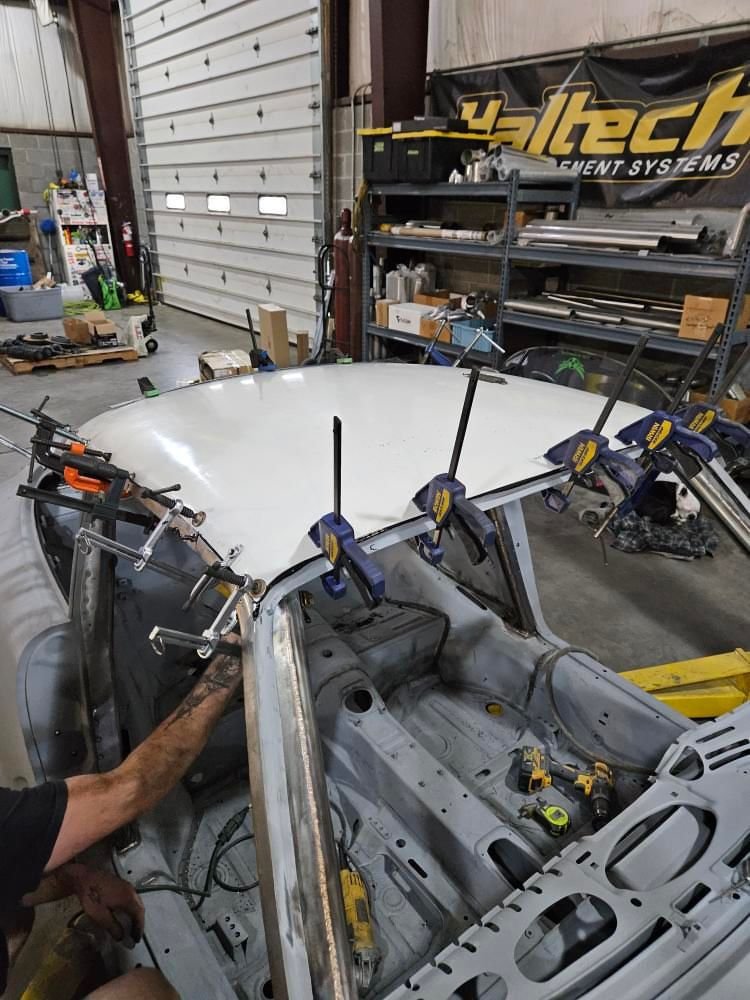
The final big step was adhering the carbon roof.
The roof was placed on the chassis and traced out, then the sunroof skin was cut out leaving a 50mm lip all around.
You can also see the rest of the IRC here -- it's impressively close to the roofline, and tied to the car at multiple points.
By cutting out some of the factory metal and tucking inside the rest of it, none of the tubing is noticeably closer to the driver's head (apart from the thicker A pillars) than in a stock 964.
In fact, I expect to hit my head a lot less over bumps since I'll be sitting a bit lower and there won't be a sunroof to hit!
The roof was then scuffed up too, and a huge amount of 3M 08115 was used to bond it in place.
One tube was painted on the entire mating surface on the metal side, a second tube was used to do the same thing on the carbon side, and then the contents of a third tube were applied on top of the metal surface.
The carbon roof was then put on the car and the two parts were squeezed together with every clamp available.
This seems like overkill (especially at $100 a tube of 08115) but this method has survived hundreds of thousands of miles of hard on- and off-road use in Keen Project Safaris without cracking.
It should also be stiffer than stock, even though it's just glued on. Modern materials are amazing!
I noticed Porsche's rear roof structure has zero structure elements. This is a excellent structure improvement for that area.
Especially when using a Carbon Roof. Your B-Pillar welded to your cage was a great idea.
 11-02-2023, 10:16 AM