

964 RS steering wheel recover & install
 03-01-2017, 07:35 PM
#1
Three Wheelin'
Thread Starter
Here’s a fun(?) way to spend an enormous amount of time.
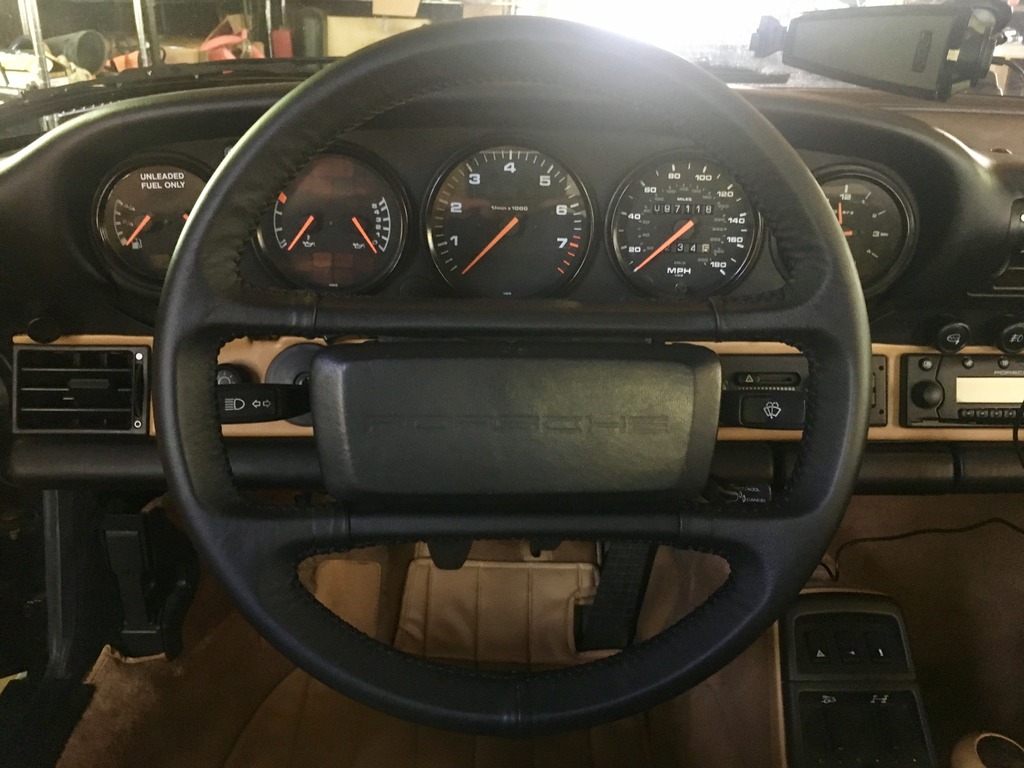
Considering my airbags are now 26 years old, and my 4’10 wife sits very close to the wheel, I finally got around to a non-airbag replacement. I haven’t seen an aftermarket wheel that has the same quality as the stock options. The standard 363mm RS wheel was the obvious choice. The parts list:
944.347.084.09 (10 VERL) 363mm “sport” wheel for 944 models, standard 964 RS wheel
944.347.859.05 944 leather covered horn pad, 210mm wide
964.652.104.00 horn contact for non-airbag wheel
928.612.220.00 airbag jumper connector to disable airbags
The ‘89 964, some 3.2’s, and many 944’s used the same 4-spoke wheel but in a 380mm diameter. I’m not sure of the difference between the 911 and 944 wheel but they carry different part numbers. I did find out that the 944 horn pad is about 25mm shorter than the 911/964 horn pad. The 911/964 horn pad also has a horn icon where the 944 pad does not. For completeness:
911.347.859.07 ‘89 964, 3.2L, horn pad, with horn icon, ~235mm wide
964.347.859.80 RS horn pad, same as 944, just has “RS” instead of “PORSCHE”
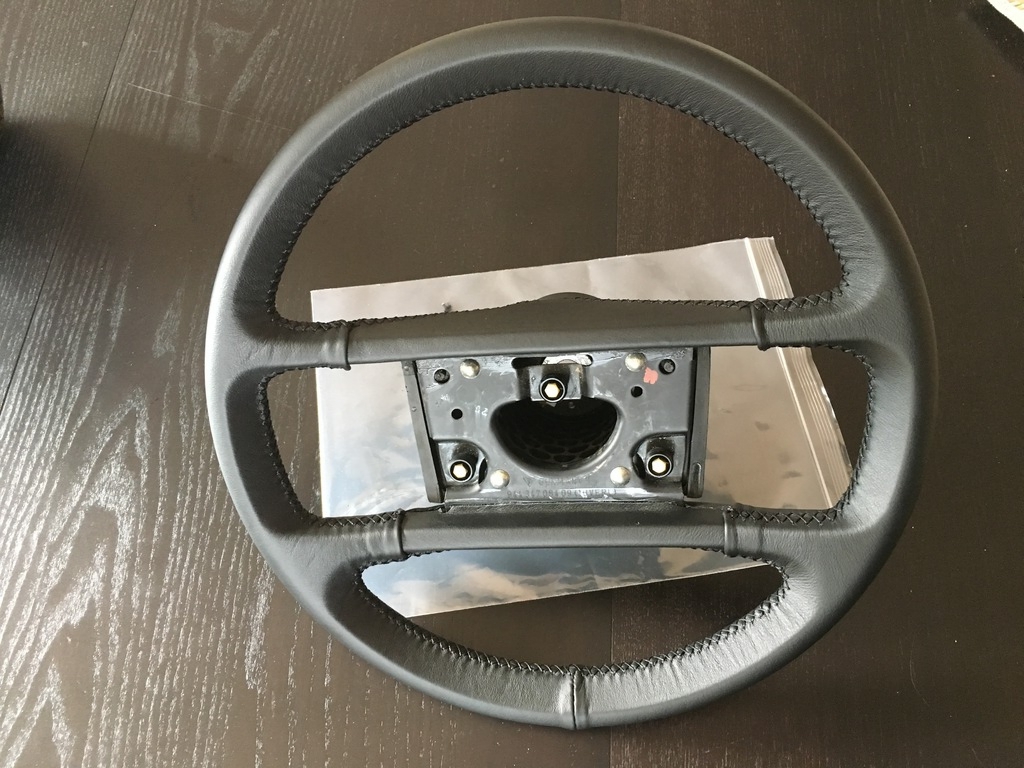
The fun part- new leather recover kit from classic9leathershop.com. I didn’t find a lot on how to recover these wheels. Turns out that it really just a matter of putting in the time to do it.
1. Strip down the old hard leather. I used goo-be-gone to remove the leftover glue from the wheel then soap & water.
2. Use rubber contact cement to glue the inner top and bottom leather pieces to the wheel.
3. Lift the inner top/bottom pieces away from the glue enough to stitch them. I measured 4x the length of the area to be stitched and cut off that much thread. You really don’t want to run out of thread before you’ve finished stitching a segment and there is a generous amount of thread in the kit.
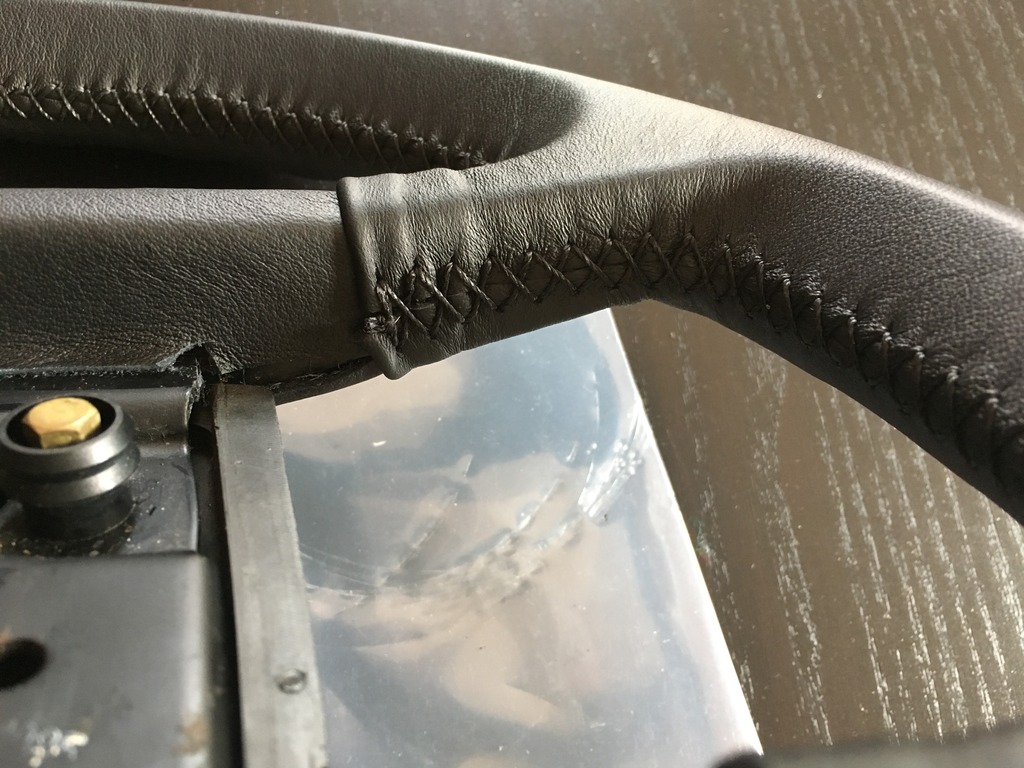
4. Start stitching the outer cover. I started my stitches by overlapping a few stitches on the inner top/bottom covers then continue the stitch into the outer cover.
5. Once the top/bottom halves of the outer cover are stitched in, go back and glue down top/bottom inner pieces for the last time.
6. Stitch up the remaining left/right sides of the outer cover and blend the first/last stitches into the inner top/bottom pieces.
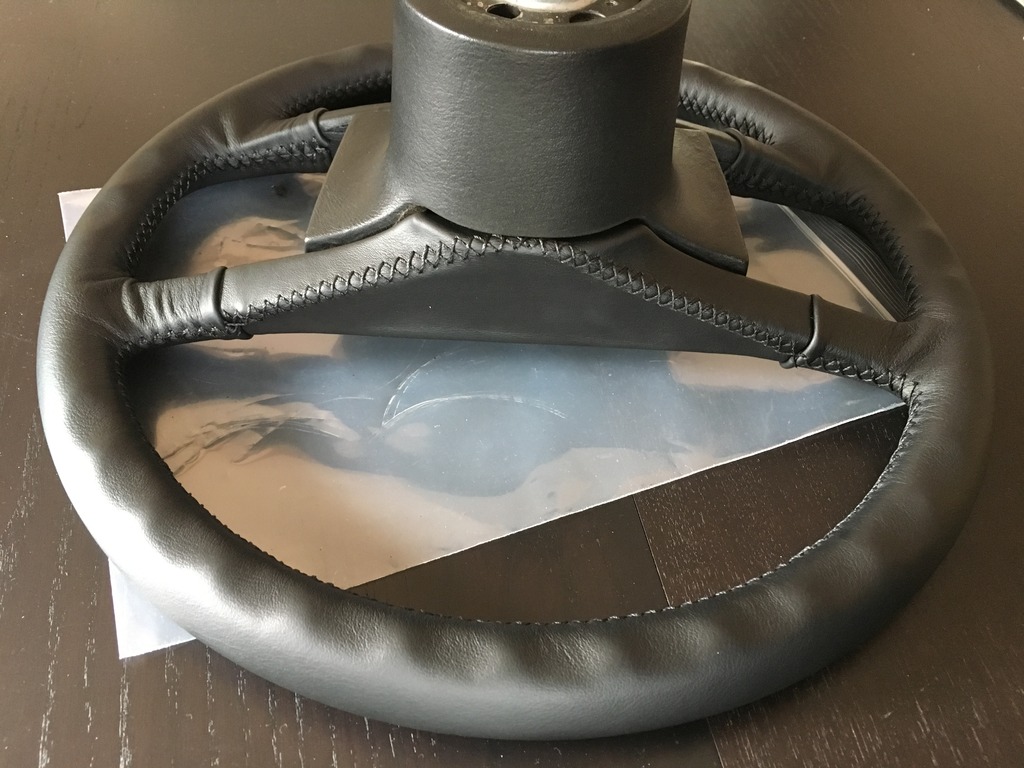
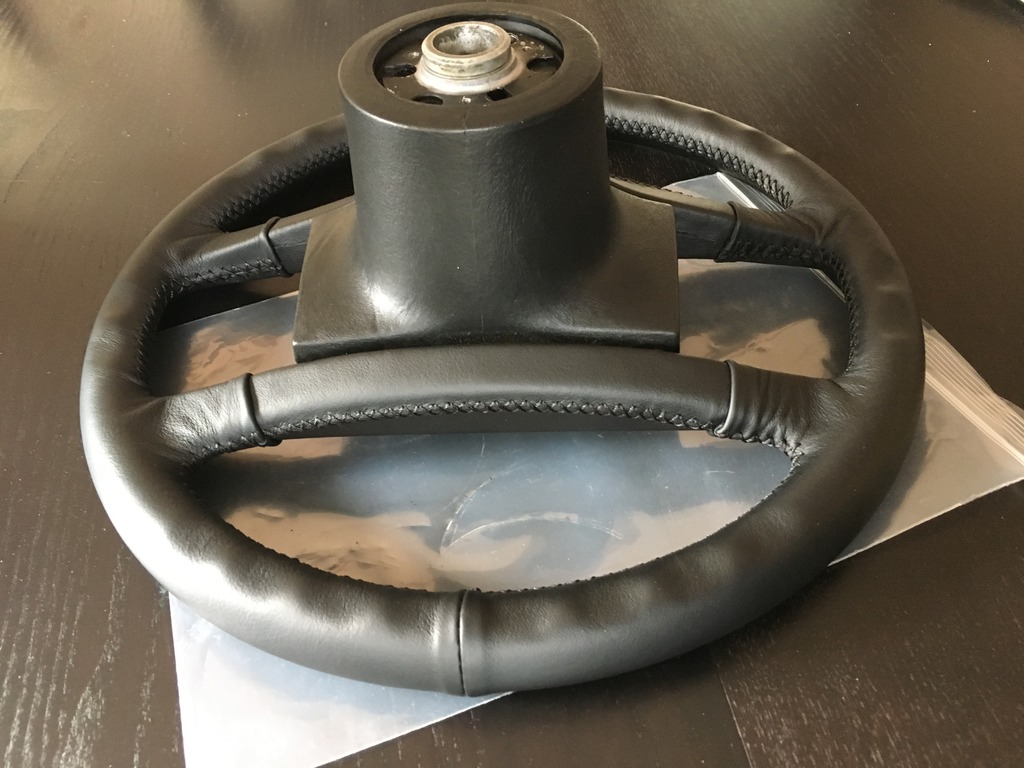
You'll notice that I treated the spokes differently where the leather pieces come together. The original covers are just rough cut edges that lie next to each other. I folded over the edges for a smoother finish. In person, the folds blend much better than in the photos.
I spent somewhere around 8-10 hours on this. Good luck if you attempt it! This is a perfect time to start watching that 10-part Ken Burns documentary that you haven’t gotten to. If there is a next time, I'll happily pay classic9 to install.
The install is easy. Remove your old steering wheel. Remove the airbag clock spring. Plug in the airbag jumper (behind the small carpeted window, passenger side tunnel under the dash). Push in the non-airbag horn contact. Install the wheel. I did need to file the edges of the plastic steering column surround very slightly. The steering wheel fit partly inside of the covers and can rub a little when turning.

Considering my airbags are now 26 years old, and my 4’10 wife sits very close to the wheel, I finally got around to a non-airbag replacement. I haven’t seen an aftermarket wheel that has the same quality as the stock options. The standard 363mm RS wheel was the obvious choice. The parts list:
944.347.084.09 (10 VERL) 363mm “sport” wheel for 944 models, standard 964 RS wheel
944.347.859.05 944 leather covered horn pad, 210mm wide
964.652.104.00 horn contact for non-airbag wheel
928.612.220.00 airbag jumper connector to disable airbags
The ‘89 964, some 3.2’s, and many 944’s used the same 4-spoke wheel but in a 380mm diameter. I’m not sure of the difference between the 911 and 944 wheel but they carry different part numbers. I did find out that the 944 horn pad is about 25mm shorter than the 911/964 horn pad. The 911/964 horn pad also has a horn icon where the 944 pad does not. For completeness:
911.347.859.07 ‘89 964, 3.2L, horn pad, with horn icon, ~235mm wide
964.347.859.80 RS horn pad, same as 944, just has “RS” instead of “PORSCHE”
The fun part- new leather recover kit from classic9leathershop.com. I didn’t find a lot on how to recover these wheels. Turns out that it really just a matter of putting in the time to do it.
1. Strip down the old hard leather. I used goo-be-gone to remove the leftover glue from the wheel then soap & water.
2. Use rubber contact cement to glue the inner top and bottom leather pieces to the wheel.
3. Lift the inner top/bottom pieces away from the glue enough to stitch them. I measured 4x the length of the area to be stitched and cut off that much thread. You really don’t want to run out of thread before you’ve finished stitching a segment and there is a generous amount of thread in the kit.
4. Start stitching the outer cover. I started my stitches by overlapping a few stitches on the inner top/bottom covers then continue the stitch into the outer cover.
5. Once the top/bottom halves of the outer cover are stitched in, go back and glue down top/bottom inner pieces for the last time.
6. Stitch up the remaining left/right sides of the outer cover and blend the first/last stitches into the inner top/bottom pieces.
You'll notice that I treated the spokes differently where the leather pieces come together. The original covers are just rough cut edges that lie next to each other. I folded over the edges for a smoother finish. In person, the folds blend much better than in the photos.
I spent somewhere around 8-10 hours on this. Good luck if you attempt it! This is a perfect time to start watching that 10-part Ken Burns documentary that you haven’t gotten to. If there is a next time, I'll happily pay classic9 to install.
The install is easy. Remove your old steering wheel. Remove the airbag clock spring. Plug in the airbag jumper (behind the small carpeted window, passenger side tunnel under the dash). Push in the non-airbag horn contact. Install the wheel. I did need to file the edges of the plastic steering column surround very slightly. The steering wheel fit partly inside of the covers and can rub a little when turning.


 03-02-2017, 03:32 PM
#4
Three Wheelin'
Thread Starter
The new leather is very buttery soft. Such a difference. The smaller diameter wheel is barely noticeable, but the overall smaller footprint of the wheel opens the space in front of you up a bit. I can now see the ignition slot and heater fan settings without needing to lean around the cockpit.
tdz3- truly plug and play. Remove the old parts, clip the new horn contact into the turn signal plate, and plug in the airbag jumper. Nothing else is needed.
tdz3- truly plug and play. Remove the old parts, clip the new horn contact into the turn signal plate, and plug in the airbag jumper. Nothing else is needed.
05-18-2017, 11:23 AM
#5
Rennlist Member

Awesome write up! I'm looking to switch over from my current 930S steering wheel to this wheel, as well.
Just a quick question, can you see the speedometer through the top of the steering wheel with the smaller diameter?
Just a quick question, can you see the speedometer through the top of the steering wheel with the smaller diameter?
05-19-2017, 09:46 AM
#6
Three Wheelin'
Thread Starter
I'd say that it's no worse than the airbag wheel around the speedo. It's more open closer to the center of the wheel, since you don't have a big airbag center anymore.
I would recommend padding the grip slightly if you recover it. It's a bit skinny.
I would recommend padding the grip slightly if you recover it. It's a bit skinny.
Trending Topics
05-20-2017, 06:52 PM
#8
Drifting
absolutely perfect...!really fits the space...
11-12-2020, 12:05 PM
#9
Rennlist Member
Resurrecting an old thread, but figured that having the information here might help the next person out.
Currently, I have a 930 ATIWE wheel in my car, but due to COVID/idle hands/what not, I decided to go through some of the parts that I haven't installed but are sitting in the garage. I found a "10 VERL" 4 spoke, non-airbag steering wheel with the hub extension and figured I'd try it out. The leather is all beat to hell, but otherwise, it's a good wheel. I seem to remember (although I could definitely be wrong) that some have stated the wheel doesn't match up with the splines of some of the 964 steering shafts, but on my '90 C2, I didn't have any issues. I wanted to try it out for a bit before I go through the same process of recovering that the OP went through.
A quick question for anyone that's done the swap with the extension, is there any way to adjust the reach to the controls (lights, turn indicator stalk)? I really like where the extended hub puts my hands/arms as far as driving position, but it's a little cumbersome to reach the turn signals. Normally, I'd say it's not THAT big of a deal, but with the size of the cars/trucks/big rigs and traffic in Houston, I like to be able to let others know where I'm planning on going.
Last edited by jon91581; 11-12-2020 at 12:07 PM.