964 C4 light refurb
07-01-2017, 02:24 AM
Rennlist Member
Thread Starter
Join Date: May 2001
Location: Auckland, New Zealand.
Posts: 13,250
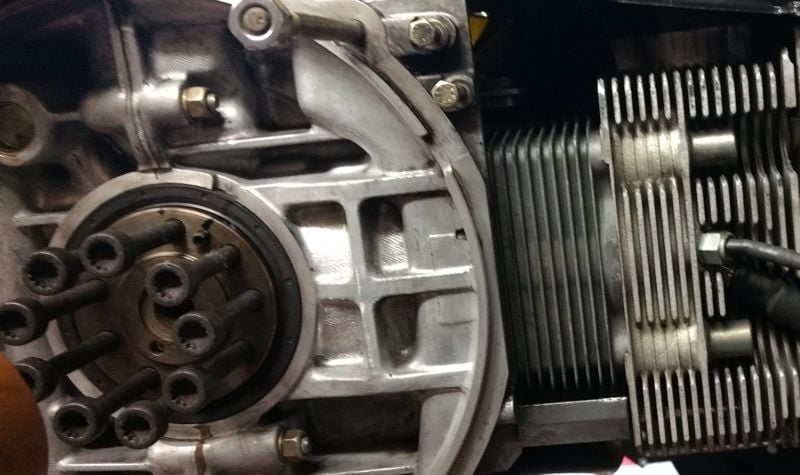
One thing I noticed with the case back together is how much deeper my flywheel seal is now compared to before. I think my old one had walked out.
Attached Images
07-01-2017, 03:21 AM
Burning Brakes
Join Date: Jun 2011
Location: West Coast
Posts: 841
Likes: 0
Here is pic of mine. It has 10k miles on it. Note the factory seams squeeze out similar to yours. Wonder if they used 574?
07-01-2017, 03:46 AM
Rennlist Member
Thread Starter
Join Date: May 2001
Location: Auckland, New Zealand.
Posts: 13,250
Mine seems deeper than yours as well. Hope I haven't overdone it.
07-01-2017, 08:09 AM
Racer
Join Date: May 2013
Location: UK
Posts: 311
Great stuff, I hope the rugby didn't spoil your day.
07-01-2017, 08:54 AM
Rennlist Member
Thread Starter
Join Date: May 2001
Location: Auckland, New Zealand.
Posts: 13,250
Quote:
Originally Posted by ffc
Great stuff, I hope the rugby didn't spoil your day.
07-01-2017, 01:00 PM
Burning Brakes
Join Date: Jun 2011
Location: West Coast
Posts: 841
Likes: 0
Is the idea, seal the case, allow squeeze out, don't touch a thing for how long? When do you spin the crank? Is it recommended to install RMS during assembly vs after case cures?
07-01-2017, 05:26 PM
Rennlist Member
Thread Starter
Join Date: May 2001
Location: Auckland, New Zealand.
Posts: 13,250
Quote:
Originally Posted by C4inLA
Is the idea, seal the case, allow squeeze out, don't touch a thing for how long? When do you spin the crank? Is it recommended to install RMS during assembly vs after case cures?
Loctite 574 takes a while to cure. How long depends on the thickness of the gap, the metal type and the ambient temperature. I'm in no hurry so I will leave it for a few days. I have however checked the crank moved (as much as I can with the rods in rubber bands). It seems ok.
07-02-2017, 06:29 AM
Rennlist Member
Thread Starter
Join Date: May 2001
Location: Auckland, New Zealand.
Posts: 13,250
Through bolt fastening method - P fix it with a John McM mod (screw in top of the sharpie). Each bolt took less than one minute - I was a machine
Btw sorry for the one pic per post but at least it ensures that the sequence order is correct.
Place the bolt in from the bottom, hold it with a socket and then place the sharpie cap over the bolt thread and thread the o ring over it.
Attached Images
Last edited by John McM; 07-02-2017 at 07:18 AM .
07-02-2017, 06:30 AM
Rennlist Member
Thread Starter
Join Date: May 2001
Location: Auckland, New Zealand.
Posts: 13,250
O ring on as far as fingers can thread it.
Attached Images
Last edited by John McM; 07-02-2017 at 07:01 AM .
07-02-2017, 06:31 AM
Rennlist Member
Thread Starter
Join Date: May 2001
Location: Auckland, New Zealand.
Posts: 13,250
Large diameter plastic pipe forces the o ring to the base of the sharpie cap.
Attached Images
Last edited by John McM; 07-02-2017 at 07:04 AM .
07-02-2017, 06:32 AM
Rennlist Member
Thread Starter
Join Date: May 2001
Location: Auckland, New Zealand.
Posts: 13,250
O ring just visible.
Attached Images
Last edited by John McM; 07-02-2017 at 07:05 AM .
07-02-2017, 06:33 AM
Rennlist Member
Thread Starter
Join Date: May 2001
Location: Auckland, New Zealand.
Posts: 13,250
Q tip / cotton bud with the cotton end removed is used to hold the o ring
Attached Images
Last edited by John McM; 07-02-2017 at 07:06 AM .
07-02-2017, 06:34 AM
Rennlist Member
Thread Starter
Join Date: May 2001
Location: Auckland, New Zealand.
Posts: 13,250
Grasp the screw in the top of the sharpie cap while holding the o ring in place with the q tip.
Attached Images
Last edited by John McM; 07-02-2017 at 07:08 AM .
07-02-2017, 06:34 AM
Rennlist Member
Thread Starter
Join Date: May 2001
Location: Auckland, New Zealand.
Posts: 13,250
Lift the sharpie cap away from the bolt end.
Attached Images
Last edited by John McM; 07-02-2017 at 07:09 AM .
07-02-2017, 06:35 AM
Rennlist Member
Thread Starter
Join Date: May 2001
Location: Auckland, New Zealand.
Posts: 13,250
Ready for the next step.
Attached Images
Last edited by John McM; 07-02-2017 at 07:10 AM .


