When you click on links to various merchants on this site and make a purchase, this can result in this site earning a commission. Affiliate programs and affiliations include, but are not limited to, the eBay Partner Network.
I had hoped that this would be the last order but I stuffed up my stud order. It appears that an 8x48mm stud is not 48mm long, it is 48mm long after the stud is inserted. The one I actually need is 8x32mm. I've put another order in. Unfortunately it will take another week to arrive, closing my rebuild window as I have another three weeks travel coming up. This rebuild is dragging on.
Along with the wrong stud, I received the other parts of my order. A spare distributor for my other C4, a seal puller for the front diff seal I'll replace and a spare crankcase gasket set. The Elring brand is preferred by some for the front and rear crankshaft seals. I find it interesting how different the various brands are with what they include e.g. The Porsche one has the case perimeter bolts whereas the Elring set doesn't. This helps explains the reason why the various sets differ so much In price.
New oil temp and pressure sender. The old ones were original with 5/90 markings. They still worked but why chance it when its so easy to sort these with the engine out? Also more evidence of gorilla mechanics in the past
I used a zinc-phosphate dip on my fan (so not a coating) and it gave it a very factory look ala the chain covers etc.. process microblast then zinc phosphate w activator at 30deg dip for 15-20min. This is a formula used by a guy near me who does high end 911S/T type restos which he uses on mag gearboxes etc..
Fan looks good. Is the fan and surrounding shroud magnesium?
Any reason you went with this dip rather than a sand/media blast and powder coat?
^^ yes Powder coat is thicker and can cause issues (many comments on the forum re rubbing etc..) and also it seals the metal where the dip allows it to remain 'breathable' for want of a better word while still protected.
The PC was also bubbling a bit after 3 years .. as the the base metal is very hard to completely clean (many PC guys wont even accept mag because of this) so effectively the bubbling results when the contaminants try leave but are blocked by the PC.
Also the finish is just so period correct and factory I just dug it - felt right.
That style of seal puller is horrible. You will have much better luck drilling two holes into the seal and then using two screws to pull it out, same goes for the engine RMS and FMS.
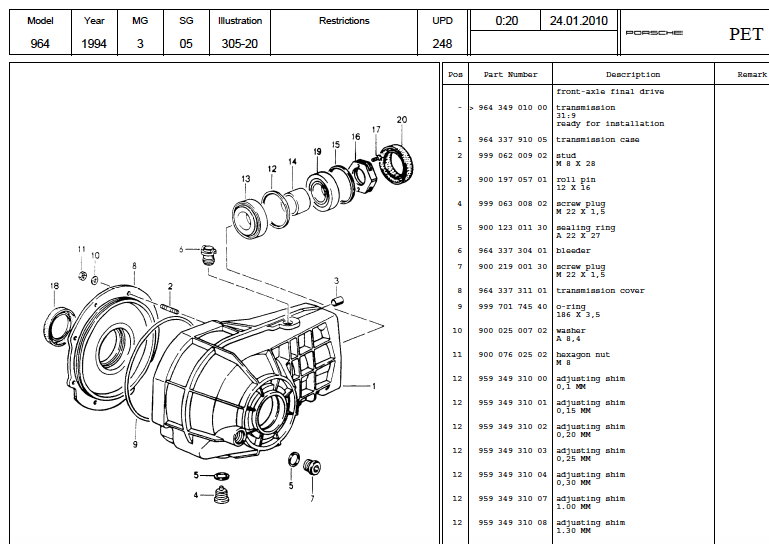
More parts have arrived. These are to replace a seal in the front diff and change the mount at the front. .
Hi John - I'm just at the same place on my '90C4 with the subframe off and everything getting resealed.
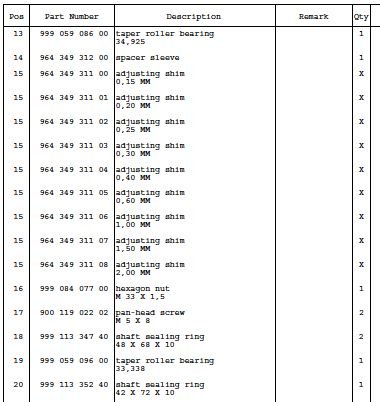
I see the big seal is the one for the front diff (#20 right?)
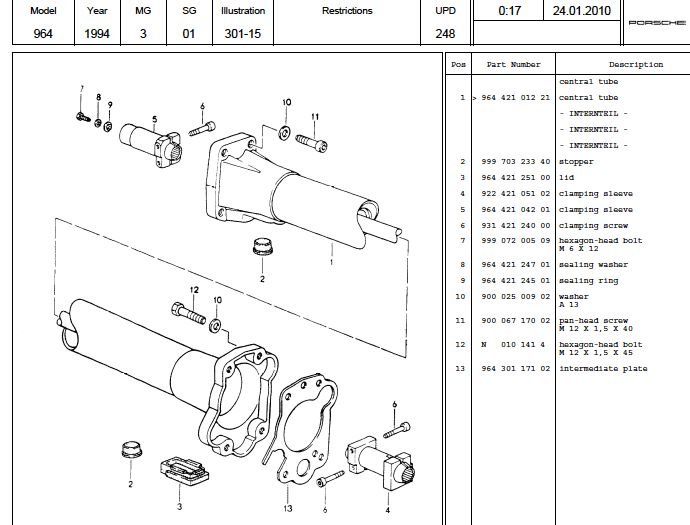
Where do the two pieces in the top 2 pics go?
Are those what number 2 (stopper) and ...???...
Are you not replacing #18 (side seal)?
That style of seal puller is horrible. You will have much better luck drilling two holes into the seal and then using two screws to pull it out, same goes for the engine RMS and FMS.
Noted. It was only a package filler, but still annoying if it's not up to the job. I've yet to use it.
Hi John - I'm just at the same place on my '90C4 with the subframe off and everything getting resealed.
I see the big seal is the one for the front diff (#20 right?)
Where do the two pieces in the top 2 pics go?
Are those what number 2 (stopper) and ...???...
Are you not replacing #18 (side seal)?
The clue is in the numbers on the bags behind the parts I have yet to get to the front diff. I'm just starting on the case reseal.
As for the side seals, I hadn't thought that far forward. I figured they could be done later if they leak. That said I have to do the boot on the inner left CV so it would make sense to do it before I refill the diff.
I haven't had any problems using that style puller. I put a rag under the pivot edge so that it doesn't ding any soft aluminum. Those big seals lift out fairly easily. I prefer that style over metal shavings and the possibility of having the drill go too far.
Nose bearing seal. Clean area with alcohol, small bead of Curil T around the area where the seal edge meets the bearing and push the seal home by hand.
When disassembling I numbered all of the bearing shells and bearing support areas, then took photos. When I reassembled them I renumbered the supports as per the photos to ensure each bearing went back exactly where it came from. I cleaned each bearing shell with white spirits. I also put clean air through the galleries.
Installing the oil pump, intermediate shaft and chains. A small coat of Molykote 111 on the seal that goes under the pump. Assembly grease in the pump and on the bearings. Put the chains back on the correct side and make sure the chain link joiner faces out of the engine. Drop it all in being careful to make sure the oil pump goes in squarely on the seal. Torque three oil pump nuts to 17 ft/lb or 25Nm. Rotate the shaft to make sure it moves freely. Wipe off the excess assembly grease and fit the temporary chain holder. Next is the crankshaft.


 06-19-2017, 07:03 AM


 I have yet to get to the front diff. I'm just starting on the case reseal.