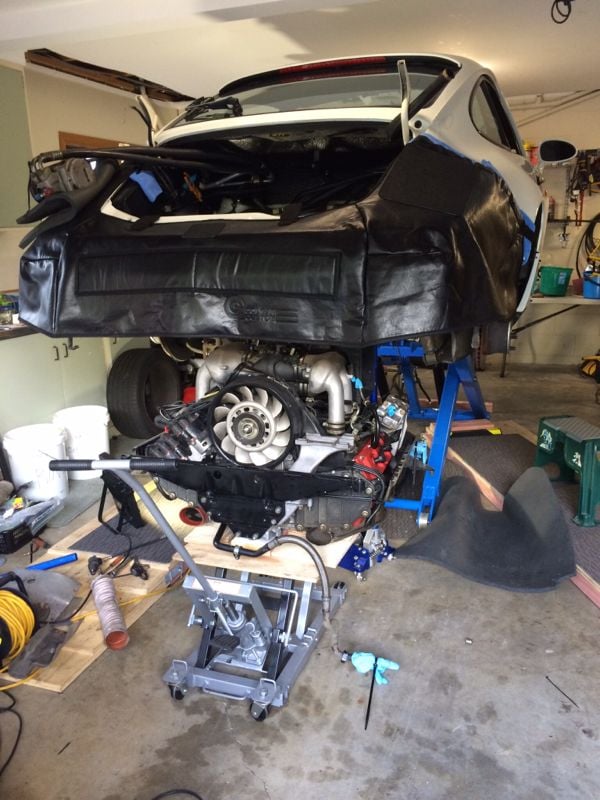
964 C4 light refurb
#511
Rennlist Member
Thread Starter
Matthew, it beggars belief whatever it is. I have my other 964 to drive in the meantime so this reseal and now cooling system flush as well can take as long as needed to get it right.
#514
Rennlist Member
Thread Starter
Is it still an engine drop when you lift the car off the engine? It's semantics, because all that matters is the engine and transmission are out and I didn't break anything. I learned the hard way last time that it's easier to avoid leaks/spills than clean up the mess. This time I siphoned the power steering reservoir and drained the two pipes slowly into the cut-off bottom of a plastic bottle. Barely a drop leaked. It helps to measure the amount taken out for when it's time to refill. 450ml is the total.
Last edited by John McM; 03-19-2017 at 04:56 PM.
#515
Rennlist Member
Thread Starter
As my car is RHD C4, I had to remove the clutch pipe that loops under the transmission, otherwise the transmission could hit it on the drop. I cut up an old pipe then sealed and folded the end. It worked as a blanking plug. Btw the plug couldn't have been in a worse place, the moment I loosened the connector I had fluid running down my arm.
#516
Rennlist Member
Thread Starter
With the pipe sorted I decided to make the drop very safe by removing the starter motor when the engine was half way dropped. This meant I didn't have to worry about it fouling the driveshaft on that side.
BTW I fully recommend a lift. I competed this drop with no help and no issues and it was so much easier than with the jack stands etc. Next up is transmission off and the engine on to the yoke.
BTW I fully recommend a lift. I competed this drop with no help and no issues and it was so much easier than with the jack stands etc. Next up is transmission off and the engine on to the yoke.
Last edited by John McM; 03-18-2017 at 06:58 AM.
#517
Rennlist Member
Thread Starter
With the White car out of action I've been driving the Silver car. I noticed that the HVAC wasn't working unless on the blue position. A classic sign the rear blower wasn't working. Sure enough the fuse had blown (30A in rear fuse box)
Rather than hope it would just go away and risk blowing more fuses I installed my spare fan ex the White car. Full fan function is back. I had a look at the old fan. Nothing obvious but I'll replace it in due course so I don't end up with a big deferred maintenance list on my cars.
Rather than hope it would just go away and risk blowing more fuses I installed my spare fan ex the White car. Full fan function is back. I had a look at the old fan. Nothing obvious but I'll replace it in due course so I don't end up with a big deferred maintenance list on my cars.
Last edited by John McM; 03-18-2017 at 03:26 PM.
#518
Burning Brakes
Nice protection of the new paint job. Everything looks so clean already. Going to make "bag and tag" less of a mess... Btw, I saw there was a post to this thread at 2:30am pst, I was viewing at 10:00am PST and could not see post. I am just getting back to RL viewing at 7:00pm PST and obviously see it. I see you had carrier support welded, did you paint or powder coat all of carrier. I have on order and may prime/paint the bare metal at minimum before taking to have stitch welds and then decide to paint or powder coat 

Last edited by C4inLA; 03-18-2017 at 11:59 PM.
#519
Rennlist Member
Thread Starter
Nice protection of the new paint job. Everything looks so clean already. Going to make "bag and tag" less of a mess... Btw, I saw there was a post to this thread at 2:30am pst, I was viewing at 10:00am PST and could not see post. I am just getting back to RL viewing at 7:00pm PST and obviously see it. I see you had carrier support welded, did you paint or powder coat all of carrier. I have on order and may prime/paint the bare metal at minimum before taking to have stitch welds and then decide to paint or powder coat 

#520
Rennlist Member
Thread Starter
I used the Pelican parts lift bar with a generic engine crane to get the engine on the yoke. I chose a three point lift using the engine carrier and the prefitted yoke as lift points. It took a few goes to get the engine level and lifted enough to get it in the stand. I did the engine drop, transmission separation and fitting to the yoke with no help. Lastly I cleaned up my garage as I don't want a mess to walk around in while I focus on the engine.
#525
Rennlist Member
Thread Starter
Hi Rob, Pelican parts. It's a Colgan product. Be aware though that they put the hard pad on the right fender, when we really need it on the left for the air con compressor.


