When you click on links to various merchants on this site and make a purchase, this can result in this site earning a commission. Affiliate programs and affiliations include, but are not limited to, the eBay Partner Network.
ok, so just to systematically go through everything.
The door lock has three ways it can lock - first, there is the internal (round) ****, second is the key lock in the handle and third is the central locking. All of these connect in different ways.
The internal **** connects from just below the **** there is a rod about 18" long that passes through a rectangle piece of rubber and attaches to the middle left hand side of the door striker mechanism. The second method through the key lock works by the tumbler inside turning either left or right (to lock or unlock) which activates a microswitch attached to the back of the tumbler on the outside door handle. This then triggers the electrics to send a pulse to the actuating rod which is in the bottom of the door about 7/8 of the way along on the left hand side (it is incased in a rubber sleeve). The actuating lever either moves up, or down and attaches to the bottom left of the door striker.
At the top of the door striker plate there is a rectangular piece that pivots to the front and back. When in the front position, the striker is unable to move underneath and as such the door is 'locked', when the other way, it can and the door will be able to be unlocked.
What I would suggest - as it doesn't take that long to do , would be to take out your mechanism and clean everything up, lube correctly and test. This will take about 1/2 hour all up.
So, (clearly, your door panel is already off !!).
Make sure you window is all the way up.
On the edge of the door, there are two plastic covers to remove - one oval one at the top and one round one at the bottom. These expose two 5mm screws at the top and one at the bottom. The screws also hold on a metal plate. Remove these.
On the inner edge of the door - remove the other oval plastic cover and take out the two 5mm screws.
There is a another 5mm allen screw inside the door, near the bottom of the centre pillar of the window frame that undoes from the front - it has a bracket attached too - note the orientation.
One more screw to remove and that is a small allen screw just under the vent window.
Ok, now you can lift out the window frame in it's entirety ! Just go slowly and evenly.
Now we take off the striker plate.
Reach in towards the striker plate and remove the 18" rod - it just presses out. Then remove the lever that is actually joined to a wire that runs to your door opening inside handle.
Finally, remove the rod from the actuating lever below - again, just presses out.
Now, it is just a matter of undoing the three phillips screws from the outside door jamb. You will need to wriggle the door striker through the hole - sometimes, you need to 'click' the door striker a notch - but you'll see how.
Ok, once out - wash the whole thing in petrol - air dry it and start checking for working parts. Lube up sparingly - one the spring where the rod slides in from the outside , on the door click mechanism and on the moving parts for the actuator rods. Just a SMALL amount of grease is fine.
Reassemble and hopefully, should be all ok. Sorry, no pictures - just doing this from memory !!
Awesome thanks man, much appreciated. Might be able to get to this sometime this week. Will let you know how it goes!
Originally Posted by hepkat63
ok, so just to systematically go through everything.
The door lock has three ways it can lock - first, there is the internal (round) ****, second is the key lock in the handle and third is the central locking. All of these connect in different ways.
The internal **** connects from just below the **** there is a rod about 18" long that passes through a rectangle piece of rubber and attaches to the middle left hand side of the door striker mechanism. The second method through the key lock works by the tumbler inside turning either left or right (to lock or unlock) which activates a microswitch attached to the back of the tumbler on the outside door handle. This then triggers the electrics to send a pulse to the actuating rod which is in the bottom of the door about 7/8 of the way along on the left hand side (it is incased in a rubber sleeve). The actuating lever either moves up, or down and attaches to the bottom left of the door striker.
At the top of the door striker plate there is a rectangular piece that pivots to the front and back. When in the front position, the striker is unable to move underneath and as such the door is 'locked', when the other way, it can and the door will be able to be unlocked.
What I would suggest - as it doesn't take that long to do , would be to take out your mechanism and clean everything up, lube correctly and test. This will take about 1/2 hour all up.
So, (clearly, your door panel is already off !!).
Make sure you window is all the way up.
On the edge of the door, there are two plastic covers to remove - one oval one at the top and one round one at the bottom. These expose two 5mm screws at the top and one at the bottom. The screws also hold on a metal plate. Remove these.
On the inner edge of the door - remove the other oval plastic cover and take out the two 5mm screws.
There is a another 5mm allen screw inside the door, near the bottom of the centre pillar of the window frame that undoes from the front - it has a bracket attached too - note the orientation.
One more screw to remove and that is a small allen screw just under the vent window.
Ok, now you can lift out the window frame in it's entirety ! Just go slowly and evenly.
Now we take off the striker plate.
Reach in towards the striker plate and remove the 18" rod - it just presses out. Then remove the lever that is actually joined to a wire that runs to your door opening inside handle.
Finally, remove the rod from the actuating lever below - again, just presses out.
Now, it is just a matter of undoing the three phillips screws from the outside door jamb. You will need to wriggle the door striker through the hole - sometimes, you need to 'click' the door striker a notch - but you'll see how.
Ok, once out - wash the whole thing in petrol - air dry it and start checking for working parts. Lube up sparingly - one the spring where the rod slides in from the outside , on the door click mechanism and on the moving parts for the actuator rods. Just a SMALL amount of grease is fine.
Reassemble and hopefully, should be all ok. Sorry, no pictures - just doing this from memory !!
Ha, not stating the obvious (at least for me), but unfortunately, hopes shot up and were then dashed when it still didn't work with the door closed...
Damn, I was hoping it was going to be something simple. Just to be sure, I'll also mention that you need power to operate the locking mechanisms. By this I mean there has to be enough battery power to lock the car. The only thing you can do with the locks without power is to unlock a door (this is a failsafe in case the battery goes flat).
It is possible to both lock and unlock the doors with the key, also without battery power. I do it all the time in winter storage. As far as I know is this the same in all 964 and 993 models.
Cheers,
Tore
It is possible to both lock and unlock the doors with the key, also without battery power. I do it all the time in winter storage. As far as I know is this the same in all 964 and 993 models.
Cheers,
Tore
Not with mine Tore. I wanted to lock mine with the key with the battery disconnected for the winter but it would not lock without power. Tried as a hard as I could without risking snapping the key. So had to leave the bonnet open, lock the car and then disconnect the battery and close bonnet. Easy to unlock though when I was ready to bring it out of temporary storage. Hence why I mentioned it above.
Hey hepkat, made an attempt today. On scale of 1-10, where 10 is Napoleons invasion of Russia in winter and 1 is Desert storm (the first one), I was somewhere between an 8.5-9.
My hands are dirty as he'll with some thick grease, even though my drivers window never went down, I'm pretty confident now that it definitely won't work, and best of all, I didn't even get the mechanism out. The "wire" part that is connected to the bottom of the mechanism wouldn't come off and I go too afraid of breaking it to force it off for good. So I reassembled with my tail between my legs hoping it would go back together.
I also dropped a bolt inside the door in an inaccessible place.
Sounds awful like it should be a 10! But I did get good access to the mechanism and gave it a thorough cleaning. Still doesn't work as it should, but at least it's clean!
The instructions were most helpful and I'm probably going to cry uncle and take this into a professional. Funking porsche locks/doors.
Yup, no kidding. Was kinda fun, though my meeting tomorrow when I shake hands will be interesting given I look like a hardened mechanic with the amount of grease under my nails will be interesting.
Been meaning to try out a new shop in my neighborhood anyway, this might be just the task.
I did not replace the two plastic covers; those are there for only anti-theft right?
plastic covers are just to keep the dust out. Do yourself a favor and when you're next at the supermarket, purchase a box of disposal gloves (like the ones doctors/paramedics use). Yes, at first it's like - too gay !! but believe me, when you've spent years with grease inground into your skin, these things are the ducks guts. For a couple of bucks, you get a few hundred and just use them everytime you work on the car. No more greasy hands !!
Anyhow, back to the job at hand. I am not sure where you could not undo things. If you want a post a few photos of where you were stuck - I'm happy to help out.
Sure, so I stewed on the what was wrong for a while this morning on my commute and came to the following conclusions:
1. I never removed the whole window apparatus; instead I "pushed up" the slider bar that sits directly in front of the striker plate to gain access to it. I'm figuring this works as well, but also part of the reason I was afraid that my window will never work!
2. The latch on the outside of the door won't fit through the hole, or at least I don't think it will even if I was able to get that final spring/attachment off. This was really why I gave up despite being so far into the project; I thought even if I do get this thing off, I'm not confident that I will actually be able to get the whole thing out given the diameter of the hole through which the latch has to travel.
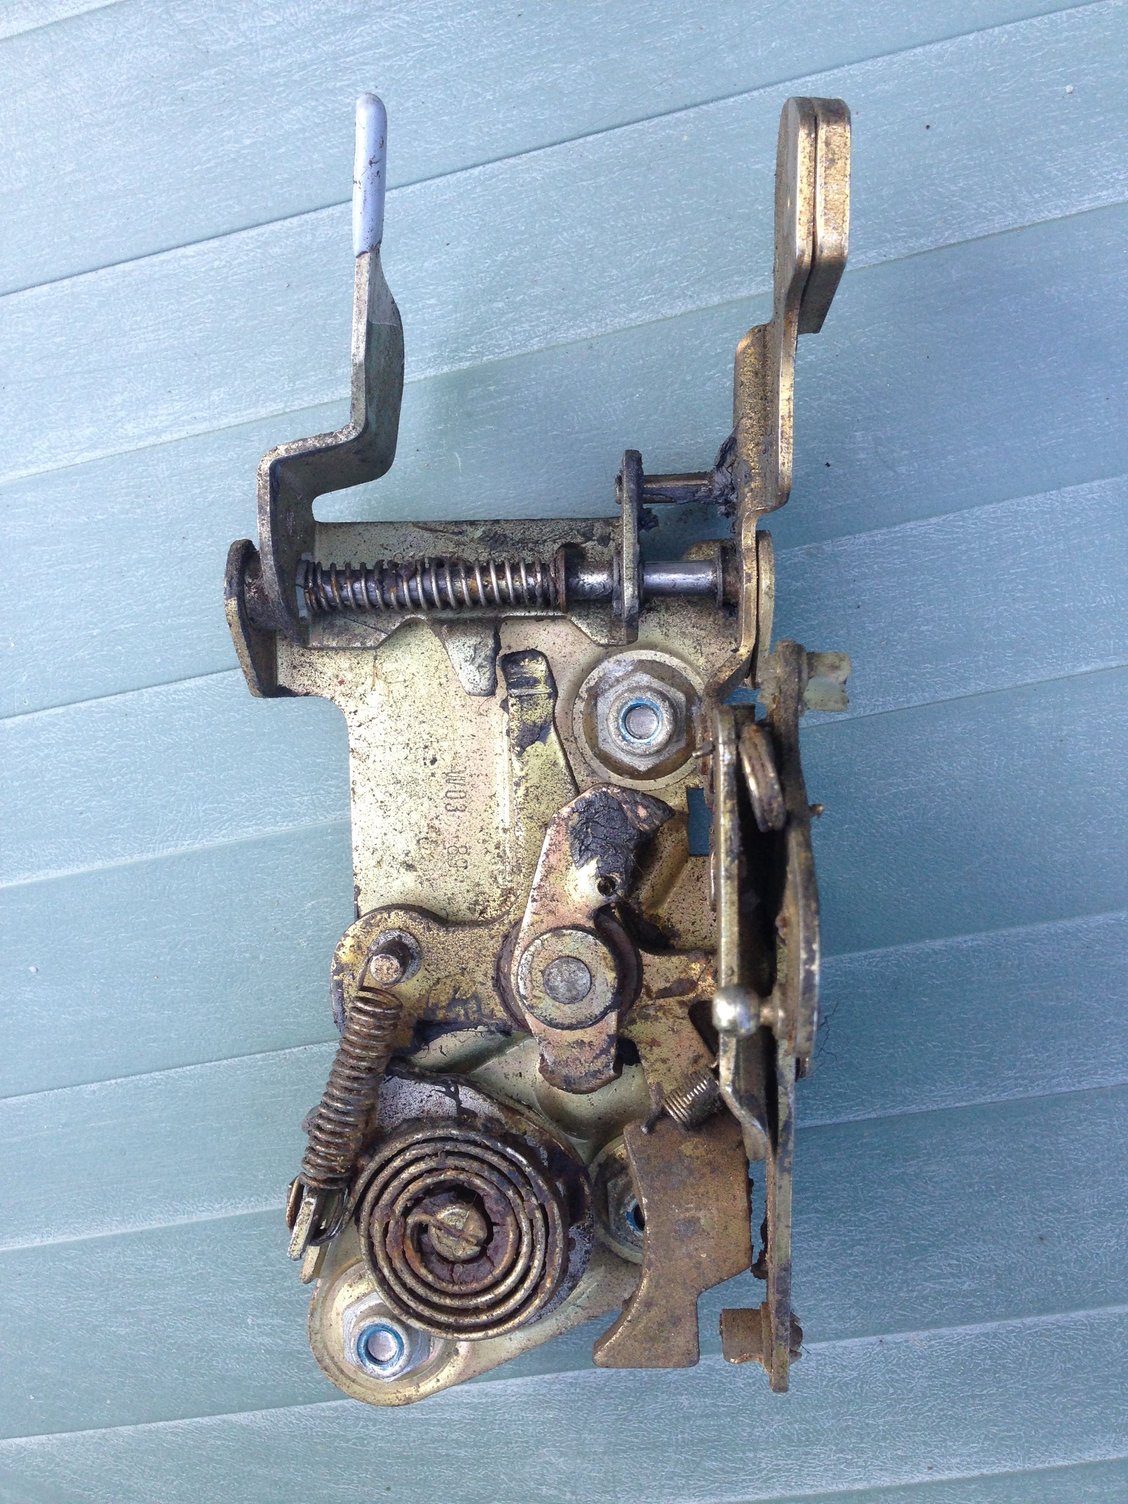
3. This is more or less the view I had peering through the large oval hole in my door. I cleaned three springs (not the small one on the bottom right of the photo, which is compliments of Bob here on RL) using degreaser, q-tips, and napkins. I gave it a thorough bath of WD-40 afterwards. Most of this dripped down the inside of the door to the three drainage holes at the bottom. I cleaned that area out too, which was where most of my greasy fingers came from.
Hi,
ok, clearly this picture shows a filthy striker mechanism. I have annotated the picture to hopefully explain my previous comments. In particular, where the 'wire' connector goes on to the middle piece, you can see it is raised (bulb) and hence why it needs a little persuasion to move. Go and buy yourself some trim removal tools. They are very cheap. You usually get a set of five plastic tools that will make jobs like this a breeze. Hope this helps.
Took it into my local shop; they said it was the actuator, and they should be able to get it back together in a jiffy.
He also said that my ignition something or other was really "twitchy". Literally no idea what that means, but he said that the car was stalling when he drove it into the garage. I'm not Michael Schumacher, so I've stalled the car maybe once in a year of ownership. I think he saw my car and $$$$$$$$.
Just picked up; final damage was:
Actuator was $132 + $140 in labor (1hr) = $282 with tax, but now the door opens and closes with authority!
Not with mine Tore. I wanted to lock mine with the key with the battery disconnected for the winter but it would not lock without power. Tried as a hard as I could without risking snapping the key. So had to leave the bonnet open, lock the car and then disconnect the battery and close bonnet. Easy to unlock though when I was ready to bring it out of temporary storage. Hence why I mentioned it above.
Same with mine, except I only realised after stripping all the electrics out of the door then driving somewhere and trying to lock the car! I had to weld a tab on the door lock mechanism so I can lock with the key. I checked on a 993 turbo that was in the shop and it already had the tab on there so I guess some do some dont!


 02-22-2015 | 11:02 PM