When you click on links to various merchants on this site and make a purchase, this can result in this site earning a commission. Affiliate programs and affiliations include, but are not limited to, the eBay Partner Network.
Ok body-shop folks: I bought a new rubber "smile" and this is what I've got now that I've tightened all the nuts and bolts .
Anyway, is the smile supposed to be above the fender and below the frunk as shown below? You can see the "bubbling" up of part of the smile in the second picture...
I just adjusted this on my car...the rubber strip is most likely "bubbling" because the bottom grooves are not securely tucked into the metal riveted strips on both sides the topside of the bumper...
from inspecting other 964s...I adjusted my front end of the frunk to sit snug onto the rubber weather strip so to prevent water seepage...so my frunk is sitting slightly below the bumper but flush with the fenders....you can raise/adjust the bumper with the bolts holding the bumper from inside the cargo bay (near the latch)...
in your picture, the drivers side frunk line looks off from the fender...I had the same issue when receiving the car...I found it easiest to adjust the frunk by loosening the 4 allen bolts (2 on each side) at the rear ends...closing the frunk but not locking the latch.....in this position, I gently repositioned the frunk so that all grooves looked even around its perimeter...then half opened the frunk without causing any shifting and re-tightened the bolts...
Aligning the smile is a time consuming job done best on a lift at eye level. It takes a lot of back and forth and readjusting. I found that it worked best once I had the smile installed in the support plates on either side to gradually tighten from the middle and work my way out pulling and stretching as you go. I don't tighten any of the screws until I get it close and then go back and start from the center again securing the screws one at a time and checking the fit. Sometimes if it is difficult using a hair dryer to soften the plastic to lay flat helps but don't over heat.
LuckyJ - Did adjusting the frunk not cause the front part to bubble up more? I see the logic of putting more weight on the smile via the frunk, but I'm just concerned that it's weight in the wrong place that will cause it to push up more.
Anthony - Ha, I'm finding that out now When I removed my old smile from my old bumper, there were two rivets that were about 1.5' from the center line and fit into pre-made holes in the bumper. My new bumper has the same holes which makes me think that perhaps the solution is riveting? I'm also only finding 3x screws per side that attach the bumper to the fender, there don't appear to be any other screws that sandwich the smile between the bumper and the body.
There should be four screws on either side (8 in total) holding the bumper to the fender and they require the metal plate that sandwiches the bumper to the fender. There are two metal plates riveted to the bumper that sit under the front of the fender that work with the spring clips on the fender to hold the bumper tightly to the car. They did this since you can't secure them with screws. The lip of the plate fits into the grove on the underside of the smile. These plates are a royal PITA and most body shops cheat and eliminate them. The four center screws attach to a metal strip that has four bolts that secure it to the tub that allow you to adjust the bumper up and down. The bolts are just inside the frunk. By all rights you have to play with everything to get it correct. Some are far easier than others. There is no need to rivet the smile to the bumper although I have seen some use this approach. This is one of those jobs that sometimes you have to walk away from and come back to after you are relaxed.
I have done 5 of these in the past year and they are usually a PITA and no two react the same to the adjustments.
Thanks Anthony, I undid the 4 screws that hold the metal plate that slides into the back of the smile and adjusted (about 5x) until it was right. Very helpful and saved me from pulling the whole bumper off and putting it back on.
LuckyJ - Did adjusting the frunk not cause the front part to bubble up more? I see the logic of putting more weight on the smile via the frunk, but I'm just concerned that it's weight in the wrong place that will cause it to push up more.
the riveted plates hold down the rubber smile...like cobalt mentions...it is a real PIA to slide the underside of the smile grooves into these plates...I used lubricant and many attempts...gotta be real patient but it eventually fit...
Thanks Anthony, I undid the 4 screws that hold the metal plate that slides into the back of the smile and adjusted (about 5x) until it was right. Very helpful and saved me from pulling the whole bumper off and putting it back on.
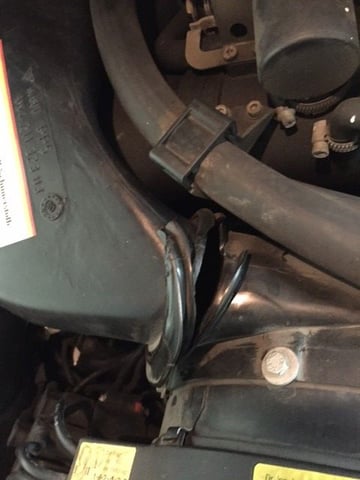
should I be in a rush to fix this torn rubber? Its torn on both the blower side and the shroud side. Can just the rubber be replaced or do I need to replace the parts? Do you guys have part numbers or names for these parts? Thanks!
should I be in a rush to fix this torn rubber? Its torn on both the blower side and the shroud side. Can just the rubber be replaced or do I need to replace the parts? Do you guys have part numbers or names for these parts? Thanks!
You need part#96410640302 (Air Duct) and make sure you get the 964 part and not the 993 one or else it may not fit correctly. It is a simple removal/install... Take the blower out by disconnecting 2 wires and removing (2) 10mm bolts, then loosen the (3) 10mm bolts holding the air duct, slide the old one out, put the new one in, tighten the previously loosened (3) 10mm bolts, reinstall the blower, reconnect the wires, and you're done.
should I be in a rush to fix this torn rubber? Its torn on both the blower side and the shroud side. Can just the rubber be replaced or do I need to replace the parts? Do you guys have part numbers or names for these parts? Thanks!
You replace the whole part, it's called an air duct
964 106 402 06 or 964 106 403 02
How did you replace the bulbs? Solder in new ones?
I bought 6 cluster bulbs from Pelican (spares are always good). Disassembled the cluster bulbs to the bare element and 2 wires. Un-soldered the old bulbs and re-soldered the new ones. A little fiddly, but worked a treat. All of my center console bulbs were out, now she has a warm glow when driving at night.
You need part#96410640302 (Air Duct) and make sure you get the 964 part and not the 993 one or else it may not fit correctly. It is a simple removal/install... Take the blower out by disconnecting 2 wires and removing (2) 10mm bolts, then loosen the (3) 10mm bolts holding the air duct, slide the old one out, put the new one in, tighten the previously loosened (3) 10mm bolts, reinstall the blower, reconnect the wires, and you're done.
Originally Posted by Earlydays
You replace the whole part, it's called an air duct
964 106 402 06 or 964 106 403 02
Thanks guys! Any negative effects if I wait to replace this?
So yesterday my spoiler decided to no longer move. When you first turn the ignition, the spoiler light indicates, and then turns off as usual but the wing cannot be put up by the switch or by driving. I checked the fuse and pulled the cover off the motor to check for debris but didn't find any.
first time going this far with any car...most difficult DIY job I've finished was replacing the front bumper...anyways, my oil pressure gauge needle was acting funny, so I have gotten to the sender...but the damn thing won't pull out...how do I get the sender manifold out...just pull or lift with a flat head screwdriver?...impossible to get a 24mm wrench in there to turn...thanks

 11-10-2015, 01:25 AM
 .
.