

Forgive me Rennlisters, for I have sinned
 09-21-2012, 03:56 PM
#16
Three Wheelin'
Slow progress. I've managed to get all calipers and disks off now and am well into stripping down the calipers. Copious heat has helped remove many of the plate retaining button screws though I've a few that have "rounded off" the hex socket that I'm now trying to work an oversize imperial drive into (without much success - all suggestions on this very welcome).
Also you can dremel a slot in the top and try a chunky screwdrive bit, the heat of the dremel may well free it up a bit too.
I answered my own Q1: The dust seals come out with a little prising from some watchmakers screwdrivers, though those for the larger pistons on the front require the guide plate to be removed first. It seems to be OK to shield them to avoid damage from my gas torch when persuading the button screws. None seemed to have suffered any visible heat damage.
However, the front piston dust covers are in worse condition than the rears - a few have splits, though the seals seem to be in OK nick with no evidence of fluid leaking past them.
Q3: Should I replace all dust covers/seals or just those with visible damage?
However, the front piston dust covers are in worse condition than the rears - a few have splits, though the seals seem to be in OK nick with no evidence of fluid leaking past them.
Q3: Should I replace all dust covers/seals or just those with visible damage?
The porsche/brembo replacement comes with a piston which makes it very expensive to do all of them. http://www.biggred.co.uk/ will probably do a full set more cheaply - you may well find someone similar more local to you.
BTW Any bubbling in the rubber means the metal ring is rusting under the seal.
Anyway these are just dust seals the main hydraulic seal is tucked away 1/4inch into the cylinder so the brakes will work fine without them, infact some earlier applications of the same brembos came without seals, as do many motocycle and race car brakes.
Front disks seem to have faired less well than the rears, with some corrosion pitting on the inboard face. (Outboard cleans up pretty well with just a few small pits). So...
Q4: Replace the disks or have them skimmed? If the latter, do I just look up "local chap with big lathe" or is there some black art involved?
The factory minimum thickness listed for the discs don't allow for much of a skim on worn discs, and replacements are fairly cheap. So skimming is marginal cost-benifit-wise.
You can skim on a lathe, but there are better/more reliable ways, one which acts more like a grinder, and one which is done with the disc still on the car.
 09-21-2012, 05:12 PM
#17
Racer
Thread Starter

Thanks Alex; your advice is much appreciated. I'll give the tangential chisel technique a go.
Er - "Brake grease" - I realise I've never done this job properly with anything other than hydraulic fluid as lubricant. Will my coppaslip be OK or should I be using a silicone grease?
Z
Er - "Brake grease" - I realise I've never done this job properly with anything other than hydraulic fluid as lubricant. Will my coppaslip be OK or should I be using a silicone grease?
Z
09-21-2012, 05:50 PM
#18
Three Wheelin'
You're probably fine just using brake fluid, fitting the actual pistons etc. I just like to get something under the dust seal though to keep out the corrosion and crud, just needs the next person who changes the pads to be a bit rough and the dust seals get nicked easy enough.
coppaslip for the nuts and bolts and the backs of the brake pads, but not on the hydraulics or rubber, you want some nice silicone grease for that.
coppaslip for the nuts and bolts and the backs of the brake pads, but not on the hydraulics or rubber, you want some nice silicone grease for that.
09-25-2012, 07:26 AM
#19
Racer
Thread Starter
Miller Oils red rubber grease/Silverhook Ceramic protector/other?
Thought I'd try and post some pics too (this may not work):
Starter mid service:

And reinstalled:

Rear right disk before:

and after:

Before and after on the rear brake guards:

Cheers,
Z
09-25-2012, 10:04 AM
#20
Three Wheelin'
Looks good! I'm jealous, the starter is so much easier to get at on a C2 compared to a C4.
That Millers stuff would be fine, I use some weird green stuff with French writing on, of unknown origin, it's such a lovely emerald green colour though you know its got to be good
If you've not already fitted them you could paint the backing plates with some barbeque paint or something, I fitted new ones a couple of years back and they are already beginning to rot at the bolt holes - kicking myself slightly now.
09-25-2012, 12:01 PM
#22
Racer
Thread Starter
The fronts, however are painted steel and I think when I get to strip them I'll discover that they're shot. Replace with RS ones maybe?
Patience young Jack. I'm thinking I shouldn't photograph the whole thing until I drive it out into the daylight. It looks too pathetic and undignified stuck up on axle stands. But thanks for taking an interest!

Cheers,
Z
09-30-2012, 07:23 PM
#23
Racer
Thread Starter
Can I pick your brains chaps?
On my task list was to clean up the trailing arms and rear struts (as there's some unsightly surface rust on the springs and dampers - check out my 3rd pic above) so I've levered off damper to trailing arm bolts (wow - there's some torque!) dropped the struts (all skin now removed from knuckles) and taken my wire cup brush to the trailing arms. So now I want to take off the AR bar so have undone the nuts at the end of the drop link. And tapped at the top of the drop link with my rubber mallett. Then added lots of penetrating fluid. Removed the ARB mounting bushes. Tapped (a bit harder) at the top of the link again.
Is heat still my friend or is there a trick to this one?
Cheers,
Z
10-03-2012, 10:44 AM
#24
Racer
Thread Starter
Sorry - more questions.
I'm contemplating having my front brake calipers sandblasted; the plate surfaces are slightly corroded, no amount of carb cleaner will make the visible bits gleam and besides, the decals look grubby. Hell, I may even do the rears too.
There's a rubber(?) spacer on the interconnect pipe. Whilst I'm pretty handy fabricating the pipes and have plenty of cunifer left over from the new hose to caliper hard lines I've had to make up, what's the spacer tube made from and where do I get it?
Also, any tips on blasting? Obviously I want them to stay WELL clear of the cylinders, dust cover grooves and threaded bits, but are there any other "gotchas"?
Thanks!!
Z
 )
10-06-2012, 06:39 PM
)
10-06-2012, 06:39 PM
#26
Three Wheelin'
I can't help on the blasting front but I can't imagine any harm will be done, obviously you need some paint, powdercoat or even plating i guess. Don't forget that the spring plates will lift and pinch the pads if the coating is too thick.
The link pipes are pretty cheap from porsche or type911 and are nice quality, I also have the gear to fab pipes, and I've made up a couple for my car, but given the choice i'd get the factory bits.
The link pipes are pretty cheap from porsche or type911 and are nice quality, I also have the gear to fab pipes, and I've made up a couple for my car, but given the choice i'd get the factory bits.
10-06-2012, 07:10 PM
#27
I left all the bleed nipples/pad plates in but just finger tight and put bolts in the holes were the brake pipe goes in & just got him to blast the out side of the Calipers as the inside came up a treat with a scrub...& just replaced the dust seals pistons that looked worn & left the crossover pipe thingy on..
10-06-2012, 07:21 PM
#28
Forgot I put new nipples on after as there only a few ŁŁŁ from a good motor factors...
This guys good for for bits..www.porschecalipers.co.uk
This guys good for for bits..www.porschecalipers.co.uk
10-11-2012, 03:08 PM
#29
Racer
Thread Starter
Chaps, I clearly have no manners - bumping for response then leaving it for so long.
In my defence, I crafted a reply then lost it on posting due to some forum server software problem. Grrr.
Anyway, Fuch: Thanks for your pics, comments & suggestions. I'm sure my wife will be delighted when I tell her I need a shiny new set of six nipples. Scaramanga, eat your heart out.
Do you have any "after" pics of those calipers so I can see what I should be aiming at?
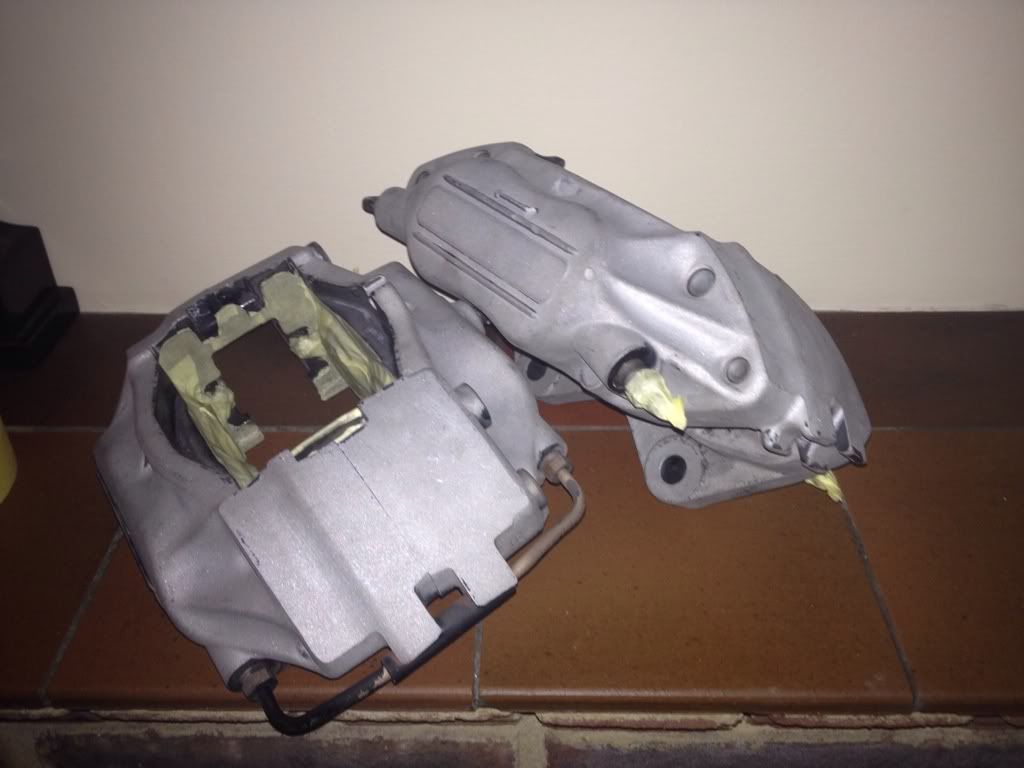
I've been battling for days to remove the last of the plate retaining button screws and finally managed the last two today. This is what the calipers looked like before heading for shot blasting.


As you can see, I ended up removing the cross-feed pipes too (just because). Still looking for some suitable tubing for the centre section of new ones or a may pay a visit to Type911.
Whilst I was scratching my head about how to get those blasted screws out, I turned some attention to the lump of rust. This particular LoR will be better know to you as the clutch slave cylinder which I last battled with on my quest to free the starter top mount nut. It's been dangling away there on the end of a perished flexible hose and I knew that one if not both would need replacing.
I spend all of 5 minutes trying to separate the 2 in situ before swearing mildly and reaching for the hacksaw. A vice and ring spanner made light(er) work of the job. Whilst I was there I broke loose the other end - this time with more swearing and a flare nut spanner braced against the gearbox. 20 minutes with the wire brush and the LoR started to take on the shape of a slave cylinder. Even the bleed screw thought better of resisting. Coat of etch primer, couple of coats of tough black and tada!:

Tell me that doesn't look brand new!! I'm a little worried that the tub nut on the hard line may not be moving independently and that this will be a problem when I come to reassemble. I suppose the thing to do is fix the flexible pipe to the hard line 1st then try to get the slave on and in place without introducing a twist. We'll see.
So, whilst I wait to get the calipers back then send them off for the stove-enamel treatment its either valve adjustment or sorting out that distributor.
How about you choose! (i.e. if you think I'm dumb doing the former before the latter, please tell me!!)
Cheers,
Z
In my defence, I crafted a reply then lost it on posting due to some forum server software problem. Grrr.
Anyway, Fuch: Thanks for your pics, comments & suggestions. I'm sure my wife will be delighted when I tell her I need a shiny new set of six nipples. Scaramanga, eat your heart out.
Do you have any "after" pics of those calipers so I can see what I should be aiming at?
I've been battling for days to remove the last of the plate retaining button screws and finally managed the last two today. This is what the calipers looked like before heading for shot blasting.
As you can see, I ended up removing the cross-feed pipes too (just because). Still looking for some suitable tubing for the centre section of new ones or a may pay a visit to Type911.
Whilst I was scratching my head about how to get those blasted screws out, I turned some attention to the lump of rust. This particular LoR will be better know to you as the clutch slave cylinder which I last battled with on my quest to free the starter top mount nut. It's been dangling away there on the end of a perished flexible hose and I knew that one if not both would need replacing.
I spend all of 5 minutes trying to separate the 2 in situ before swearing mildly and reaching for the hacksaw. A vice and ring spanner made light(er) work of the job. Whilst I was there I broke loose the other end - this time with more swearing and a flare nut spanner braced against the gearbox. 20 minutes with the wire brush and the LoR started to take on the shape of a slave cylinder. Even the bleed screw thought better of resisting. Coat of etch primer, couple of coats of tough black and tada!:
Tell me that doesn't look brand new!! I'm a little worried that the tub nut on the hard line may not be moving independently and that this will be a problem when I come to reassemble. I suppose the thing to do is fix the flexible pipe to the hard line 1st then try to get the slave on and in place without introducing a twist. We'll see.
So, whilst I wait to get the calipers back then send them off for the stove-enamel treatment its either valve adjustment or sorting out that distributor.
How about you choose! (i.e. if you think I'm dumb doing the former before the latter, please tell me!!)
Cheers,
Z