
Yet another valve adjustment thread (dial indicator method)
 11-28-2011, 04:16 AM
#1
Rennlist Member
Thread Starter
Howdy folks,
I'm not done with my valve adjustment yet, but thought I would document the process for myself for the next time and help try and repay all the help this forum has given me over the years.
964 valve adjustment
- I ordered the valve cover gasket kit from Pelican Parts which includes the catalytic converter gasket and set of 4 nuts/bolts for that joint: 10-0906-093-M136
1)Drain the oil on your car (see other posts on how to do this, which means engine under tray is off, and car is on lift or at least rear is on jack stands)
2)Disconnect battery
3)Remove the rear blower outlet duct (I need to add more detail to this later). No need to remove the blower motor. On the other side remove air box cover and filter.
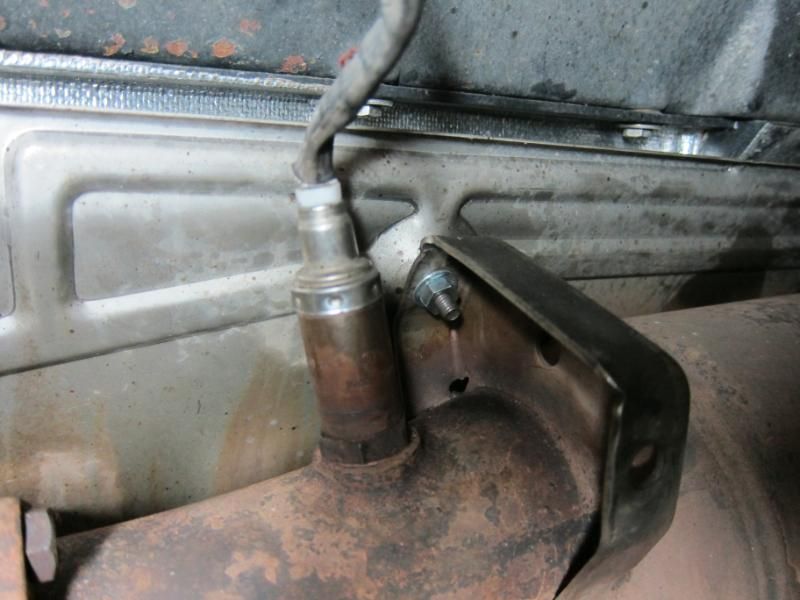
4)Remove the catalytic converter heat shield shown in the photo below. Be warned, there are U nuts on the back side of these bolts that may fail. And then at that point you are kinda screwed. This happened to me and cut the bolts off that failed. I used my dremel with the cut off wheel, several of them, to do so. These U nuts are a terrible design and can fail easily, two of mine did.
5)Remove the oxygen sensor grommet then shine a flashlight in the hole. You can then easily go the engine compartment and trace the oxygen sensor wire and disconnect it. The connector simply pulls apart.
I'm not done with my valve adjustment yet, but thought I would document the process for myself for the next time and help try and repay all the help this forum has given me over the years.
964 valve adjustment
- I ordered the valve cover gasket kit from Pelican Parts which includes the catalytic converter gasket and set of 4 nuts/bolts for that joint: 10-0906-093-M136
1)Drain the oil on your car (see other posts on how to do this, which means engine under tray is off, and car is on lift or at least rear is on jack stands)
2)Disconnect battery
3)Remove the rear blower outlet duct (I need to add more detail to this later). No need to remove the blower motor. On the other side remove air box cover and filter.
4)Remove the catalytic converter heat shield shown in the photo below. Be warned, there are U nuts on the back side of these bolts that may fail. And then at that point you are kinda screwed. This happened to me and cut the bolts off that failed. I used my dremel with the cut off wheel, several of them, to do so. These U nuts are a terrible design and can fail easily, two of mine did.
5)Remove the oxygen sensor grommet then shine a flashlight in the hole. You can then easily go the engine compartment and trace the oxygen sensor wire and disconnect it. The connector simply pulls apart.
Last edited by RicardoD; 12-08-2011 at 12:41 AM.
 11-28-2011, 04:30 AM
#2
Rennlist Member
Thread Starter
6)Remove the 4 bolts on the cat gasket side and then remove the single clamp nut on the other side to remove the cat. I let these joints soak overnight with PB blaster before I went at them. They removed easily the next day. The pelican valve cover gasket kit comes with this cat gasket and replacement nuts and bolts. The longer clamp bolt and nut I need to replace and ordered a set from Sunset Porsche as I thought the bolt would be harder to find at my local Ace hardware.
7)On the opposite side of the car you will have to remove the secondary muffler, its the same type of clamp bolt and nut and then a couple of nuts on the other side that hold it up.
7)On the opposite side of the car you will have to remove the secondary muffler, its the same type of clamp bolt and nut and then a couple of nuts on the other side that hold it up.
11-28-2011, 04:33 AM
#3
Rennlist Member
Thread Starter
Anybody have a solution for replacement U-nuts, the Porsche ones I don't like and are way overpriced. I found an M6 U-nut at my local auto parts stores and I also see McMaster has a supply of these, but can't find anything in stainless steel. Anybody have a suggestion?
UPDATE: added photo with measurement reference to help others
UPDATE: added photo with measurement reference to help others
Last edited by RicardoD; 11-29-2011 at 01:37 AM.
11-28-2011, 05:07 AM
#4
Rennlist Member
Thread Starter
8) Remove the spark plug wires. Note the spark plug wire clips are extremely brittle and will probably crack. Order replacements, part number: 964 602 559 00
9)Remove lower valve cover nuts. Valve covers may need a little help to be removed. I carefully pried them off with a screwdriver, once a bit loose they can be grabbed and will pop right off.
Cat side and secondary muffler lower valve covers shown in attached photo.
9)Remove lower valve cover nuts. Valve covers may need a little help to be removed. I carefully pried them off with a screwdriver, once a bit loose they can be grabbed and will pop right off.
Cat side and secondary muffler lower valve covers shown in attached photo.
 11-28-2011, 10:45 AM
#6
Burning Brakes

I'm not sure if I'd want new stainless u-nuts though. Stainless might not corrode, but it is very susceptible to galling/jamming (which is what happens to the oem ones). Copious applications of something like PB Blaster can loosen a corroded steel nut, but does nothing for a jammed stainless nut.
So I think those steel u-nuts you found are pretty nifty, and I reckon I'd take my chances with those. Great write up BTW
 11-28-2011, 11:48 AM
#7
IHI KING!
Rennlist Member
Rennlist Member
Join Date: Aug 2001
Location: Nashua, New Hampshire, USA
Posts: 13,386
Received 223 Likes
on
177 Posts
Ricardo - I'm using the same steel speed nuts, purchased at my local hardware store. I plan on replacing them when they start to look rusty. I can replace them about 10 times before I exceed the OEM priced ones.
Trending Topics
11-28-2011, 01:28 PM
#8
Three Wheelin'
I remember the misery of Porsche's speed nuts on the heat shields.
I picked up a sack full of these fellows- extruded u-nuts at a local home depot
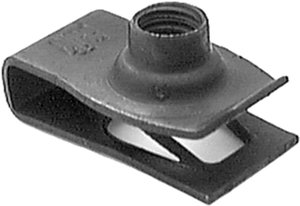
You want the M6 size for the usual bolts with 10mm head. Coat in copper grease, and I expect to get some good life out of them.
I picked up a sack full of these fellows- extruded u-nuts at a local home depot
You want the M6 size for the usual bolts with 10mm head. Coat in copper grease, and I expect to get some good life out of them.
The following users liked this post:
kos11-12 (11-02-2020)
11-28-2011, 03:59 PM
#10
Rennlist Member
Thread Starter
Found these at McMaster Carr, I think will order the top one, 95210A150, but will confirm via measurements tonight.
UPDATE: I ordered the top one in the image below but I think the A dimension is too large, works fine but better to order 95210A150 as indicated above
UPDATE: I ordered the top one in the image below but I think the A dimension is too large, works fine but better to order 95210A150 as indicated above
Last edited by RicardoD; 12-25-2011 at 03:14 PM. Reason: U-nut type update
11-28-2011, 08:25 PM
#11
Racer
Join Date: May 2011
Location: Minneapolis MN.
Posts: 373
Likes: 0
Received 0 Likes
on
0 Posts
Ricardo,
Keep up the good work with your post. I am about to undertake the valve adjustment myself for the first time. Looking forward to the more technical aspects of the project and how you’re able to overcome them, tight spaces, part removal for access ect… and most importantly the valve adjustment itself. You’re off to a great start with the excellent pictures and descriptions.
Regards, Steve
11-28-2011, 08:47 PM
#12
Rennlist Member
Thread Starter
10) Two more photos for reference with the lower valve covers removed on the cat side and the secondary muffler side. You can see the 3 valve adjustment locking nuts and screws on each side.
 11-28-2011, 11:24 PM
#14
Rennlist Member
Thread Starter
11-29-2011, 12:10 AM
#15
Rennlist Member

Join Date: Jun 2010
Location: Detroit (Rock City); 1990 C4
Posts: 1,710
Likes: 0
Received 4 Likes
on
4 Posts
If my car is any indication you could probably ignore the coating flaking for another adjustment cycle at least.
Mine was really coming off (~112k mi) so I blasted it off (total PITA; the coating and whatever was under it is surprisingly tough) and powdercoated.
Mine was really coming off (~112k mi) so I blasted it off (total PITA; the coating and whatever was under it is surprisingly tough) and powdercoated.