Aussie 964C2 Maintenance Diary (pic heavy!)

 09-23-2011, 09:18 PM
#47
Burning Brakes
Thread Starter


I poked and tested a whole bunch of stuff in the back of the engine bay, but all the possible power sources in the fusebox are always-on. The other possibility was the heater element wire for the O2 sensor, but I didn't want to mess with that
 09-23-2011, 10:48 PM
#48
Three Wheelin'
A joy to read and very informative too! Keep up the good work, pleased to see these cars deserve a bit more TLC at this age.
Should be a gem when you finish with her.
Norm
Should be a gem when you finish with her.
Norm
09-24-2011, 02:02 AM
#49
Racer
Join Date: Sep 2006
Location: Auckland NZ & Newcastle AU
Posts: 437
Likes: 0
Received 1 Like
on
1 Post
Wow.
You sure have an amazing intuition for this automobile stuff, I am suitably impressed - do you wrench for a living? I'm sure you said you were a lawyer...?
Great work and pics. Wish I lived closer, I'd get you to have a look at my spoiler mechanism, which has quit :-)
You sure have an amazing intuition for this automobile stuff, I am suitably impressed - do you wrench for a living? I'm sure you said you were a lawyer...?
Great work and pics. Wish I lived closer, I'd get you to have a look at my spoiler mechanism, which has quit :-)
 wrenching on cars is just for fun
09-24-2011, 05:57 AM
wrenching on cars is just for fun
09-24-2011, 05:57 AM
#51

BTW, is the groud needed? Do you think I can use the original socket to plug a standard 4-pin relay?
OT: last night I've been dinnering with my uncle from Sydney (also my birth city). He left Italy this morning to fly back to the most beautifull city on earth
Ciao
09-24-2011, 08:30 AM
#52
Burning Brakes
Thread Starter
I spent a week near you many years ago, a mate of mine (also born in Sydney) has a hotel in San Benedetto Del Tronto. Fantastic! I have very fond memories of that part of the world
I think a standard 4 pin relay will plug into the stock relay socket (I'm not 100% sure, but looking at the stock relay right now it might work) but the stock plug is wired up all wrong for it. You would have to rearrange the 87c and 30c pins in the stock plug to go to the coil and earth instead. I guess you could achieve this by cutting the stock wires that go to the 30c and 87c pins, and fitting say some male/female connectors. You could then plug those into new wires that go to the coil/earth.
Do you need the earth? Yes I think so....in a relay the earth is there for the switch or trigger signal to flow (ie the wire coming from the coil in our case). So the current flows from the coil, through the relay (where it activates the internal switch) and then out of the relay and to ground.
In the stock relay, this ground is the 85 & 85c wires that go back to the CCU (yellow wires in my diagram). So in other words, the stock relay is wired up a little backwards in that what normally goes to earth, actually goes to the CCU first and then to earth. My concern with letting the coil current go to the CCU, is because if you look at the wiring diagram, you will see that there are 2 resistors right next to the 85 & 85c terminals inside the relay. I get the feeling that maybe they are there to reduce the current that goes back to the CCU, and if we just let the coil wire earth thru the CCU without any limiting resistor, maybe we will fry something in the CCU Hence the decision to make a new wire going to a body ground is the safer one
For the feedback wire that we do have going back to the CCU (red one in my diagram), this is not a concern, since this is normally exposed to the full 30A of the current used to power the fan blower, so it can take a lot more than what would be coming from the coil.
If you were to wire it up like TWood's car, I think you would get a standard 4pin relay, then do a jumper between 87 on the plug and 87 on the relay, and 30 on the plug and 30 on the relay. Then 86 & 85 on the 4 pin relay will go to the coil and the body ground as I have described. And finally, remove the 30A fuse for the heater blower and replace it with a much smaller one like 7.5A for safety.
I think a standard 4 pin relay will plug into the stock relay socket (I'm not 100% sure, but looking at the stock relay right now it might work) but the stock plug is wired up all wrong for it. You would have to rearrange the 87c and 30c pins in the stock plug to go to the coil and earth instead. I guess you could achieve this by cutting the stock wires that go to the 30c and 87c pins, and fitting say some male/female connectors. You could then plug those into new wires that go to the coil/earth.
Do you need the earth? Yes I think so....in a relay the earth is there for the switch or trigger signal to flow (ie the wire coming from the coil in our case). So the current flows from the coil, through the relay (where it activates the internal switch) and then out of the relay and to ground.
In the stock relay, this ground is the 85 & 85c wires that go back to the CCU (yellow wires in my diagram). So in other words, the stock relay is wired up a little backwards in that what normally goes to earth, actually goes to the CCU first and then to earth. My concern with letting the coil current go to the CCU, is because if you look at the wiring diagram, you will see that there are 2 resistors right next to the 85 & 85c terminals inside the relay. I get the feeling that maybe they are there to reduce the current that goes back to the CCU, and if we just let the coil wire earth thru the CCU without any limiting resistor, maybe we will fry something in the CCU
Hence the decision to make a new wire going to a body ground is the safer one For the feedback wire that we do have going back to the CCU (red one in my diagram), this is not a concern, since this is normally exposed to the full 30A of the current used to power the fan blower, so it can take a lot more than what would be coming from the coil.
If you were to wire it up like TWood's car, I think you would get a standard 4pin relay, then do a jumper between 87 on the plug and 87 on the relay, and 30 on the plug and 30 on the relay. Then 86 & 85 on the 4 pin relay will go to the coil and the body ground as I have described. And finally, remove the 30A fuse for the heater blower and replace it with a much smaller one like 7.5A for safety.
09-24-2011, 02:43 PM
#54
Babalouie, you need to bring out a how to book with pics as it would sell like hot cakes!!... I look forward to
your posts there just great and full of info....well done fella...
your posts there just great and full of info....well done fella...
09-24-2011, 03:15 PM
#55
Racer
Join Date: Feb 2005
Location: Sweden
Posts: 382
Likes: 0
Received 0 Likes
on
0 Posts
Not to wish you any bad luck or anything but I hope I get to read just how to remove the intake manifolds and other stuff around them here soon.... (your detailed informational posts rule, enought to qualify you for a free Rennlist membership in my eyes)
09-25-2011, 09:44 PM
#56
Instructor
Hi Bubba,
I've only just seen this thread, thanks for the great pix - I'm just down the road from you, I have changed out my brake lines for braided items, well only the rears as the fronts simply would not shift - someone tried in the past and rounded one of the hard line bolts, so its on the until I work out how to change or just destroy the hard line and replace...
Also interested in how good your dealer/tuner is up there - i've just got my C4 back from having the rhs rear quearter resprayed as the dealer (apprentice?) mechanic put a scratch in it when doing the service.
Cheers
AB
09-25-2011, 10:04 PM
#57
Burning Brakes
Thread Starter
Hi Bubba,
I've only just seen this thread, thanks for the great pix - I'm just down the road from you, I have changed out my brake lines for braided items, well only the rears as the fronts simply would not shift - someone tried in the past and rounded one of the hard line bolts, so its on the until I work out how to change or just destroy the hard line and replace...
Also interested in how good your dealer/tuner is up there - i've just got my C4 back from having the rhs rear quearter resprayed as the dealer (apprentice?) mechanic put a scratch in it when doing the service.
Cheers
AB
I've only just seen this thread, thanks for the great pix - I'm just down the road from you, I have changed out my brake lines for braided items, well only the rears as the fronts simply would not shift - someone tried in the past and rounded one of the hard line bolts, so its on the until I work out how to change or just destroy the hard line and replace...
Also interested in how good your dealer/tuner is up there - i've just got my C4 back from having the rhs rear quearter resprayed as the dealer (apprentice?) mechanic put a scratch in it when doing the service.
Cheers
AB
I use Autohaus Hamilton, and can recommend, they're good ppl.Is it the hardline to softline nut (at the front shock) stripped? Hardlines aren't hard to make, esp since the caliper to strut hardline is only very short. There are some good insturctional vids on Youtube on how to make brake lines, but you do need a flaring and bending tool and it takes a bit of practice...if it's your first attempt, then it'll be version 3.0 that ends up on the car
I find that once you take the decision to cut the old hardline, you can get a conventional socket onto it, and it'll come off real easy.
09-25-2011, 10:23 PM
#58
Instructor
Haha...only Australians will describe a 3.5hr drive as "just down the road" I use Autohaus Hamilton, and can recommend, they're good ppl.
Is it the hardline to softline nut (at the front shock) stripped? Hardlines aren't hard to make, esp since the caliper to strut hardline is only very short. There are some good insturctional vids on Youtube on how to make brake lines, but you do need a flaring and bending tool and it takes a bit of practice...if it's your first attempt, then it'll be version 3.0 that ends up on the car
I find that once you take the decision to cut the old hardline, you can get a conventional socket onto it, and it'll come off real easy.
I use Autohaus Hamilton, and can recommend, they're good ppl.Is it the hardline to softline nut (at the front shock) stripped? Hardlines aren't hard to make, esp since the caliper to strut hardline is only very short. There are some good insturctional vids on Youtube on how to make brake lines, but you do need a flaring and bending tool and it takes a bit of practice...if it's your first attempt, then it'll be version 3.0 that ends up on the car
I find that once you take the decision to cut the old hardline, you can get a conventional socket onto it, and it'll come off real easy.
Thanks for the info mate, yes its the line you mention, might see if my Father-in-law has a flaring/bending tool, he has just about everything else.
09-26-2011, 08:43 AM
#59
Burning Brakes
Thread Starter
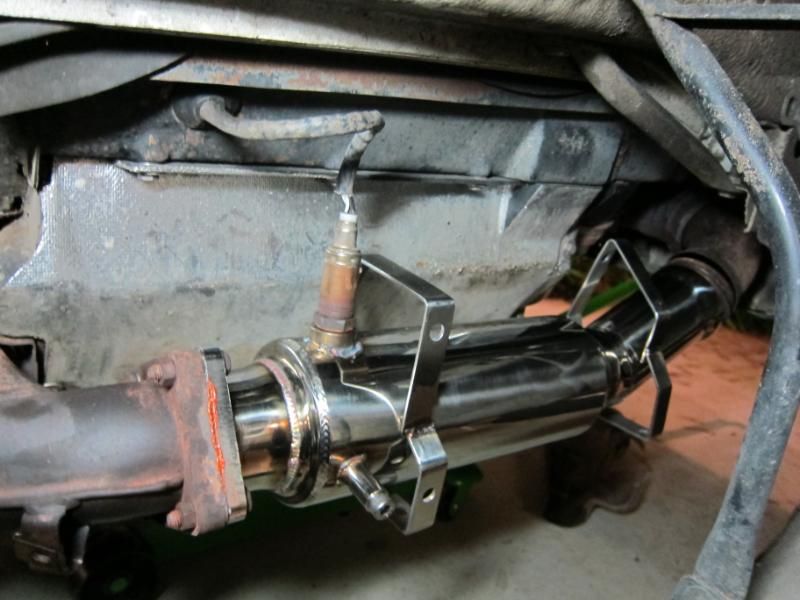
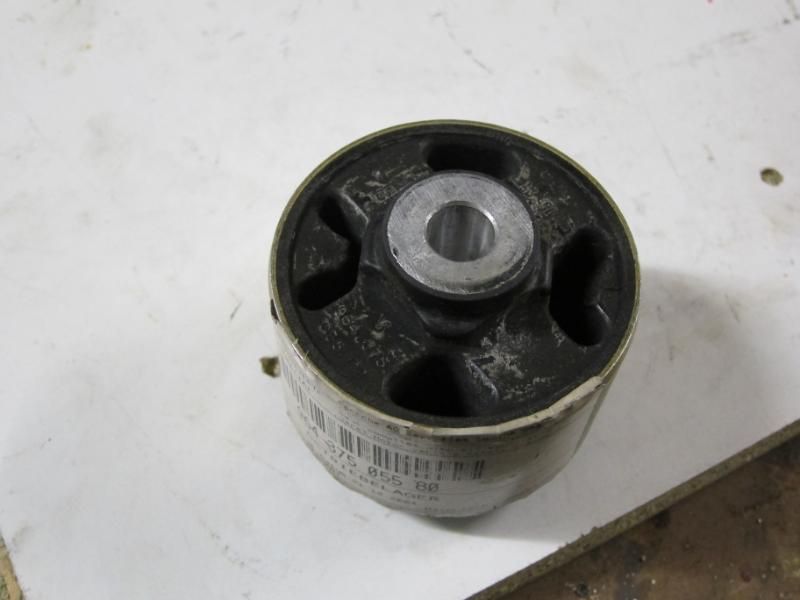
But the first job on the list is to get this little fella (he's an RS trans mount) into its new home:
Then in no particular order:
- plug & wire change
- fit braided brake lines
- remove and get injectors flushed
- lower to RS height
- and then at some point I have to revisit this, it's a you-beaut fancy 100-cell cat which as you can see, is too short to bolt up. I'll need to cut it and extend it in some way, haven't worked out how to do it yet